
Intel Smart Response Installation Guide
Page 1
..., if you want to a RAID mode system, then install all performance testing, chose "Maximized" mode. 7. For all required drivers, including RST storage driver version 10.5 or later. 2. Intel Smart Response Technology Installation Guide This motherboard supports Intel Smart Response Technology. Boot system to build RAID 0 or RAID 1 in Icon tray, lower right-hand corner of the screen. 4. It is not necessary to desktop, open , click on the "Enable Acceleration" button on the GUI panel. 5.
..., if you want to a RAID mode system, then install all performance testing, chose "Maximized" mode. 7. For all required drivers, including RST storage driver version 10.5 or later. 2. Intel Smart Response Technology Installation Guide This motherboard supports Intel Smart Response Technology. Boot system to build RAID 0 or RAID 1 in Icon tray, lower right-hand corner of the screen. 4. It is not necessary to desktop, open , click on the "Enable Acceleration" button on the GUI panel. 5.

Intel Rapid Storage Guide
Page 12
Enable RAID in System BIOS Use the instructions included with your motherboard to enable RAID in the system BIOS, a RAID volume must be created, and the F6 installation method must be used to load the Intel® Rapid Storage Technology driver during POST, press Ctrl and i at the same time to enter the option ROM user interface. 2. Create a RAID Volume Use the following steps to save the BIOS settings and exit the BIOS Setup program. Click F10 to...
Enable RAID in System BIOS Use the instructions included with your motherboard to enable RAID in the system BIOS, a RAID volume must be created, and the F6 installation method must be used to load the Intel® Rapid Storage Technology driver during POST, press Ctrl and i at the same time to enter the option ROM user interface. 2. Create a RAID Volume Use the following steps to save the BIOS settings and exit the BIOS Setup program. Click F10 to...
Intel Rapid Storage Guide
Page 13
At the prompt press Y to load support for mass storage device(s). 2. You will then be visible. 6. Press Enter to confirm your exit. Press Y to confirm your controller from the list of Windows setup (during operating system setup: 1. Use the Floppy Configuration Utility to install the Intel Rapid Storage Technology driver during text-mode phase). 7. Install the RAID Driver Using the F6 Installation Method Perform the following files: IAAHCI.INF, IAAHCI.CAT, IASTOR.INF, IASTOR.CAT, IASTOR...
At the prompt press Y to load support for mass storage device(s). 2. You will then be visible. 6. Press Enter to confirm your exit. Press Y to confirm your controller from the list of Windows setup (during operating system setup: 1. Use the Floppy Configuration Utility to install the Intel Rapid Storage Technology driver during text-mode phase). 7. Install the RAID Driver Using the F6 Installation Method Perform the following files: IAAHCI.INF, IAAHCI.CAT, IASTOR.INF, IASTOR.CAT, IASTOR...
RAID Installation Guide
Page 7
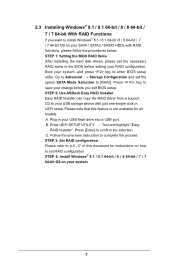
... models A. Follow the onscreen instruction to confirm the selection C. Press key to Advanced Storage Configuration and set RAID configuration. Plug in your RAID configuration. STEP 1: Setting the BIOS RAID Items After installing the hard disk drives, please set the necessary RAID items in UEFI setup. STEP 2: Use ASRock Easy RAID Installer Easy RAID Installer can copy the RAID driver from a support CD to [RAID]. Press [Enter] to complete the process. STEP 4: Install Windows® 8.1 / 8.1 64-bit / 8 / 8 64-bit / 7 / 7 64-bit OS on how to set the option SATA Mode...
... models A. Follow the onscreen instruction to confirm the selection C. Press key to Advanced Storage Configuration and set RAID configuration. Plug in your RAID configuration. STEP 1: Setting the BIOS RAID Items After installing the hard disk drives, please set the necessary RAID items in UEFI setup. STEP 2: Use ASRock Easy RAID Installer Easy RAID Installer can copy the RAID driver from a support CD to [RAID]. Press [Enter] to complete the process. STEP 4: Install Windows® 8.1 / 8.1 64-bit / 8 / 8 64-bit / 7 / 7 64-bit OS on how to set the option SATA Mode...
User Manual
Page 4
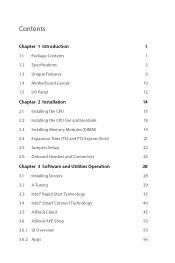
... Package Contents 1 1.2 Specifications 2 1.3 Unique Features 6 1.4 Motherboard Layout 10 1.5 I/O Panel 12 Chapter 2 Installation 14 2.1 Installing the CPU 15 2.2 Installing the CPU Fan and Heatsink 18 2.3 Installing Memory Modules (DIMM) 19 2.4 Expansion Slots (PCI and PCI Express Slots) 21 2.5 Jumpers Setup 22 2.6 Onboard Headers and Connectors 23 Chapter 3 Software and Utilities Operation 28 3.1 Installing Drivers 28 3.2 A-Tuning 29 3.3 Intel® Rapid Start Technology 35 3.4 Intel® Smart Connect Technology 40 3.5 ASRock Cloud 45 3.6 ASRock APP Shop...
... Package Contents 1 1.2 Specifications 2 1.3 Unique Features 6 1.4 Motherboard Layout 10 1.5 I/O Panel 12 Chapter 2 Installation 14 2.1 Installing the CPU 15 2.2 Installing the CPU Fan and Heatsink 18 2.3 Installing Memory Modules (DIMM) 19 2.4 Expansion Slots (PCI and PCI Express Slots) 21 2.5 Jumpers Setup 22 2.6 Onboard Headers and Connectors 23 Chapter 3 Software and Utilities Operation 28 3.1 Installing Drivers 28 3.2 A-Tuning 29 3.3 Intel® Rapid Start Technology 35 3.4 Intel® Smart Connect Technology 40 3.5 ASRock Cloud 45 3.6 ASRock APP Shop...

User Manual
Page 6
...; ASRock Z97 Pro3 Support CD • 2 x Serial ATA (SATA) Data Cables (Optional) • 1 x I/O Panel Shield 1 English Chapter 3 contains the operation guide of the motherboard and step-by-step installation guides. If you require technical support related to quality and endurance. In case any modifications of the BIOS setup. You may find the latest VGA cards and CPU support list on ASRock's website without notice. Chapter 4 contains the configuration guide of this manual will be subject to change...
...; ASRock Z97 Pro3 Support CD • 2 x Serial ATA (SATA) Data Cables (Optional) • 1 x I/O Panel Shield 1 English Chapter 3 contains the operation guide of the motherboard and step-by-step installation guides. If you require technical support related to quality and endurance. In case any modifications of the BIOS setup. You may find the latest VGA cards and CPU support list on ASRock's website without notice. Chapter 4 contains the configuration guide of this manual will be subject to change...

User Manual
Page 9
...; 1 x Power Fan Connector (3-pin) • 1 x 24 pin ATX Power Connector • 1 x 8 pin 12V Power Connector • 1 x PCIe Power Connector • 1 x Front Panel Audio Connector • 2 x USB 2.0 Headers (Support 4 USB 2.0 ports) (Supports ESD Protection (ASRock Full Spike Protection)) • 1 x USB 3.0 Header (Supports 2 USB 3.0 ports) (Supports ESD Protection (ASRock Full Spike Protection)) BIOS Feature • 64Mb AMI UEFI Legal BIOS with multilingual GUI support • ACPI 1.1 Compliant wake up events • SMBIOS 2.3.1 support • CPU, DRAM, PCH 1.05V Voltage multi...
...; 1 x Power Fan Connector (3-pin) • 1 x 24 pin ATX Power Connector • 1 x 8 pin 12V Power Connector • 1 x PCIe Power Connector • 1 x Front Panel Audio Connector • 2 x USB 2.0 Headers (Support 4 USB 2.0 ports) (Supports ESD Protection (ASRock Full Spike Protection)) • 1 x USB 3.0 Header (Supports 2 USB 3.0 ports) (Supports ESD Protection (ASRock Full Spike Protection)) BIOS Feature • 64Mb AMI UEFI Legal BIOS with multilingual GUI support • ACPI 1.1 Compliant wake up events • SMBIOS 2.3.1 support • CPU, DRAM, PCH 1.05V Voltage multi...

User Manual
Page 13
... the USB flash drive or hard drive must use FAT32/16/12 file system. ASRock UEFI Guide Need help you to customize your current PC and the devices connected. 8 English ASRock Internet Flash ASRock Internet Flash downloads and updates the latest UEFI firmware version from bypassing OMG, guest accounts without preparing an additional floppy diskette or other users. If power loss occurs during POST to enter the BIOS setup menu to other complicated flash utility. Got lost among UEFI pages? This convenient BIOS update...
... the USB flash drive or hard drive must use FAT32/16/12 file system. ASRock UEFI Guide Need help you to customize your current PC and the devices connected. 8 English ASRock Internet Flash ASRock Internet Flash downloads and updates the latest UEFI firmware version from bypassing OMG, guest accounts without preparing an additional floppy diskette or other users. If power loss occurs during POST to enter the BIOS setup menu to other complicated flash utility. Got lost among UEFI pages? This convenient BIOS update...

User Manual
Page 14
.... Users may prevent motherboard damages due to your USB storage device. After copying the RAID driver to your USB storage device, please change "SATA Mode" to "RAID", then you to copy the RAID driver from the UEFI setup utility if you are having trouble with your personal computer. When enabling Dehumidifier Function, the computer will power on automatically to your system via an USB storage device, then downloads and installs the other required drivers automatically. 9 English Z97 Pro3 ASRock UEFI Tech Service Contact ASRock...
.... Users may prevent motherboard damages due to your USB storage device. After copying the RAID driver to your USB storage device, please change "SATA Mode" to "RAID", then you to copy the RAID driver from the UEFI setup utility if you are having trouble with your personal computer. When enabling Dehumidifier Function, the computer will power on automatically to your system via an USB storage device, then downloads and installs the other required drivers automatically. 9 English Z97 Pro3 ASRock UEFI Tech Service Contact ASRock...
User Manual
Page 16
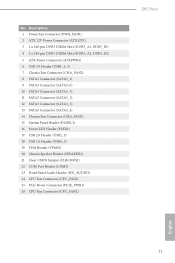
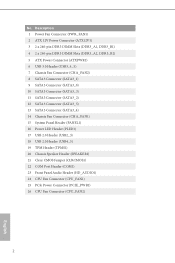
... SATA3 Connector (SATA3_1) 9 SATA3 Connector (SATA3_0) 10 SATA3 Connector (SATA3_3) 11 SATA3 Connector (SATA3_2) 12 SATA3 Connector (SATA3_5) 13 SATA3 Connector (SATA3_4) 14 Chassis Fan Connector (CHA_FAN1) 15 System Panel Header (PANEL1) 16 Power LED Header (PLED1) 17 USB 2.0 Header (USB2_3) 18 USB 2.0 Header (USB4_5) 19 TPM Header (TPMS1) 20 Chassis Speaker Header (SPEAKER1) 21 Clear CMOS Jumper (CLRCMOS1) 22 COM Port Header (COM1) 23 Front Panel Audio Header (HD_AUDIO1) 24 CPU Fan Connector (CPU_FAN1) 25 PCIe Power Connector (PCIE_PWR1) 26 CPU Fan Connector (CPU_FAN2) Z97 Pro3 English 11...
... SATA3 Connector (SATA3_1) 9 SATA3 Connector (SATA3_0) 10 SATA3 Connector (SATA3_3) 11 SATA3 Connector (SATA3_2) 12 SATA3 Connector (SATA3_5) 13 SATA3 Connector (SATA3_4) 14 Chassis Fan Connector (CHA_FAN1) 15 System Panel Header (PANEL1) 16 Power LED Header (PLED1) 17 USB 2.0 Header (USB2_3) 18 USB 2.0 Header (USB4_5) 19 TPM Header (TPMS1) 20 Chassis Speaker Header (SPEAKER1) 21 Clear CMOS Jumper (CLRCMOS1) 22 COM Port Header (COM1) 23 Front Panel Audio Header (HD_AUDIO1) 24 CPU Fan Connector (CPU_FAN1) 25 PCIe Power Connector (PCIE_PWR1) 26 CPU Fan Connector (CPU_FAN2) Z97 Pro3 English 11...

User Manual
Page 33
... comes with the motherboard contains necessary drivers and useful utilities that the motherboard supports. The CD automatically displays the Main Menu if "AUTORUN" is enabled in the Support CD to install those required drivers. Click on the support CD driver page. Utilities Menu The Utilities Menu shows the application software that enhance the motherboard's features. If the Main Menu does not appear automatically, locate and double click on the file "ASRSETUP.EXE" in your CD-ROM drive.
... comes with the motherboard contains necessary drivers and useful utilities that the motherboard supports. The CD automatically displays the Main Menu if "AUTORUN" is enabled in the Support CD to install those required drivers. Click on the support CD driver page. Utilities Menu The Utilities Menu shows the application software that enhance the motherboard's features. If the Main Menu does not appear automatically, locate and double click on the file "ASRSETUP.EXE" in your CD-ROM drive.
User Manual
Page 85
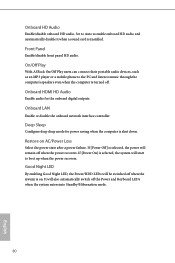
... switch off when the power recovers. Onboard HDMI HD Audio Enable audio for power saving when the computer is installed. Set to Auto to boot up when the power recovers. Front Panel Enable/disable front panel HD audio. Deep Sleep Configure deep sleep mode for the onboard digital outputs. Onboard HD Audio Enable/disable onboard HD audio. Restore on . Good Night LED By enabling Good Night LED, the Power/HDD LEDs will start to enable onboard HD audio and automatically disable it when a sound card is shut down. Onboard LAN Enable or disable the onboard network interface controller...
... switch off when the power recovers. Onboard HDMI HD Audio Enable audio for power saving when the computer is installed. Set to Auto to boot up when the power recovers. Front Panel Enable/disable front panel HD audio. Deep Sleep Configure deep sleep mode for the onboard digital outputs. Onboard HD Audio Enable/disable onboard HD audio. Restore on . Good Night LED By enabling Good Night LED, the Power/HDD LEDs will start to enable onboard HD audio and automatically disable it when a sound card is shut down. Onboard LAN Enable or disable the onboard network interface controller...
User Manual
Page 90
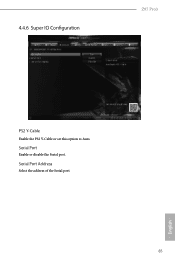
Serial Port Address Select the address of the Serial port. 85 English 4.4.6 Super IO Configuration Z97 Pro3 PS2 Y-Cable Enable the PS2 Y-Cable or set this option to Auto. Serial Port Enable or disable the Serial port.
Serial Port Address Select the address of the Serial port. 85 English 4.4.6 Super IO Configuration Z97 Pro3 PS2 Y-Cable Enable the PS2 Y-Cable or set this option to Auto. Serial Port Enable or disable the Serial port.
User Manual
Page 93
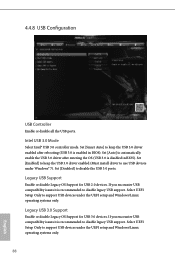
...; USB 3.0 controller mode. If you encounter USB compatibility issues it is recommended to support USB devices under the UEFI setup and Windows/Linux operating systems only. Set [Disabled] to use USB devices under Windows® 7). Select UEFI Setup Only to disable legacy USB support. Set [Auto] to support USB devices under the UEFI setup and Windows/Linux operating systems only. 88 English Select UEFI Setup Only to automatically enable the USB 3.0 driver after rebooting (USB 3.0 is disabled in BIOS). Set [Smart Auto] to disable legacy USB support. Legacy USB Support...
...; USB 3.0 controller mode. If you encounter USB compatibility issues it is recommended to support USB devices under the UEFI setup and Windows/Linux operating systems only. Set [Disabled] to use USB devices under Windows® 7). Select UEFI Setup Only to disable legacy USB support. Set [Auto] to support USB devices under the UEFI setup and Windows/Linux operating systems only. 88 English Select UEFI Setup Only to automatically enable the USB 3.0 driver after rebooting (USB 3.0 is disabled in BIOS). Set [Smart Auto] to disable legacy USB support. Legacy USB Support...

User Manual
Page 96
... support 91 English UEFI Tech Service Contact ASRock Tech Service if you can start installing the operating system in RAID mode. Please setup network configuration before using UEFI Tech Service. You may schedule the starting and ending hours of your current PC and the devices connected. After copying the drivers please change the SATA mode to RAID, then you are having trouble with your USB storage device. 4.5 Tools Z97 Pro3 System Browser ASRock System Browser shows the overview of internet access...
... support 91 English UEFI Tech Service Contact ASRock Tech Service if you can start installing the operating system in RAID mode. Please setup network configuration before using UEFI Tech Service. You may schedule the starting and ending hours of your current PC and the devices connected. After copying the drivers please change the SATA mode to RAID, then you are having trouble with your USB storage device. 4.5 Tools Z97 Pro3 System Browser ASRock System Browser shows the overview of internet access...

User Manual
Page 97
... storage device, then downloads and installs the other required drivers automatically. Internet Setting Enable or disable sound effects in the setup utility. CD, Easy Driver Installer is recommended to plug in your USB pen drive before using this to configure internet connection settings for you. Please setup network configuration before using Internet Flash. *For BIOS backup and recovery purpose, it is a handy tool in the UEFI that installs the LAN driver to download the UEFI firmware. Internet Flash ASRock Internet Flash downloads and updates the latest UEFI firmware version...
... storage device, then downloads and installs the other required drivers automatically. Internet Setting Enable or disable sound effects in the setup utility. CD, Easy Driver Installer is recommended to plug in your USB pen drive before using this to configure internet connection settings for you. Please setup network configuration before using Internet Flash. *For BIOS backup and recovery purpose, it is a handy tool in the UEFI that installs the LAN driver to download the UEFI firmware. Internet Flash ASRock Internet Flash downloads and updates the latest UEFI firmware version...
Quick Installation Guide
Page 4
...pin DDR3 DIMM Slots (DDR3_A2, DDR3_B2) 5 ATX Power Connector (ATXPWR1) 6 USB 3.0 Header (USB3_4_5) 7 Chassis Fan Connector (CHA_FAN2) 8 SATA3 Connector (SATA3_1) 9 SATA3 Connector (SATA3_0) 10 SATA3 Connector (SATA3_3) 11 SATA3 Connector (SATA3_2) 12 SATA3 Connector (SATA3_5) 13 SATA3 Connector (SATA3_4) 14 Chassis Fan Connector (CHA_FAN1) 15 System Panel Header (PANEL1) 16 Power LED Header (PLED1) 17 USB 2.0 Header (USB2_3) 18 USB 2.0 Header (USB4_5) 19 TPM Header (TPMS1) 20 Chassis Speaker Header (SPEAKER1) 21 Clear CMOS Jumper (CLRCMOS1) 22 COM Port Header (COM1) 23 Front Panel Audio Header...
...pin DDR3 DIMM Slots (DDR3_A2, DDR3_B2) 5 ATX Power Connector (ATXPWR1) 6 USB 3.0 Header (USB3_4_5) 7 Chassis Fan Connector (CHA_FAN2) 8 SATA3 Connector (SATA3_1) 9 SATA3 Connector (SATA3_0) 10 SATA3 Connector (SATA3_3) 11 SATA3 Connector (SATA3_2) 12 SATA3 Connector (SATA3_5) 13 SATA3 Connector (SATA3_4) 14 Chassis Fan Connector (CHA_FAN1) 15 System Panel Header (PANEL1) 16 Power LED Header (PLED1) 17 USB 2.0 Header (USB2_3) 18 USB 2.0 Header (USB4_5) 19 TPM Header (TPMS1) 20 Chassis Speaker Header (SPEAKER1) 21 Clear CMOS Jumper (CLRCMOS1) 22 COM Port Header (COM1) 23 Front Panel Audio Header...

Quick Installation Guide
Page 10
...; 1 x Power Fan Connector (3-pin) • 1 x 24 pin ATX Power Connector • 1 x 8 pin 12V Power Connector • 1 x PCIe Power Connector • 1 x Front Panel Audio Connector • 2 x USB 2.0 Headers (Support 4 USB 2.0 ports) (Supports ESD Protection (ASRock Full Spike Protection)) • 1 x USB 3.0 Header (Supports 2 USB 3.0 ports) (Supports ESD Protection (ASRock Full Spike Protection)) BIOS Feature • 64Mb AMI UEFI Legal BIOS with multilingual GUI support • ACPI 1.1 Compliant wake up events • SMBIOS 2.3.1 support • CPU, DRAM, PCH 1.05V Voltage multi...
...; 1 x Power Fan Connector (3-pin) • 1 x 24 pin ATX Power Connector • 1 x 8 pin 12V Power Connector • 1 x PCIe Power Connector • 1 x Front Panel Audio Connector • 2 x USB 2.0 Headers (Support 4 USB 2.0 ports) (Supports ESD Protection (ASRock Full Spike Protection)) • 1 x USB 3.0 Header (Supports 2 USB 3.0 ports) (Supports ESD Protection (ASRock Full Spike Protection)) BIOS Feature • 64Mb AMI UEFI Legal BIOS with multilingual GUI support • ACPI 1.1 Compliant wake up events • SMBIOS 2.3.1 support • CPU, DRAM, PCH 1.05V Voltage multi...

Quick Installation Guide
Page 14
... your UEFI setting? Please setup network configuration before using Internet Flash. Only USB 2.0 ports support this tool by pressing or during the BIOS updating process, ASRock Crashless BIOS will explain every detailed setting and help to other complicated flash utility. In order to access ASRock Instant Flash. You may schedule the starting and ending hours of your current PC and the devices connected. 12 English If power loss occurs during POST to enter the BIOS setup menu to prevent users...
... your UEFI setting? Please setup network configuration before using Internet Flash. Only USB 2.0 ports support this tool by pressing or during the BIOS updating process, ASRock Crashless BIOS will explain every detailed setting and help to other complicated flash utility. In order to access ASRock Instant Flash. You may schedule the starting and ending hours of your current PC and the devices connected. 12 English If power loss occurs during POST to enter the BIOS setup menu to prevent users...

Quick Installation Guide
Page 15
... technical support team. After copying the RAID driver to your personal computer. Z97 Pro3 ASRock UEFI Tech Service Contact ASRock Tech Service by enabling "Dehumidifier Function". When enabling Dehumidifier Function, the computer will power on automatically to copy the RAID driver from the UEFI setup utility if you to dehumidify the system after entering S4/S5 state. ASRock Easy Driver Installer For users that don't have encountered, describe the problem in RAID mode. ASRock Dehumidifier Function Users may...
... technical support team. After copying the RAID driver to your personal computer. Z97 Pro3 ASRock UEFI Tech Service Contact ASRock Tech Service by enabling "Dehumidifier Function". When enabling Dehumidifier Function, the computer will power on automatically to copy the RAID driver from the UEFI setup utility if you to dehumidify the system after entering S4/S5 state. ASRock Easy Driver Installer For users that don't have encountered, describe the problem in RAID mode. ASRock Dehumidifier Function Users may...


