
Intel Rapid Storage Guide
Page 12
... method) In order to install an operating system onto a RAID volume, the RAID option must be used to load the Intel® Rapid Storage Technology driver during POST, press Ctrl and i at the same time to enter the option ROM user interface. 2. Use the up or down arrow keys to scroll...
... method) In order to install an operating system onto a RAID volume, the RAID option must be used to load the Intel® Rapid Storage Technology driver during POST, press Ctrl and i at the same time to enter the option ROM user interface. 2. Use the up or down arrow keys to scroll...

Intel Rapid Storage Guide
Page 13
.... Setup will happen immediately after pressing F6. Press Enter to create the volume. 9. At this point, you need to install a third party SCSI or RAID driver. Press Enter to confirm your exit. Press F6 when you see a prompt that says, Press F6 if you have successfully installed the... driver and Windows setup should continue. Press Enter. 5. Leave 13 At the prompt press Y to confirm your controller and continue. Press Y to confirm volume creation. 10. ...
.... Setup will happen immediately after pressing F6. Press Enter to create the volume. 9. At this point, you need to install a third party SCSI or RAID driver. Press Enter to confirm your exit. Press F6 when you see a prompt that says, Press F6 if you have successfully installed the... driver and Windows setup should continue. Press Enter. 5. Leave 13 At the prompt press Y to confirm your controller and continue. Press Y to confirm volume creation. 10. ...

Intel Rapid Storage Guide
Page 16
... with the necessary files. This message appears at the beginning of the final package. Nothing will Note temporarily continue loading drivers. How to load the driver during OS installation using the F6 installation method. 1. You do not have a floppy drive on Microsoft Windows Vista* ...and Microsoft Windows 7* because Intel provided a RAID driver as part of Windows XP* setup (during operating system installation. You can use the Floppy Configuration Utility to create a floppy disk with ...
... with the necessary files. This message appears at the beginning of the final package. Nothing will Note temporarily continue loading drivers. How to load the driver during OS installation using the F6 installation method. 1. You do not have a floppy drive on Microsoft Windows Vista* ...and Microsoft Windows 7* because Intel provided a RAID driver as part of Windows XP* setup (during operating system installation. You can use the Floppy Configuration Utility to create a floppy disk with ...

Intel Rapid Storage Guide
Page 17
... need to run Setup.exe from the floppy to copy the files again from within Windows, you have successfully installed the Intel Rapid Storage Technology driver and Windows setup should continue. Select your controller and continue. Leave the floppy disk in the floppy drive until the system reboots. 4.
... need to run Setup.exe from the floppy to copy the files again from within Windows, you have successfully installed the Intel Rapid Storage Technology driver and Windows setup should continue. Select your controller and continue. Leave the floppy disk in the floppy drive until the system reboots. 4.

Intel Rapid Storage Guide
Page 18
...* and Windows Server 2003*. o If the system has a 64-bit processor, the files will be used to do unattended install of AHCI/RAID driver on Windows 2000/XP/Server 2003* The unattended method of the README.TXT. To extract these files, run the executable (e.g. Does the system contain ...a 32-bit or 64-bit processor? o If the system has a 32-bit processor, the files will be located in the Drivers folder after extraction. 2. IATA88ENU.EXE for systems using any supported RAID Note controller hub by replacing the text within the quotation marks. // Insert the ...
...* and Windows Server 2003*. o If the system has a 64-bit processor, the files will be used to do unattended install of AHCI/RAID driver on Windows 2000/XP/Server 2003* The unattended method of the README.TXT. To extract these files, run the executable (e.g. Does the system contain ...a 32-bit or 64-bit processor? o If the system has a 32-bit processor, the files will be located in the Drivers folder after extraction. 2. IATA88ENU.EXE for systems using any supported RAID Note controller hub by replacing the text within the quotation marks. // Insert the ...

Intel Smart Response Installation Guide
Page 1
..., chose "Maximized" mode. 7. Intel Smart Response Technology Installation Guide This motherboard supports Intel Smart Response Technology. For all required drivers, including RST storage driver version 10.5 or later. 2. After clicking OK button, SRT will enable automatically, and the RST GUI will update the new... Once open RST GUI from either Start Menu or by step instructions below. For the new version RST driver, please check our website for the latest information: http://www.asrock.com * Before you just need to set the UEFI option "SATA Mode" to show the newly accelerated...
..., chose "Maximized" mode. 7. Intel Smart Response Technology Installation Guide This motherboard supports Intel Smart Response Technology. For all required drivers, including RST storage driver version 10.5 or later. 2. After clicking OK button, SRT will enable automatically, and the RST GUI will update the new... Once open RST GUI from either Start Menu or by step instructions below. For the new version RST driver, please check our website for the latest information: http://www.asrock.com * Before you just need to set the UEFI option "SATA Mode" to show the newly accelerated...

RAID Installation Guide
Page 6
... you start to configure the RAID function, you are allowed to Intel Rapid Storage", which is located in Windows® environment, install "SATA2 driver" from the Support CD again so that "Intel Rapid Storage" will be installed to install Windows® 7 / 7 64-bit / VistaTM / VistaTM 64-bit OS on...
... you start to configure the RAID function, you are allowed to Intel Rapid Storage", which is located in Windows® environment, install "SATA2 driver" from the Support CD again so that "Intel Rapid Storage" will be installed to install Windows® 7 / 7 64-bit / VistaTM / VistaTM 64-bit OS on...

User Manual
Page 3
...SLITM Operation Guide 24 2.8 CrossFireXTM, 3-Way CrossFireXTM, 4-Way CrossFireXTM and Quad CrossFireXTM Operation Guide. 31 2.9 Surround Display Feature 37 2.10 ASRock Smart Remote Installation Guide 40 2.11 Jumpers Setup 42 2.12 Onboard Headers and Connectors 43 2.13 Smart Switches 49 2.14 Dr. Debug...2.18 Hot Plug and Hot Swap Functions for SATA3 HDDs ..... 55 2.19 SATA / SATA2 / SATA3 HDD Hot Plug Feature and Operation Guide 56 2.20 Driver Installation Guide 58 2.21 Installing Windows® 7 / 7 64-bit / VistaTM / VistaTM 64-bit With RAID Functions 58 2.22 Installing Windows® 7...
...SLITM Operation Guide 24 2.8 CrossFireXTM, 3-Way CrossFireXTM, 4-Way CrossFireXTM and Quad CrossFireXTM Operation Guide. 31 2.9 Surround Display Feature 37 2.10 ASRock Smart Remote Installation Guide 40 2.11 Jumpers Setup 42 2.12 Onboard Headers and Connectors 43 2.13 Smart Switches 49 2.14 Dr. Debug...2.18 Hot Plug and Hot Swap Functions for SATA3 HDDs ..... 55 2.19 SATA / SATA2 / SATA3 HDD Hot Plug Feature and Operation Guide 56 2.20 Driver Installation Guide 58 2.21 Installing Windows® 7 / 7 64-bit / VistaTM / VistaTM 64-bit With RAID Functions 58 2.22 Installing Windows® 7...

User Manual
Page 4
... 84 3.7 Boot Screen 85 3.8 Security Screen 86 3.9 Exit Screen 87 4 Software Support 88 4.1 Install Operating System 88 4.2 Support CD Information 88 4.2.1 Running Support CD 88 4.2.2 Drivers Menu 88 4.2.3 Utilities Menu 88 4.2.4 Contact Information 88 4
... 84 3.7 Boot Screen 85 3.8 Security Screen 86 3.9 Exit Screen 87 4 Software Support 88 4.1 Install Operating System 88 4.2 Support CD Information 88 4.2.1 Running Support CD 88 4.2.2 Drivers Menu 88 4.2.3 Utilities Menu 88 4.2.4 Contact Information 88 4
User Manual
Page 8
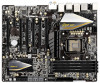
... 24 pin ATX power connector - 8 pin 12V power connector - Drivers, Utilities, AntiVirus Software (Trial Version), CyberLink MediaEspresso 6.5 Trial, ASRock MAGIX Multimedia Suite - CPU Temperature Sensing - Chassis Temperature Sensing - ...ACPI 1.1 Compliance Wake Up Events - CPU/Chassis Fan Multi-Speed Control 8 SMBIOS 2.3.1 Support - SLI/XFire power connector - Supports "Plug and Play" - USB3.0 Connector BIOS Feature Support CD Hardware Monitor - 4 x Rear USB 3.0 ports by Intel® Z77...
... 24 pin ATX power connector - 8 pin 12V power connector - Drivers, Utilities, AntiVirus Software (Trial Version), CyberLink MediaEspresso 6.5 Trial, ASRock MAGIX Multimedia Suite - CPU Temperature Sensing - Chassis Temperature Sensing - ...ACPI 1.1 Compliance Wake Up Events - CPU/Chassis Fan Multi-Speed Control 8 SMBIOS 2.3.1 Support - SLI/XFire power connector - Supports "Plug and Play" - USB3.0 Connector BIOS Feature Support CD Hardware Monitor - 4 x Rear USB 3.0 ports by Intel® Z77...

User Manual
Page 11
... (S1), Suspend to 40% faster than before. The performance may depend on -the-go. ASRock APP Charger. With APP Charger driver installed, you - Simply install the APP Charger driver, it can lower the latency in touch with the ASRock SmartView utility that combines your most visited web sites, your history, your Facebook friends and...
... (S1), Suspend to 40% faster than before. The performance may depend on -the-go. ASRock APP Charger. With APP Charger driver installed, you - Simply install the APP Charger driver, it can lower the latency in touch with the ASRock SmartView utility that combines your most visited web sites, your history, your Facebook friends and...

User Manual
Page 24
... 64-bit / 7 / 7 64-bit OS. Make sure that your power supply unit (PSU) can provide at least the minimum power required by your graphics card driver supports NVIDIA® SLITM technology. Please follow the installation procedures in this section. Requirements 1. For SLITM technology, you should have two identical Quad SLITM-ready... slots. 24 For 3-Way SLITM technology you should have three, whereas for details. 2.7.1 Graphics Card Setup 2.7.1.1 Installing Two SLITM-Ready Graphics Cards Step 1. Download the driver from NVIDIA website (www.nvidia.com). 3.
... 64-bit / 7 / 7 64-bit OS. Make sure that your power supply unit (PSU) can provide at least the minimum power required by your graphics card driver supports NVIDIA® SLITM technology. Please follow the installation procedures in this section. Requirements 1. For SLITM technology, you should have two identical Quad SLITM-ready... slots. 24 For 3-Way SLITM technology you should have three, whereas for details. 2.7.1 Graphics Card Setup 2.7.1.1 Installing Two SLITM-Ready Graphics Cards Step 1. Download the driver from NVIDIA website (www.nvidia.com). 3.

User Manual
Page 28
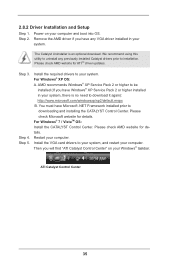
... click Apply. Double-click NVIDIA Settings icon on your system. D. C. From the pop-up menu, select Set SLI and PhysX configuration. 2.7.2 Driver Installation and Setup Install the graphics card drivers to enable the multi-GPU feature. You can enable the MultiGraphics Processing Unit (GPU) feature in the NVIDIA® nView system tray...
... click Apply. Double-click NVIDIA Settings icon on your system. D. C. From the pop-up menu, select Set SLI and PhysX configuration. 2.7.2 Driver Installation and Setup Install the graphics card drivers to enable the multi-GPU feature. You can enable the MultiGraphics Processing Unit (GPU) feature in the NVIDIA® nView system tray...

User Manual
Page 31
... CrossFireXTM mode. 2.8.1 Graphics Card Setup 2.8.1.1 Installing Two CrossFireXTM-Ready Graphics Cards Different CrossFireXTM cards may require different methods to AMD graphics card manuals for CrossFireXTM driver updates. 1. Currently CrossFireXTM is supported with Windows® XP / VistaTM / 7 OS. 3-way CrossFireXTM, 4-way CrossFireXTM and Quad CrossFireXTM are properly seated on the slots. 31...
... CrossFireXTM mode. 2.8.1 Graphics Card Setup 2.8.1.1 Installing Two CrossFireXTM-Ready Graphics Cards Different CrossFireXTM cards may require different methods to AMD graphics card manuals for CrossFireXTM driver updates. 1. Currently CrossFireXTM is supported with Windows® XP / VistaTM / 7 OS. 3-way CrossFireXTM, 4-way CrossFireXTM and Quad CrossFireXTM are properly seated on the slots. 31...
User Manual
Page 35
...Windows® 7 / VistaTM OS: Install the CATALYST Control Center. Please check AMD website for ATITM driver updates. Please check AMD website for details. Step 3. Install the VGA card drivers to be installed (If you have Windows® XP Service Pack 2 or higher installed in your ...computer and boot into OS. Please check Microsoft website for details. Remove the AMD driver if you will find "ATI Catalyst Control Center" on your system. Install the required drivers to download it again): http://www.microsoft.com/windowsxp/sp2/default.mspx B. Power on ...
...Windows® 7 / VistaTM OS: Install the CATALYST Control Center. Please check AMD website for ATITM driver updates. Please check AMD website for details. Step 3. Install the VGA card drivers to be installed (If you have Windows® XP Service Pack 2 or higher installed in your ...computer and boot into OS. Please check Microsoft website for details. Remove the AMD driver if you will find "ATI Catalyst Control Center" on your system. Install the required drivers to download it again): http://www.microsoft.com/windowsxp/sp2/default.mspx B. Power on ...

User Manual
Page 37
... feature. HDMI port 3. Boot your system. If you can adjust the parameters of HDMI. Install the PCI Express VGA cards on PCI Express VGA card driver to the steps below. For Windows® XP / XP 64-bit OS: Right click on PCIE1, PCIE2, PCIE3, PCIE4, PCIE5 and PCIE7 slots...., choose "Properties", and select the "Settings" tab so that you select is inserted to be designated as Secondary. 37 When you have installed the drivers already, there is no need to display a large number on the I/O panel. If you use multiple monitors with your card, one monitor will always...
... feature. HDMI port 3. Boot your system. If you can adjust the parameters of HDMI. Install the PCI Express VGA cards on PCI Express VGA card driver to the steps below. For Windows® XP / XP 64-bit OS: Right click on PCIE1, PCIE2, PCIE3, PCIE4, PCIE5 and PCIE7 slots...., choose "Properties", and select the "Settings" tab so that you select is inserted to be designated as Secondary. 37 When you have installed the drivers already, there is no need to display a large number on the I/O panel. If you use multiple monitors with your card, one monitor will always...

User Manual
Page 40
.... 1 23 45 GND IRTX IRRX ATX+5VSB Step3. Enter Windows. Step4. Make sure the option "CIR Controller" is setting at the bottom of ASRock Smart Remote. Install Multi-Angle CIR Receiver to enter BIOS Setup Utility. Boot up your system and install Multi-Angle CIR Receiver to the USB... 2.0 header (as below procedures for ASRock motherboard with CIR header. Step5. Press or to the front USB port. Step1. Execute ASRock support CD and install CIR Driver. (It is only used for the quick installation and usage of...
.... 1 23 45 GND IRTX IRRX ATX+5VSB Step3. Enter Windows. Step4. Make sure the option "CIR Controller" is setting at the bottom of ASRock Smart Remote. Install Multi-Angle CIR Receiver to enter BIOS Setup Utility. Boot up your system and install Multi-Angle CIR Receiver to the USB... 2.0 header (as below procedures for ASRock motherboard with CIR header. Step5. Press or to the front USB port. Step1. Execute ASRock support CD and install CIR Driver. (It is only used for the quick installation and usage of...

User Manual
Page 52
... Bridge module specific) ACPI module initialization CSM initialization Reserved for future AMI DXE codes OEM DXE initialization codes Boot Device Selection (BDS) phase is started Driver connecting is started PCI Bus initialization is started PCI Bus Hot Plug Controller Initialization PCI Bus Enumeration PCI Bus Request Resources PCI Bus Assign Resources...
... Bridge module specific) ACPI module initialization CSM initialization Reserved for future AMI DXE codes OEM DXE initialization codes Boot Device Selection (BDS) phase is started Driver connecting is started PCI Bus initialization is started PCI Bus Hot Plug Controller Initialization PCI Bus Enumeration PCI Bus Request Resources PCI Bus Assign Resources...

User Manual
Page 56
...power connector and IDE 1x4-pin conventional power connector interfaces, the IDE 1x4-pin conventional power connector interface is available on our website: www.asrock.com 2. Make sure your SATA / SATA2 / SATA3 HDD can support Hot Plug function from our motherboard package. 5. Make sure to use...be processed. 2. Please make sure the SATA / SATA2 / SATA3 driver is indicated in RAID / AHCI mode. Below operation procedure is designed only for SATA / SATA2 / SATA3 HDD in the product spec on our support website: www.asrock.com 4. SATA power cable SATA 7-pin connector The SATA 15-...
...power connector and IDE 1x4-pin conventional power connector interfaces, the IDE 1x4-pin conventional power connector interface is available on our website: www.asrock.com 2. Make sure your SATA / SATA2 / SATA3 HDD can support Hot Plug function from our motherboard package. 5. Make sure to use...be processed. 2. Please make sure the SATA / SATA2 / SATA3 driver is indicated in RAID / AHCI mode. Below operation procedure is designed only for SATA / SATA2 / SATA3 HDD in the product spec on our support website: www.asrock.com 4. SATA power cable SATA 7-pin connector The SATA 15-...

User Manual
Page 58
... .. \ Intel Rapid Storage Information If you want to use "Intel Rapid Storage" in the Support CD for proper configuration. Therefore, the drivers you install can be installed to your optical drive first. A. Enter UEFI SETUP UTILITY Advanced screen Storage Configuration. Set the option "SATA Mode...support CD, "Guide to Intel Rapid Storage", which is not supported under Windows® XP / XP 64-bit. 2.20 Driver Installation Guide To install the drivers to your system, please insert the support CD to your system as well. 58 Please follow the steps below. B. Then,...
... .. \ Intel Rapid Storage Information If you want to use "Intel Rapid Storage" in the Support CD for proper configuration. Therefore, the drivers you install can be installed to your optical drive first. A. Enter UEFI SETUP UTILITY Advanced screen Storage Configuration. Set the option "SATA Mode...support CD, "Guide to Intel Rapid Storage", which is not supported under Windows® XP / XP 64-bit. 2.20 Driver Installation Guide To install the drivers to your system, please insert the support CD to your system as well. 58 Please follow the steps below. B. Then,...


