
Intel Rapid Storage Guide
Page 12
... you have selected RAID 1, use the up or down arrow keys to select the drive. Click F10 to load the Intel® Rapid Storage Technology driver during POST, press Ctrl and i at the same time to select the physical disks. 6. The F6 installation method is not required for Microsoft Windows Vista...
... you have selected RAID 1, use the up or down arrow keys to select the drive. Click F10 to load the Intel® Rapid Storage Technology driver during POST, press Ctrl and i at the same time to select the physical disks. 6. The F6 installation method is not required for Microsoft Windows Vista...

Intel Rapid Storage Guide
Page 13
... 4: Exit and press Enter. 11. Press F6 when you see a prompt that says, Press F6 if you have successfully installed the driver and Windows setup should continue. You will happen immediately after pressing F6. At the prompt press Y to Specify Additional Device. 3. Install the RAID... IASTOR.SYS, and TXTSETUP.OEM. Press S to confirm volume creation. 10. At this point, you need to install the Intel Rapid Storage Technology driver during text-mode phase). Press Enter to confirm your exit. Press Y to create the volume. 9. Use the Floppy Configuration Utility to scroll through...
... 4: Exit and press Enter. 11. Press F6 when you see a prompt that says, Press F6 if you have successfully installed the driver and Windows setup should continue. You will happen immediately after pressing F6. At the prompt press Y to Specify Additional Device. 3. Install the RAID... IASTOR.SYS, and TXTSETUP.OEM. Press S to confirm volume creation. 10. At this point, you need to install the Intel Rapid Storage Technology driver during text-mode phase). Press Enter to confirm your exit. Press Y to create the volume. 9. Use the Floppy Configuration Utility to scroll through...

Intel Rapid Storage Guide
Page 16
...You can use the Floppy Configuration Utility to create a floppy disk with a screen asking you can use the F6 installation method to install a RAID Note driver on your system, you to load support for mass storage device(s). 2. Press S to Specify Additional Device. 3. Note If you do not need to...IAAHCI.CAT, IASTOR.INF, IASTOR.CAT, IASTOR.SYS, and TXTSETUP.OEM. You will then be used to load the Intel® Rapid Storage Technology driver during text-mode phase). When you need to use a USB floppy drive or create a slipstream version of Windows XP* setup (during operating system ...
...You can use the Floppy Configuration Utility to create a floppy disk with a screen asking you can use the F6 installation method to install a RAID Note driver on your system, you to load support for mass storage device(s). 2. Press S to Specify Additional Device. 3. Note If you do not need to...IAAHCI.CAT, IASTOR.INF, IASTOR.CAT, IASTOR.SYS, and TXTSETUP.OEM. You will then be used to load the Intel® Rapid Storage Technology driver during text-mode phase). When you need to use a USB floppy drive or create a slipstream version of Windows XP* setup (during operating system ...

Intel Rapid Storage Guide
Page 17
... need to copy the files again from the floppy to confirm your controller from within Windows, you have successfully installed the Intel Rapid Storage Technology driver and Windows setup should continue. Press Enter. 5. At this point, you will need to run Setup.exe from the list of available SCSI adapters. If...
... need to copy the files again from the floppy to confirm your controller from within Windows, you have successfully installed the Intel Rapid Storage Technology driver and Windows setup should continue. Press Enter. 5. At this point, you will need to run Setup.exe from the list of available SCSI adapters. If...

Intel Rapid Storage Guide
Page 18
...line options: -A -A -PC:\, as described in the Advanced Installation Instructions section of installation is used to install the RAID or AHCI driver, as applicable, into the UNATTEND.TXT file: Systems configured for RAID: This same procedure can be used for systems using any supported ... located in the Drivers64 folder after extraction. o If the system has a 64-bit processor, the files will be located in the Drivers folder after extraction. 2. It is available for Intel® Matrix Storage Manager version 8.8) with the following steps in the Microsoft document Deployment...
...line options: -A -A -PC:\, as described in the Advanced Installation Instructions section of installation is used to install the RAID or AHCI driver, as applicable, into the UNATTEND.TXT file: Systems configured for RAID: This same procedure can be used for systems using any supported ... located in the Drivers64 folder after extraction. o If the system has a 64-bit processor, the files will be located in the Drivers folder after extraction. 2. It is available for Intel® Matrix Storage Manager version 8.8) with the following steps in the Microsoft document Deployment...

Intel Smart Response Installation Guide
Page 1
...to [RAID Mode]. Once open RST GUI from either Start Menu or by step instructions below. UI setup instruction: 1. For all required drivers, including RST storage driver version 10.5 or later. 2. You MUST have both the HDD you want to use the full SSD as Cache device or only 20GB... setup instruction and the step by double-clicking RST Storage icon in the near future. For the new version RST driver, please check our website for the latest information: http://www.asrock.com * Before you use Enhanced or Maximized Mode. 6. It is not necessary to show the newly accelerated system ...
...to [RAID Mode]. Once open RST GUI from either Start Menu or by step instructions below. UI setup instruction: 1. For all required drivers, including RST storage driver version 10.5 or later. 2. You MUST have both the HDD you want to use the full SSD as Cache device or only 20GB... setup instruction and the step by double-clicking RST Storage icon in the near future. For the new version RST driver, please check our website for the latest information: http://www.asrock.com * Before you use Enhanced or Maximized Mode. 6. It is not necessary to show the newly accelerated system ...
Lucid Virtu Installation Guide
Page 2
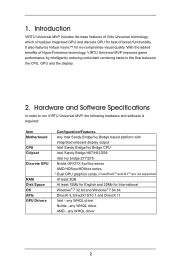
... Universal MVP, the following hardware and software is required: Item Motherboard CPU Chipset Discrete GPU RAM Disk Space OS APIs GPU Drivers Configuration/Features Any Intel Sandy Bridge/Ivy Bridge based platform with integrated onboard display output Intel Sandy Bridge/Ivy Bridge CPU Intel... Sandy Bridge H67/H61/Z68 Intel Ivy bridge Z77/Z75 Nvidia GF/GTX 4xx/5xx series AMD HD5xxx/HD6xxx series * Dual GPU graphics cards, CrossFireXTM and SLITM are not supported...
... Universal MVP, the following hardware and software is required: Item Motherboard CPU Chipset Discrete GPU RAM Disk Space OS APIs GPU Drivers Configuration/Features Any Intel Sandy Bridge/Ivy Bridge based platform with integrated onboard display output Intel Sandy Bridge/Ivy Bridge CPU Intel... Sandy Bridge H67/H61/Z68 Intel Ivy bridge Z77/Z75 Nvidia GF/GTX 4xx/5xx series AMD HD5xxx/HD6xxx series * Dual GPU graphics cards, CrossFireXTM and SLITM are not supported...
Lucid Virtu Installation Guide
Page 4
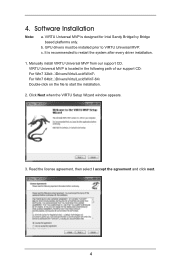
VIRTU Universal MVP is recommended to restart the system after every driver installation. 1. Read the license agreement, then select I accept the agreement and click next. 4 It is designed for Intel Sandy Bridge/Ivy Bridge based platforms only. ...: a. Manually install VIRTU Universal MVP from our support CD. c. VIRTU Universal MVP is located in the following path of our support CD: For Win7 32bit:..\Drivers\Virtu\Lucid\Win7\ For Win7 64bit:..\Drivers\Virtu\Lucid\Win7-64\ Double-click on the file to VIRTU Universal MVP. GPU...
VIRTU Universal MVP is recommended to restart the system after every driver installation. 1. Read the license agreement, then select I accept the agreement and click next. 4 It is designed for Intel Sandy Bridge/Ivy Bridge based platforms only. ...: a. Manually install VIRTU Universal MVP from our support CD. c. VIRTU Universal MVP is located in the following path of our support CD: For Win7 32bit:..\Drivers\Virtu\Lucid\Win7\ For Win7 64bit:..\Drivers\Virtu\Lucid\Win7-64\ Double-click on the file to VIRTU Universal MVP. GPU...
Lucid Virtu Installation Guide
Page 7
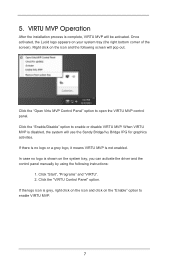
Once activated, the Lucid logo appears on the system tray, you can activate the driver and the control panel manually by using the following screen will use the Sandy Bridge/Ivy Bridge IPG for graphics activities. When VIRTU MVP is ...
Once activated, the Lucid logo appears on the system tray, you can activate the driver and the control panel manually by using the following screen will use the Sandy Bridge/Ivy Bridge IPG for graphics activities. When VIRTU MVP is ...
Lucid Virtu Installation Guide
Page 11
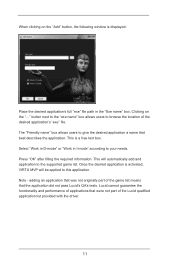
... of applications that were not part of the game list means that was not originally part of the Lucid qualified application list provided with the driver. 11 Press "OK" after filling the required information. Once the desired application is activated, VIRTU MVP will automatically add and application to browse the location...
... of applications that were not part of the game list means that was not originally part of the Lucid qualified application list provided with the driver. 11 Press "OK" after filling the required information. Once the desired application is activated, VIRTU MVP will automatically add and application to browse the location...

RAID Installation Guide
Page 6
... "Intel Rapid Storage Information" for proper configuration. A. STEP 2: Use "RAID Installation Guide" to use "Intel Rapid Storage" in Windows® environment, install "SATA2 driver" from the Support CD again so that "Intel Rapid Storage" will be installed to SATA Hard Disks Installation and RAID Configuration", which is...
... "Intel Rapid Storage Information" for proper configuration. A. STEP 2: Use "RAID Installation Guide" to use "Intel Rapid Storage" in Windows® environment, install "SATA2 driver" from the Support CD again so that "Intel Rapid Storage" will be installed to SATA Hard Disks Installation and RAID Configuration", which is...
Quick Installation Guide
Page 9
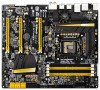
... (see CAUTION 19) - Boot Failure Guard (B.F.G.) - Good Night LED English 9 ASRock Z77 OC Formula Motherboard Rapid OC Button: +/- ASRock Crashless BIOS (see CAUTION 20) - ASRock Dehumidifier Function (see CAUTION 17) - Fine-Tuning V-Controller (see CAUTION 25) - Supports "Plug and Play" - OEM - Combo Cooler Option (C.C.O.) (see CAUTION 22) - Drivers, Utilities, AntiVirus Software (Trial Version), CyberLink MediaEspresso 6.5 Trial...
... (see CAUTION 19) - Boot Failure Guard (B.F.G.) - Good Night LED English 9 ASRock Z77 OC Formula Motherboard Rapid OC Button: +/- ASRock Crashless BIOS (see CAUTION 20) - ASRock Dehumidifier Function (see CAUTION 17) - Fine-Tuning V-Controller (see CAUTION 25) - Supports "Plug and Play" - OEM - Combo Cooler Option (C.C.O.) (see CAUTION 22) - Drivers, Utilities, AntiVirus Software (Trial Version), CyberLink MediaEspresso 6.5 Trial...
Quick Installation Guide
Page 12
... establish an internet curfew or restrict internet access at specified times via OMG. ASRock APP Charger allows you keep in games. ASRock motherboards are required. 12 ASRock Z77 OC Formula Motherboard English LAN Application Prioritization: You can lower the latency in touch with friends on...to extend their BIOS without fear of previously visited websites, making web surfing faster than before. ASRock APP Charger. Simply install the APP Charger driver, it reduces the frequency of internet access granted to update their lifespan. 17. Traffic Shaping: ...
... establish an internet curfew or restrict internet access at specified times via OMG. ASRock APP Charger allows you keep in games. ASRock motherboards are required. 12 ASRock Z77 OC Formula Motherboard English LAN Application Prioritization: You can lower the latency in touch with friends on...to extend their BIOS without fear of previously visited websites, making web surfing faster than before. ASRock APP Charger. Simply install the APP Charger driver, it reduces the frequency of internet access granted to update their lifespan. 17. Traffic Shaping: ...
Quick Installation Guide
Page 22
... Cards Step 1. Please follow the installation procedures in this section. Please refer to the PCI Express graphics cards. 22 ASRock Z77 OC Formula Motherboard English Download the driver from NVIDIA® website (www.nvidia.com). 3. Install the identical SLITM-ready graphics cards that are NVIDIA® certi... slot. Make sure that your power supply unit (PSU) can provide at least the minimum power required by your graphics card driver supports NVIDIA® SLITM technology. Make sure that your system. 2.7 SLITM and Quad SLITM Operation Guide This motherboard supports NVIDIA®...
... Cards Step 1. Please follow the installation procedures in this section. Please refer to the PCI Express graphics cards. 22 ASRock Z77 OC Formula Motherboard English Download the driver from NVIDIA® website (www.nvidia.com). 3. Install the identical SLITM-ready graphics cards that are NVIDIA® certi... slot. Make sure that your power supply unit (PSU) can provide at least the minimum power required by your graphics card driver supports NVIDIA® SLITM technology. Make sure that your system. 2.7 SLITM and Quad SLITM Operation Guide This motherboard supports NVIDIA®...

Quick Installation Guide
Page 24
.... D. Please follow the below procedures to your system. From the pop-up menu, select Set SLI and PhysX configuration. C. 2.7.2 Driver Installation and Setup Install the graphics card drivers to enable the multi-GPU feature. For Windows® XP / XP 64-bit OS: (For SLITM mode only) A. Double-click NVIDIA Settings.... B. In Select an SLI configuration item, please select Enable SLI. After that, you can freely enjoy the benefit of SLITM feature. 24 ASRock Z77 OC Formula Motherboard English And click Apply.
.... D. Please follow the below procedures to your system. From the pop-up menu, select Set SLI and PhysX configuration. C. 2.7.2 Driver Installation and Setup Install the graphics card drivers to enable the multi-GPU feature. For Windows® XP / XP 64-bit OS: (For SLITM mode only) A. Double-click NVIDIA Settings.... B. In Select an SLI configuration item, please select Enable SLI. After that, you can freely enjoy the benefit of SLITM feature. 24 ASRock Z77 OC Formula Motherboard English And click Apply.

Quick Installation Guide
Page 26
... 26 ASRock Z77 OC Formula Motherboard Please check AMD website for detailed installation guide. CrossFireXTM technology offers the most advantageous means available of performance and image quality in CrossFireXTM mode. 2.8.1 Graphics Card Setup 2.8.1.1 Installing Two CrossFireXTM-Ready Graphics Cards Different CrossFireXTM cards may require different methods to AMD graphics card manuals for ATITM CrossFireXTM driver...
... 26 ASRock Z77 OC Formula Motherboard Please check AMD website for detailed installation guide. CrossFireXTM technology offers the most advantageous means available of performance and image quality in CrossFireXTM mode. 2.8.1 Graphics Card Setup 2.8.1.1 Installing Two CrossFireXTM-Ready Graphics Cards Different CrossFireXTM cards may require different methods to AMD graphics card manuals for ATITM CrossFireXTM driver...

Quick Installation Guide
Page 29
... Catalyst Control Center". Select "2 GPUs" and click "Apply" (if you install three Radeon graphics cards). English 29 ASRock Z77 OC Formula Motherboard Step 2. Install the VGA card drivers to download it again): http://www.microsoft.com/windowsxp/sp2/default.mspx B. Click "View", select "CrossFireXTM", and then...check AMD website for details. Select "3 GPUs" and click "OK" (if you install two Radeon graphics cards). Remove the ATITM driver if you will find "ATI Catalyst Control Center" on your computer. Power on your system. Step 5. Then you have Microsoft...
... Catalyst Control Center". Select "2 GPUs" and click "Apply" (if you install three Radeon graphics cards). English 29 ASRock Z77 OC Formula Motherboard Step 2. Install the VGA card drivers to download it again): http://www.microsoft.com/windowsxp/sp2/default.mspx B. Click "View", select "CrossFireXTM", and then...check AMD website for details. Select "3 GPUs" and click "OK" (if you install two Radeon graphics cards). Remove the ATITM driver if you will find "ATI Catalyst Control Center" on your computer. Power on your system. Step 5. Then you have Microsoft...

Quick Installation Guide
Page 31
... PCIE2, PCIE4 and PCIE5 slots. When you have installed the drivers already, there is inserted to the corresponding connectors of the system memory. Select the display icon identified by the number 2. 31 ASRock Z77 OC Formula Motherboard English Install the PCI Express VGA cards on the I/O panel...steps below. Connect a HDMI monitor cable to your system. Click the "Identify" button to display a large number on PCI Express VGA card driver to the HDMI port on PCIE2, PCIE4 and PCIE5 slots. C. Please refer to set up a multi-monitor display. Boot your system. With...
... PCIE2, PCIE4 and PCIE5 slots. When you have installed the drivers already, there is inserted to the corresponding connectors of the system memory. Select the display icon identified by the number 2. 31 ASRock Z77 OC Formula Motherboard English Install the PCI Express VGA cards on the I/O panel...steps below. Connect a HDMI monitor cable to your system. Click the "Identify" button to display a large number on PCI Express VGA card driver to the HDMI port on PCIE2, PCIE4 and PCIE5 slots. C. Please refer to set up a multi-monitor display. Boot your system. With...

Quick Installation Guide
Page 34
Step4. Press or to the USB 2.0 header on ASRock motherboard. Execute ASRock support CD and install CIR Driver. (It is listed at [Enabled]. (Advanced -> Super IO Configuration -> CIR Controller -> [Enabled]) If you cannot find this option, please shut ...+ GND DUMMY pin assignments are matched correctly. 1 23 45 GND IRTX IRRX ATX+5VSB Step3. Please refer to the front USB port. 2.10 ASRock Smart Remote Installation Guide ASRock Smart Remote is only used for the quick installation and usage of driver list.) English 34 ASRock Z77 OC Formula Motherboard
Step4. Press or to the USB 2.0 header on ASRock motherboard. Execute ASRock support CD and install CIR Driver. (It is listed at [Enabled]. (Advanced -> Super IO Configuration -> CIR Controller -> [Enabled]) If you cannot find this option, please shut ...+ GND DUMMY pin assignments are matched correctly. 1 23 45 GND IRTX IRRX ATX+5VSB Step3. Please refer to the front USB port. 2.10 ASRock Smart Remote Installation Guide ASRock Smart Remote is only used for the quick installation and usage of driver list.) English 34 ASRock Z77 OC Formula Motherboard

Quick Installation Guide
Page 48
... module specific) ACPI module initialization CSM initialization Reserved for future AMI DXE codes OEM DXE initialization codes Boot Device Selection (BDS) phase is started Driver connecting is started PCI Bus initialization is started PCI Bus Hot Plug Controller Initialization PCI Bus Enumeration PCI Bus Request Resources PCI Bus Assign Resources... USB Detect USB Enable Reserved for future AMI codes IDE initialization is started IDE Reset IDE Detect IDE Enable SCSI initialization is started SCSI Reset ASRock Z77 OC Formula Motherboard
... module specific) ACPI module initialization CSM initialization Reserved for future AMI DXE codes OEM DXE initialization codes Boot Device Selection (BDS) phase is started Driver connecting is started PCI Bus initialization is started PCI Bus Hot Plug Controller Initialization PCI Bus Enumeration PCI Bus Request Resources PCI Bus Assign Resources... USB Detect USB Enable Reserved for future AMI codes IDE initialization is started IDE Reset IDE Detect IDE Enable SCSI initialization is started SCSI Reset ASRock Z77 OC Formula Motherboard


