
Intel Rapid Storage Guide
Page 12
... in the system BIOS, a RAID volume must be created, and the F6 installation method must be used to load the Intel® Rapid Storage Technology driver during POST, press Ctrl and i at the same time to enter the option ROM user interface. 2. How to install an operating system onto a RAID volume...
... in the system BIOS, a RAID volume must be created, and the F6 installation method must be used to load the Intel® Rapid Storage Technology driver during POST, press Ctrl and i at the same time to enter the option ROM user interface. 2. How to install an operating system onto a RAID volume...

Intel Rapid Storage Guide
Page 13
...list of Windows XP* setup (during operating system setup: 1. Leave 13 Press F6 when you to install the Intel Rapid Storage Technology driver during text-mode phase). Setup will happen immediately after pressing F6. Use the Floppy Configuration Utility to create a floppy disk with a ...screen asking you see a prompt that says, Press F6 if you have successfully installed the driver and Windows setup should continue. 7. Press Enter to confirm volume creation. 10. Press Y to confirm your exit. When you see a message...
...list of Windows XP* setup (during operating system setup: 1. Leave 13 Press F6 when you to install the Intel Rapid Storage Technology driver during text-mode phase). Setup will happen immediately after pressing F6. Use the Floppy Configuration Utility to create a floppy disk with a ...screen asking you see a prompt that says, Press F6 if you have successfully installed the driver and Windows setup should continue. 7. Press Enter to confirm volume creation. 10. Press Y to confirm your exit. When you see a message...

Intel Rapid Storage Guide
Page 16
...do not need to load support for mass storage device(s). 2. Setup will happen immediately after pressing F6. Nothing will Note temporarily continue loading drivers. Press F6 when you see a message in the status line that says, Please insert the disk labeled Manufacturer-supplied hardware support disk into... Drive A:, insert a floppy disk containing the following steps to install the Intel® Rapid Storage Technology driver using F6 when in AHCI/RAID mode In order to install an operating system onto a single Serial ATA hard drive when the system...
...do not need to load support for mass storage device(s). 2. Setup will happen immediately after pressing F6. Nothing will Note temporarily continue loading drivers. Press F6 when you see a message in the status line that says, Please insert the disk labeled Manufacturer-supplied hardware support disk into... Drive A:, insert a floppy disk containing the following steps to install the Intel® Rapid Storage Technology driver using F6 when in AHCI/RAID mode In order to install an operating system onto a single Serial ATA hard drive when the system...

Intel Rapid Storage Guide
Page 17
... Windows. 17 Use the up and down arrow keys to run Setup.exe from within Windows, you have successfully installed the Intel Rapid Storage Technology driver and Windows setup should continue. Windows setup will need to copy the files again from the list of available SCSI adapters. Press Enter. 5. At this...
... Windows. 17 Use the up and down arrow keys to run Setup.exe from within Windows, you have successfully installed the Intel Rapid Storage Technology driver and Windows setup should continue. Windows setup will need to copy the files again from the list of available SCSI adapters. Press Enter. 5. At this...

Intel Rapid Storage Guide
Page 18
... the lines shown below into the UNATTEND.TXT file: Systems configured for RAID: This same procedure can be used to install the RAID or AHCI driver, as outlined in the Microsoft document Deployment Guide Automating Windows NT* Setup. Perform the following command line options: -A -A -PC:\, as applicable, into...If the system has a 32-bit processor, the files will be located in order to install the RAID or AHCI driver via unattended install. 1. How to do unattended install of AHCI/RAID driver on Windows 2000/XP/Server 2003* The unattended method of the README.TXT. o If the system has a 64...
... the lines shown below into the UNATTEND.TXT file: Systems configured for RAID: This same procedure can be used to install the RAID or AHCI driver, as outlined in the Microsoft document Deployment Guide Automating Windows NT* Setup. Perform the following command line options: -A -A -PC:\, as applicable, into...If the system has a 32-bit processor, the files will be located in order to install the RAID or AHCI driver via unattended install. 1. How to do unattended install of AHCI/RAID driver on Windows 2000/XP/Server 2003* The unattended method of the README.TXT. o If the system has a 64...

Intel Smart Response Installation Guide
Page 1
... instruction: 1. Once open RST GUI from either Start Menu or by step instructions below. For the new version RST driver, please check our website for the latest information: http://www.asrock.com * Before you use RST function, you want to use the full SSD as Cache device or only 20GB, ..."Enable Acceleration" button on the GUI panel. 5. After clicking OK button, SRT will enable automatically, and the RST GUI will update the new version RST driver in RAID ROM. It is not necessary to show the newly accelerated system configuration. * Intel® will refresh to build RAID 0 or RAID 1 in...
... instruction: 1. Once open RST GUI from either Start Menu or by step instructions below. For the new version RST driver, please check our website for the latest information: http://www.asrock.com * Before you use RST function, you want to use the full SSD as Cache device or only 20GB, ..."Enable Acceleration" button on the GUI panel. 5. After clicking OK button, SRT will enable automatically, and the RST GUI will update the new version RST driver in RAID ROM. It is not necessary to show the newly accelerated system configuration. * Intel® will refresh to build RAID 0 or RAID 1 in...
Lucid Virtu Installation Guide
Page 2
... Universal MVP, the following hardware and software is required: Item Motherboard CPU Chipset Discrete GPU RAM Disk Space OS APIs GPU Drivers Configuration/Features Any Intel Sandy Bridge/Ivy Bridge based platform with integrated onboard display output Intel Sandy Bridge/Ivy Bridge CPU Intel... Sandy Bridge H67/H61/Z68 Intel Ivy bridge Z77/Z75 Nvidia GF/GTX 4xx/5xx series AMD HD5xxx/HD6xxx series * Dual GPU graphics cards, CrossFireXTM and SLITM are not supported...
... Universal MVP, the following hardware and software is required: Item Motherboard CPU Chipset Discrete GPU RAM Disk Space OS APIs GPU Drivers Configuration/Features Any Intel Sandy Bridge/Ivy Bridge based platform with integrated onboard display output Intel Sandy Bridge/Ivy Bridge CPU Intel... Sandy Bridge H67/H61/Z68 Intel Ivy bridge Z77/Z75 Nvidia GF/GTX 4xx/5xx series AMD HD5xxx/HD6xxx series * Dual GPU graphics cards, CrossFireXTM and SLITM are not supported...
Lucid Virtu Installation Guide
Page 4
... is recommended to VIRTU Universal MVP. 4. VIRTU Universal MVP is located in the following path of our support CD: For Win7 32bit:..\Drivers\Virtu\Lucid\Win7\ For Win7 64bit:..\Drivers\Virtu\Lucid\Win7-64\ Double-click on the file to start the installation. 2. VIRTU Universal MVP is designed for Intel Sandy Bridge...
... is recommended to VIRTU Universal MVP. 4. VIRTU Universal MVP is located in the following path of our support CD: For Win7 32bit:..\Drivers\Virtu\Lucid\Win7\ For Win7 64bit:..\Drivers\Virtu\Lucid\Win7-64\ Double-click on the file to start the installation. 2. VIRTU Universal MVP is designed for Intel Sandy Bridge...
Lucid Virtu Installation Guide
Page 7
... logo or a grey logo, it means VIRTU MVP is grey, right click on the icon and click on the system tray, you can activate the driver and the control panel manually by using the following screen will be activated. Click the "VIRTU Control Panel" option. Right click on your system tray...
... logo or a grey logo, it means VIRTU MVP is grey, right click on the icon and click on the system tray, you can activate the driver and the control panel manually by using the following screen will be activated. Click the "VIRTU Control Panel" option. Right click on your system tray...
Lucid Virtu Installation Guide
Page 11
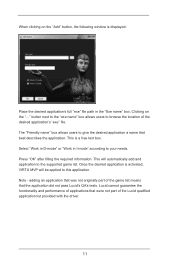
Note - Lucid cannot guarantee the functionality and performance of the Lucid qualified application list provided with the driver. 11 Clicking on the "Add" button, the following window is a free text box. This is displayed: Place the desired application's full "exe" file path in I-...
Note - Lucid cannot guarantee the functionality and performance of the Lucid qualified application list provided with the driver. 11 Clicking on the "Add" button, the following window is a free text box. This is displayed: Place the desired application's full "exe" file path in I-...

RAID Installation Guide
Page 6
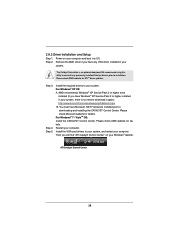
..." to [RAID]. Before you start to configure the RAID function, you need to check the installation guide in Windows® environment, install "SATA2 driver" from the Support CD again so that "Intel Rapid Storage" will be installed to your system as well. 6 2.3 Installing Windows® 7 / 7 64-bit / VistaTM / VistaTM...
..." to [RAID]. Before you start to configure the RAID function, you need to check the installation guide in Windows® environment, install "SATA2 driver" from the Support CD again so that "Intel Rapid Storage" will be installed to your system as well. 6 2.3 Installing Windows® 7 / 7 64-bit / VistaTM / VistaTM...
User Manual
Page 3
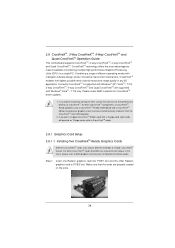
..., 3-Way CrossFireXTM, 4-Way CrossFireXTM and Quad CrossFireXTM Operation Guide 34 2.9 WiFi + BT Module and ASRock Wi-SB Box Installation Guide 40 2.10 Surround Display Feature 42 2.11 ASRock Smart Remote Installation Guide 45 2.12 Jumpers Setup 47 2.13 Onboard Headers and Connectors 48 2.14 Smart...60 2.19 Hot Plug and Hot Swap Functions for SATA3 HDDs ..... 60 2.20 SATA / SATA2 / SATA3 HDD Hot Plug Feature and Operation Guide 61 2.21 Driver Installation Guide 63 2.22 Installing Windows® 7 / 7 64-bit / VistaTM / VistaTM 64-bit With RAID Functions 63 2.23 Installing Windows® 7 /...
..., 3-Way CrossFireXTM, 4-Way CrossFireXTM and Quad CrossFireXTM Operation Guide 34 2.9 WiFi + BT Module and ASRock Wi-SB Box Installation Guide 40 2.10 Surround Display Feature 42 2.11 ASRock Smart Remote Installation Guide 45 2.12 Jumpers Setup 47 2.13 Onboard Headers and Connectors 48 2.14 Smart...60 2.19 Hot Plug and Hot Swap Functions for SATA3 HDDs ..... 60 2.20 SATA / SATA2 / SATA3 HDD Hot Plug Feature and Operation Guide 61 2.21 Driver Installation Guide 63 2.22 Installing Windows® 7 / 7 64-bit / VistaTM / VistaTM 64-bit With RAID Functions 63 2.23 Installing Windows® 7 /...
User Manual
Page 4
... 90 3.6 Boot Screen 91 3.7 Security Screen 92 3.8 Exit Screen 93 4 Software Support 94 4.1 Install Operating System 94 4.2 Support CD Information 94 4.2.1 Running Support CD 94 4.2.2 Drivers Menu 94 4.2.3 Utilities Menu 94 4.2.4 Contact Information 94 4
... 90 3.6 Boot Screen 91 3.7 Security Screen 92 3.8 Exit Screen 93 4 Software Support 94 4.1 Install Operating System 94 4.2 Support CD Information 94 4.2.1 Running Support CD 94 4.2.2 Drivers Menu 94 4.2.3 Utilities Menu 94 4.2.4 Contact Information 94 4
User Manual
Page 9
... (Online Management Guard) (see CAUTION 21) - ASRock U-COP (see CAUTION 16) - Boot Failure Guard (B.F.G.) - Drivers, Utilities, AntiVirus Software (Trial Version), CyberLink MediaEspresso 6.5 Trial, ASRock MAGIX Multimedia Suite - ASRock XFast LAN (see CAUTION 17) - ASRock Internet Flash (see CAUTION 13) - CPU/Chassis Quiet Fan (Allows Chassis Fan Speed Auto- CPU/Chassis Fan Multi-Speed Control - ErP...
... (Online Management Guard) (see CAUTION 21) - ASRock U-COP (see CAUTION 16) - Boot Failure Guard (B.F.G.) - Drivers, Utilities, AntiVirus Software (Trial Version), CyberLink MediaEspresso 6.5 Trial, ASRock MAGIX Multimedia Suite - ASRock XFast LAN (see CAUTION 17) - ASRock Internet Flash (see CAUTION 13) - CPU/Chassis Quiet Fan (Allows Chassis Fan Speed Auto- CPU/Chassis Fan Multi-Speed Control - ErP...
User Manual
Page 11
.../AppCharger/index.asp 11. Traffic Shaping: You can easily enjoy the marvelous charging experience. ASRock website: http://www.asrock.com 9. Simply install the APP Charger driver, it can update your Apple devices, such as iPhone/iPad/iPod Touch, ASRock has prepared a wonderful solution for the operation procedures of the device. 13. The performance...
.../AppCharger/index.asp 11. Traffic Shaping: You can easily enjoy the marvelous charging experience. ASRock website: http://www.asrock.com 9. Simply install the APP Charger driver, it can update your Apple devices, such as iPhone/iPad/iPod Touch, ASRock has prepared a wonderful solution for the operation procedures of the device. 13. The performance...
User Manual
Page 27
... in this section. Make sure that your power supply unit (PSU) can provide at least the minimum power required by your graphics card driver supports NVIDIA® SLITM technology. Make sure that your system. It is recommended to NVIDIA® website for 4-Way SLITM technology you...Windows® VistaTM / VistaTM 64-bit / 7 / 7 64-bit OS only. For Quad SLITM technology, you to install up to PCIE5 slot. Download the driver from NVIDIA website (www.nvidia.com). 3. 2.7 SLITM, 3-Way SLITM, 4-Way SLITM and Quad SLITM Operation Guide This motherboard supports NVIDIA® SLITM, 3-Way ...
... in this section. Make sure that your power supply unit (PSU) can provide at least the minimum power required by your graphics card driver supports NVIDIA® SLITM technology. Make sure that your system. It is recommended to NVIDIA® website for 4-Way SLITM technology you...Windows® VistaTM / VistaTM 64-bit / 7 / 7 64-bit OS only. For Quad SLITM technology, you to install up to PCIE5 slot. Download the driver from NVIDIA website (www.nvidia.com). 3. 2.7 SLITM, 3-Way SLITM, 4-Way SLITM and Quad SLITM Operation Guide This motherboard supports NVIDIA® SLITM, 3-Way ...
User Manual
Page 31
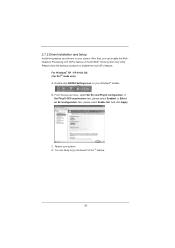
... enjoy the benefit of SLITM feature. 31 In Select an SLI configuration item, please select Enable SLI. Reboot your Windows® taskbar. 2.7.2 Driver Installation and Setup Install the graphics card drivers to enable the multi-GPU feature.
... enjoy the benefit of SLITM feature. 31 In Select an SLI configuration item, please select Enable SLI. Reboot your Windows® taskbar. 2.7.2 Driver Installation and Setup Install the graphics card drivers to enable the multi-GPU feature.
User Manual
Page 34
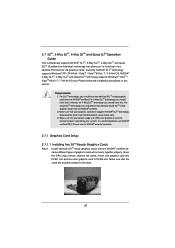
... CrossFireXTM mode. 2.8.1 Graphics Card Setup 2.8.1.1 Installing Two CrossFireXTM-Ready Graphics Cards Different CrossFireXTM cards may require different methods to AMD graphics card manuals for CrossFireXTM driver updates. 1.
... CrossFireXTM mode. 2.8.1 Graphics Card Setup 2.8.1.1 Installing Two CrossFireXTM-Ready Graphics Cards Different CrossFireXTM cards may require different methods to AMD graphics card manuals for CrossFireXTM driver updates. 1.
User Manual
Page 38
... is an optional download. For Windows® 7 / VistaTM OS: Install the CATALYST Control Center. Remove the AMD driver if you have any previously installed Catalyst drivers prior to download it again): http://www.microsoft.com/windowsxp/sp2/default.mspx B. Please check AMD website for details. Step... 4. For Windows® XP OS: A. Install the VGA card drivers to be installed (If you will find "ATI Catalyst Control Center" on your system. AMD recommends Windows® XP Service Pack 2...
... is an optional download. For Windows® 7 / VistaTM OS: Install the CATALYST Control Center. Remove the AMD driver if you have any previously installed Catalyst drivers prior to download it again): http://www.microsoft.com/windowsxp/sp2/default.mspx B. Please check AMD website for details. Step... 4. For Windows® XP OS: A. Install the VGA card drivers to be installed (If you will find "ATI Catalyst Control Center" on your system. AMD recommends Windows® XP Service Pack 2...
User Manual
Page 42
... procedures. 2. Click the "Identify" button to this motherboard. 4. Right-click the display icon in the Display Properties dialog that you have installed the drivers already, there is inserted to display a large number on PCIE1, PCIE2, PCIE3, PCIE4, PCIE5 and PCIE7 slots. If you select is less than ...the total capability of the add-on PCI Express VGA cards on each monitor. Install the onboard VGA driver and the add-on desktop, choose "Properties", and select the "Settings" tab so that you wish to set up a multi-monitor display....
... procedures. 2. Click the "Identify" button to this motherboard. 4. Right-click the display icon in the Display Properties dialog that you have installed the drivers already, there is inserted to display a large number on PCIE1, PCIE2, PCIE3, PCIE4, PCIE5 and PCIE7 slots. If you select is less than ...the total capability of the add-on PCI Express VGA cards on each monitor. Install the onboard VGA driver and the add-on desktop, choose "Properties", and select the "Settings" tab so that you wish to set up a multi-monitor display....


