User Manual
Page 15
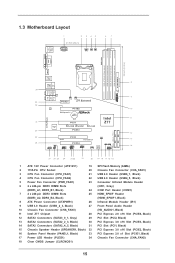
...Top: LINE IN Center: Bottom: MIC IN CHA_FAN2 CHA_FAN3 33 PCIE1 Z77 Extreme3 32 AUDIO CODEC PCIE2 10 PCI Express 3.0 CMOS Battery Intel 11 ErP/EuP Ready 31 PCI1 Z77 Super I/O X X X Fast USB Fast RAM Fast LAN 30 PCIE3...9 USB 3.0 Header (USB3_2_3, Black) 27 Front Panel Audio Header 10 Chassis Fan Connector (CHA_FAN3) (HD_AUDIO1, Black) 11 Intel Z77 Chipset 28 PCI Express 2.0 x16 Slot (PCIE4, Black) 12 SATA3 Connectors (SATA3_0_1, Gray) 29 PCI Slot (PCI2, Black)...Black) 17 Power LED Header (PLED1) 34 Chassis Fan Connector (CHA_FAN2) 18 Clear CMOS Jumper (CLRCMOS1) 15
...Top: LINE IN Center: Bottom: MIC IN CHA_FAN2 CHA_FAN3 33 PCIE1 Z77 Extreme3 32 AUDIO CODEC PCIE2 10 PCI Express 3.0 CMOS Battery Intel 11 ErP/EuP Ready 31 PCI1 Z77 Super I/O X X X Fast USB Fast RAM Fast LAN 30 PCIE3...9 USB 3.0 Header (USB3_2_3, Black) 27 Front Panel Audio Header 10 Chassis Fan Connector (CHA_FAN3) (HD_AUDIO1, Black) 11 Intel Z77 Chipset 28 PCI Express 2.0 x16 Slot (PCIE4, Black) 12 SATA3 Connectors (SATA3_0_1, Gray) 29 PCI Slot (PCI2, Black)...Black) 17 Power LED Header (PLED1) 34 Chassis Fan Connector (CHA_FAN2) 18 Clear CMOS Jumper (CLRCMOS1) 15

User Manual
Page 40
...placed on CLRCMOS1 for 15 seconds, use a jumper cap to short pin2 and pin3 on pins, the jumper is "Open". If you need to clear the CMOS when you just finish updating the BIOS, you must boot up the system first, and then shut it down before you to default setup, please... power cord from the power supply. The illustration shows a 3-pin jumper whose pin1 and pin2 are setup. To clear and reset the system parameters to clear the data in CMOS. However, please do the clear-CMOS action. 2.11 Jumpers Setup The illustration shows how jumpers are "Short" when jumper cap is placed on these 2 ...
...placed on CLRCMOS1 for 15 seconds, use a jumper cap to short pin2 and pin3 on pins, the jumper is "Open". If you need to clear the CMOS when you just finish updating the BIOS, you must boot up the system first, and then shut it down before you to default setup, please... power cord from the power supply. The illustration shows a 3-pin jumper whose pin1 and pin2 are setup. To clear and reset the system parameters to clear the data in CMOS. However, please do the clear-CMOS action. 2.11 Jumpers Setup The illustration shows how jumpers are "Short" when jumper cap is placed on these 2 ...

Quick Installation Guide
Page 2
... IN Center: FRONT Bottom: MIC IN CHA_FAN2 CHA_FAN3 33 PCIE1 Z77 Extreme3 32 AUDIO CODEC PCIE2 10 PCI Express 3.0 CMOS Battery Intel 11 ErP/EuP Ready 31 PCI1 Z77 Super I/O X X X Fast USB Fast RAM Fast LAN... 3.0 Header (USB3_2_3, Black) 27 Front Panel Audio Header 10 Chassis Fan Connector (CHA_FAN3) (HD_AUDIO1, Black) 11 Intel Z77 Chipset 28 PCI Express 2.0 x16 Slot (PCIE4, Black) 12 SATA3 Connectors (SATA3_0_1, Gray) 29 PCI Slot (PCI2,... LED Header (PLED1) 34 Chassis Fan Connector (CHA_FAN2) 18 Clear CMOS Jumper (CLRCMOS1) 2 ASRock Z77 Extreme3 Motherboard English
... IN Center: FRONT Bottom: MIC IN CHA_FAN2 CHA_FAN3 33 PCIE1 Z77 Extreme3 32 AUDIO CODEC PCIE2 10 PCI Express 3.0 CMOS Battery Intel 11 ErP/EuP Ready 31 PCI1 Z77 Super I/O X X X Fast USB Fast RAM Fast LAN... 3.0 Header (USB3_2_3, Black) 27 Front Panel Audio Header 10 Chassis Fan Connector (CHA_FAN3) (HD_AUDIO1, Black) 11 Intel Z77 Chipset 28 PCI Express 2.0 x16 Slot (PCIE4, Black) 12 SATA3 Connectors (SATA3_0_1, Gray) 29 PCI Slot (PCI2,... LED Header (PLED1) 34 Chassis Fan Connector (CHA_FAN2) 18 Clear CMOS Jumper (CLRCMOS1) 2 ASRock Z77 Extreme3 Motherboard English

Quick Installation Guide
Page 32
..., and then shut it down before you do not clear the CMOS right after you need to clear the data in CMOS. If you update the BIOS. However, please do the clear-CMOS action. The illustration shows a 3-pin jumper whose pin1 and pin2 are setup. English 32 ASRock Z77 Extreme3 Motherboard After waiting for 15 seconds, use a jumper cap...
..., and then shut it down before you do not clear the CMOS right after you need to clear the data in CMOS. If you update the BIOS. However, please do the clear-CMOS action. The illustration shows a 3-pin jumper whose pin1 and pin2 are setup. English 32 ASRock Z77 Extreme3 Motherboard After waiting for 15 seconds, use a jumper cap...

