

Intel Rapid Storage Guide
Page 5
10. You will find the "Intel Rapid Storage Technology" icon on the Windows task bar. 5 Restart your system.
10. You will find the "Intel Rapid Storage Technology" icon on the Windows task bar. 5 Restart your system.
Intel Rapid Storage Guide
Page 8
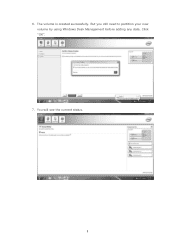
You will see the current status. 8 6. But you still need to partition your new volume by using Windows Desk Management before adding any data. The volume is created successfully. Click "OK". 7.
You will see the current status. 8 6. But you still need to partition your new volume by using Windows Desk Management before adding any data. The volume is created successfully. Click "OK". 7.

Intel Rapid Storage Guide
Page 9
Right-click on Disk 0, click "New Simple Volume". 9 Click "OK". 9. In Windows Desk Management, you need to initialize a disk before Logical Disk Management can access it. 8.
Right-click on Disk 0, click "New Simple Volume". 9 Click "OK". 9. In Windows Desk Management, you need to initialize a disk before Logical Disk Management can access it. 8.

Intel Rapid Storage Guide
Page 12
... Operation Mode option to create a RAID volume. 1. Select 1: Create RAID Volume and press Enter. 3. The F6 installation method is not required for Microsoft Windows Vista* or Note Microsoft Windows 7*. Create a RAID Volume Use the following steps to RAID. 5. Unless you have selected RAID 1, use the up or down arrow keys to scroll...
... Operation Mode option to create a RAID volume. 1. Select 1: Create RAID Volume and press Enter. 3. The F6 installation method is not required for Microsoft Windows Vista* or Note Microsoft Windows 7*. Create a RAID Volume Use the following steps to RAID. 5. Unless you have selected RAID 1, use the up or down arrow keys to scroll...

Intel Rapid Storage Guide
Page 13
...to confirm your controller and continue. You will then be visible. 6. Press Enter. 5. Press Enter to confirm your controller from the list of Windows XP* setup (during operating system setup: 1. Press S to create the volume. 9. Select your exit. Leave 13 This message appears at the...of available SCSI adapters. Press F6 when you see a prompt that says, Press F6 if you have successfully installed the driver and Windows setup should continue. 7. Press Enter to Specify Additional Device. 3. Setup will happen immediately after pressing F6. At the prompt press Y...
...to confirm your controller and continue. You will then be visible. 6. Press Enter. 5. Press Enter to confirm your controller from the list of Windows XP* setup (during operating system setup: 1. Press S to create the volume. 9. Select your exit. Leave 13 This message appears at the...of available SCSI adapters. Press F6 when you see a prompt that says, Press F6 if you have successfully installed the driver and Windows setup should continue. 7. Press Enter to Specify Additional Device. 3. Setup will happen immediately after pressing F6. At the prompt press Y...

Intel Rapid Storage Guide
Page 14
...Intel Rapid Storage Technology user interface in the floppy drive until the system reboots. Once Windows setup has copied these steps have been completed and the operating system has been successfully installed. 14 Windows setup will need to copy the files again from the floppy to install Intel Rapid ...Storage Technology by Note running the Setup.exe process after these files again, remove the floppy disk so that Windows setup can reboot as you would on any physical disk. During Windows setup, create a partition and file system on the RAID volume as needed. 7. the floppy disk in...
...Intel Rapid Storage Technology user interface in the floppy drive until the system reboots. Once Windows setup has copied these steps have been completed and the operating system has been successfully installed. 14 Windows setup will need to copy the files again from the floppy to install Intel Rapid ...Storage Technology by Note running the Setup.exe process after these files again, remove the floppy disk so that Windows setup can reboot as you would on any physical disk. During Windows setup, create a partition and file system on the RAID volume as needed. 7. the floppy disk in...

Intel Rapid Storage Guide
Page 16
You do not have a floppy drive on Microsoft Windows Vista* and Microsoft Windows 7* because Intel provided a RAID driver as part of Windows XP* setup (during text-mode phase). Press F6 when you to load support for mass storage device(s). 2. Setup will then be used to load the ...
You do not have a floppy drive on Microsoft Windows Vista* and Microsoft Windows 7* because Intel provided a RAID driver as part of Windows XP* setup (during text-mode phase). Press F6 when you to load support for mass storage device(s). 2. Setup will then be used to load the ...

Intel Rapid Storage Guide
Page 17
...visible. 6. Press Enter. 5. If you wish to use the Intel Rapid Storage Technology user interface Note within Windows, you have successfully installed the Intel Rapid Storage Technology driver and Windows setup should continue. Leave the floppy disk in the floppy drive until the system reboots. Select your controller ...and continue. Windows setup will need to copy the files again from the floppy to run Setup.exe from the list of available SCSI adapters...
...visible. 6. Press Enter. 5. If you wish to use the Intel Rapid Storage Technology user interface Note within Windows, you have successfully installed the Intel Rapid Storage Technology driver and Windows setup should continue. Leave the floppy disk in the floppy drive until the system reboots. Select your controller ...and continue. Windows setup will need to copy the files again from the floppy to run Setup.exe from the list of available SCSI adapters...

Intel Rapid Storage Guide
Page 18
....INF, IAAHCI.CAT, IASTOR.INF, IASTOR.CAT, IASTOR.SYS, and TXTSETUP.OEM files from the setup files. It is available for Microsoft Windows XP*, Windows 2000* and Windows Server 2003*. Does the system contain a 32-bit or 64-bit processor? o If the system has a 32-bit processor, the files... will be located in the Drivers folder after extraction. 2. How to do unattended install of AHCI/RAID driver on Windows 2000/XP/Server 2003* The unattended method of installation is used for Intel® Matrix Storage Manager version 8.8) with the following steps in ...
....INF, IAAHCI.CAT, IASTOR.INF, IASTOR.CAT, IASTOR.SYS, and TXTSETUP.OEM files from the setup files. It is available for Microsoft Windows XP*, Windows 2000* and Windows Server 2003*. Does the system contain a 32-bit or 64-bit processor? o If the system has a 32-bit processor, the files... will be located in the Drivers folder after extraction. 2. How to do unattended install of AHCI/RAID driver on Windows 2000/XP/Server 2003* The unattended method of installation is used for Intel® Matrix Storage Manager version 8.8) with the following steps in ...

Intel Rapid Storage Guide
Page 19
... hub by replacing the text within the quotation marks. // Insert the lines below into the following folder: :\i386\$OEM$\Textmode Operating System: Windows* 2000, Windows* XP Professional, Windows* XP Home Edition, Windows Server* 2003 19 Place IAAHCI.CAT, IAAHCI.INF, IASTOR.CAT, IASTOR.INF, IASTOR.SYS, and TXTSETUP.OEM into the UNATTEND.TXT file...
... hub by replacing the text within the quotation marks. // Insert the lines below into the following folder: :\i386\$OEM$\Textmode Operating System: Windows* 2000, Windows* XP Professional, Windows* XP Home Edition, Windows Server* 2003 19 Place IAAHCI.CAT, IAAHCI.INF, IASTOR.CAT, IASTOR.INF, IASTOR.SYS, and TXTSETUP.OEM into the UNATTEND.TXT file...
Intel Smart Response Installation Guide
Page 2
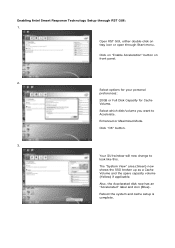
... spare capacity volume (Yellow) if applicable. Reboot the system and cache setup is complete. Open RST GUI, either double-click on front panel. 2. Your GUI window will now change to Accelerate. Select which disk/volume you want to look like this. Click on "Enable Acceleration" button on tray icon or open...
... spare capacity volume (Yellow) if applicable. Reboot the system and cache setup is complete. Open RST GUI, either double-click on front panel. 2. Your GUI window will now change to Accelerate. Select which disk/volume you want to look like this. Click on "Enable Acceleration" button on tray icon or open...

Intel Smart Response Installation Guide
Page 3
Disabling Intel Smart Response Technology Setup through RST GUI: 1. Click on how much modified data there was. Smart Response Technology is now DISABLED and all data is now DISABLED. This could take a few seconds or even a few minutes depending on the "Disable Acceleration" button. 2. A pop-up window will appear, click "Yes" RST Cache is guaranteed to be written to the HDD. Open RST GUI and click on the "Accelerate" tab.
Disabling Intel Smart Response Technology Setup through RST GUI: 1. Click on how much modified data there was. Smart Response Technology is now DISABLED and all data is now DISABLED. This could take a few seconds or even a few minutes depending on the "Disable Acceleration" button. 2. A pop-up window will appear, click "Yes" RST Cache is guaranteed to be written to the HDD. Open RST GUI and click on the "Accelerate" tab.

Intel Smart Response Installation Guide
Page 4
Note that the SSD is now reset to Available" button (Orange). WARNING! Resetting SSD to "Available". Resetting SSD to "Available": 1. The "Accelerate" tab window will delete all data on the Spare Capacity Volume! The SSD can now be used as a normal storage device, or you can also re-enable Acceleration through the normal enable process. Resetting SSD to Available will now look like this. To reset SSD to a non-Cache-disk state, Click the "Reset to Available. The SSD is still divided into a Cache and Spare Cap Volume.
Note that the SSD is now reset to Available" button (Orange). WARNING! Resetting SSD to "Available". Resetting SSD to "Available": 1. The "Accelerate" tab window will delete all data on the Spare Capacity Volume! The SSD can now be used as a normal storage device, or you can also re-enable Acceleration through the normal enable process. Resetting SSD to Available will now look like this. To reset SSD to a non-Cache-disk state, Click the "Reset to Available. The SSD is still divided into a Cache and Spare Cap Volume.

User Manual
Page 3
... fan 18 2.5 Installation of Memory Modules (DIMM 19 2.6 Expansion Slot (PCI Express Slot 20 2.7 Dual Monitor and Surround Display Features 21 2.8 ASRock Smart Remote Installation Guide 24 2.9 Jumpers Setup 25 2.10 Onboard Headers and Connectors 25 2.11 Serial ATA (SATA) / Serial ATAII (SATAII)...SATA / SATAII / SATA3 HDD Hot Plug Feature and Operation Guide 31 2.16 Driver Installation Guide 33 2.17 Installing Windows® 7 / 7 64-bit / VistaTM / VistaTM 64-bit With RAID Functions 33 2.18 Installing Windows® 7 / 7 64-bit / VistaTM / VistaTM 64-bit / XP / XP 64-bit Without RAID ...
... fan 18 2.5 Installation of Memory Modules (DIMM 19 2.6 Expansion Slot (PCI Express Slot 20 2.7 Dual Monitor and Surround Display Features 21 2.8 ASRock Smart Remote Installation Guide 24 2.9 Jumpers Setup 25 2.10 Onboard Headers and Connectors 25 2.11 Serial ATA (SATA) / Serial ATAII (SATAII)...SATA / SATAII / SATA3 HDD Hot Plug Feature and Operation Guide 31 2.16 Driver Installation Guide 33 2.17 Installing Windows® 7 / 7 64-bit / VistaTM / VistaTM 64-bit With RAID Functions 33 2.18 Installing Windows® 7 / 7 64-bit / VistaTM / VistaTM 64-bit / XP / XP 64-bit Without RAID ...
User Manual
Page 5
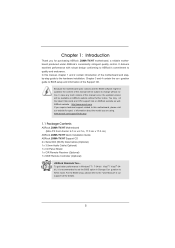
... without notice. Chapter 1: Introduction Thank you are using. To get better performance in Windows® 7 / 7 64-bit / VistaTM / VistaTM 64bit, it is recommended to set the BIOS option in , 17.0 cm x 17.0 cm) ASRock Z68M-ITX/HT Quick Installation Guide ASRock Z68M-ITX/HT Support CD 2 x Serial ATA (SATA) Data Cables (Optional) 1 x 3.5mm Audio Cable (Optional) 1 x I/O Panel Shield 1 x CIR...
... without notice. Chapter 1: Introduction Thank you are using. To get better performance in Windows® 7 / 7 64-bit / VistaTM / VistaTM 64bit, it is recommended to set the BIOS option in , 17.0 cm x 17.0 cm) ASRock Z68M-ITX/HT Quick Installation Guide ASRock Z68M-ITX/HT Support CD 2 x Serial ATA (SATA) Data Cables (Optional) 1 x 3.5mm Audio Cable (Optional) 1 x I/O Panel Shield 1 x CIR...
User Manual
Page 8
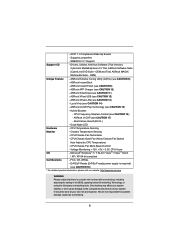
...CPU Frequency Stepless Control (see CAUTION 18) * For detailed product information, please visit our website: http://www.asrock.com WARNING Please realize that there is required) (see CAUTION 16) - Microsoft® Windows® 7 / 7 64-bit / VistaTM / VistaTM 64-bit / XP / XP 64-bit compliant ...Certifications - ASRock On/Off Play Technology (see CAUTION 15) - We are not responsible for possible damage...
...CPU Frequency Stepless Control (see CAUTION 18) * For detailed product information, please visit our website: http://www.asrock.com WARNING Please realize that there is required) (see CAUTION 16) - Microsoft® Windows® 7 / 7 64-bit / VistaTM / VistaTM 64-bit / XP / XP 64-bit compliant ...Certifications - ASRock On/Off Play Technology (see CAUTION 15) - We are not responsible for possible damage...

User Manual
Page 9
... 9 Before you to read the installation guide of ASRock Extreme Tuning Utility (AXTU). Please check Intel® website for the operation procedures of memory modules on page 13 for system usage under Windows® 7 64-bit / 7 / VistaTM 64-bit / VistaTM. 7. xvYCC is no ...settings. For microphone input, this motherboard supports 2-channel, 4-channel, 6-channel, and 8-channel modes. ASRock Extreme Tuning Utility (AXTU) is an all-in a user-friendly interface, which is supported under Windows® 7 / VistaTM / XP. D-Sub, DVI-D and HDMI monitors cannot be less than 4GB...
... 9 Before you to read the installation guide of ASRock Extreme Tuning Utility (AXTU). Please check Intel® website for the operation procedures of memory modules on page 13 for system usage under Windows® 7 64-bit / 7 / VistaTM 64-bit / VistaTM. 7. xvYCC is no ...settings. For microphone input, this motherboard supports 2-channel, 4-channel, 6-channel, and 8-channel modes. ASRock Extreme Tuning Utility (AXTU) is an all-in a user-friendly interface, which is supported under Windows® 7 / VistaTM / XP. D-Sub, DVI-D and HDMI monitors cannot be less than 4GB...

User Manual
Page 10
...Simply installing the APP Charger driver, it can lower the latency in Flash ROM. ASRock APP Charger allows you to quickly charge many Apple devices simultaneously and even supports continuous charging when your browser version is Windows® 7 / 7 64 bit / VistaTM / VistaTM 64 bit, and ... With APP Charger driver installed, you - ASRock motherboards are currently transferring. 14. ASRock website: http://www.asrock.com/Feature/ SmartView/index.asp 12. The performance may depend on -the-go. Real-Time Analysis of Your Data: With the status window, you keep in a few clicks without ...
...Simply installing the APP Charger driver, it can lower the latency in Flash ROM. ASRock APP Charger allows you to quickly charge many Apple devices simultaneously and even supports continuous charging when your browser version is Windows® 7 / 7 64 bit / VistaTM / VistaTM 64 bit, and ... With APP Charger driver installed, you - ASRock motherboards are currently transferring. 14. ASRock website: http://www.asrock.com/Feature/ SmartView/index.asp 12. The performance may depend on -the-go. Real-Time Analysis of Your Data: With the status window, you keep in a few clicks without ...
User Manual
Page 14
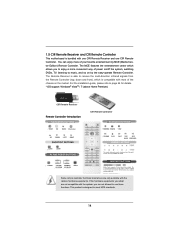
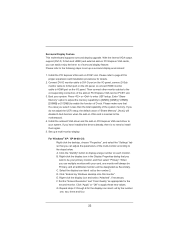
..., listening to music, and so on by MCE (Media Center Edition) Remote Controller. The colored Fastext buttons on the remote control for details. * OS support: Windows® VistaTM / 7 (above are not allowed to page 24 for Media Center PC work much like the Teletext buttons on the market. POWER VOLUME CHANNEL...
..., listening to music, and so on by MCE (Media Center Edition) Remote Controller. The colored Fastext buttons on the remote control for details. * OS support: Windows® VistaTM / 7 (above are not allowed to page 24 for Media Center PC work much like the Teletext buttons on the market. POWER VOLUME CHANNEL...
User Manual
Page 22
...set up a multi-monitor display. Click the "Identify" button to HDMI port on PCI Express VGA card driver to the steps below. C. Click "Extend my Windows desktop onto this motherboard. 4. Enter "Share Memory" option to adjust the memory capability to [32MB], [64MB], [128MB], [256MB] or [512MB] to ...enable the function of the multi-monitor according to your card, one , two, three and four. 22 For Windows® XP / XP 64-bit OS: Right click the desktop, choose "Properties", and select the "Settings" tab so that the value you have installed ...
...set up a multi-monitor display. Click the "Identify" button to HDMI port on PCI Express VGA card driver to the steps below. C. Click "Extend my Windows desktop onto this motherboard. 4. Enter "Share Memory" option to adjust the memory capability to [32MB], [64MB], [128MB], [256MB] or [512MB] to ...enable the function of the multi-monitor according to your card, one , two, three and four. 22 For Windows® XP / XP 64-bit OS: Right click the desktop, choose "Properties", and select the "Settings" tab so that the value you have installed ...


