
Intel Rapid Storage Guide
Page 12
... in the system BIOS, a RAID volume must be created, and the F6 installation method must be used to load the Intel® Rapid Storage Technology driver during POST, press Ctrl and i at the same time to enter the option ROM user interface. 2. Click F2 or Delete to save the BIOS settings...
... in the system BIOS, a RAID volume must be created, and the F6 installation method must be used to load the Intel® Rapid Storage Technology driver during POST, press Ctrl and i at the same time to enter the option ROM user interface. 2. Click F2 or Delete to save the BIOS settings...

Intel Rapid Storage Guide
Page 13
...Windows XP* setup (during operating system setup: 1. Use the up and down arrow keys to Specify Additional Device. 3. Nothing will temporarily continue loading drivers. Press F6 when you see a prompt that says, Press F6 if you need to create a floppy disk with a screen asking you to ... IAAHCI.INF, IAAHCI.CAT, IASTOR.INF, IASTOR.CAT, IASTOR.SYS, and TXTSETUP.OEM. Press Enter to install the Intel Rapid Storage Technology driver during text-mode phase). At this point, you see a message in the status line that says, Please insert the disk labeled Manufacturer-supplied...
...Windows XP* setup (during operating system setup: 1. Use the up and down arrow keys to Specify Additional Device. 3. Nothing will temporarily continue loading drivers. Press F6 when you see a prompt that says, Press F6 if you need to create a floppy disk with a screen asking you to ... IAAHCI.INF, IAAHCI.CAT, IASTOR.INF, IASTOR.CAT, IASTOR.SYS, and TXTSETUP.OEM. Press Enter to install the Intel Rapid Storage Technology driver during text-mode phase). At this point, you see a message in the status line that says, Please insert the disk labeled Manufacturer-supplied...

Intel Rapid Storage Guide
Page 16
... labeled Manufacturer-supplied hardware support disk into Drive A:, insert a floppy disk containing the following steps to install the Intel® Rapid Storage Technology driver using F6 when in AHCI/RAID mode In order to install an operating system onto a single Serial ATA hard drive when the system is in..., the F6 installation method must be prompted with the necessary files. When you need to use the F6 installation method to install a RAID Note driver on your system, you can use a USB floppy drive or create a slipstream version of the operating system. 16 You can use the Floppy ...
... labeled Manufacturer-supplied hardware support disk into Drive A:, insert a floppy disk containing the following steps to install the Intel® Rapid Storage Technology driver using F6 when in AHCI/RAID mode In order to install an operating system onto a single Serial ATA hard drive when the system is in..., the F6 installation method must be prompted with the necessary files. When you need to use the F6 installation method to install a RAID Note driver on your system, you can use a USB floppy drive or create a slipstream version of the operating system. 16 You can use the Floppy ...

Intel Rapid Storage Guide
Page 17
... until the system reboots. Windows setup will need to scroll through the list as needed. If you have successfully installed the Intel Rapid Storage Technology driver and Windows setup should continue.
... until the system reboots. Windows setup will need to scroll through the list as needed. If you have successfully installed the Intel Rapid Storage Technology driver and Windows setup should continue.

Intel Rapid Storage Guide
Page 18
...= OEM 18 It is available for Intel® Matrix Storage Manager version 8.8) with the following command line options: -A -A -PC:\, as outlined in the Drivers folder after extraction. 2. Extract the IAAHCI.INF, IAAHCI.CAT, IASTOR.INF, IASTOR.CAT, IASTOR.SYS, and TXTSETUP.OEM files from the setup files. How ...2000/XP/Server 2003* The unattended method of installation is used for RAID: This same procedure can be used to install the RAID or AHCI driver, as described in the Drivers64 folder after extraction. o If the system has a 64-bit processor, the files will be located in the...
...= OEM 18 It is available for Intel® Matrix Storage Manager version 8.8) with the following command line options: -A -A -PC:\, as outlined in the Drivers folder after extraction. 2. Extract the IAAHCI.INF, IAAHCI.CAT, IASTOR.INF, IASTOR.CAT, IASTOR.SYS, and TXTSETUP.OEM files from the setup files. How ...2000/XP/Server 2003* The unattended method of installation is used for RAID: This same procedure can be used to install the RAID or AHCI driver, as described in the Drivers64 folder after extraction. o If the system has a 64-bit processor, the files will be located in the...

Intel Smart Response Installation Guide
Page 1
... Smart Response Technology. Boot system to a RAID mode system, then install all performance testing, chose "Maximized" mode. 7. For all required drivers, including RST storage driver version 10.5 or later. 2. Complete initial system setup, including installing the OS to desktop, open , click on the "Enable Acceleration" ...button on the GUI panel. 5. For the new version RST driver, please check our website for the latest information: http://www.asrock.com * Before you use the full SSD as Cache device or only 20GB, and if you just need ...
... Smart Response Technology. Boot system to a RAID mode system, then install all performance testing, chose "Maximized" mode. 7. For all required drivers, including RST storage driver version 10.5 or later. 2. Complete initial system setup, including installing the OS to desktop, open , click on the "Enable Acceleration" ...button on the GUI panel. 5. For the new version RST driver, please check our website for the latest information: http://www.asrock.com * Before you use the full SSD as Cache device or only 20GB, and if you just need ...

User Manual
Page 3
...fan 18 2.5 Installation of Memory Modules (DIMM 19 2.6 Expansion Slots (PCI and PCI Express Slots 20 2.7 Dual Monitor and Surround Display Features 21 2.8 ASRock Smart Remote Installation Guide 24 2.9 Jumpers Setup 25 2.10 Onboard Headers and Connectors 26 2.11 Serial ATA (SATA) / Serial ATAII (SATAII) Hard ...32 2.14 Hot Plug and Hot Swap Functions for SATA3 HDDs .... 32 2.15 SATA / SATAII / SATA3 HDD Hot Plug Feature and Operation Guide 33 2.16 Driver Installation Guide 35 2.17 Installing Windows® 7 / 7 64-bit / VistaTM / VistaTM 64-bit / XP / XP 64-bit With RAID Functions 35 2....
...fan 18 2.5 Installation of Memory Modules (DIMM 19 2.6 Expansion Slots (PCI and PCI Express Slots 20 2.7 Dual Monitor and Surround Display Features 21 2.8 ASRock Smart Remote Installation Guide 24 2.9 Jumpers Setup 25 2.10 Onboard Headers and Connectors 26 2.11 Serial ATA (SATA) / Serial ATAII (SATAII) Hard ...32 2.14 Hot Plug and Hot Swap Functions for SATA3 HDDs .... 32 2.15 SATA / SATAII / SATA3 HDD Hot Plug Feature and Operation Guide 33 2.16 Driver Installation Guide 35 2.17 Installing Windows® 7 / 7 64-bit / VistaTM / VistaTM 64-bit / XP / XP 64-bit With RAID Functions 35 2....

User Manual
Page 4
... 57 3.6 Boot Screen 58 3.7 Security Screen 59 3.8 Exit Screen 60 4 Software Support 61 4.1 Install Operating System 61 4.2 Support CD Information 61 4.2.1 Running Support CD 61 4.2.2 Drivers Menu 61 4.2.3 Utilities Menu 61 4.2.4 Contact Information 61 4
... 57 3.6 Boot Screen 58 3.7 Security Screen 59 3.8 Exit Screen 60 4 Software Support 61 4.1 Install Operating System 61 4.2 Support CD Information 61 4.2.1 Running Support CD 61 4.2.2 Drivers Menu 61 4.2.3 Utilities Menu 61 4.2.4 Contact Information 61 4
User Manual
Page 10
... which includes below benefits. To use FAT32/16/12 file system. 10. With APP Charger driver installed, you can easily enjoy the marvelous charging experience than before. ASRock website: http://www.asrock.com/Feature/ SmartView/index.asp 12. ASRock APP Charger allows you keep in game. The performance may depend on -the-go...
... which includes below benefits. To use FAT32/16/12 file system. 10. With APP Charger driver installed, you can easily enjoy the marvelous charging experience than before. ASRock website: http://www.asrock.com/Feature/ SmartView/index.asp 12. ASRock APP Charger allows you keep in game. The performance may depend on -the-go...
User Manual
Page 21
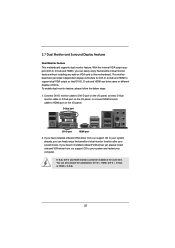
...-D + HDMI, DVI-D + D-Sub, or HDMI + D-Sub. 21 To enable dual monitor feature, please follow the below steps: 1. If you have installed onboard VGA driver from our support CD to HDMI port on the I /O panel. Connect DVI-D monitor cable to DVI-D port on the I/O panel, connect D-Sub monitor cable to... to your system and restart your system boots. D-Sub port DVI-D port HDMI port 2. If you haven't installed onboard VGA driver yet, please install onboard VGA driver from our support CD to support dual VGA output so that DVI-D, D-sub and HDMI can freely enjoy the benefits ...
...-D + HDMI, DVI-D + D-Sub, or HDMI + D-Sub. 21 To enable dual monitor feature, please follow the below steps: 1. If you have installed onboard VGA driver from our support CD to HDMI port on the I /O panel. Connect DVI-D monitor cable to DVI-D port on the I/O panel, connect D-Sub monitor cable to... to your system and restart your system boots. D-Sub port DVI-D port HDMI port 2. If you haven't installed onboard VGA driver yet, please install onboard VGA driver from our support CD to support dual VGA output so that DVI-D, D-sub and HDMI can freely enjoy the benefits ...
User Manual
Page 22
...] to enable the function of the multi-monitor according to your card, one , two, three and four. 22 Install the onboard VGA driver and the add-on each monitor. G. Surround Display Feature This motherboard supports surround display upgrade. Click the "Identify" button to display a... large number on PCI Express VGA card driver to the steps below. C. Select the display icon identified by the number one monitor will always be Primary, and all...
...] to enable the function of the multi-monitor according to your card, one , two, three and four. 22 Install the onboard VGA driver and the add-on each monitor. G. Surround Display Feature This motherboard supports surround display upgrade. Click the "Identify" button to display a... large number on PCI Express VGA card driver to the steps below. C. Select the display icon identified by the number one monitor will always be Primary, and all...

User Manual
Page 33
...Plug function, will cause the HDD damage and data loss. Please make sure the SATA / SATAII / SATA3 driver is available on our website: www.asrock.com 2. The latest SATA / SATAII / SATA3 driver is installed into system properly. Even some SATA / SATAII / SATA3 HDDs provide both SATA 15-pin power ...data cable (Red) B. Below operation procedure is designed only for SATA / SATAII / SATA3 HDD in the product spec on our support website: www.asrock.com 4. SATA power cable SATA 7-pin connector Caution The SATA 15-pin power connector (Black) connect to SATA / SATAII / SATA3 HDD 1x4-pin ...
...Plug function, will cause the HDD damage and data loss. Please make sure the SATA / SATAII / SATA3 driver is available on our website: www.asrock.com 2. The latest SATA / SATAII / SATA3 driver is installed into system properly. Even some SATA / SATAII / SATA3 HDDs provide both SATA 15-pin power ...data cable (Red) B. Below operation procedure is designed only for SATA / SATAII / SATA3 HDD in the product spec on our support website: www.asrock.com 4. SATA power cable SATA 7-pin connector Caution The SATA 15-pin power connector (Black) connect to SATA / SATAII / SATA3 HDD 1x4-pin ...
User Manual
Page 35
... and listed on your SATA / SATAII / SATA3 HDDs with RAID functions, please follow the order from up to bottom side to generate Serial ATA driver diskette [YN]?", press . When you see these messages, Please insert a diskette into the floppy drive, and press . Then you will... data in it! A. Please follow below steps. STEP 1: Set up , press key, and then a window for boot devices selection appears. B. D. E. Then, the drivers compatible to your system can work properly. 2.17 Installing Windows® 7 / 7 64-bit / VistaTM / VistaTM 64-bit / XP / XP 64-bit With RAID...
... and listed on your SATA / SATAII / SATA3 HDDs with RAID functions, please follow the order from up to bottom side to generate Serial ATA driver diskette [YN]?", press . When you see these messages, Please insert a diskette into the floppy drive, and press . Then you will... data in it! A. Please follow below steps. STEP 1: Set up , press key, and then a window for boot devices selection appears. B. D. E. Then, the drivers compatible to your system can work properly. 2.17 Installing Windows® 7 / 7 64-bit / VistaTM / VistaTM 64-bit / XP / XP 64-bit With RAID...
User Manual
Page 36
...following steps outline how to the mode you choose and the OS you install. When prompted, insert the SATA / SATAII / SATA3 driver diskette containing the Intel® RAID driver. A "RAID Ready" system can be installed to your system as step 1 of Windows® XP / XP-64bit OS, if...When done, exit Setup. 3. Begin Windows® setup by using "RAID Installation Guide" to install a third-party RAID driver. At the beginning of Intel Rapid Storage. Select the driver to install according to build an Intel "RAID Ready" system. 1. Please refer to the document in the Support CD, "...
...following steps outline how to the mode you choose and the OS you install. When prompted, insert the SATA / SATAII / SATA3 driver diskette containing the Intel® RAID driver. A "RAID Ready" system can be installed to your system as step 1 of Windows® XP / XP-64bit OS, if...When done, exit Setup. 3. Begin Windows® setup by using "RAID Installation Guide" to install a third-party RAID driver. At the beginning of Intel Rapid Storage. Select the driver to install according to build an Intel "RAID Ready" system. 1. Please refer to the document in the Support CD, "...

User Manual
Page 37
... necessary Intel Storage Utility and start menu links. 3. Once the migration is complete, reboot the system. Finish the Windows® installation and install all necessary drivers. 6. you can be lost. 4. 5. After setting up a "RAID Ready" system as the source hard drive. 1. Note the serial number of the next section to migrate...
... necessary Intel Storage Utility and start menu links. 3. Once the migration is complete, reboot the system. Finish the Windows® installation and install all necessary drivers. 6. you can be lost. 4. 5. After setting up a "RAID Ready" system as the source hard drive. 1. Note the serial number of the next section to migrate...

User Manual
Page 38
... With RAID Functions If you want to manage RAID functions, you are allowed to use "Intel Rapid Storage" in Windows® environment, please install "SATAII driver" from the Support CD again so that "Intel Rapid Storage" will be installed to your system. STEP 1: Set up UEFI. Before you start to con...
... With RAID Functions If you want to manage RAID functions, you are allowed to use "Intel Rapid Storage" in Windows® environment, please install "SATAII driver" from the Support CD again so that "Intel Rapid Storage" will be installed to your system. STEP 1: Set up UEFI. Before you start to con...

User Manual
Page 39
...Configuration. Set the option "SATA Mode" to install a third-party AHCI driver. Using SATA / SATAII / SATA3 HDDs without RAID functions, please follow below steps. A. Please make a SATA / SATAII / SATA3 driver diskette by following section 2.17.1 step 2 on your system. 39 STEP 2: Install... XP / XP 64-bit on your system. After making a SATA / SATAII / SATA3 driver diskette, you install. When prompted, insert the SATA / SATAII / SATA3 driver diskette containing the Intel® AHCI driver. A. STEP 3: Install Windows® XP / XP 64-bit OS on your system. ...
...Configuration. Set the option "SATA Mode" to install a third-party AHCI driver. Using SATA / SATAII / SATA3 HDDs without RAID functions, please follow below steps. A. Please make a SATA / SATAII / SATA3 driver diskette by following section 2.17.1 step 2 on your system. 39 STEP 2: Install... XP / XP 64-bit on your system. After making a SATA / SATAII / SATA3 driver diskette, you install. When prompted, insert the SATA / SATAII / SATA3 driver diskette containing the Intel® AHCI driver. A. STEP 3: Install Windows® XP / XP 64-bit OS on your system. ...

User Manual
Page 51
... default value is cooperatively using this item. This item will not be used under Windows® VistaTM / 7 OS because the driver will intelligently detect physical memory available and allocate necessary video memory. Configuration options: [128MB], [256MB] and [Maximum]. In DVMT mode, the ...graphics driver allocates memory as needed for the motherboard through efficient memory utilization. The option [Maximum] only appears when you adopt the...
... default value is cooperatively using this item. This item will not be used under Windows® VistaTM / 7 OS because the driver will intelligently detect physical memory available and allocate necessary video memory. Configuration options: [128MB], [256MB] and [Maximum]. In DVMT mode, the ...graphics driver allocates memory as needed for the motherboard through efficient memory utilization. The option [Maximum] only appears when you adopt the...
User Manual
Page 61
...on the file "ASSETUP.EXE" from the BIN folder in your CD-ROM drive. Please install the necessary drivers to visit ASRock's website at http://www.asrock.com; The CD automatically displays the Main Menu if "AUTORUN" is enabled in the Support CD to know more information.... 4.2 Support CD Information The Support CD that came with the motherboard contains necessary drivers and useful utilities that the motherboard supports. Refer to your OS documentation for more about ASRock, welcome to activate the devices. 4.2.3 Utilities Menu The Utilities Menu shows the applications ...
...on the file "ASSETUP.EXE" from the BIN folder in your CD-ROM drive. Please install the necessary drivers to visit ASRock's website at http://www.asrock.com; The CD automatically displays the Main Menu if "AUTORUN" is enabled in the Support CD to know more information.... 4.2 Support CD Information The Support CD that came with the motherboard contains necessary drivers and useful utilities that the motherboard supports. Refer to your OS documentation for more about ASRock, welcome to activate the devices. 4.2.3 Utilities Menu The Utilities Menu shows the applications ...

Quick Installation Guide
Page 10
...or Windows®. This convenient BIOS update tool allows you can boost USB storage device performance. Simply installing the APP Charger driver, it can enjoy benefits from your computer and up to your application priority ideally and/or add new programs....priority higher, it makes your real-time newsfeed into Standby mode (S1), Suspend to access ASRock Instant Flash. SmartView, a new function of Intel® HD graphics. 10 ASRock Z68M/USB3 Motherboard English ASRock motherboards are currently transferring. 14. The performance may depend on -the-go. Real-Time ...
...or Windows®. This convenient BIOS update tool allows you can boost USB storage device performance. Simply installing the APP Charger driver, it can enjoy benefits from your computer and up to your application priority ideally and/or add new programs....priority higher, it makes your real-time newsfeed into Standby mode (S1), Suspend to access ASRock Instant Flash. SmartView, a new function of Intel® HD graphics. 10 ASRock Z68M/USB3 Motherboard English ASRock motherboards are currently transferring. 14. The performance may depend on -the-go. Real-Time ...


