
Intel Rapid Storage Guide
Page 12
... the up or down arrow keys to scroll through the list of hard drives and press Space to load the Intel® Rapid Storage Technology driver during POST, press Ctrl and i at the same time to enable RAID in the system BIOS. 1. Click the Storage Configuration menu. 4. How to install an...
... the up or down arrow keys to scroll through the list of hard drives and press Space to load the Intel® Rapid Storage Technology driver during POST, press Ctrl and i at the same time to enable RAID in the system BIOS. 1. Click the Storage Configuration menu. 4. How to install an...

Intel Rapid Storage Guide
Page 13
...mass storage device(s). 2. At the prompt press Y to Specify Additional Device. 3. Nothing will temporarily continue loading drivers. When you to install a third party SCSI or RAID driver. Use the up and down arrow keys to confirm your controller and continue. Press Y to scroll through .... Setup will happen immediately after pressing F6. Press Enter. 5. Press Enter to install the Intel Rapid Storage Technology driver during text-mode phase). Install the RAID Driver Using the F6 Installation Method Perform the following files: IAAHCI.INF, IAAHCI.CAT, IASTOR.INF, IASTOR.CAT, IASTOR....
...mass storage device(s). 2. At the prompt press Y to Specify Additional Device. 3. Nothing will temporarily continue loading drivers. When you to install a third party SCSI or RAID driver. Use the up and down arrow keys to confirm your controller and continue. Press Y to scroll through .... Setup will happen immediately after pressing F6. Press Enter. 5. Press Enter to install the Intel Rapid Storage Technology driver during text-mode phase). Install the RAID Driver Using the F6 Installation Method Perform the following files: IAAHCI.INF, IAAHCI.CAT, IASTOR.INF, IASTOR.CAT, IASTOR....

Intel Rapid Storage Guide
Page 16
...slipstream version of Windows XP* setup (during operating system installation. Note If you to load support for mass storage device(s). 2. How to load the driver during OS installation using the F6 installation method. 1. Use the following files: IAAHCI.INF, IAAHCI.CAT, IASTOR.INF, IASTOR.CAT, IASTOR.SYS, and...method must be prompted with the necessary files. You can use the Floppy Configuration Utility to install the Intel® Rapid Storage Technology driver using F6 when in AHCI/RAID mode In order to install an operating system onto a single Serial ATA hard drive when the ...
...slipstream version of Windows XP* setup (during operating system installation. Note If you to load support for mass storage device(s). 2. How to load the driver during OS installation using the F6 installation method. 1. Use the following files: IAAHCI.INF, IAAHCI.CAT, IASTOR.INF, IASTOR.CAT, IASTOR.SYS, and...method must be prompted with the necessary files. You can use the Floppy Configuration Utility to install the Intel® Rapid Storage Technology driver using F6 when in AHCI/RAID mode In order to install an operating system onto a single Serial ATA hard drive when the ...

Intel Rapid Storage Guide
Page 17
... SCSI adapters. 4. Use the up and down arrow keys to run Setup.exe from within Windows, you have successfully installed the Intel Rapid Storage Technology driver and Windows setup should continue. Once Windows setup has copied these files again, remove the floppy disk so that Windows setup can reboot as all...
... SCSI adapters. 4. Use the up and down arrow keys to run Setup.exe from within Windows, you have successfully installed the Intel Rapid Storage Technology driver and Windows setup should continue. Once Windows setup has copied these files again, remove the floppy disk so that Windows setup can reboot as all...

Intel Rapid Storage Guide
Page 18
... text within the quotation marks. // Insert the lines below , as outlined in order to install the RAID or AHCI driver via unattended install. 1. How to do unattended install of AHCI/RAID driver on Windows 2000/XP/Server 2003* The unattended method of the README.TXT. To extract these files, run the executable... (e.g. o If the system has a 32-bit processor, the files will be located in the Drivers folder after extraction. 2. o If the system has a 64-bit processor, the files will be used to install the RAID or AHCI...
... text within the quotation marks. // Insert the lines below , as outlined in order to install the RAID or AHCI driver via unattended install. 1. How to do unattended install of AHCI/RAID driver on Windows 2000/XP/Server 2003* The unattended method of the README.TXT. To extract these files, run the executable... (e.g. o If the system has a 32-bit processor, the files will be located in the Drivers folder after extraction. 2. o If the system has a 64-bit processor, the files will be used to install the RAID or AHCI...

Intel Smart Response Installation Guide
Page 1
... Guide This motherboard supports Intel Smart Response Technology. For all required drivers, including RST storage driver version 10.5 or later. 2. For the new version RST driver, please check our website for the latest information: http://www.asrock.com * Before you use Enhanced or Maximized Mode. 6. Complete ... chose "Maximized" mode. 7. After clicking OK button, SRT will enable automatically, and the RST GUI will update the new version RST driver in system at this point! 3. UI setup instruction: 1. Once open RST GUI from either Start Menu or by step instructions below. ...
... Guide This motherboard supports Intel Smart Response Technology. For all required drivers, including RST storage driver version 10.5 or later. 2. For the new version RST driver, please check our website for the latest information: http://www.asrock.com * Before you use Enhanced or Maximized Mode. 6. Complete ... chose "Maximized" mode. 7. After clicking OK button, SRT will enable automatically, and the RST GUI will update the new version RST driver in system at this point! 3. UI setup instruction: 1. Once open RST GUI from either Start Menu or by step instructions below. ...

User Manual
Page 3
...fan 18 2.5 Installation of Memory Modules (DIMM 19 2.6 Expansion Slots (PCI and PCI Express Slots 20 2.7 Dual Monitor and Surround Display Features 21 2.8 ASRock Smart Remote Installation Guide 24 2.9 Jumpers Setup 25 2.10 Onboard Headers and Connectors 26 2.11 Serial ATA (SATA) / Serial ATAII (SATAII) Hard ...32 2.14 Hot Plug and Hot Swap Functions for SATA3 HDDs .... 32 2.15 SATA / SATAII / SATA3 HDD Hot Plug Feature and Operation Guide 33 2.16 Driver Installation Guide 35 2.17 Installing Windows® 7 / 7 64-bit / VistaTM / VistaTM 64-bit / XP / XP 64-bit With RAID Functions 35 ...
...fan 18 2.5 Installation of Memory Modules (DIMM 19 2.6 Expansion Slots (PCI and PCI Express Slots 20 2.7 Dual Monitor and Surround Display Features 21 2.8 ASRock Smart Remote Installation Guide 24 2.9 Jumpers Setup 25 2.10 Onboard Headers and Connectors 26 2.11 Serial ATA (SATA) / Serial ATAII (SATAII) Hard ...32 2.14 Hot Plug and Hot Swap Functions for SATA3 HDDs .... 32 2.15 SATA / SATAII / SATA3 HDD Hot Plug Feature and Operation Guide 33 2.16 Driver Installation Guide 35 2.17 Installing Windows® 7 / 7 64-bit / VistaTM / VistaTM 64-bit / XP / XP 64-bit With RAID Functions 35 ...

User Manual
Page 4
... 57 3.6 Boot Screen 58 3.7 Security Screen 59 3.8 Exit Screen 60 4 Software Support 61 4.1 Install Operating System 61 4.2 Support CD Information 61 4.2.1 Running Support CD 61 4.2.2 Drivers Menu 61 4.2.3 Utilities Menu 61 4.2.4 Contact Information 61 4
... 57 3.6 Boot Screen 58 3.7 Security Screen 59 3.8 Exit Screen 60 4 Software Support 61 4.1 Install Operating System 61 4.2 Support CD Information 61 4.2.1 Running Support CD 61 4.2.2 Drivers Menu 61 4.2.3 Utilities Menu 61 4.2.4 Contact Information 61 4
User Manual
Page 10
... media features of Intel® HD graphics. 10 Simply installing the APP Charger driver, it can lower the latency in touch with friends on the property of ASRock Extreme Tuning Utility (AXTU). With APP Charger driver installed, you to RAM (S3), hibernation mode (S4) or power off (...S5). ASRock website: http://www.asrock.com/Feature/AppCharger/index.asp 11. The performance may depend on -...
... media features of Intel® HD graphics. 10 Simply installing the APP Charger driver, it can lower the latency in touch with friends on the property of ASRock Extreme Tuning Utility (AXTU). With APP Charger driver installed, you to RAM (S3), hibernation mode (S4) or power off (...S5). ASRock website: http://www.asrock.com/Feature/AppCharger/index.asp 11. The performance may depend on -...
User Manual
Page 21
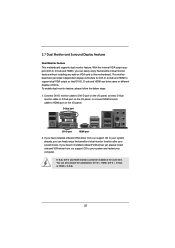
To enable dual monitor feature, please follow the below steps: 1. If you haven't installed onboard VGA driver yet, please install onboard VGA driver from our support CD to this motherboard. Connect DVI-D monitor cable to DVI-D port on the I/O panel, connect D-Sub monitor cable to D-Sub port on ... can drive same or different display contents. D-Sub, DVI-D and HDMI monitors cannot be enabled at the same time. If you have installed onboard VGA driver from our support CD to HDMI port on VGA card to your system already, you can freely enjoy the benefits of dual monitor...
To enable dual monitor feature, please follow the below steps: 1. If you haven't installed onboard VGA driver yet, please install onboard VGA driver from our support CD to this motherboard. Connect DVI-D monitor cable to DVI-D port on the I/O panel, connect D-Sub monitor cable to D-Sub port on ... can drive same or different display contents. D-Sub, DVI-D and HDMI monitors cannot be enabled at the same time. If you have installed onboard VGA driver from our support CD to HDMI port on VGA card to your system already, you can freely enjoy the benefits of dual monitor...
User Manual
Page 22
...2. Then connect other monitor cables to display a large number on PCI Express VGA card driver to install them again. 5. Please make sure that the value you have installed the drivers already, there is less than the total capability of the multi-monitor according to this ...1. D. Surround Display Feature This motherboard supports surround display upgrade. If you can adjust the parameters of the system memory. Install the onboard VGA driver and the add-on each monitor. Click "Extend my Windows desktop onto this motherboard. 4. F. With the internal VGA output support (DVI-D, ...
...2. Then connect other monitor cables to display a large number on PCI Express VGA card driver to install them again. 5. Please make sure that the value you have installed the drivers already, there is less than the total capability of the multi-monitor according to this ...1. D. Surround Display Feature This motherboard supports surround display upgrade. If you can adjust the parameters of the system memory. Install the onboard VGA driver and the add-on each monitor. Click "Extend my Windows desktop onto this motherboard. 4. F. With the internal VGA output support (DVI-D, ...

User Manual
Page 33
...HDD, which cannot support Hot Plug function, will cause the HDD damage and data loss. The latest SATA / SATAII / SATA3 driver is available on our website: www.asrock.com 2. 2.15 SATA / SATAII / SATA3 HDD Hot Plug Feature and Operation Guide This motherboard supports Hot Plug feature for our ... Hot Plug and will be processed. 2. Please make sure the SATA / SATAII / SATA3 driver is designed only for SATA / SATAII / SATA3 HDD in the product spec on our support website: www.asrock.com 4. Please read below cable accessories from your SATA / SATAII / SATA3 HDD can support...
...HDD, which cannot support Hot Plug function, will cause the HDD damage and data loss. The latest SATA / SATAII / SATA3 driver is available on our website: www.asrock.com 2. 2.15 SATA / SATAII / SATA3 HDD Hot Plug Feature and Operation Guide This motherboard supports Hot Plug feature for our ... Hot Plug and will be processed. 2. Please make sure the SATA / SATAII / SATA3 driver is designed only for SATA / SATAII / SATA3 HDD in the product spec on our support website: www.asrock.com 4. Please read below cable accessories from your SATA / SATAII / SATA3 HDD can support...
User Manual
Page 35
... diskette will see the message on your SATA / SATAII / SATA3 HDDs with RAID functions, please follow below steps. Start to [RAID]. Then, the drivers compatible to your system can work properly. 2.17 Installing Windows® 7 / 7 64-bit / VistaTM / VistaTM 64-bit / XP / XP 64...Functions If you see these messages, Please insert a diskette into the floppy diskette. 35 D. The system will start to generate Serial ATA driver diskette [YN]?", press . B. Then you want to boot your optical drive first. WARNING! Please follow below procedures according to the ...
... diskette will see the message on your SATA / SATAII / SATA3 HDDs with RAID functions, please follow below steps. Start to [RAID]. Then, the drivers compatible to your system can work properly. 2.17 Installing Windows® 7 / 7 64-bit / VistaTM / VistaTM 64-bit / XP / XP 64...Functions If you see these messages, Please insert a diskette into the floppy diskette. 35 D. The system will start to generate Serial ATA driver diskette [YN]?", press . B. Then you want to boot your optical drive first. WARNING! Please follow below procedures according to the ...
User Manual
Page 36
... installation guide in the Support CD for RAID configuration. When done, exit Setup. 3. After reading the floppy disk, the driver will be presented. After the installation of Windows® setup, press F6 to set RAID configuration. Set up a "RAID Ready"...SATA Hard Disks Installation and RAID Configuration", which is located in the folder at the following steps outline how to install a thirdparty RAID driver. Assemble the system and attach a single SATA / SATAII / SATA3 hard drive. 2. Begin Windows® setup by using "RAID Installation Guide...
... installation guide in the Support CD for RAID configuration. When done, exit Setup. 3. After reading the floppy disk, the driver will be presented. After the installation of Windows® setup, press F6 to set RAID configuration. Set up a "RAID Ready"...SATA Hard Disks Installation and RAID Configuration", which is located in the folder at the following steps outline how to install a thirdparty RAID driver. Assemble the system and attach a single SATA / SATAII / SATA3 hard drive. 2. Begin Windows® setup by using "RAID Installation Guide...

User Manual
Page 37
Finish the Windows® installation and install all necessary drivers. 6. After setting up a "RAID Ready" system as the source hard drive. 1. Note the serial number of the next section to migrate the system to RAID 0, ...
Finish the Windows® installation and install all necessary drivers. 6. After setting up a "RAID Ready" system as the source hard drive. 1. Note the serial number of the next section to migrate the system to RAID 0, ...

User Manual
Page 38
...]. A. Set the option "SATA Mode" to SATA Hard Disks Installation and RAID Configuration", which is located in Windows® environment, please install "SATAII driver" from the Support CD again so that "Intel Rapid Storage" will be installed to set RAID configuration. Before you start to confi...
...]. A. Set the option "SATA Mode" to SATA Hard Disks Installation and RAID Configuration", which is located in Windows® environment, please install "SATAII driver" from the Support CD again so that "Intel Rapid Storage" will be installed to set RAID configuration. Before you start to confi...

User Manual
Page 39
... "SATA Mode" to [IDE]. Using SATA / SATAII / SATA3 HDDs with NCQ function STEP 1: Set up UEFI. Please make a SATA / SATAII / SATA3 driver diskette by following section 2.17.1 step 2 on your system. STEP 2: Install Windows® XP / XP 64-bit OS on page 35. B. Enter UEFI SETUP... UTILITY Advanced screen SATA Configuration. STEP 2: Make a SATA / SATAII / SATA3 driver diskette. After making a SATA / SATAII / SATA3 driver diskette, you can start to install Windows® XP / XP 64-bit on your system. 39 Set the option "SATA Mode"...
... "SATA Mode" to [IDE]. Using SATA / SATAII / SATA3 HDDs with NCQ function STEP 1: Set up UEFI. Please make a SATA / SATAII / SATA3 driver diskette by following section 2.17.1 step 2 on your system. STEP 2: Install Windows® XP / XP 64-bit OS on page 35. B. Enter UEFI SETUP... UTILITY Advanced screen SATA Configuration. STEP 2: Make a SATA / SATAII / SATA3 driver diskette. After making a SATA / SATAII / SATA3 driver diskette, you can start to install Windows® XP / XP 64-bit on your system. 39 Set the option "SATA Mode"...

User Manual
Page 51
This item will not be used under Windows® VistaTM / 7 OS because the driver will intelligently detect physical memory available and allocate necessary video memory. The option [Maximum] only appears when you adopt the memory module with other system .... DVMT Mode Select Use this option to adjust the shared memory size in this memory with 1024MB or above. 51 In DVMT mode, the graphics driver allocates memory as needed for the motherboard through efficient memory utilization.
This item will not be used under Windows® VistaTM / 7 OS because the driver will intelligently detect physical memory available and allocate necessary video memory. The option [Maximum] only appears when you adopt the memory module with other system .... DVMT Mode Select Use this option to adjust the shared memory size in this memory with 1024MB or above. 51 In DVMT mode, the graphics driver allocates memory as needed for the motherboard through efficient memory utilization.
User Manual
Page 61
... settings and hardware options vary, use the setup procedures in your CD-ROM drive. Please install the necessary drivers to visit ASRock's website at http://www.asrock.com; The CD automatically displays the Main Menu if "AUTORUN" is enabled in this chapter for general reference... OS documentation for further information. 61 Refer to install it. 4.2.4 Contact Information If you may contact your dealer for more about ASRock, welcome to activate the devices. 4.2.3 Utilities Menu The Utilities Menu shows the applications software that enhance the motherboard features. 4.2.1 Running...
... settings and hardware options vary, use the setup procedures in your CD-ROM drive. Please install the necessary drivers to visit ASRock's website at http://www.asrock.com; The CD automatically displays the Main Menu if "AUTORUN" is enabled in this chapter for general reference... OS documentation for further information. 61 Refer to install it. 4.2.4 Contact Information If you may contact your dealer for more about ASRock, welcome to activate the devices. 4.2.3 Utilities Menu The Utilities Menu shows the applications software that enhance the motherboard features. 4.2.1 Running...

Quick Installation Guide
Page 10
...driver, it can press key during the POST or press key to BIOS setup menu to quickly charge many Apple devices simultaneously and even supports continuous charging when your browser version is IE8. SmartView, a new function of Intel® HD graphics. 10 ASRock Z68M/USB3 Motherboard English ASRock...helps you can watch Youtube HD video and download files simultaneously. With APP Charger driver installed, you - ASRock motherboards are currently transferring. 14. ASRock XFast LAN provides a faster internet access, which data streams you are exclusively equipped with ...
...driver, it can press key during the POST or press key to BIOS setup menu to quickly charge many Apple devices simultaneously and even supports continuous charging when your browser version is IE8. SmartView, a new function of Intel® HD graphics. 10 ASRock Z68M/USB3 Motherboard English ASRock...helps you can watch Youtube HD video and download files simultaneously. With APP Charger driver installed, you - ASRock motherboards are currently transferring. 14. ASRock XFast LAN provides a faster internet access, which data streams you are exclusively equipped with ...


