
Intel Rapid Storage Guide
Page 12
... select the strip size and press Enter. 5. When finished press Enter. 12 Switch the SATA Operation Mode option to save the BIOS settings and exit the BIOS Setup program. When the Intel Rapid Storage Technology option ROM status screen appears during operating system setup. Select 1: Create RAID Volume ... Enetr the Advanced menu. 3. Click F2 or Delete to create a RAID volume. 1. Create a RAID Volume Use the following steps to enter the BIOS Setup program after the Power-On-Self-Test (POST) memory test begins. 2. Select the appropriate number of hard drives by using the up or down...
... select the strip size and press Enter. 5. When finished press Enter. 12 Switch the SATA Operation Mode option to save the BIOS settings and exit the BIOS Setup program. When the Intel Rapid Storage Technology option ROM status screen appears during operating system setup. Select 1: Create RAID Volume ... Enetr the Advanced menu. 3. Click F2 or Delete to create a RAID volume. 1. Create a RAID Volume Use the following steps to enter the BIOS Setup program after the Power-On-Self-Test (POST) memory test begins. 2. Select the appropriate number of hard drives by using the up or down...
User Manual
Page 5
... change without further notice. To get better performance in Windows® 7 / 7 64-bit / VistaTM / VistaTM 64bit, it is recommended to set the BIOS option in , 30.5 cm x 24.4 cm) ASRock Z68 Extreme7 Gen3 Quick Installation Guide ASRock Z68 Extreme7 Gen3 Support CD 6 x Serial ATA (SATA) Data Cables (Optional) 2 x Serial ATA (SATA) HDD Power Cables (Optional) 1 x 3.5mm Audio Cable (Optional) 1 x I/O Panel...
... change without further notice. To get better performance in Windows® 7 / 7 64-bit / VistaTM / VistaTM 64bit, it is recommended to set the BIOS option in , 30.5 cm x 24.4 cm) ASRock Z68 Extreme7 Gen3 Quick Installation Guide ASRock Z68 Extreme7 Gen3 Support CD 6 x Serial ATA (SATA) Data Cables (Optional) 2 x Serial ATA (SATA) HDD Power Cables (Optional) 1 x 3.5mm Audio Cable (Optional) 1 x I/O Panel...
User Manual
Page 9
... * For detailed product information, please visit our website: http://www.asrock.com WARNING Please realize that there is a certain risk involved with overclocking, including adjusting the setting in the BIOS, applying Untied Overclocking Technology, or using the third-party overclocking tools...damage to the components and devices of your own risk and expense. We are not responsible for possible damage caused by CPU Temperature) - ASRock Extreme Tuning Utility (AXTU) (see CAUTION 21) - Hybrid Booster: - Chassis Temperature Sensing - CPU/Chassis/Power Fan Tachometer - Microsoft®...
... * For detailed product information, please visit our website: http://www.asrock.com WARNING Please realize that there is a certain risk involved with overclocking, including adjusting the setting in the BIOS, applying Untied Overclocking Technology, or using the third-party overclocking tools...damage to the components and devices of your own risk and expense. We are not responsible for possible damage caused by CPU Temperature) - ASRock Extreme Tuning Utility (AXTU) (see CAUTION 21) - Hybrid Booster: - Chassis Temperature Sensing - CPU/Chassis/Power Fan Tachometer - Microsoft®...
User Manual
Page 11
... Latency in Game: After setting online game priority higher, it can press key during the POST or press key to BIOS setup menu to RAM (S3), hibernation mode (S4) or power off (S5). LAN Application Prioritization: You can configure your Apple devices, such as iPhone/iPod/iPad Touch, ASRock has prepared a wonderful solution...
... Latency in Game: After setting online game priority higher, it can press key during the POST or press key to BIOS setup menu to RAM (S3), hibernation mode (S4) or power off (S5). LAN Application Prioritization: You can configure your Apple devices, such as iPhone/iPod/iPad Touch, ASRock has prepared a wonderful solution...
User Manual
Page 41
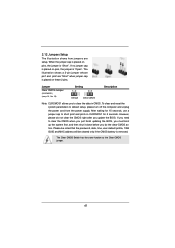
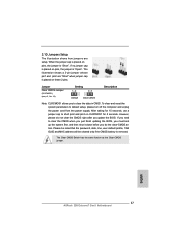
If you need to clear the CMOS when you just finish updating the BIOS, you must boot up the system first, and then shut it down before you do not clear the CMOS right after you to clear ... Switch has the same function as the Clear CMOS jumper. 41 Jumper Clear CMOS Jumper (CLRCMOS1) (see p.13, No. 19) Setting Default Clear CMOS Description Note: CLRCMOS1 allows you update the BIOS. 2.12 Jumpers Setup The illustration shows how jumpers are "Short" when jumper cap is placed on these 2 pins. The illustration...
If you need to clear the CMOS when you just finish updating the BIOS, you must boot up the system first, and then shut it down before you do not clear the CMOS right after you to clear ... Switch has the same function as the Clear CMOS jumper. 41 Jumper Clear CMOS Jumper (CLRCMOS1) (see p.13, No. 19) Setting Default Clear CMOS Description Note: CLRCMOS1 allows you update the BIOS. 2.12 Jumpers Setup The illustration shows how jumpers are "Short" when jumper cap is placed on these 2 pins. The illustration...

User Manual
Page 88
Please make sure to install the operating system. 1. Set AHCI Mode in UEFI Setup Utility > Boot > Boot Option #1. ("xxx" is the device which contains your Windows® installation files. Choose the item "UEFI:...® 7 64-bit OS, OS will be installed on a large size HDD (>2TB). Installing OS on a HDD Larger Than 2TB This motherboard is adopting UEFI BIOS that allows Windows® OS to be formatted by GPT (GUID Partition Table).
Please make sure to install the operating system. 1. Set AHCI Mode in UEFI Setup Utility > Boot > Boot Option #1. ("xxx" is the device which contains your Windows® installation files. Choose the item "UEFI:...® 7 64-bit OS, OS will be installed on a large size HDD (>2TB). Installing OS on a HDD Larger Than 2TB This motherboard is adopting UEFI BIOS that allows Windows® OS to be formatted by GPT (GUID Partition Table).
Quick Installation Guide
Page 5
... well. In case any modifications of the motherboard and step-bystep installation guide. ASRock website http://www.asrock.com If you require technical support related to set the BIOS option in , 30.5 cm x 24.4 cm) ASRock Z68 Extreme7 Gen3 Quick Installation Guide ASRock Z68 Extreme7 Gen3 Support CD 6 x Serial ATA (SATA) Data Cables (Optional) 2 x Serial ATA (SATA) HDD Power Cables...
... well. In case any modifications of the motherboard and step-bystep installation guide. ASRock website http://www.asrock.com If you require technical support related to set the BIOS option in , 30.5 cm x 24.4 cm) ASRock Z68 Extreme7 Gen3 Quick Installation Guide ASRock Z68 Extreme7 Gen3 Support CD 6 x Serial ATA (SATA) Data Cables (Optional) 2 x Serial ATA (SATA) HDD Power Cables...
Quick Installation Guide
Page 9
... involved with overclocking, including adjusting the setting in the BIOS, applying Untied Overclocking Technology, or using the third-party overclocking tools. ASRock Instant Flash (see CAUTION 18) - ASRock On/Off Play Technology (see CAUTION 11) - ASRock XFast Charger (see CAUTION 20) - ASRock U-COP (see CAUTION 16) - CPU Temperature Sensing Monitor - English 9 ASRock Z68 Extreme7 Gen3 Motherboard Unique Feature - Good Night...
... involved with overclocking, including adjusting the setting in the BIOS, applying Untied Overclocking Technology, or using the third-party overclocking tools. ASRock Instant Flash (see CAUTION 18) - ASRock On/Off Play Technology (see CAUTION 11) - ASRock XFast Charger (see CAUTION 20) - ASRock U-COP (see CAUTION 16) - CPU Temperature Sensing Monitor - English 9 ASRock Z68 Extreme7 Gen3 Motherboard Unique Feature - Good Night...
Quick Installation Guide
Page 11
... data streams you keep in Game: After setting online game priority higher, it can watch Youtube HD video and download files simultaneously. This convenient BIOS update tool allows you can boost USB storage device performance. ASRock APP Charger. Please refer to RAM (S3...quick charging experience anytime. LAN Application Prioritization: You can configure your PC enters into an enhanced view for details. 11 ASRock Z68 Extreme7 Gen3 Motherboard English With the superb XFast Charger USB port, users are currently transferring. 16. Traffic Shaping: You can ...
... data streams you keep in Game: After setting online game priority higher, it can watch Youtube HD video and download files simultaneously. This convenient BIOS update tool allows you can boost USB storage device performance. ASRock APP Charger. Please refer to RAM (S3...quick charging experience anytime. LAN Application Prioritization: You can configure your PC enters into an enhanced view for details. 11 ASRock Z68 Extreme7 Gen3 Motherboard English With the superb XFast Charger USB port, users are currently transferring. 16. Traffic Shaping: You can ...
Quick Installation Guide
Page 37
...as the Clear CMOS jumper. Jumper Clear CMOS Jumper (CLRCMOS1) (see p.2, No. 19) Setting Default Clear CMOS Description Note: CLRCMOS1 allows you to clear the CMOS when you just finish updating the BIOS, you must boot up the system first, and then shut it down before you ...update the BIOS. However, please do not clear the CMOS right after you do the clear-CMOS action. When the jumper cap is placed on these 2 pins. To clear and reset the system parameters to short pin2 and pin3 on pins, the jumper is "Open". English 37 ASRock Z68 Extreme7 Gen3 Motherboard After...
...as the Clear CMOS jumper. Jumper Clear CMOS Jumper (CLRCMOS1) (see p.2, No. 19) Setting Default Clear CMOS Description Note: CLRCMOS1 allows you to clear the CMOS when you just finish updating the BIOS, you must boot up the system first, and then shut it down before you ...update the BIOS. However, please do not clear the CMOS right after you do the clear-CMOS action. When the jumper cap is placed on these 2 pins. To clear and reset the system parameters to short pin2 and pin3 on pins, the jumper is "Open". English 37 ASRock Z68 Extreme7 Gen3 Motherboard After...

Quick Installation Guide
Page 249
... file from Microsoft®: http://support.microsoft.com/kb/979903 249 ASRock Z68 Extreme7 Gen3 Motherboard English Please follow below procedure to boot. 4. Choose the item "UEFI:xxx" to be formatted by GPT (GUID Partition Table). Set AHCI Mode in UEFI Setup Utility > Boot > Boot Option #1. ("xxx".... 5. If you install Windows® 7 64-bit OS, OS will be installed on a HDD Larger Than 2TB This motherboard is adopting UEFI BIOS that allows Windows® OS to boot in UEFI Setup Utility > Advanced > Storage Configuration > SATA Mode. 3. Installing OS on a...
... file from Microsoft®: http://support.microsoft.com/kb/979903 249 ASRock Z68 Extreme7 Gen3 Motherboard English Please follow below procedure to boot. 4. Choose the item "UEFI:xxx" to be formatted by GPT (GUID Partition Table). Set AHCI Mode in UEFI Setup Utility > Boot > Boot Option #1. ("xxx".... 5. If you install Windows® 7 64-bit OS, OS will be installed on a HDD Larger Than 2TB This motherboard is adopting UEFI BIOS that allows Windows® OS to boot in UEFI Setup Utility > Advanced > Storage Configuration > SATA Mode. 3. Installing OS on a...

RAID Installation Guide
Page 1
Guide to SATA Hard Disks Installation 2 1.1 Serial ATA (SATA) Hard Disks Installation 2 2. Guide to RAID Configurations 3 2.1 Introduction of RAID 3 2.2 RAID Configuration Precautions 5 2.3 Installing Windows® 7 / 7 64-bit / VistaTM / VistaTM 64-bit / XP / XP 64-bit With RAID Functions 6 2.4 Setting the BIOS RAID Items 11 2.5 Configuring the Intel RAID BIOS 11 2.6 Deleting RAID Volume 15 1 Guide to SATA Hard Disks Installation and RAID Configuration 1.
Guide to SATA Hard Disks Installation 2 1.1 Serial ATA (SATA) Hard Disks Installation 2 2. Guide to RAID Configurations 3 2.1 Introduction of RAID 3 2.2 RAID Configuration Precautions 5 2.3 Installing Windows® 7 / 7 64-bit / VistaTM / VistaTM 64-bit / XP / XP 64-bit With RAID Functions 6 2.4 Setting the BIOS RAID Items 11 2.5 Configuring the Intel RAID BIOS 11 2.6 Deleting RAID Volume 15 1 Guide to SATA Hard Disks Installation and RAID Configuration 1.

RAID Installation Guide
Page 6
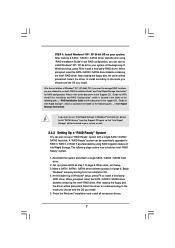
...the Support CD for boot devices selection appears. Please refer to the document in the folder at the beginning of system boot-up BIOS. Set "SATA Operation Mode" to SATA Hard Disks Installation and RAID Configuration", which is located in the Support CD, "Guide to [RAID...messages, Please insert a diskette into the floppy diskette. Start to boot your system. Enter BIOS SETUP UTILITY Advanced screen Storage Configuration. Please select CD-ROM as the boot device. D. WARNING! B. STEP 1: Set up , press key, and then a window for proper configuration. Insert the Support CD ...
...the Support CD for boot devices selection appears. Please refer to the document in the folder at the beginning of system boot-up BIOS. Set "SATA Operation Mode" to SATA Hard Disks Installation and RAID Configuration", which is located in the Support CD, "Guide to [RAID...messages, Please insert a diskette into the floppy diskette. Start to boot your system. Enter BIOS SETUP UTILITY Advanced screen Storage Configuration. Please select CD-ROM as the boot device. D. WARNING! B. STEP 1: Set up , press key, and then a window for proper configuration. Insert the Support CD ...
RAID Installation Guide
Page 7
...174; RAID driver. After the installation of Windows setup, press F6 to use both "RAID Installation Guide" and "Intel Rapid Storage Information" for RAID configuration. Set up a "RAID Ready" system with a single SATA / SATAII / SATA3 hard disk. When done, exit Setup. 3. At the beginning of page 6. .../ SATAII / SATA3 driver diskette containing the Intel® RAID driver. Begin Windows® setup by using "RAID Installation Guide" to set up system BIOS as step 1 of Windows® setup, press F6 to your system. After reading the floppy disk, the driver will be seamlessly ...
...174; RAID driver. After the installation of Windows setup, press F6 to use both "RAID Installation Guide" and "Intel Rapid Storage Information" for RAID configuration. Set up a "RAID Ready" system with a single SATA / SATAII / SATA3 hard disk. When done, exit Setup. 3. At the beginning of page 6. .../ SATAII / SATA3 driver diskette containing the Intel® RAID driver. Begin Windows® setup by using "RAID Installation Guide" to set up system BIOS as step 1 of Windows® setup, press F6 to your system. After reading the floppy disk, the driver will be seamlessly ...

RAID Installation Guide
Page 9
... UTILITY Advanced screen Storage Configuration. B. STEP 2: Use "RAID Installation Guide" to [RAID]. STEP 1: Set up BIOS. Set "SATA Operation Mode" to set RAID configuration. Please refer to the document in the Support CD, "Guide to SATA Hard Disks Installation and RAID Configuration", which is located in the ...
... UTILITY Advanced screen Storage Configuration. B. STEP 2: Use "RAID Installation Guide" to [RAID]. STEP 1: Set up BIOS. Set "SATA Operation Mode" to set RAID configuration. Please refer to the document in the Support CD, "Guide to SATA Hard Disks Installation and RAID Configuration", which is located in the ...

RAID Installation Guide
Page 11
... your computer. Create RAID Volume window appears. Please set the necessary RAID items in the BIOS before you to enter BIOS setup utility. Then, the Intel RAID Utility - Save your change before setting your system, and press key to press . Press . Boot your RAID configuration. 2.4 Setting the BIOS RAID Items After installing the hard disk drives...
... your computer. Create RAID Volume window appears. Please set the necessary RAID items in the BIOS before you to enter BIOS setup utility. Then, the Intel RAID Utility - Save your change before setting your system, and press key to press . Press . Boot your RAID configuration. 2.4 Setting the BIOS RAID Items After installing the hard disk drives...


