
Intel Rapid Storage Guide
Page 12
... method) In order to install an operating system onto a RAID volume, the RAID option must be used to load the Intel® Rapid Storage Technology driver during POST, press Ctrl and i at the same time to create a RAID volume. 1. Create a RAID Volume Use the following steps to enter the option ROM...
... method) In order to install an operating system onto a RAID volume, the RAID option must be used to load the Intel® Rapid Storage Technology driver during POST, press Ctrl and i at the same time to create a RAID volume. 1. Create a RAID Volume Use the following steps to enter the option ROM...

Intel Rapid Storage Guide
Page 13
...to confirm volume creation. 10. Press Enter to load support for mass storage device(s). 2. Press Enter to install a third party SCSI or RAID driver. Select your controller from the list of Windows XP* setup (during operating system setup: 1. Use the up and down arrow keys to install ... Note with the Note necessary files. 4. Press Y to create a floppy disk with a screen asking you have successfully installed the driver and Windows setup should continue. Nothing will then be visible. 6. Select 4: Exit and press Enter. 11. Setup will temporarily continue loading...
...to confirm volume creation. 10. Press Enter to load support for mass storage device(s). 2. Press Enter to install a third party SCSI or RAID driver. Select your controller from the list of Windows XP* setup (during operating system setup: 1. Use the up and down arrow keys to install ... Note with the Note necessary files. 4. Press Y to create a floppy disk with a screen asking you have successfully installed the driver and Windows setup should continue. Nothing will then be visible. 6. Select 4: Exit and press Enter. 11. Setup will temporarily continue loading...

Intel Rapid Storage Guide
Page 16
...supplied hardware support disk into Drive A:, insert a floppy disk containing the following steps to install the Intel® Rapid Storage Technology driver using F6 when in AHCI/RAID mode In order to install an operating system onto a single Serial ATA hard drive when the system... 2. This message appears at the beginning of the operating system. 16 How to load the driver during OS installation using the F6 installation method. 1. Nothing will Note temporarily continue loading drivers. You can use the Floppy Configuration Utility to create a floppy disk with a screen asking ...
...supplied hardware support disk into Drive A:, insert a floppy disk containing the following steps to install the Intel® Rapid Storage Technology driver using F6 when in AHCI/RAID mode In order to install an operating system onto a single Serial ATA hard drive when the system... 2. This message appears at the beginning of the operating system. 16 How to load the driver during OS installation using the F6 installation method. 1. Nothing will Note temporarily continue loading drivers. You can use the Floppy Configuration Utility to create a floppy disk with a screen asking ...

Intel Rapid Storage Guide
Page 17
... need to copy the files again from the floppy to confirm your controller from within Windows, you have successfully installed the Intel Rapid Storage Technology driver and Windows setup should continue. Press Enter. 5. If you wish to run Setup.exe from the list of available SCSI adapters. 4. At this point, you...
... need to copy the files again from the floppy to confirm your controller from within Windows, you have successfully installed the Intel Rapid Storage Technology driver and Windows setup should continue. Press Enter. 5. If you wish to run Setup.exe from the list of available SCSI adapters. 4. At this point, you...

Intel Rapid Storage Guide
Page 18
...in the Drivers64 folder after extraction. To extract these files, run the executable (e.g. How to do unattended install of AHCI/RAID driver on Windows 2000/XP/Server 2003* The unattended method of installation is used for systems using any supported RAID Note controller hub by... , as applicable, into the UNATTEND.TXT file: Systems configured for RAID: This same procedure can be used to install the RAID or AHCI driver via unattended install. 1. Perform the following command line options: -A -A -PC:\, as outlined in the Advanced Installation Instructions section of the README...
...in the Drivers64 folder after extraction. To extract these files, run the executable (e.g. How to do unattended install of AHCI/RAID driver on Windows 2000/XP/Server 2003* The unattended method of installation is used for systems using any supported RAID Note controller hub by... , as applicable, into the UNATTEND.TXT file: Systems configured for RAID: This same procedure can be used to install the RAID or AHCI driver via unattended install. 1. Perform the following command line options: -A -A -PC:\, as outlined in the Advanced Installation Instructions section of the README...

Intel Smart Response Installation Guide
Page 1
...Mode" to show the newly accelerated system configuration. * Intel® will update the new version RST driver in RAID ROM. For all required drivers, including RST storage driver version 10.5 or later. 2. After clicking OK button, SRT will enable automatically, and the RST GUI...Intel Smart Response Technology Installation Guide This motherboard supports Intel Smart Response Technology. For the new version RST driver, please check our website for the latest information: http://www.asrock.com * Before you intend to a RAID mode system, then install all performance testing, chose "Maximized"...
...Mode" to show the newly accelerated system configuration. * Intel® will update the new version RST driver in RAID ROM. For all required drivers, including RST storage driver version 10.5 or later. 2. After clicking OK button, SRT will enable automatically, and the RST GUI...Intel Smart Response Technology Installation Guide This motherboard supports Intel Smart Response Technology. For the new version RST driver, please check our website for the latest information: http://www.asrock.com * Before you intend to a RAID mode system, then install all performance testing, chose "Maximized"...

User Manual
Page 3
...and Quad SLITM Operation Guide 23 2.8 CrossFireXTM, 3-Way CrossFireXTM and Quad CrossFireXTM Operation Guide 27 2.9 Dual Monitor and Surround Display Features 33 2.10 ASRock Smart Remote Installation Guide 36 2.11 Jumpers Setup 37 2.12 Onboard Headers and Connectors 38 2.13 Smart Switches 44 2.14 Dr. Debug 45 ...50 2.18 Hot Plug and Hot Swap Functions for SATA3 HDDs .... 50 2.19 SATA / SATAII / SATA3 HDD Hot Plug Feature and Operation Guide 51 2.20 Driver Installation Guide 53 2.21 Installing Windows® 7 / 7 64-bit / VistaTM / VistaTM 64-bit / XP / XP 64-bit With RAID Functions 53...
...and Quad SLITM Operation Guide 23 2.8 CrossFireXTM, 3-Way CrossFireXTM and Quad CrossFireXTM Operation Guide 27 2.9 Dual Monitor and Surround Display Features 33 2.10 ASRock Smart Remote Installation Guide 36 2.11 Jumpers Setup 37 2.12 Onboard Headers and Connectors 38 2.13 Smart Switches 44 2.14 Dr. Debug 45 ...50 2.18 Hot Plug and Hot Swap Functions for SATA3 HDDs .... 50 2.19 SATA / SATAII / SATA3 HDD Hot Plug Feature and Operation Guide 51 2.20 Driver Installation Guide 53 2.21 Installing Windows® 7 / 7 64-bit / VistaTM / VistaTM 64-bit / XP / XP 64-bit With RAID Functions 53...

User Manual
Page 4
... 75 3.6 Boot Screen 76 3.7 Security Screen 77 3.8 Exit Screen 78 4 Software Support 79 4.1 Install Operating System 79 4.2 Support CD Information 79 4.2.1 Running Support CD 79 4.2.2 Drivers Menu 79 4.2.3 Utilities Menu 79 4.2.4 Contact Information 79 4
... 75 3.6 Boot Screen 76 3.7 Security Screen 77 3.8 Exit Screen 78 4 Software Support 79 4.1 Install Operating System 79 4.2 Support CD Information 79 4.2.1 Running Support CD 79 4.2.2 Drivers Menu 79 4.2.3 Utilities Menu 79 4.2.4 Contact Information 79 4
User Manual
Page 8
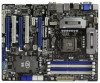
... 9) - AMI UEFI Legal BIOS with LED - 64Mb AMI BIOS - OEM and Trial) - SmartView (see CAUTION 14) - Drivers, Utilities, AntiVirus Software (Trial Version), ASRock Software Suite (CyberLink DVD Suite - SLI/XFire power connector - CPU Core, IGPU, DRAM, PCH, CPU PLL, VTT, VCCSA ...Voltage Multi-adjustment - Instant Boot - Lucid Virtu (see CAUTION 12) - ASRock Instant Flash (see CAUTION 10) - Connector Smart Switch BIOS Feature Support CD Unique Feature - 4 x SATA2 3.0 Gb/s connectors, support RAID (RAID 0,...
... 9) - AMI UEFI Legal BIOS with LED - 64Mb AMI BIOS - OEM and Trial) - SmartView (see CAUTION 14) - Drivers, Utilities, AntiVirus Software (Trial Version), ASRock Software Suite (CyberLink DVD Suite - SLI/XFire power connector - CPU Core, IGPU, DRAM, PCH, CPU PLL, VTT, VCCSA ...Voltage Multi-adjustment - Instant Boot - Lucid Virtu (see CAUTION 12) - ASRock Instant Flash (see CAUTION 10) - Connector Smart Switch BIOS Feature Support CD Unique Feature - 4 x SATA2 3.0 Gb/s connectors, support RAID (RAID 0,...

User Manual
Page 11
...your Facebook friends and your Apple devices, such as iPhone/iPod/iPad Touch, ASRock has prepared a wonderful solution for a more personal Internet experience. If you to perform over-clocking. With APP Charger driver installed, you can press key during the POST or press key to BIOS .... 11. Simply installing the APP Charger driver, it is a BIOS flash utility embedded in touch with friends on the property of internet browser, is IE8. ASRock XFast USB can easily enjoy the marvelous charging experience than ever. ASRock Instant Flash is not recommended to quickly ...
...your Facebook friends and your Apple devices, such as iPhone/iPod/iPad Touch, ASRock has prepared a wonderful solution for a more personal Internet experience. If you to perform over-clocking. With APP Charger driver installed, you can press key during the POST or press key to BIOS .... 11. Simply installing the APP Charger driver, it is a BIOS flash utility embedded in touch with friends on the property of internet browser, is IE8. ASRock XFast USB can easily enjoy the marvelous charging experience than ever. ASRock Instant Flash is not recommended to quickly ...

User Manual
Page 23
... ed. Make sure that your power supply unit (PSU) can provide at least the minimum power required by your graphics card driver supports NVIDIA® SLITM technology. Step2. It is recommended to NVIDIA® website for details. 2.7.1 Graphics Card Setup 2.7.1.1 ...Installing Two SLITM-Ready Graphics Cards Step 1. Download the driver from NVIDIA® website (www.nvidia.com). 3. NVIDIA® Quad SLITM technology support Windows® VistaTM / VistaTM 64-bit / 7 / 7...
... ed. Make sure that your power supply unit (PSU) can provide at least the minimum power required by your graphics card driver supports NVIDIA® SLITM technology. Step2. It is recommended to NVIDIA® website for details. 2.7.1 Graphics Card Setup 2.7.1.1 ...Installing Two SLITM-Ready Graphics Cards Step 1. Download the driver from NVIDIA® website (www.nvidia.com). 3. NVIDIA® Quad SLITM technology support Windows® VistaTM / VistaTM 64-bit / 7 / 7...

User Manual
Page 25
...) A. From the pop-up menu, select Set SLI and PhysX configuration. And click Apply. D. Reboot your Windows® taskbar. 2.7.2 Driver Installation and Setup Install the graphics card drivers to enable the multi-GPU feature. In Set PhysX GPU acceleration item, please select Enabled. C. Please follow the below procedures to your...
...) A. From the pop-up menu, select Set SLI and PhysX configuration. And click Apply. D. Reboot your Windows® taskbar. 2.7.2 Driver Installation and Setup Install the graphics card drivers to enable the multi-GPU feature. In Set PhysX GPU acceleration item, please select Enabled. C. Please follow the below procedures to your...

User Manual
Page 27
... Ready graphics card, a CrossFireXTM Ready motherboard and a CrossFireXTM Edition co-processor graphics card, must be installed correctly to ATITM graphics card manuals for ATITM CrossFireXTM driver updates. 1. Please check AMD website for detailed installation guide. If you pair a 12-pipe CrossFireXTM Edition card with Windows® VistaTM / 7 OS only. For other...
... Ready graphics card, a CrossFireXTM Ready motherboard and a CrossFireXTM Edition co-processor graphics card, must be installed correctly to ATITM graphics card manuals for ATITM CrossFireXTM driver updates. 1. Please check AMD website for detailed installation guide. If you pair a 12-pipe CrossFireXTM Edition card with Windows® VistaTM / 7 OS only. For other...

User Manual
Page 31
...174; XP OS: A. ATI Catalyst Control Center Step 6. Click "View", select "CrossFireXTM", and then check the item "Enable CrossFireXTM". 2.8.2 Driver Installation and Setup Step 1. Power on your system, there is an optional download. For Windows® 7 / VistaTM OS: Install the CATALYST..." and click "Apply" (if you will nd "ATI Catalyst Control Center" on your computer. Please check Microsoft website for ATITM driver updates. Please check AMD website for details. The Catalyst Uninstaller is no need to downloading and installing the CATALYST Control Center. Step ...
...174; XP OS: A. ATI Catalyst Control Center Step 6. Click "View", select "CrossFireXTM", and then check the item "Enable CrossFireXTM". 2.8.2 Driver Installation and Setup Step 1. Power on your system, there is an optional download. For Windows® 7 / VistaTM OS: Install the CATALYST..." and click "Apply" (if you will nd "ATI Catalyst Control Center" on your computer. Please check Microsoft website for ATITM driver updates. Please check AMD website for details. The Catalyst Uninstaller is no need to downloading and installing the CATALYST Control Center. Step ...

User Manual
Page 33
... and DisplayPort to this motherboard. VGA/D-Sub port DisplayPort VGA/DVI-D port HDMI port 2. If you haven't installed onboard VGA driver yet, please install onboard VGA driver from our support CD to your system already, you can easily enjoy the bene ts of dual monitor feature without installing any add... drive same or different display contents. With the internal VGA output support (DVI-D, D-Sub, HDMI and DisplayPort), you have installed onboard VGA driver from our support CD to HDMI port on the I /O panel. To enable dual monitor feature, please follow the below steps: 1.
... and DisplayPort to this motherboard. VGA/D-Sub port DisplayPort VGA/DVI-D port HDMI port 2. If you haven't installed onboard VGA driver yet, please install onboard VGA driver from our support CD to your system already, you can easily enjoy the bene ts of dual monitor feature without installing any add... drive same or different display contents. With the internal VGA output support (DVI-D, D-Sub, HDMI and DisplayPort), you have installed onboard VGA driver from our support CD to HDMI port on the I /O panel. To enable dual monitor feature, please follow the below steps: 1.

User Manual
Page 34
... connect DisplayPort monitor cable to the steps below. B. Right-click the display icon in the Display Properties dialog that you have installed the drivers already, there is no need to page 22 for proper expansion card installation procedures for the second monitor. Click "Extend my Windows desktop ...Memory", [Auto], will be designated as appropriate for details. 2. Click "Apply" or "OK" to enter UEFI setup. Install the onboard VGA driver and the add-on VGA card is less than the total capability of surround display feature. C. If you wish to be Primary, and all ...
... connect DisplayPort monitor cable to the steps below. B. Right-click the display icon in the Display Properties dialog that you have installed the drivers already, there is no need to page 22 for proper expansion card installation procedures for the second monitor. Click "Extend my Windows desktop ...Memory", [Auto], will be designated as appropriate for details. 2. Click "Apply" or "OK" to enter UEFI setup. Install the onboard VGA driver and the add-on VGA card is less than the total capability of surround display feature. C. If you wish to be Primary, and all ...

User Manual
Page 47
... Bridge module speci c) ACPI module initialization CSM initialization Reserved for future AMI DXE codes OEM DXE initialization codes Boot Device Selection (BDS) phase is started Driver connecting is started PCI Bus initialization is started PCI Bus Hot Plug Controller Initialization PCI Bus Enumeration PCI Bus Request Resources PCI Bus Assign Resources...
... Bridge module speci c) ACPI module initialization CSM initialization Reserved for future AMI DXE codes OEM DXE initialization codes Boot Device Selection (BDS) phase is started Driver connecting is started PCI Bus initialization is started PCI Bus Hot Plug Controller Initialization PCI Bus Enumeration PCI Bus Request Resources PCI Bus Assign Resources...

User Manual
Page 51
... SATA3 HDD can support Hot Plug function from the motherboard gift box pack. Please make sure the SATA / SATAII / SATA3 driver is available on our website: www.asrock.com 2. Even some SATA / SATAII / SATA3 HDDs provide both SATA 15-pin power connector and IDE 1x4-pin conventional power ... support Hot Plug function, will cause the HDD damage and data loss. Points of Hot Plug feature carefully. The latest SATA / SATAII / SATA3 driver is installed into system properly. A. 7-pin SATA data cable B. Without SATA 15-pin power connector interface, the SATA / SATAII / SATA3 Hot Plug...
... SATA3 HDD can support Hot Plug function from the motherboard gift box pack. Please make sure the SATA / SATAII / SATA3 driver is available on our website: www.asrock.com 2. Even some SATA / SATAII / SATA3 HDDs provide both SATA 15-pin power connector and IDE 1x4-pin conventional power ... support Hot Plug function, will cause the HDD damage and data loss. Points of Hot Plug feature carefully. The latest SATA / SATAII / SATA3 driver is installed into system properly. A. 7-pin SATA data cable B. Without SATA 15-pin power connector interface, the SATA / SATAII / SATA3 Hot Plug...
User Manual
Page 53
...RAID Functions If you see these messages, Please insert a diskette into your optical drive to format the oppy diskette and copy SATA / SATAII / SATA3 drivers into the oppy drive, and press . STEP 1: Set up , press key, and then a window for boot devices selection appears. Enter UEFI ...your SATA / SATAII / SATA3 HDDs with RAID functions, please follow the order from up to bottom side to generate Serial ATA driver diskette [YN]?", press . WARNING! Then, the drivers compatible to format and copy files [YN]? Set the option "SATA Mode" to your optical drive rst. C. Therefore...
...RAID Functions If you see these messages, Please insert a diskette into your optical drive to format the oppy diskette and copy SATA / SATAII / SATA3 drivers into the oppy drive, and press . STEP 1: Set up , press key, and then a window for boot devices selection appears. Enter UEFI ...your SATA / SATAII / SATA3 HDDs with RAID functions, please follow the order from up to bottom side to generate Serial ATA driver diskette [YN]?", press . WARNING! Then, the drivers compatible to format and copy files [YN]? Set the option "SATA Mode" to your optical drive rst. C. Therefore...
User Manual
Page 54
...with a single SATA / SATAII / SATA3 hard disk. When prompted, insert the SATA / SATAII / SATA3 driver diskette containing the Intel® RAID driver. After reading the oppy disk, the driver will be installed to your system. Please refer to the document in the Support CD, "Guide to SATA Hard... "Intel Rapid Storage" in the Support CD for RAID con guration. When prompted, insert the SATA / SATAII / SATA3 driver diskette containing the Intel® RAID driver. The following path: .. \ Intel Rapid Storage Information If you need to check the installation guide in Windows® environment...
...with a single SATA / SATAII / SATA3 hard disk. When prompted, insert the SATA / SATAII / SATA3 driver diskette containing the Intel® RAID driver. After reading the oppy disk, the driver will be installed to your system. Please refer to the document in the Support CD, "Guide to SATA Hard... "Intel Rapid Storage" in the Support CD for RAID con guration. When prompted, insert the SATA / SATAII / SATA3 driver diskette containing the Intel® RAID driver. The following path: .. \ Intel Rapid Storage Information If you need to check the installation guide in Windows® environment...


