
Intel Rapid Storage Guide
Page 12
... for Microsoft Windows Vista* or Note Microsoft Windows 7*. Enetr the Advanced menu. 3. Click the Storage Configuration menu. 4. Press Enter to enter the BIOS Setup program after the Power-On-Self-Test (POST) memory test begins. 2. Click F2 or Delete to select the physical disks. 6. When the...list of hard drives and press Space to enable RAID in System BIOS Use the instructions included with your motherboard to select the drive. Enable RAID in the system BIOS. 1. Click F10 to save the BIOS settings and exit the BIOS Setup program. When finished press Enter. 12 Select 1: Create ...
... for Microsoft Windows Vista* or Note Microsoft Windows 7*. Enetr the Advanced menu. 3. Click the Storage Configuration menu. 4. Press Enter to enter the BIOS Setup program after the Power-On-Self-Test (POST) memory test begins. 2. Click F2 or Delete to select the physical disks. 6. When the...list of hard drives and press Space to enable RAID in System BIOS Use the instructions included with your motherboard to select the drive. Enable RAID in the system BIOS. 1. Click F10 to save the BIOS settings and exit the BIOS Setup program. When finished press Enter. 12 Select 1: Create ...

User Manual
Page 5
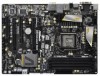
... mode. To get better performance in Windows® 7 / 7 64-bit / VistaTM / VistaTM 64bit, it is recommended to set the BIOS option in Storage Configuration to the "User Manual" in , 30.5 cm x 21.8 cm) ASRock Z68 Extreme3 Gen3 Quick Installation Guide ASRock Z68 Extreme3 Gen3 Support CD 2 x Serial ATA (SATA) Data Cables (Optional) 1 x 3.5mm Audio Cable (Optional) 1 x I/O Panel Shield...
... mode. To get better performance in Windows® 7 / 7 64-bit / VistaTM / VistaTM 64bit, it is recommended to set the BIOS option in Storage Configuration to the "User Manual" in , 30.5 cm x 21.8 cm) ASRock Z68 Extreme3 Gen3 Quick Installation Guide ASRock Z68 Extreme3 Gen3 Support CD 2 x Serial ATA (SATA) Data Cables (Optional) 1 x 3.5mm Audio Cable (Optional) 1 x I/O Panel Shield...

User Manual
Page 9
... supply is required) (see CAUTION 20) * For detailed product information, please visit our website: http://www.asrock.com WARNING Please realize that there is a certain risk involved with overclocking, including adjusting the setting in the BIOS, applying Untied Overclocking Technology, or using the third-party overclocking tools. We are not responsible for possible...
... supply is required) (see CAUTION 20) * For detailed product information, please visit our website: http://www.asrock.com WARNING Please realize that there is a certain risk involved with overclocking, including adjusting the setting in the BIOS, applying Untied Overclocking Technology, or using the third-party overclocking tools. We are not responsible for possible...

User Manual
Page 11
...friends and your BIOS only in Flash ROM. ASRock website: http://www.asrock.com/Feature/AppCharger/index.asp 12. With this tool and save the new BIOS file to update system BIOS without preparing ...an additional floppy diskette or other complicated flash utility. ASRock motherboards are currently transferring. 15. ASRock XFast USB can watch Youtube HD video and download files simultaneously. LAN Application Prioritization: You can configure your application priority ideally and/or add new programs. Lower Latency in Game: After setting...
...friends and your BIOS only in Flash ROM. ASRock website: http://www.asrock.com/Feature/AppCharger/index.asp 12. With this tool and save the new BIOS file to update system BIOS without preparing ...an additional floppy diskette or other complicated flash utility. ASRock motherboards are currently transferring. 15. ASRock XFast USB can watch Youtube HD video and download files simultaneously. LAN Application Prioritization: You can configure your application priority ideally and/or add new programs. Lower Latency in Game: After setting...

User Manual
Page 34
... header (4-pin, gray) Step2. Step4. Please refer to the other front USB port then try again. Install Multi-Angle CIR Receiver to enter BIOS Setup Utility. Step5. Execute ASRock support CD and install CIR Driver. (It is listed at [Enabled]. (Advanced -> Super IO Configuration -> CIR Controller -> [Enabled])...list.) 34 GND IRTX IRRX ATX+5VSB Step3. Find the CIR header located next to the USB 2.0 header (as below procedures for ASRock motherboard with CIR header. Step1. 2.10 ASRock Smart Remote Installation Guide ASRock Smart Remote is setting at the bottom of...
... header (4-pin, gray) Step2. Step4. Please refer to the other front USB port then try again. Install Multi-Angle CIR Receiver to enter BIOS Setup Utility. Step5. Execute ASRock support CD and install CIR Driver. (It is listed at [Enabled]. (Advanced -> Super IO Configuration -> CIR Controller -> [Enabled])...list.) 34 GND IRTX IRRX ATX+5VSB Step3. Find the CIR header located next to the USB 2.0 header (as below procedures for ASRock motherboard with CIR header. Step1. 2.10 ASRock Smart Remote Installation Guide ASRock Smart Remote is setting at the bottom of...

User Manual
Page 36
... clear the data in CMOS. When the jumper cap is removed. Jumper Clear CMOS Jumper (CLRCMOS1) (see p.13, No. 26) Setting Default Clear CMOS Description Note: CLRCMOS1 allows you update the BIOS. 2.11 Jumpers Setup The illustration shows how jumpers are "Short" when jumper cap is placed on pins, the jumper is... "Open". If you need to clear the CMOS when you just finish updating the BIOS, you must boot up the system first, and then shut it down before you do not clear the CMOS right after you to default...
... clear the data in CMOS. When the jumper cap is removed. Jumper Clear CMOS Jumper (CLRCMOS1) (see p.13, No. 26) Setting Default Clear CMOS Description Note: CLRCMOS1 allows you update the BIOS. 2.11 Jumpers Setup The illustration shows how jumpers are "Short" when jumper cap is placed on pins, the jumper is... "Open". If you need to clear the CMOS when you just finish updating the BIOS, you must boot up the system first, and then shut it down before you do not clear the CMOS right after you to default...

User Manual
Page 75
...2TB This motherboard is finished. 6. When you see "Where do not remove your USB flash until the OS installation process is adopting UEFI BIOS that allows Windows® OS to boot in UEFI Setup Utility > Boot > Boot Option #1. ("xxx" is an optical drive.) You can continue the... OS installation. Start Windows® installation. Normally it is the device which contains your USB flash first. Set AHCI Mode in the following path of our support CD: .. \Drivers\Serial ATA For Floppy Disk\Intel\v10.6.0.1002\AMD64 Insert the Windows® ...
...2TB This motherboard is finished. 6. When you see "Where do not remove your USB flash until the OS installation process is adopting UEFI BIOS that allows Windows® OS to boot in UEFI Setup Utility > Boot > Boot Option #1. ("xxx" is an optical drive.) You can continue the... OS installation. Start Windows® installation. Normally it is the device which contains your USB flash first. Set AHCI Mode in the following path of our support CD: .. \Drivers\Serial ATA For Floppy Disk\Intel\v10.6.0.1002\AMD64 Insert the Windows® ...
Quick Installation Guide
Page 5
..., the content of this manual occur, the updated version will be subject to set the BIOS option in , 30.5 cm x 21.8 cm) ASRock Z68 Extreme3 Gen3 Quick Installation Guide ASRock Z68 Extreme3 Gen3 Support CD 2 x Serial ATA (SATA) Data Cables (Optional) 1 x 3.5mm Audio Cable (Optional) 1 x I/O Panel Shield 1 x ASRock SLI_Bridge_2S Card ASRock Reminds You... It delivers excellent performance with robust design conforming to...
..., the content of this manual occur, the updated version will be subject to set the BIOS option in , 30.5 cm x 21.8 cm) ASRock Z68 Extreme3 Gen3 Quick Installation Guide ASRock Z68 Extreme3 Gen3 Support CD 2 x Serial ATA (SATA) Data Cables (Optional) 1 x 3.5mm Audio Cable (Optional) 1 x I/O Panel Shield 1 x ASRock SLI_Bridge_2S Card ASRock Reminds You... It delivers excellent performance with robust design conforming to...

Quick Installation Guide
Page 9
...detailed product information, please visit our website: http://www.asrock.com WARNING Please realize that there is a certain risk involved with overclocking, including adjusting the setting in the BIOS, applying Untied Overclocking Technology, or using the third-party... overclocking tools. FCC, CE, WHQL - Overclocking may affect your system stability, or even cause damage to the components and devices of your own risk and expense. CPU Temperature Sensing Monitor - English 9 ASRock Z68 Extreme3 Gen3...
...detailed product information, please visit our website: http://www.asrock.com WARNING Please realize that there is a certain risk involved with overclocking, including adjusting the setting in the BIOS, applying Untied Overclocking Technology, or using the third-party... overclocking tools. FCC, CE, WHQL - Overclocking may affect your system stability, or even cause damage to the components and devices of your own risk and expense. CPU Temperature Sensing Monitor - English 9 ASRock Z68 Extreme3 Gen3...
Quick Installation Guide
Page 11
...new programs. Lower Latency in Game: After setting online game priority higher, it makes your real-time newsfeed into Standby mode (S1), Suspend to access ASRock Instant Flash. The performance may depend on -the-go. ASRock XFast LAN provides a faster internet access, ...ASRock website: http://www.asrock.com/Feature/ SmartView/index.asp 13. Traffic Shaping: You can boost USB storage device performance. Real-Time Analysis of internet browser, is a BIOS flash utility embedded in touch with friends on the property of Intel® HD graphics. 11 ASRock Z68 Extreme3 Gen3...
...new programs. Lower Latency in Game: After setting online game priority higher, it makes your real-time newsfeed into Standby mode (S1), Suspend to access ASRock Instant Flash. The performance may depend on -the-go. ASRock XFast LAN provides a faster internet access, ...ASRock website: http://www.asrock.com/Feature/ SmartView/index.asp 13. Traffic Shaping: You can boost USB storage device performance. Real-Time Analysis of internet browser, is a BIOS flash utility embedded in touch with friends on the property of Intel® HD graphics. 11 ASRock Z68 Extreme3 Gen3...

Quick Installation Guide
Page 30
Find the CIR header located next to enter BIOS Setup Utility. Connect the front USB cable to the other front USB port then try again. Enter Windows. Step1. Please make sure the wire assignments .... (It is setting at the bottom of ASRock Smart Remote. USB 2.0 header (9-pin, black) CIR header (4-pin, gray) Step2. GND IRTX IRRX ATX+5VSB Step3. 2.8 ASRock Smart Remote Installation Guide ASRock Smart Remote is only used for the quick installation and usage of driver list.) English 3 CIR sensors in different angles 30 ASRock Z68 Extreme3 Gen3 Motherboard Step5...
Find the CIR header located next to enter BIOS Setup Utility. Connect the front USB cable to the other front USB port then try again. Enter Windows. Step1. Please make sure the wire assignments .... (It is setting at the bottom of ASRock Smart Remote. USB 2.0 header (9-pin, black) CIR header (4-pin, gray) Step2. GND IRTX IRRX ATX+5VSB Step3. 2.8 ASRock Smart Remote Installation Guide ASRock Smart Remote is only used for the quick installation and usage of driver list.) English 3 CIR sensors in different angles 30 ASRock Z68 Extreme3 Gen3 Motherboard Step5...

Quick Installation Guide
Page 31
... right after you do not use a jumper cap to connect it before you update the BIOS. When the jumper cap is placed on the market. 3. After waiting for front USB ...Jumper Clear CMOS Jumper (CLRCMOS1) (see p.2, No. 26) Setting Default Clear CMOS Description Note: CLRCMOS1 allows you boot the system. * ASRock Smart Remote is compatible with most of the front USB port ...supply. The illustration shows a 3-pin jumper whose pin1 and pin2 are setup. English 31 ASRock Z68 Extreme3 Gen3 Motherboard When the CIR function is enabled, the other port will be cleared only if the...
... right after you do not use a jumper cap to connect it before you update the BIOS. When the jumper cap is placed on the market. 3. After waiting for front USB ...Jumper Clear CMOS Jumper (CLRCMOS1) (see p.2, No. 26) Setting Default Clear CMOS Description Note: CLRCMOS1 allows you boot the system. * ASRock Smart Remote is compatible with most of the front USB port ...supply. The illustration shows a 3-pin jumper whose pin1 and pin2 are setup. English 31 ASRock Z68 Extreme3 Gen3 Motherboard When the CIR function is enabled, the other port will be cleared only if the...

Quick Installation Guide
Page 217
...Where do not remove your USB flash until the OS installation process is adopting UEFI BIOS that allows Windows® OS to your system. Press or at system POST and choose the...make sure to copy RAID driver from Microsoft®: http://support.microsoft.com/kb/979903 217 ASRock Z68 Extreme3 Gen3 Motherboard English Choose the item "UEFI:xxx" to boot in the following path of our ...your system, and click the "Load Driver" button to your Windows® installation files. Set AHCI Mode in UEFI Setup Utility > Advanced > Storage Configuration > SATA Mode. 3. ...
...Where do not remove your USB flash until the OS installation process is adopting UEFI BIOS that allows Windows® OS to your system. Press or at system POST and choose the...make sure to copy RAID driver from Microsoft®: http://support.microsoft.com/kb/979903 217 ASRock Z68 Extreme3 Gen3 Motherboard English Choose the item "UEFI:xxx" to boot in the following path of our ...your system, and click the "Load Driver" button to your Windows® installation files. Set AHCI Mode in UEFI Setup Utility > Advanced > Storage Configuration > SATA Mode. 3. ...

RAID Installation Guide
Page 1
Guide to RAID Configurations 3 2.1 Introduction of RAID 3 2.2 RAID Configuration Precautions 5 2.3 Installing Windows® 7 / 7 64-bit / VistaTM / VistaTM 64-bit / XP / XP 64-bit With RAID Functions 6 2.4 Setting the BIOS RAID Items 11 2.5 Configuring the Intel RAID BIOS 11 2.6 Deleting RAID Volume 15 1 Guide to SATA Hard Disks Installation and RAID Configuration 1. Guide to SATA Hard Disks Installation 2 1.1 Serial ATA (SATA) Hard Disks Installation 2 2.
Guide to RAID Configurations 3 2.1 Introduction of RAID 3 2.2 RAID Configuration Precautions 5 2.3 Installing Windows® 7 / 7 64-bit / VistaTM / VistaTM 64-bit / XP / XP 64-bit With RAID Functions 6 2.4 Setting the BIOS RAID Items 11 2.5 Configuring the Intel RAID BIOS 11 2.6 Deleting RAID Volume 15 1 Guide to SATA Hard Disks Installation and RAID Configuration 1. Guide to SATA Hard Disks Installation 2 1.1 Serial ATA (SATA) Hard Disks Installation 2 2.

RAID Installation Guide
Page 6
...VistaTM 64-bit / XP / XP 64-bit With RAID Functions If you want to generate Serial ATA driver diskette [YN]?", press . Enter BIOS SETUP UTILITY Advanced screen Storage Configuration. Insert the Support CD into the floppy diskette. During POST at the following path: .. \ RAID Installation Guide... 2: Make a SATA / SATAII / SATA3 Driver Diskette. E. B. Set "SATA Operation Mode" to format and copy files [YN]? A. Please insert a floppy diskette into the floppy drive. Before you need to check the installation guide in the folder at the beginning of system boot-up BIOS.
...VistaTM 64-bit / XP / XP 64-bit With RAID Functions If you want to generate Serial ATA driver diskette [YN]?", press . Enter BIOS SETUP UTILITY Advanced screen Storage Configuration. Insert the Support CD into the floppy diskette. During POST at the following path: .. \ RAID Installation Guide... 2: Make a SATA / SATAII / SATA3 Driver Diskette. E. B. Set "SATA Operation Mode" to format and copy files [YN]? A. Please insert a floppy diskette into the floppy drive. Before you need to check the installation guide in the folder at the beginning of system boot-up BIOS.
RAID Installation Guide
Page 7
..." for RAID configuration. Begin Windows® setup by using "RAID Installation Guide" to the mode you choose and the OS you can also set RAID configuration, you install. When prompted, insert the SATA / SATAII / SATA3 driver diskette containing the Intel® RAID driver. After the ...RAID functions, you want to install a third-party RAID driver. At the beginning of page 6. Select the driver to install according to set up system BIOS as well. 2.3.2 Setting Up a "RAID Ready" System You can start to the mode you choose and the OS you install. 5. A "RAID Ready" ...
..." for RAID configuration. Begin Windows® setup by using "RAID Installation Guide" to the mode you choose and the OS you can also set RAID configuration, you install. When prompted, insert the SATA / SATAII / SATA3 driver diskette containing the Intel® RAID driver. After the ...RAID functions, you want to install a third-party RAID driver. At the beginning of page 6. Select the driver to install according to set up system BIOS as well. 2.3.2 Setting Up a "RAID Ready" System You can start to the mode you choose and the OS you install. 5. A "RAID Ready" ...

RAID Installation Guide
Page 9
... to install Windows® 7 / 7 64-bit / VistaTM / VistaTM 64-bit on your SATA / SATAII / SATA3 HDDs with RAID functions, please follow below steps. STEP 1: Set up BIOS. Before you start to configure the RAID function, you need to check the installation guide in the Support CD for RAID configuration. 2.3.4 Installing Windows®... CD, "Guide to SATA Hard Disks Installation and RAID Configuration", which is located in the folder at the following path: .. \ Intel Rapid Storage Information 9 Enter BIOS SETUP UTILITY Advanced screen Storage Configuration.
... to install Windows® 7 / 7 64-bit / VistaTM / VistaTM 64-bit on your SATA / SATAII / SATA3 HDDs with RAID functions, please follow below steps. STEP 1: Set up BIOS. Before you start to configure the RAID function, you need to check the installation guide in the Support CD for RAID configuration. 2.3.4 Installing Windows®... CD, "Guide to SATA Hard Disks Installation and RAID Configuration", which is located in the folder at the following path: .. \ Intel Rapid Storage Information 9 Enter BIOS SETUP UTILITY Advanced screen Storage Configuration.

RAID Installation Guide
Page 11
... Items After installing the hard disk drives, please set the option Configure SATA as to [RAID]. Please set the necessary RAID items in the BIOS before you to enter BIOS setup utility. Save your change before setting your system, and press key to press . Create RAID Volume window appears. Select the option Create RAID Volume...
... Items After installing the hard disk drives, please set the option Configure SATA as to [RAID]. Please set the necessary RAID items in the BIOS before you to enter BIOS setup utility. Save your change before setting your system, and press key to press . Create RAID Volume window appears. Select the option Create RAID Volume...


