
User Manual
Page 4
... 2.4 Expansion Slots (PCI Express Slots) 17 2.5 Jumpers Setup 18 2.6 Onboard Headers and Connectors 19 2.7 CrossFireXTM and Quad CrossFireXTM Operation Guide 23 2.7.2 Driver Installation and Setup 25 2.8 M.2_SSD (NGFF) Module Installation Guide 26 Chapter 3 Software and Utilities Operation 29 3.1 Installing Drivers 29 3.2 A-Tuning 30 3.3 ASRock Live Update & APP Shop 34 3.3.1 UI Overview 34 3.3.2 Apps 35
... 2.4 Expansion Slots (PCI Express Slots) 17 2.5 Jumpers Setup 18 2.6 Onboard Headers and Connectors 19 2.7 CrossFireXTM and Quad CrossFireXTM Operation Guide 23 2.7.2 Driver Installation and Setup 25 2.8 M.2_SSD (NGFF) Module Installation Guide 26 Chapter 3 Software and Utilities Operation 29 3.1 Installing Drivers 29 3.2 A-Tuning 30 3.3 ASRock Live Update & APP Shop 34 3.3.1 UI Overview 34 3.3.2 Apps 35
User Manual
Page 5
3.3.3 BIOS & Drivers 38 3.3.4 Setting 39 3.4 Enabling USB Ports for Windows® 7 Installation 40 Chapter 4 UEFI SETUP UTILITY 43 4.1 Introduction 43 4.1.1 UEFI Menu Bar 43 4.1.2 Navigation Keys 44 4.2 Main Screen 45 4.3 OC Tweaker Screen 46 4.4 Advanced Screen 54 4.4.1 ...
3.3.3 BIOS & Drivers 38 3.3.4 Setting 39 3.4 Enabling USB Ports for Windows® 7 Installation 40 Chapter 4 UEFI SETUP UTILITY 43 4.1 Introduction 43 4.1.1 UEFI Menu Bar 43 4.1.2 Navigation Keys 44 4.2 Main Screen 45 4.3 OC Tweaker Screen 46 4.4 Advanced Screen 54 4.4.1 ...
User Manual
Page 6
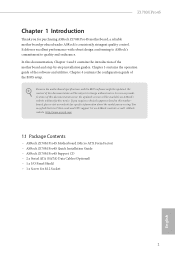
... operation guide of the BIOS setup. If you require technical support related to quality and endurance. ASRock website http://www.asrock.com. 1.1 Package Contents • ASRock Z170M Pro4S Motherboard (Micro ATX Form Factor) • ASRock Z170M Pro4S Quick Installation Guide • ASRock Z170M Pro4S Support CD • 2 x Serial ATA (SATA) Data Cables (Optional) • 1 x I/O Panel Shield • 1 x Screw for...
... operation guide of the BIOS setup. If you require technical support related to quality and endurance. ASRock website http://www.asrock.com. 1.1 Package Contents • ASRock Z170M Pro4S Motherboard (Micro ATX Form Factor) • ASRock Z170M Pro4S Quick Installation Guide • ASRock Z170M Pro4S Support CD • 2 x Serial ATA (SATA) Data Cables (Optional) • 1 x I/O Panel Shield • 1 x Screw for...
User Manual
Page 10
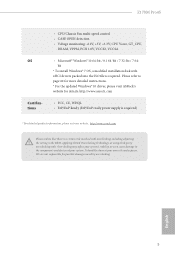
... 40 for more detailed instructions. * For the updated Windows® 10 driver, please visit ASRock's website for possible damage caused by overclocking. Z170M Pro4S OS Certiications • CPU/Chassis Fan multi-speed control • CASE OPEN detection •... Voltage monitoring: +12V, +5V, +3.3V, CPU Vcore, GT_CPU, DRAM, VPPM, PCH 1.0V, VCCIO, VCCSA • Microsot® Windows® 10 64-bit / 8.1 64-bit / 7 32-bit / 7 64bit * To install Windows® 7 OS, a modiied installation...
... 40 for more detailed instructions. * For the updated Windows® 10 driver, please visit ASRock's website for possible damage caused by overclocking. Z170M Pro4S OS Certiications • CPU/Chassis Fan multi-speed control • CASE OPEN detection •... Voltage monitoring: +12V, +5V, +3.3V, CPU Vcore, GT_CPU, DRAM, VPPM, PCH 1.0V, VCCIO, VCCSA • Microsot® Windows® 10 64-bit / 8.1 64-bit / 7 32-bit / 7 64bit * To install Windows® 7 OS, a modiied installation...
User Manual
Page 15
... the components. • Hold components by the edges and do not touch the ICs. • Whenever you install the motherboard, study the coniguration of the following precautions before installing or removing the motherboard components. Pre-installation Precautions Take note of your chassis to ensure that comes with the components. • When placing screws..., please do so may damage the motherboard. 10 English Before you uninstall any motherboard settings. • Make sure to do not overtighten the screws! Chapter 2 Installation his is a Micro ATX form factor motherboard.
... the components. • Hold components by the edges and do not touch the ICs. • Whenever you install the motherboard, study the coniguration of the following precautions before installing or removing the motherboard components. Pre-installation Precautions Take note of your chassis to ensure that comes with the components. • When placing screws..., please do so may damage the motherboard. 10 English Before you uninstall any motherboard settings. • Make sure to do not overtighten the screws! Chapter 2 Installation his is a Micro ATX form factor motherboard.
User Manual
Page 16
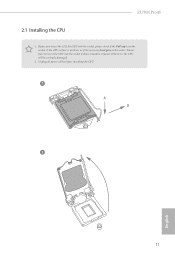
Otherwise, the CPU will be seriously damaged. 2. Unplug all power cables before installing the CPU. 1 A B 2 11 English Do not force to insert the CPU into the socket, please check if the PnP cap is on the socket, if the CPU surface is found. Before you insert the 1151-Pin CPU into the socket if above situation is unclean, or if there are any bent pins in the socket. Z170M Pro4S 2.1 Installing the CPU 1.
Otherwise, the CPU will be seriously damaged. 2. Unplug all power cables before installing the CPU. 1 A B 2 11 English Do not force to insert the CPU into the socket, please check if the PnP cap is on the socket, if the CPU surface is found. Before you insert the 1151-Pin CPU into the socket if above situation is unclean, or if there are any bent pins in the socket. Z170M Pro4S 2.1 Installing the CPU 1.
User Manual
Page 19
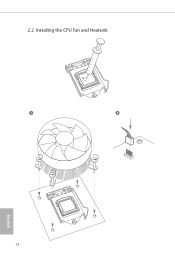
2.2 Installing the CPU Fan and Heatsink 1 2 CPU_FAN English 14
2.2 Installing the CPU Fan and Heatsink 1 2 CPU_FAN English 14
User Manual
Page 20
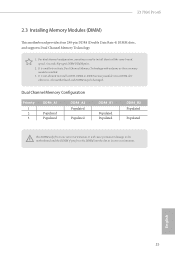
... DDR4_B1 Populated Populated DDR4_B2 Populated Populated he DIMM only its in one or three memory module installed. 3. For dual channel coniguration, you force the DIMM into a DDR4 slot; Z170M Pro4S 2.3 Installing Memory Modules (DIMM) his motherboard provides four 288-pin DDR4 (Double Data Rate 4) DIMM...Channel Memory Technology with only one correct orientation. It will cause permanent damage to install a DDR, DDR2 or DDR3 memory module into the slot at incorrect orientation. English 15 It is unable to install identical (the same brand, speed, size and chip-type) DDR4 DIMM pairs...
... DDR4_B1 Populated Populated DDR4_B2 Populated Populated he DIMM only its in one or three memory module installed. 3. For dual channel coniguration, you force the DIMM into a DDR4 slot; Z170M Pro4S 2.3 Installing Memory Modules (DIMM) his motherboard provides four 288-pin DDR4 (Double Data Rate 4) DIMM...Channel Memory Technology with only one correct orientation. It will cause permanent damage to install a DDR, DDR2 or DDR3 memory module into the slot at incorrect orientation. English 15 It is unable to install identical (the same brand, speed, size and chip-type) DDR4 DIMM pairs...
User Manual
Page 22
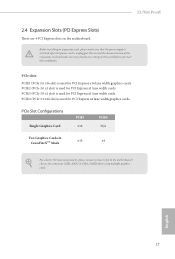
... expansion card, please make necessary hardware settings for the card before you start the installation. PCIE2 (PCIe 3.0 x1 slot) is unplugged. PCIE4 (PCIe 3.0 x16 slot) is used for PCI Express x1 lane width cards. English 17 PCIe slots: PCIE1 (PCIe 3.0 ... x16 x4 For a better thermal environment, please connect a chassis fan to the motherboard's chassis fan connector (CHA_FAN1 or CHA_FAN2) when using multiple graphics cards. Z170M Pro4S 2.4 Expansion Slots (PCI Express Slots) here are 4 PCI Express slots on the motherboard.
... expansion card, please make necessary hardware settings for the card before you start the installation. PCIE2 (PCIe 3.0 x1 slot) is unplugged. PCIE4 (PCIe 3.0 x16 slot) is used for PCI Express x1 lane width cards. English 17 PCIe slots: PCIE1 (PCIe 3.0 ... x16 x4 For a better thermal environment, please connect a chassis fan to the motherboard's chassis fan connector (CHA_FAN1 or CHA_FAN2) when using multiple graphics cards. Z170M Pro4S 2.4 Expansion Slots (PCI Express Slots) here are 4 PCI Express slots on the motherboard.
User Manual
Page 26
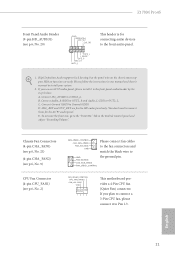
... (GND). E. To activate the front mic, go to the "FrontMic" Tab in our manual and chassis manual to install your system. 2. If you use an AC'97 audio panel, please install it to Pin 1-3. Z170M Pro4S Front Panel Audio Header (9-pin HD_AUDIO1) (see p.6, No. 2) FAN_SPEED_CONTROL CHA_FAN_SPEED FAN_VOLTAGE GND GND FAN_VOLTAGE CHA_FAN_SPEED FAN_SPEED_CONTROL Please...
... (GND). E. To activate the front mic, go to the "FrontMic" Tab in our manual and chassis manual to install your system. 2. If you use an AC'97 audio panel, please install it to Pin 1-3. Z170M Pro4S Front Panel Audio Header (9-pin HD_AUDIO1) (see p.6, No. 2) FAN_SPEED_CONTROL CHA_FAN_SPEED FAN_VOLTAGE GND GND FAN_VOLTAGE CHA_FAN_SPEED FAN_SPEED_CONTROL Please...

User Manual
Page 28
.... 2.7.1 Installing Two CrossFireXTM-Ready Graphics Cards Step 1 Insert one graphics card into PCIE1 slot and the other graphics card to AMD graphics card manuals for details.) English 23 Z170M Pro4S 2.7 CrossFireXTM and Quad CrossFireXTM Operation Guide his motherboard ...supports CrossFireXTM and Quad CrossFireXTM that allows you pair a 12-pipe CrossFireXTM Edition card with this motherboard. Make sure that are properly seated on the slots. CrossFire Bridge Step 2 Connect two graphics cards by installing...
.... 2.7.1 Installing Two CrossFireXTM-Ready Graphics Cards Step 1 Insert one graphics card into PCIE1 slot and the other graphics card to AMD graphics card manuals for details.) English 23 Z170M Pro4S 2.7 CrossFireXTM and Quad CrossFireXTM Operation Guide his motherboard ...supports CrossFireXTM and Quad CrossFireXTM that allows you pair a 12-pipe CrossFireXTM Edition card with this motherboard. Make sure that are properly seated on the slots. CrossFire Bridge Step 2 Connect two graphics cards by installing...
User Manual
Page 30
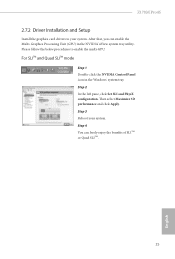
... Maximize 3D performance and click Apply. Step 4 You can enable the Multi-Graphics Processing Unit (GPU) in the Windows® system tray. Z170M Pro4S 2.7.2 Driver Installation and Setup Install the graphics card drivers to enable the multi-GPU. Step 2 In the let pane, click Set SLI and PhysX coniguration. Step 3 Reboot your system...
... Maximize 3D performance and click Apply. Step 4 You can enable the Multi-Graphics Processing Unit (GPU) in the Windows® system tray. Z170M Pro4S 2.7.2 Driver Installation and Setup Install the graphics card drivers to enable the multi-GPU. Step 2 In the let pane, click Set SLI and PhysX coniguration. Step 3 Reboot your system...
User Manual
Page 31
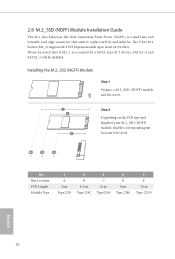
Please be noted that if M2_1 is a small size and versatile card edge connector that aims to be disabled. Installing the M.2_SSD (NGFF) Module Step 1 Prepare a M.2_SSD (NGFF) module and the screw. 3 2 1 Step 2 Depending on the PCB type and length of your M.2_SSD (...NGFF) module, ind the corresponding nut location to replace mPCIe and mSATA. C B A No. 2.8 M.2_SSD (NGFF) Module Installation Guide The M.2, also known as the Next Generation Form Factor (NGFF), is occupied by a SATA-type M.2 device, SATA3_0 and SATA3_1 will be used. The Ultra...
Please be noted that if M2_1 is a small size and versatile card edge connector that aims to be disabled. Installing the M.2_SSD (NGFF) Module Step 1 Prepare a M.2_SSD (NGFF) module and the screw. 3 2 1 Step 2 Depending on the PCB type and length of your M.2_SSD (...NGFF) module, ind the corresponding nut location to replace mPCIe and mSATA. C B A No. 2.8 M.2_SSD (NGFF) Module Installation Guide The M.2, also known as the Next Generation Form Factor (NGFF), is occupied by a SATA-type M.2 device, SATA3_0 and SATA3_1 will be used. The Ultra...

User Manual
Page 34
... the support CD, insert the CD into your system will be auto-detected and listed on the support CD driver page. Z170M Pro4S Chapter 3 Software and Utilities Operation 3.1 Installing Drivers he Support CD that comes with the motherboard contains necessary drivers and useful utilities that the motherboard supports. If the Main Menu...
... the support CD, insert the CD into your system will be auto-detected and listed on the support CD driver page. Z170M Pro4S Chapter 3 Software and Utilities Operation 3.1 Installing Drivers he Support CD that comes with the motherboard contains necessary drivers and useful utilities that the motherboard supports. If the Main Menu...
User Manual
Page 35
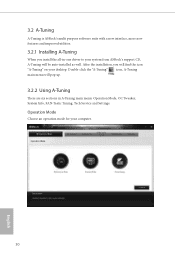
... -one driver to your system from ASRock's support CD, A-Tuning will ind the icon "A-Tuning" on your computer. 30 English Operation Mode Choose an operation mode for your desktop. 3.2 A-Tuning A-Tuning is ASRock's multi purpose sotware suite with a new interface, more new features and improved utilities. 3.2.1 Installing A-Tuning When you will be auto...
... -one driver to your system from ASRock's support CD, A-Tuning will ind the icon "A-Tuning" on your computer. 30 English Operation Mode Choose an operation mode for your desktop. 3.2 A-Tuning A-Tuning is ASRock's multi purpose sotware suite with a new interface, more new features and improved utilities. 3.2.1 Installing A-Tuning When you will be auto...
User Manual
Page 39
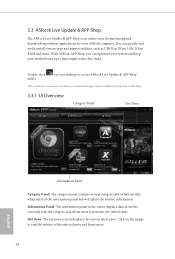
With ASRock APP Shop, you can quickly and easily install various apps and support ...utilities, such as USB Key, XFast LAN, XFast RAM and more . 34 English Information Panel: he information panel in the center displays data about the currently selected category and allows users to date simply with a few clicks. Double-click utility. Click on your desktop to access ASRock... up to perform job-related tasks. on the image to download apps from the ASRock Live Update & APP Shop. 3.3.1 UI Overview Category Panel Hot News Information Panel ...
With ASRock APP Shop, you can quickly and easily install various apps and support ...utilities, such as USB Key, XFast LAN, XFast RAM and more . 34 English Information Panel: he information panel in the center displays data about the currently selected category and allows users to date simply with a few clicks. Double-click utility. Click on your desktop to access ASRock... up to perform job-related tasks. on the image to download apps from the ASRock Live Update & APP Shop. 3.3.1 UI Overview Category Panel Hot News Information Panel ...
User Manual
Page 40
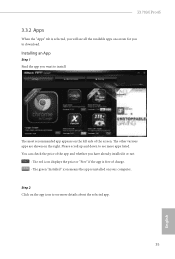
.... Step 2 Click on screen for you to download. You can check the price of charge. - Installing an App Step 1 Find the app you have already intalled it or not. - he green "Installed" icon means the app is installed on the right. he other various apps are shown on your computer. he red icon... displays the price or "Free" if the app is free of the app and whether you want to install. Z170M Pro4S 3.3.2 Apps When the "Apps" tab is selected, you will see all the available apps on the app icon to see more details about the...
.... Step 2 Click on screen for you to download. You can check the price of charge. - Installing an App Step 1 Find the app you have already intalled it or not. - he green "Installed" icon means the app is installed on the right. he other various apps are shown on your computer. he red icon... displays the price or "Free" if the app is free of the app and whether you want to install. Z170M Pro4S 3.3.2 Apps When the "Apps" tab is selected, you will see all the available apps on the app icon to see more details about the...

User Manual
Page 41
Step 4 When installation completes, you want to start downloading. Step 3 If you can icon . *he trash icon may not appear for certain apps. 36 English To uninstall it, simply click on the trash can ind the green "Installed" icon appears on the red icon to install the app, click on the upper right corner.
Step 4 When installation completes, you want to start downloading. Step 3 If you can icon . *he trash icon may not appear for certain apps. 36 English To uninstall it, simply click on the trash can ind the green "Installed" icon appears on the red icon to install the app, click on the upper right corner.
User Manual
Page 42
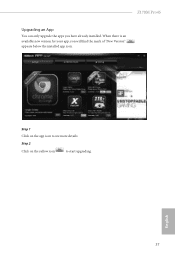
English 37 Z170M Pro4S Upgrading an App You can only upgrade the apps you will ind the mark of "New Version" appears below the installed app icon. Step 2 Click on the app icon to start upgrading. When there is an available new version for your app, you have already installed. Step 1 Click on the yellow icon to see more details.
English 37 Z170M Pro4S Upgrading an App You can only upgrade the apps you will ind the mark of "New Version" appears below the installed app icon. Step 2 Click on the app icon to start upgrading. When there is an available new version for your app, you have already installed. Step 1 Click on the yellow icon to see more details.
User Manual
Page 43
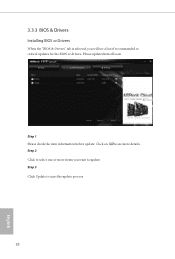
Click to select one or more details. Click on Step 2 to update. Step 3 Click Update to start the update process. 38 English 3.3.3 BIOS & Drivers Installing BIOS or Drivers When the "BIOS & Drivers" tab is selected, you want to see more items you will see a list of recommended or critical updates for the BIOS or drivers. Step 1 Please check the item information before update. Please update them all soon.
Click to select one or more details. Click on Step 2 to update. Step 3 Click Update to start the update process. 38 English 3.3.3 BIOS & Drivers Installing BIOS or Drivers When the "BIOS & Drivers" tab is selected, you want to see more items you will see a list of recommended or critical updates for the BIOS or drivers. Step 1 Please check the item information before update. Please update them all soon.


