
User Manual
Page 4
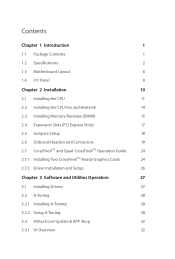
... 2.5 Jumpers Setup 18 2.6 Onboard Headers and Connectors 19 2.7 CrossFireXTM and Quad CrossFireXTM Operation Guide 24 2.7.1 Installing Two CrossFireXTM-Ready Graphics Cards 24 2.7.2 Driver Installation and Setup 26 Chapter 3 Software and Utilities Operation 27 3.1 Installing Drivers 27 3.2 A-Tuning 28 3.2.1 Installing A-Tuning 28 3.2.2 Using A-Tuning 28 3.3 ASRock Live Update & APP Shop 32 3.3.1 UI Overview 32
... 2.5 Jumpers Setup 18 2.6 Onboard Headers and Connectors 19 2.7 CrossFireXTM and Quad CrossFireXTM Operation Guide 24 2.7.1 Installing Two CrossFireXTM-Ready Graphics Cards 24 2.7.2 Driver Installation and Setup 26 Chapter 3 Software and Utilities Operation 27 3.1 Installing Drivers 27 3.2 A-Tuning 28 3.2.1 Installing A-Tuning 28 3.2.2 Using A-Tuning 28 3.3 ASRock Live Update & APP Shop 32 3.3.1 UI Overview 32

User Manual
Page 5
3.3.2 Apps 33 3.3.3 BIOS & Drivers 36 3.3.4 Setting 37 3.4 Enabling USB Ports for Windows® 7 Installation 38 Chapter 4 UEFI SETUP UTILITY 41 4.1 Introduction 41 4.1.1 UEFI Menu Bar 41 4.1.2 Navigation Keys 42 4.2 ...
3.3.2 Apps 33 3.3.3 BIOS & Drivers 36 3.3.4 Setting 37 3.4 Enabling USB Ports for Windows® 7 Installation 38 Chapter 4 UEFI SETUP UTILITY 41 4.1 Introduction 41 4.1.1 UEFI Menu Bar 41 4.1.2 Navigation Keys 42 4.2 ...
User Manual
Page 8
resolution up to 4K x 2K (4096x2304) @ 24Hz • Supports DVI-D with max. Z170 Pro4/D3 • Supports HDMI with Content Protection (Realtek ALC892 Audio Codec) * To configure 7.1 CH HD Audio, it is required) • Supports Accelerated Media Codecs: HEVC, VP8, ... is required to use an HD front panel audio module and enable the multi-channel audio feature through the audio driver. • Premium Blu-ray Audio support • Supports Surge Protection (ASRock Full Spike Protection) • ELNA Audio Caps LAN • PCIE x1 Gigabit LAN 10/100/1000 Mb/s • Realtek RTL8111GR...
resolution up to 4K x 2K (4096x2304) @ 24Hz • Supports DVI-D with max. Z170 Pro4/D3 • Supports HDMI with Content Protection (Realtek ALC892 Audio Codec) * To configure 7.1 CH HD Audio, it is required) • Supports Accelerated Media Codecs: HEVC, VP8, ... is required to use an HD front panel audio module and enable the multi-channel audio feature through the audio driver. • Premium Blu-ray Audio support • Supports Surge Protection (ASRock Full Spike Protection) • ELNA Audio Caps LAN • PCIE x1 Gigabit LAN 10/100/1000 Mb/s • Realtek RTL8111GR...
User Manual
Page 10
... required. It should be done at your system. bit * To install Windows® 7 OS, a modified installation disk with xHCI drivers packed into the ISO file is a certain risk involved with overclocking, including adjusting the setting in the BIOS, applying Untied Overclocking Technology...174; 10 driver, please visit ASRock's website for possible damage caused by CPU temperature) • CPU/Chassis Fan multi-speed control • Voltage monitoring: +12V, +5V, +3.3V, CPU Vcore OS • Microsoft® Windows® 10 64-bit / 8.1 64-bit / 7 32-bit / 7 64- Z170 Pro4/D3 Hardware Monitor...
... required. It should be done at your system. bit * To install Windows® 7 OS, a modified installation disk with xHCI drivers packed into the ISO file is a certain risk involved with overclocking, including adjusting the setting in the BIOS, applying Untied Overclocking Technology...174; 10 driver, please visit ASRock's website for possible damage caused by CPU temperature) • CPU/Chassis Fan multi-speed control • Voltage monitoring: +12V, +5V, +3.3V, CPU Vcore OS • Microsoft® Windows® 10 64-bit / 8.1 64-bit / 7 32-bit / 7 64- Z170 Pro4/D3 Hardware Monitor...

User Manual
Page 14
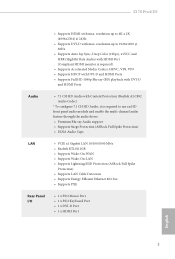
Function of the Audio Ports in the Realtek HD Audio Manager. Z170 Pro4/D3 ** To configure 7.1 CH HD Audio, it is required to "7.1 Speaker"in 7.1-channel Configuration: Port Light Blue (Rear panel) Lime (Rear panel) Pink (Rear panel) Lime (Front panel) Function Rear Speaker Out Front Speaker Out Central /Subwoofer Speaker Out Side Speaker Out 9 English Please set Speaker Configuration to use an HD front panel audio module and enable the multichannel audio feature through the audio driver.
Function of the Audio Ports in the Realtek HD Audio Manager. Z170 Pro4/D3 ** To configure 7.1 CH HD Audio, it is required to "7.1 Speaker"in 7.1-channel Configuration: Port Light Blue (Rear panel) Lime (Rear panel) Pink (Rear panel) Lime (Front panel) Function Rear Speaker Out Front Speaker Out Central /Subwoofer Speaker Out Side Speaker Out 9 English Please set Speaker Configuration to use an HD front panel audio module and enable the multichannel audio feature through the audio driver.

User Manual
Page 29
...only use a AMD certified PSU. Make sure that your power supply unit (PSU) can provide at least the minimum power your graphics card driver supports AMD CrossFireXTM technology. If you pair a 12-pipe CrossFireXTM Edition card with this motherboard. Please refer to three identical PCI Express x16 graphics...one graphics card into PCIE2 slot and the other graphics card to use identical CrossFireXTM-ready graphics cards that your system requires. Download the drivers from the AMD's website: www.amd.com 3. Make sure that are properly seated on the top of the graphics cards. (The CrossFire...
...only use a AMD certified PSU. Make sure that your power supply unit (PSU) can provide at least the minimum power your graphics card driver supports AMD CrossFireXTM technology. If you pair a 12-pipe CrossFireXTM Edition card with this motherboard. Please refer to three identical PCI Express x16 graphics...one graphics card into PCIE2 slot and the other graphics card to use identical CrossFireXTM-ready graphics cards that your system requires. Download the drivers from the AMD's website: www.amd.com 3. Make sure that are properly seated on the top of the graphics cards. (The CrossFire...
User Manual
Page 31
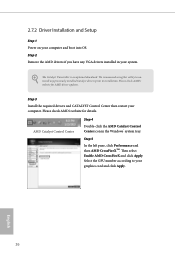
... CATALYST Control Center then restart your graphics card and click Apply. Select the GPU number according to installation. 2.7.2 Driver Installation and Setup Step 1 Power on your system. AMD Catalyst Control Center Step 4 Double-click the AMD Catalyst Control Center icon in your ...computer and boot into OS. English 26 Step 2 Remove the AMD drivers if you have any previously installed Catalyst drivers prior to your computer. The Catalyst Uninstaller is an optional download. Please check AMD's website for AMD...
... CATALYST Control Center then restart your graphics card and click Apply. Select the GPU number according to installation. 2.7.2 Driver Installation and Setup Step 1 Power on your system. AMD Catalyst Control Center Step 4 Double-click the AMD Catalyst Control Center icon in your ...computer and boot into OS. English 26 Step 2 Remove the AMD drivers if you have any previously installed Catalyst drivers prior to your computer. The Catalyst Uninstaller is an optional download. Please check AMD's website for AMD...
User Manual
Page 32
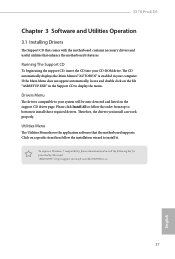
...the following hot fix provided by Microsoft. Z170 Pro4/D3 Chapter 3 Software and Utilities Operation 3.1 Installing Drivers The Support CD that comes with the motherboard contains necessary drivers and useful utilities that the motherboard supports. Drivers Menu The drivers compatible to install those required drivers. Please click Install All or follow ... automatically displays the Main Menu if "AUTORUN" is enabled in the Support CD to install it. Therefore, the drivers you install can work properly. If the Main Menu does not appear automatically, locate and double click on the support CD...
...the following hot fix provided by Microsoft. Z170 Pro4/D3 Chapter 3 Software and Utilities Operation 3.1 Installing Drivers The Support CD that comes with the motherboard contains necessary drivers and useful utilities that the motherboard supports. Drivers Menu The drivers compatible to install those required drivers. Please click Install All or follow ... automatically displays the Main Menu if "AUTORUN" is enabled in the Support CD to install it. Therefore, the drivers you install can work properly. If the Main Menu does not appear automatically, locate and double click on the support CD...

User Manual
Page 41
Step 3 Click Update to select one or more items you will see more details. 3.3.3 BIOS & Drivers Installing BIOS or Drivers When the "BIOS & Drivers" tab is selected, you want to update. Please update them all soon. Step 1 Please check the item information before update. Click on Step 2 to see a list of recommended or critical updates for the BIOS or drivers. Click to start the update process. 36 English
Step 3 Click Update to select one or more items you will see more details. 3.3.3 BIOS & Drivers Installing BIOS or Drivers When the "BIOS & Drivers" tab is selected, you want to update. Please update them all soon. Step 1 Please check the item information before update. Click on Step 2 to see a list of recommended or critical updates for the BIOS or drivers. Click to start the update process. 36 English

User Manual
Page 43
...create a new ISO file with the Intel® USB 3.0 eXtensible Host Controller (xHCI) drivers packed into the ISO file. Requirements • A Windows® 7 installation disk or USB drive • USB 3.0 drivers (included in the ASRock Support CD or website) • A Windows® PC • Win7 USB Patcher... (included in the ASRock Support CD or website) Scenarios You have an ODD and PS/2 ports: If there is...
...create a new ISO file with the Intel® USB 3.0 eXtensible Host Controller (xHCI) drivers packed into the ISO file. Requirements • A Windows® 7 installation disk or USB drive • USB 3.0 drivers (included in the ASRock Support CD or website) • A Windows® PC • Win7 USB Patcher... (included in the ASRock Support CD or website) Scenarios You have an ODD and PS/2 ports: If there is...
User Manual
Page 44
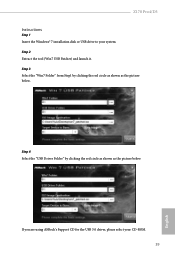
Z170 Pro4/D3 Instructions Step 1 Insert the Windows® 7 installation disk or USB drive to your CD-ROM. 39 English Step 4 Select the "USB Driver Folder" by clicking the red circle as shown as the picture below . If you are using ASRock's Support CD for the USB 3.0 driver, please select your system. Step 2 Extract the tool (Win7 USB Patcher) and launch it. Step 3 Select the "Win7 Folder" from Step1 by clicking the red circle as shown as the picture below .
Z170 Pro4/D3 Instructions Step 1 Insert the Windows® 7 installation disk or USB drive to your CD-ROM. 39 English Step 4 Select the "USB Driver Folder" by clicking the red circle as shown as the picture below . If you are using ASRock's Support CD for the USB 3.0 driver, please select your system. Step 2 Extract the tool (Win7 USB Patcher) and launch it. Step 3 Select the "Win7 Folder" from Step1 by clicking the red circle as shown as the picture below .

User Manual
Page 69
... disk drive to modify the system time are able to RAID, then you to copy the RAID driver from our support 64 English 4.5 Tools System Browser ASRock System Browser shows the overview of internet access granted to your USB storage device. Please setup network ...configuration before using UEFI Tech Service. OMG (Online Management Guard) Administrators are required. After copying the drivers please change the SATA mode...
... disk drive to modify the system time are able to RAID, then you to copy the RAID driver from our support 64 English 4.5 Tools System Browser ASRock System Browser shows the overview of internet access granted to your USB storage device. Please setup network ...configuration before using UEFI Tech Service. OMG (Online Management Guard) Administrators are required. After copying the drivers please change the SATA mode...

User Manual
Page 70
...enabled, the computer will power on and enables Dehumidifier after entering S4/S5 state. Boot Manager Enable/disable the Boot Manager. Z170 Pro4/D3 CD, Easy Driver Installer is specifically designed for the Boot Manager. Boot Manager Timeout Enable/disable the Boot Manager Timeout. Boot Manager Boot Manager is... a handy tool in the UEFI that installs the LAN driver to dehumidify the system after entering S4/S5 state. 65 English Timeout Seconds Configure the number of time until the computer powers on...
...enabled, the computer will power on and enables Dehumidifier after entering S4/S5 state. Boot Manager Enable/disable the Boot Manager. Z170 Pro4/D3 CD, Easy Driver Installer is specifically designed for the Boot Manager. Boot Manager Timeout Enable/disable the Boot Manager Timeout. Boot Manager Boot Manager is... a handy tool in the UEFI that installs the LAN driver to dehumidify the system after entering S4/S5 state. 65 English Timeout Seconds Configure the number of time until the computer powers on...


