
Quick Installation Guide
Page 8
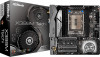
... and endurance. ASRock website http://www.asrock.com. 1.1 Package Contents • ASRock X399M Taichi Motherboard (Micro ATX Form Factor) • ASRock X399M Taichi Quick Installation Guide • ASRock X399M Taichi Support CD • 1 x I/O Panel Shield • 4 x Serial ATA (SATA) Data Cables (Optional) • 1 x ASRock SLI_HB_Bridge_1S Card (Optional) • 1 x ASRock SLI_HB_Bridge_2S Card (Optional) • 2 x ASRock WiFi 2.4/5 GHz Antennas (Optional) • 3 x Screws for purchasing ASRock X399M Taichi motherboard, a reliable...
... and endurance. ASRock website http://www.asrock.com. 1.1 Package Contents • ASRock X399M Taichi Motherboard (Micro ATX Form Factor) • ASRock X399M Taichi Quick Installation Guide • ASRock X399M Taichi Support CD • 1 x I/O Panel Shield • 4 x Serial ATA (SATA) Data Cables (Optional) • 1 x ASRock SLI_HB_Bridge_1S Card (Optional) • 1 x ASRock SLI_HB_Bridge_2S Card (Optional) • 2 x ASRock WiFi 2.4/5 GHz Antennas (Optional) • 3 x Screws for purchasing ASRock X399M Taichi motherboard, a reliable...

Quick Installation Guide
Page 14
... + BT. BT 4.2 also includes Low Energy Technology and ensures extraordinary low power consumption for WiFi 802.11 a/b/ g/n/ac connectivity standards and Bluetooth v4.2. X399M Taichi 1.3 WiFi-802.11ac Module and ASRock WiFi 2.4/5 GHz Antenna WiFi-802.11ac + BT Module This motherboard comes with an exclusive WiFi 802.11 a/b/g/n/ac + BT v4.2 module (pre...
... + BT. BT 4.2 also includes Low Energy Technology and ensures extraordinary low power consumption for WiFi 802.11 a/b/ g/n/ac connectivity standards and Bluetooth v4.2. X399M Taichi 1.3 WiFi-802.11ac Module and ASRock WiFi 2.4/5 GHz Antenna WiFi-802.11ac + BT Module This motherboard comes with an exclusive WiFi 802.11 a/b/g/n/ac + BT v4.2 module (pre...

Quick Installation Guide
Page 32
... *Do not boot the system. 6. Install PSU and turn it to flash the BIOS. Then plug your USB flash drive must be FAT32. 3. X399M Taichi BIOS Flashback Button (BIOS_FB1) (see p.3, No. 17) BIOS Flashback Button allows users to the root directory of your USB drive to blink. 8. Copy... the BIOS file to your USB flash drive.Please make sure the file system of X: USB flash drive. 5. Extract BIOS file from ASRock's website : http://www.asrock.com. 2. Please follow the steps below. 1. USB BIOS Flashback port English 29 Wait until the LED stops blinking, indicating that BIOS flashing...
... *Do not boot the system. 6. Install PSU and turn it to flash the BIOS. Then plug your USB flash drive must be FAT32. 3. X399M Taichi BIOS Flashback Button (BIOS_FB1) (see p.3, No. 17) BIOS Flashback Button allows users to the root directory of your USB drive to blink. 8. Copy... the BIOS file to your USB flash drive.Please make sure the file system of X: USB flash drive. 5. Extract BIOS file from ASRock's website : http://www.asrock.com. 2. Please follow the steps below. 1. USB BIOS Flashback port English 29 Wait until the LED stops blinking, indicating that BIOS flashing...

Quick Installation Guide
Page 40
X399M Taichi M.2_SSD (NGFF) Module Support List Vendor ADATA ADATA ADATA ADATA ADATA Corsair Intel Intel Kingston OCZ Plextor Plextor Plextor Plextor Plextor Plextor Samsung Samsung Samsung ... TM8FP2480GC110 WDS256G1X0C-00ENX0 (NVME) WDS512G1X0C-00ENX0 (NVME) For the latest updates of M.2_SSD (NFGG) module support list, please visit our website for details: http://www.asrock.com English 37
X399M Taichi M.2_SSD (NGFF) Module Support List Vendor ADATA ADATA ADATA ADATA ADATA Corsair Intel Intel Kingston OCZ Plextor Plextor Plextor Plextor Plextor Plextor Samsung Samsung Samsung ... TM8FP2480GC110 WDS256G1X0C-00ENX0 (NVME) WDS512G1X0C-00ENX0 (NVME) For the latest updates of M.2_SSD (NFGG) module support list, please visit our website for details: http://www.asrock.com English 37

Quick Installation Guide
Page 44
X399M Taichi Transcend Transcend Transcend V-Color V-Color V-Color V-Color WD WD WD WD SATA3 SATA3 SATA3 SATA3 SATA3 SATA3 SATA3 SATA3 SATA3 PCIe3 x4 PCIe3 x4 2242 TS256GMTS400 2260 TS512GMTS600 2280 TS512GMTS800 2280 VLM100-120G-2280B-RD 2280 VLM100-240G-2280B-RD 2280 VLM100-240G-2280RGB 2280 VSM100-240G-2280 2280 WDS100T1B0B-00AS40 2280 WDS240G1G0B-00RC30 2280 WDS256G1X0C-00ENX0 (NVME) 2280 WDS512G1X0C-00ENX0 (NVME) For the latest updates of M.2_SSD (NFGG) module support list, please visit our website for details: http://www.asrock.com English 41
X399M Taichi Transcend Transcend Transcend V-Color V-Color V-Color V-Color WD WD WD WD SATA3 SATA3 SATA3 SATA3 SATA3 SATA3 SATA3 SATA3 SATA3 PCIe3 x4 PCIe3 x4 2242 TS256GMTS400 2260 TS512GMTS600 2280 TS512GMTS800 2280 VLM100-120G-2280B-RD 2280 VLM100-240G-2280B-RD 2280 VLM100-240G-2280RGB 2280 VSM100-240G-2280 2280 WDS100T1B0B-00AS40 2280 WDS240G1G0B-00RC30 2280 WDS256G1X0C-00ENX0 (NVME) 2280 WDS512G1X0C-00ENX0 (NVME) For the latest updates of M.2_SSD (NFGG) module support list, please visit our website for details: http://www.asrock.com English 41

Quick Installation Guide
Page 46
Toggle on/off the RGB LED switch Sync RGB LED effects for all LED regions of the motherboard Select a RGB LED light effect from the ASRock Live Update & APP Shop and start coloring your PC style your preference. X399M Taichi ASRock RGB LED Utility Now you can adjust the RGB LED color through the ASRock RGB LED utility. English 43 Download this utility from the drop-down menu. Drag the tab to customize your way!
Toggle on/off the RGB LED switch Sync RGB LED effects for all LED regions of the motherboard Select a RGB LED light effect from the ASRock Live Update & APP Shop and start coloring your PC style your preference. X399M Taichi ASRock RGB LED Utility Now you can adjust the RGB LED color through the ASRock RGB LED utility. English 43 Download this utility from the drop-down menu. Drag the tab to customize your way!

Quick Installation Guide
Page 150
BIOS 4 creative.rom 5. PSU 6. 이제 USB USB BIOS 7. LED BIOS *LED BIOS USB BIOS 한국어 147 BIOS 파일을 USB USB 스템이 FAT32 3. BIOS 3 LED 8. X399M Taichi BIOS BIOS_FB1)(3 17 BIOS BIOS USB BIOS BIOS 3 1. ASRock BIOS http://www.asrock.com. 2.
BIOS 4 creative.rom 5. PSU 6. 이제 USB USB BIOS 7. LED BIOS *LED BIOS USB BIOS 한국어 147 BIOS 파일을 USB USB 스템이 FAT32 3. BIOS 3 LED 8. X399M Taichi BIOS BIOS_FB1)(3 17 BIOS BIOS USB BIOS BIOS 3 1. ASRock BIOS http://www.asrock.com. 2.

Quick Installation Guide
Page 152
日本語 X399M Taichi 1.2 仕様 ATX 8 ϨΠϠ PCB • 2 PCB CPU • AMD TR4 ιέοτ Ryzen Threadripper γϦʔζ CPU IR &#... X399 ϝϞϦ DDR4 4 x DDR4 DIMM DDR4 3600+(OC)/3200(OC)/2933(OC)/ 2667/2400/2133 ECC ͓Αͼ non-ECC U-DIMM)* ASRock http://www.asrock.com 64GB • DIMM εϩοτʹ 15 • 3 x PCI Express 3.0 x16 εϩοτʢPCIE1/PCIE2/PCIE3:x16 (PCIE1...
日本語 X399M Taichi 1.2 仕様 ATX 8 ϨΠϠ PCB • 2 PCB CPU • AMD TR4 ιέοτ Ryzen Threadripper γϦʔζ CPU IR &#... X399 ϝϞϦ DDR4 4 x DDR4 DIMM DDR4 3600+(OC)/3200(OC)/2933(OC)/ 2667/2400/2133 ECC ͓Αͼ non-ECC U-DIMM)* ASRock http://www.asrock.com 64GB • DIMM εϩοτʹ 15 • 3 x PCI Express 3.0 x16 εϩοτʢPCIE1/PCIE2/PCIE3:x16 (PCIE1...

Quick Installation Guide
Page 176
X399M Taichi BIOS BIOS_FB1) (见第 3 页,第 17 个) BIOS BIOS。 要使用 USB BIOS BIOS 1. 从 ASRock BIOS 文件:http://www.asrock.com。 2. 将 BIOS USB USB FAT32。 3 BIOS 文件。 4 creative.rom"。 5. 安装 PSU 6. 然后将 USB USB BIOS 7. 按住 BIOS LED 8. 等待 LED BIOS * 如果 LED BIOS USB BIOS 173
X399M Taichi BIOS BIOS_FB1) (见第 3 页,第 17 个) BIOS BIOS。 要使用 USB BIOS BIOS 1. 从 ASRock BIOS 文件:http://www.asrock.com。 2. 将 BIOS USB USB FAT32。 3 BIOS 文件。 4 creative.rom"。 5. 安装 PSU 6. 然后将 USB USB BIOS 7. 按住 BIOS LED 8. 等待 LED BIOS * 如果 LED BIOS USB BIOS 173

Quick Installation Guide
Page 190
繁體中文 X399M Taichi BIOS Flashback 按鈕 (BIOS_FB1 3 17) BIOS Flashback BIOS。 USB BIOS Flashback BIOS Flashback 1. 從 ASRock BIOS 檔案:http://www.asrock.com。 2. 將 BIOS USB USB FAT32。 3. 從 zip BIOS 檔案。 4 creative.rom」。 5. 安裝 PSU 6. 接著將...
繁體中文 X399M Taichi BIOS Flashback 按鈕 (BIOS_FB1 3 17) BIOS Flashback BIOS。 USB BIOS Flashback BIOS Flashback 1. 從 ASRock BIOS 檔案:http://www.asrock.com。 2. 將 BIOS USB USB FAT32。 3. 從 zip BIOS 檔案。 4 creative.rom」。 5. 安裝 PSU 6. 接著將...

Quick Installation Guide
Page 197
...: is device may not cause harmful interference, and (2) this device must accept any interference received, including interference that the product Product Name : Motherboard Model Number : X399M Taichi Conforms to the following two conditions: (1) is device complies with part 15 of the FCC Rules. DECLARATION OF CONFORMITY Per FCC Part 2 Section 2.1077(a) Responsible...
...: is device may not cause harmful interference, and (2) this device must accept any interference received, including interference that the product Product Name : Motherboard Model Number : X399M Taichi Conforms to the following two conditions: (1) is device complies with part 15 of the FCC Rules. DECLARATION OF CONFORMITY Per FCC Part 2 Section 2.1077(a) Responsible...

Quick Installation Guide
Page 198
... making this declaration: (Name, Surname) A.V.P (Position / Title) February 9, 2018 (Date) P/N: 15G062070000AK V1.0 EU Declaration of Conformity For the following equipment: Motherboard (Product Name) X399M Taichi / ASRock (Model Designation / Trade Name) ASRock Incorporation (Manufacturer Name) 2F., No.37, Sec. 2, Jhongyang S. Rd., Beitou District, Taipei City 112, Taiwan (R.O.C.) (Manufacturer Address) ڛEMC -Directive 2014...
... making this declaration: (Name, Surname) A.V.P (Position / Title) February 9, 2018 (Date) P/N: 15G062070000AK V1.0 EU Declaration of Conformity For the following equipment: Motherboard (Product Name) X399M Taichi / ASRock (Model Designation / Trade Name) ASRock Incorporation (Manufacturer Name) 2F., No.37, Sec. 2, Jhongyang S. Rd., Beitou District, Taipei City 112, Taiwan (R.O.C.) (Manufacturer Address) ڛEMC -Directive 2014...
User Manual
Page 9
... step-by-step installation guides. It delivers excellent performance with robust design conforming to ASRock's commitment to change without further notice. ASRock website http://www.asrock.com. 1.1 Package Contents • ASRock X399M Taichi Motherboard (Micro ATX Form Factor) • ASRock X399M Taichi Quick Installation Guide • ASRock X399M Taichi Support CD • 1 x I/O Panel Shield • 4 x Serial ATA (SATA) Data Cables (Optional) •...
... step-by-step installation guides. It delivers excellent performance with robust design conforming to ASRock's commitment to change without further notice. ASRock website http://www.asrock.com. 1.1 Package Contents • ASRock X399M Taichi Motherboard (Micro ATX Form Factor) • ASRock X399M Taichi Quick Installation Guide • ASRock X399M Taichi Support CD • 1 x I/O Panel Shield • 4 x Serial ATA (SATA) Data Cables (Optional) •...

User Manual
Page 19
... + BT. BT 4.2 also includes Low Energy Technology and ensures extraordinary low power consumption for WiFi 802.11 a/b/ g/n/ac connectivity standards and Bluetooth v4.2. X399M Taichi 1.5 WiFi-802.11ac Module and ASRock WiFi 2.4/5 GHz Antenna WiFi-802.11ac + BT Module This motherboard comes with an exclusive WiFi 802.11 a/b/g/n/ac + BT v4.2 module (pre...
... + BT. BT 4.2 also includes Low Energy Technology and ensures extraordinary low power consumption for WiFi 802.11 a/b/ g/n/ac connectivity standards and Bluetooth v4.2. X399M Taichi 1.5 WiFi-802.11ac Module and ASRock WiFi 2.4/5 GHz Antenna WiFi-802.11ac + BT Module This motherboard comes with an exclusive WiFi 802.11 a/b/g/n/ac + BT v4.2 module (pre...

User Manual
Page 37
...drive.Please make sure the file system of X: USB flash drive. 5. Then the LED starts to flash the BIOS. Extract BIOS file from ASRock's website : http://www.asrock.com. 2. Install PSU and turn it to "creative.rom" and save it on. *Do not boot the system. 6. Wait until the...7. USB BIOS Flashback port English 29 Download the latest BIOS file from the zip file. 4. Press the BIOS Flashback Button for three seconds. X399M Taichi BIOS Flashback Button (BIOS_FB1) (see p.9, No. 17) BIOS Flashback Button allows users to blink. 8. Then plug your USB flash drive must be FAT32...
...drive.Please make sure the file system of X: USB flash drive. 5. Then the LED starts to flash the BIOS. Extract BIOS file from ASRock's website : http://www.asrock.com. 2. Install PSU and turn it to "creative.rom" and save it on. *Do not boot the system. 6. Wait until the...7. USB BIOS Flashback port English 29 Download the latest BIOS file from the zip file. 4. Press the BIOS Flashback Button for three seconds. X399M Taichi BIOS Flashback Button (BIOS_FB1) (see p.9, No. 17) BIOS Flashback Button allows users to blink. 8. Then plug your USB flash drive must be FAT32...

User Manual
Page 41
X399M Taichi Step 3 When the graphics cards are installed on PCIE1 and PCIE3: Align and insert the ASRock SLI_HB_ Bridge_2S Card to the goldfingers on each graphics card. English 33 SLI_HB_Bridge_1S Card ASRock SLI_HB_Bridge_1S Card SLI_HB_Bridge_2S Card ASRock SLI_HB_Bridge_2S Card When the graphics cards are installed on PCIE1 and PCIE2: Align and insert the ASRock...connector or the DVI connector of the graphics card that is firmly in place. Make sure the ASRock SLI_ HB_Bridge_1S Card is firmly in place. Make sure the ASRock SLI_ HB_Bridge_2S Card is inserted to PCIE1 slot.
X399M Taichi Step 3 When the graphics cards are installed on PCIE1 and PCIE3: Align and insert the ASRock SLI_HB_ Bridge_2S Card to the goldfingers on each graphics card. English 33 SLI_HB_Bridge_1S Card ASRock SLI_HB_Bridge_1S Card SLI_HB_Bridge_2S Card ASRock SLI_HB_Bridge_2S Card When the graphics cards are installed on PCIE1 and PCIE2: Align and insert the ASRock...connector or the DVI connector of the graphics card that is firmly in place. Make sure the ASRock SLI_ HB_Bridge_1S Card is firmly in place. Make sure the ASRock SLI_ HB_Bridge_2S Card is inserted to PCIE1 slot.

User Manual
Page 51
X399M Taichi M.2_SSD (NGFF) Module Support List Vendor ADATA ADATA ADATA ADATA ADATA Corsair Intel Intel Kingston OCZ Plextor Plextor Plextor Plextor Plextor Plextor Samsung Samsung Samsung ... TM8FP2480GC110 WDS256G1X0C-00ENX0 (NVME) WDS512G1X0C-00ENX0 (NVME) For the latest updates of M.2_SSD (NFGG) module support list, please visit our website for details: http://www.asrock.com English 43
X399M Taichi M.2_SSD (NGFF) Module Support List Vendor ADATA ADATA ADATA ADATA ADATA Corsair Intel Intel Kingston OCZ Plextor Plextor Plextor Plextor Plextor Plextor Samsung Samsung Samsung ... TM8FP2480GC110 WDS256G1X0C-00ENX0 (NVME) WDS512G1X0C-00ENX0 (NVME) For the latest updates of M.2_SSD (NFGG) module support list, please visit our website for details: http://www.asrock.com English 43

User Manual
Page 55
X399M Taichi Transcend Transcend Transcend V-Color V-Color V-Color V-Color WD WD WD WD SATA3 SATA3 SATA3 SATA3 SATA3 SATA3 SATA3 SATA3 SATA3 PCIe3 x4 PCIe3 x4 2242 TS256GMTS400 2260 TS512GMTS600 2280 TS512GMTS800 2280 VLM100-120G-2280B-RD 2280 VLM100-240G-2280B-RD 2280 VLM100-240G-2280RGB 2280 VSM100-240G-2280 2280 WDS100T1B0B-00AS40 2280 WDS240G1G0B-00RC30 2280 WDS256G1X0C-00ENX0 (NVME) 2280 WDS512G1X0C-00ENX0 (NVME) For the latest updates of M.2_SSD (NFGG) module support list, please visit our website for details: http://www.asrock.com English 47
X399M Taichi Transcend Transcend Transcend V-Color V-Color V-Color V-Color WD WD WD WD SATA3 SATA3 SATA3 SATA3 SATA3 SATA3 SATA3 SATA3 SATA3 PCIe3 x4 PCIe3 x4 2242 TS256GMTS400 2260 TS512GMTS600 2280 TS512GMTS800 2280 VLM100-120G-2280B-RD 2280 VLM100-240G-2280B-RD 2280 VLM100-240G-2280RGB 2280 VSM100-240G-2280 2280 WDS100T1B0B-00AS40 2280 WDS240G1G0B-00RC30 2280 WDS256G1X0C-00ENX0 (NVME) 2280 WDS512G1X0C-00ENX0 (NVME) For the latest updates of M.2_SSD (NFGG) module support list, please visit our website for details: http://www.asrock.com English 47

User Manual
Page 57
Operation Mode Choose an operation mode for your desktop. X399M Taichi 3.2 A-Tuning A-Tuning is ASRock's multi purpose software suite with a new interface, more new features and improved utilities. 3.2.1 Installing A-Tuning A-Tuning can be downloaded from ASRock Live Update & APP Shop. After the installation, you will pop up. 3.2.2 Using A-Tuning There are five sections in A-Tuning main menu: Operation Mode, OC Tweaker, System Info, FAN-Tastic Tuning and Settings. Double-click the "A-Tuning" icon, A-Tuning main menu will find the icon "A-Tuning" on your computer. 49 English
Operation Mode Choose an operation mode for your desktop. X399M Taichi 3.2 A-Tuning A-Tuning is ASRock's multi purpose software suite with a new interface, more new features and improved utilities. 3.2.1 Installing A-Tuning A-Tuning can be downloaded from ASRock Live Update & APP Shop. After the installation, you will pop up. 3.2.2 Using A-Tuning There are five sections in A-Tuning main menu: Operation Mode, OC Tweaker, System Info, FAN-Tastic Tuning and Settings. Double-click the "A-Tuning" icon, A-Tuning main menu will find the icon "A-Tuning" on your computer. 49 English

User Manual
Page 59
Settings Configure ASRock A-Tuning. The fans will automatically shift to be launched when you want A-Tuning to the next speed level when the assigned temperature is met. Click to select "Auto run at Windows Startup" if you start up to five different fan speeds using the graph. X399M Taichi FAN-Tastic Tuning Configure up the Windows operating system. 51 English
Settings Configure ASRock A-Tuning. The fans will automatically shift to be launched when you want A-Tuning to the next speed level when the assigned temperature is met. Click to select "Auto run at Windows Startup" if you start up to five different fan speeds using the graph. X399M Taichi FAN-Tastic Tuning Configure up the Windows operating system. 51 English


