

Intel Smart Response Installation Guide
Page 1
... RAID 0 or RAID 1 in Icon tray, lower right-hand corner of the screen. 4. For the new version RST driver, please check our website for the latest information: http://www.asrock.com * Before you use RST function, you want to use Enhanced or Maximized Mode. 6. Once open RST GUI from either... Start Menu or by step instructions below. For all required drivers, including RST storage driver version 10.5 or later. 2. It is ...
... RAID 0 or RAID 1 in Icon tray, lower right-hand corner of the screen. 4. For the new version RST driver, please check our website for the latest information: http://www.asrock.com * Before you use RST function, you want to use Enhanced or Maximized Mode. 6. Once open RST GUI from either... Start Menu or by step instructions below. For all required drivers, including RST storage driver version 10.5 or later. 2. It is ...
Intel Small Business Advantage Installation Guide
Page 3
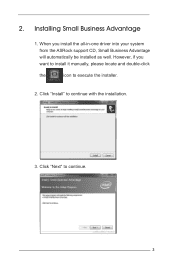
2. When you want to install it manually, please locate and double-click the icon to execute the installer. 2. Click "Install" to continue. 3 However, if you install the all-in-one driver into your system from the ASRock support CD, Small Business Advantage will automatically be installed as well. Installing Small Business Advantage 1. Click "Next" to continue with the installation. 3.
2. When you want to install it manually, please locate and double-click the icon to execute the installer. 2. Click "Install" to continue. 3 However, if you install the all-in-one driver into your system from the ASRock support CD, Small Business Advantage will automatically be installed as well. Installing Small Business Advantage 1. Click "Next" to continue with the installation. 3.
Intel Rapid Storage Guide
Page 12
... in the system BIOS, a RAID volume must be created, and the F6 installation method must be used to load the Intel® Rapid Storage Technology driver during POST, press Ctrl and i at the same time to select the RAID level and press Enter. 4. Click the Storage Configuration menu. 4. Select the appropriate...
... in the system BIOS, a RAID volume must be created, and the F6 installation method must be used to load the Intel® Rapid Storage Technology driver during POST, press Ctrl and i at the same time to select the RAID level and press Enter. 4. Click the Storage Configuration menu. 4. Select the appropriate...
Intel Rapid Storage Guide
Page 13
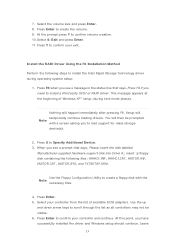
...asking you need to Specify Additional Device. 3. Setup will happen immediately after pressing F6. Press S to install a third party SCSI or RAID driver. Press Enter. 5. Leave 13 Press F6 when you see a prompt that says, Press F6 if you to confirm your controller from the...support disk into Drive A:, insert ;a floppy disk containing the following steps to create the volume. 9. Nothing will temporarily continue loading drivers. Install the RAID Driver Using the F6 Installation Method Perform the following files: IAAHCI.INF, IAAHCI.CAT, IASTOR.INF, IASTOR.CAT, IASTOR.SYS, and ...
...asking you need to Specify Additional Device. 3. Setup will happen immediately after pressing F6. Press S to install a third party SCSI or RAID driver. Press Enter. 5. Leave 13 Press F6 when you see a prompt that says, Press F6 if you to confirm your controller from the...support disk into Drive A:, insert ;a floppy disk containing the following steps to create the volume. 9. Nothing will temporarily continue loading drivers. Install the RAID Driver Using the F6 Installation Method Perform the following files: IAAHCI.INF, IAAHCI.CAT, IASTOR.INF, IASTOR.CAT, IASTOR.SYS, and ...
Intel Rapid Storage Guide
Page 16
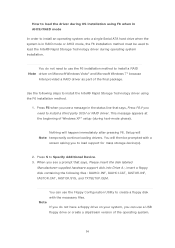
... storage device(s). 2. You can use a USB floppy drive or create a slipstream version of the final package. Nothing will Note temporarily continue loading drivers. You do not have a floppy drive on your system, you see a message in RAID mode or AHCI mode, the F6 installation method must...Manufacturer-supplied hardware support disk into Drive A:, insert a floppy disk containing the following steps to install the Intel® Rapid Storage Technology driver using F6 when in AHCI/RAID mode In order to install an operating system onto a single Serial ATA hard drive when the system ...
... storage device(s). 2. You can use a USB floppy drive or create a slipstream version of the final package. Nothing will Note temporarily continue loading drivers. You do not have a floppy drive on your system, you see a message in RAID mode or AHCI mode, the F6 installation method must...Manufacturer-supplied hardware support disk into Drive A:, insert a floppy disk containing the following steps to install the Intel® Rapid Storage Technology driver using F6 when in AHCI/RAID mode In order to install an operating system onto a single Serial ATA hard drive when the system ...

Intel Rapid Storage Guide
Page 17
... and continue. 4. Use the up and down arrow keys to confirm your controller from within Windows, you have successfully installed the Intel Rapid Storage Technology driver and Windows setup should continue. At this point, you will need to the Windows installation folders. Press Enter to scroll through the list as needed...
... and continue. 4. Use the up and down arrow keys to confirm your controller from within Windows, you have successfully installed the Intel Rapid Storage Technology driver and Windows setup should continue. At this point, you will need to the Windows installation folders. Press Enter to scroll through the list as needed...
Intel Rapid Storage Guide
Page 18
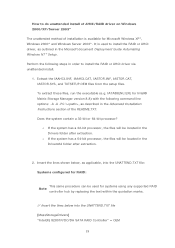
... Microsoft document Deployment Guide Automating Windows NT* Setup. o If the system has a 32-bit processor, the files will be located in the Drivers folder after extraction. 2. Insert the lines shown below into the UNATTEND.TXT file [MassStorageDrivers] "Intel(R) 82801R/DO/DH SATA RAID Controller" =... OEM 18 Does the system contain a 32-bit or 64-bit processor? How to install the RAID or AHCI driver via unattended install. 1. Perform the following command line options: -A -A -PC:\, as applicable, into the UNATTEND.TXT file: Systems configured for ...
... Microsoft document Deployment Guide Automating Windows NT* Setup. o If the system has a 32-bit processor, the files will be located in the Drivers folder after extraction. 2. Insert the lines shown below into the UNATTEND.TXT file [MassStorageDrivers] "Intel(R) 82801R/DO/DH SATA RAID Controller" =... OEM 18 Does the system contain a 32-bit or 64-bit processor? How to install the RAID or AHCI driver via unattended install. 1. Perform the following command line options: -A -A -PC:\, as applicable, into the UNATTEND.TXT file: Systems configured for ...
RAID Installation Guide
Page 7
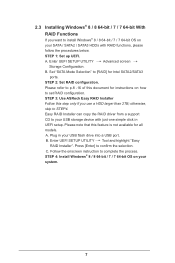
Easy RAID Installer can copy the RAID driver from a support CD to your SATA / SATA2 / SATA3 HDDs with just one simple click in your system. 7 Please note that this feature is not available ... how to install Windows® 8 / 8 64-bit / 7 / 7 64-bit OS on your USB storage device with RAID functions, please follow the procedures below. STEP 3: Use ASRock Easy RAID Installer Follow this document for instructions on your USB flash drive into a USB port B. Follow the onscreen instruction to confirm the selection C. Enter...
Easy RAID Installer can copy the RAID driver from a support CD to your SATA / SATA2 / SATA3 HDDs with just one simple click in your system. 7 Please note that this feature is not available ... how to install Windows® 8 / 8 64-bit / 7 / 7 64-bit OS on your USB storage device with RAID functions, please follow the procedures below. STEP 3: Use ASRock Easy RAID Installer Follow this document for instructions on your USB flash drive into a USB port B. Follow the onscreen instruction to confirm the selection C. Enter...
RAID Installation Guide
Page 18
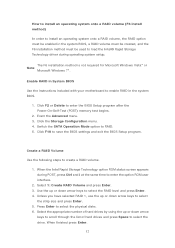
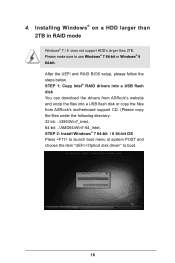
... a USB flash disk You can download the drivers from ASRock's website and unzip the files into a USB flash disk or copy the files from ASRock's motherboard support CD. (Please copy the files under the following directory: 32 bit: ..\i386\Win7_Intel.. 64-bit: ..\AMD64\Win7-64_Intel.. Please make sure to boot. ...
... a USB flash disk You can download the drivers from ASRock's website and unzip the files into a USB flash disk or copy the files from ASRock's motherboard support CD. (Please copy the files under the following directory: 32 bit: ..\i386\Win7_Intel.. 64-bit: ..\AMD64\Win7-64_Intel.. Please make sure to boot. ...
RAID Installation Guide
Page 19
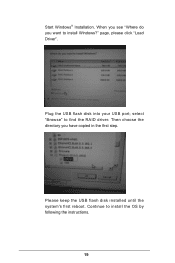
When you see "Where do you have copied in the first step. page, please click "Load Driver". select "Browse" to install Windows?" Continue to install the OS by following the instructions. 19 Start Windows® Installation. Plug the USB flash disk into your USB port; Then choose the directory you want to find the RAID driver. Please keep the USB flash disk installed until the system's first reboot.
When you see "Where do you have copied in the first step. page, please click "Load Driver". select "Browse" to install Windows?" Continue to install the OS by following the instructions. 19 Start Windows® Installation. Plug the USB flash disk into your USB port; Then choose the directory you want to find the RAID driver. Please keep the USB flash disk installed until the system's first reboot.
RAID Installation Guide
Page 20
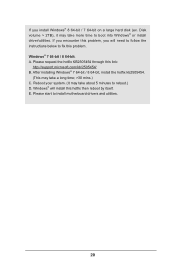
... / 8 64-bit, install the hotfix kb2505454. (This may take more time to reboot.) D. Windows® will need to follow the instructions below to install motherboard drivers and utilities. 20 If you encounter this problem. Windows® 7 64-bit / 8 64-bit: A. Please request the hotfix KB2505454 through this hotfix then reboot by.... E. Reboot your system. (It may take a long time; >30 mins.) C. Disk volume > 2TB), it may take about 5 minutes to boot into Windows® or install driver/utilities.
... / 8 64-bit, install the hotfix kb2505454. (This may take more time to reboot.) D. Windows® will need to follow the instructions below to install motherboard drivers and utilities. 20 If you encounter this problem. Windows® 7 64-bit / 8 64-bit: A. Please request the hotfix KB2505454 through this hotfix then reboot by.... E. Reboot your system. (It may take a long time; >30 mins.) C. Disk volume > 2TB), it may take about 5 minutes to boot into Windows® or install driver/utilities.

User Manual
Page 6
Contents Chapter 1 Introduction 1 1.2 Specifications 2 1.3 System Motherboard Components 4 1.4 Rear Panel 6 1.5 System Chassis 7 1.6 MHSL (Mobile High Speed Link ) 8 1.7 Remote Controller 10 Chapter 2 Opening the chassis 11 Chapter 3 Reinstalling the ODD/HDD 12 Chapter 4 Installing the second HDD 13 Chapter 5 Reinstalling the DIMMs 15 Chapter 6 Reinstalling the CPU 16 Chapter 7 Dual Monitor 17 Chapter 8 Software and Utilities Operation 18 8.1 Installing Drivers 18 8.2 A-Tuning 19 8.3 Symantec Norton AntiVirus Software free bundle (Trial version) 23
Contents Chapter 1 Introduction 1 1.2 Specifications 2 1.3 System Motherboard Components 4 1.4 Rear Panel 6 1.5 System Chassis 7 1.6 MHSL (Mobile High Speed Link ) 8 1.7 Remote Controller 10 Chapter 2 Opening the chassis 11 Chapter 3 Reinstalling the ODD/HDD 12 Chapter 4 Installing the second HDD 13 Chapter 5 Reinstalling the DIMMs 15 Chapter 6 Reinstalling the CPU 16 Chapter 7 Dual Monitor 17 Chapter 8 Software and Utilities Operation 18 8.1 Installing Drivers 18 8.2 A-Tuning 19 8.3 Symantec Norton AntiVirus Software free bundle (Trial version) 23
User Manual
Page 24
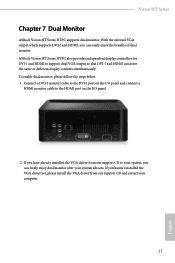
With the internal VGA output which supports DVI-I and HDMI, you haven't installed the VGA driver yet, please install the VGA driver from our support CD to the HDMI port on the I/O panel and connect a HDMI monitor cable to your system reboots. Connect a DVI-I ... HDMI to support dual VGA output so that DVI-I /O panel. 2. Vision HT Series Chapter 7 Dual Monitor ASRock Vision HT Series HTPC supports dual monitor. If you can freely enjoy dual monitor after your system, you have already installed the VGA driver from our support CD and restart your computer. 17 English To enable dual...
With the internal VGA output which supports DVI-I and HDMI, you haven't installed the VGA driver yet, please install the VGA driver from our support CD to the HDMI port on the I/O panel and connect a HDMI monitor cable to your system reboots. Connect a DVI-I ... HDMI to support dual VGA output so that DVI-I /O panel. 2. Vision HT Series Chapter 7 Dual Monitor ASRock Vision HT Series HTPC supports dual monitor. If you can freely enjoy dual monitor after your system, you have already installed the VGA driver from our support CD and restart your computer. 17 English To enable dual...
User Manual
Page 25
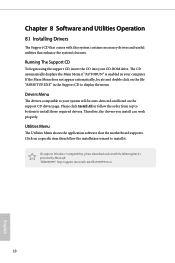
... is enabled in the Support CD to install it. Please click Install All or follow the installation wizard to display the menu. Therefore, the drivers you install can work properly. "KB2720599": http://support.microsoft.com/kb/2720599/en-us 18 English Running The Support CD To begin using the support... CD, insert the CD into your computer. Drivers Menu The drivers compatible to your system will be auto-detected and listed on the file "ASRSETUP.EXE" in your CD-ROM drive. Utilities Menu The...
... is enabled in the Support CD to install it. Please click Install All or follow the installation wizard to display the menu. Therefore, the drivers you install can work properly. "KB2720599": http://support.microsoft.com/kb/2720599/en-us 18 English Running The Support CD To begin using the support... CD, insert the CD into your computer. Drivers Menu The drivers compatible to your system will be auto-detected and listed on the file "ASRSETUP.EXE" in your CD-ROM drive. Utilities Menu The...
User Manual
Page 26
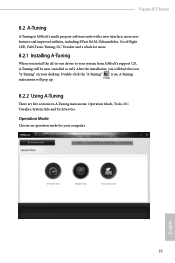
.... Double-click the "A-Tuning" icon, A-Tuning main menu will be auto-installed as well. Vision HT Series 8.2 A-Tuning A-Tuning is ASRock's multi purpose software suite with a new interface, more new features and improved utilities, including XFast... RAM, Dehumidifier, Good Night LED, FAN-Tastic Tuning, OC Tweaker and a whole lot more. 8.2.1 Installing A-Tuning When you will find the icon "A-Tuning" on your desktop. After the installation, you install the all-in-one driver...
.... Double-click the "A-Tuning" icon, A-Tuning main menu will be auto-installed as well. Vision HT Series 8.2 A-Tuning A-Tuning is ASRock's multi purpose software suite with a new interface, more new features and improved utilities, including XFast... RAM, Dehumidifier, Good Night LED, FAN-Tastic Tuning, OC Tweaker and a whole lot more. 8.2.1 Installing A-Tuning When you will find the icon "A-Tuning" on your desktop. After the installation, you install the all-in-one driver...
User Manual
Page 55
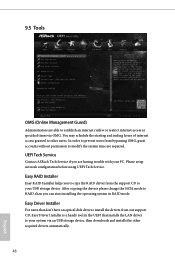
...able to your PC. 9.5 Tools OMG (Online Management Guard) Administrators are required. Please setup network configuration before using UEFI Tech Service. UEFI Tech Service Contact ASRock Tech Service if you can start installing the operating system in the UEFI that don't have an optical disk drive to install the... drivers from the support CD to establish an internet curfew or restrict internet access at specified times via an USB storage device, then downloads and ...
...able to your PC. 9.5 Tools OMG (Online Management Guard) Administrators are required. Please setup network configuration before using UEFI Tech Service. UEFI Tech Service Contact ASRock Tech Service if you can start installing the operating system in the UEFI that don't have an optical disk drive to install the... drivers from the support CD to establish an internet curfew or restrict internet access at specified times via an USB storage device, then downloads and ...
