User Manual
Page 5
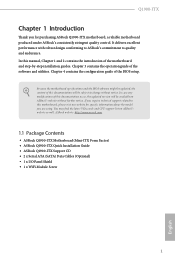
... software and utilities. Because the motherboard specifications and the BIOS software might be updated, the content of this documentation will be subject to quality and endurance. ASRock website http://www.asrock.com. 1.1 Package Contents • ASRock Q1900-ITX Motherboard (Mini-ITX Form Factor) • ASRock Q1900-ITX Quick Installation Guide • ASRock Q1900-ITX Support CD • 2 x Serial ATA (SATA) Data Cables (Optional...
... software and utilities. Because the motherboard specifications and the BIOS software might be updated, the content of this documentation will be subject to quality and endurance. ASRock website http://www.asrock.com. 1.1 Package Contents • ASRock Q1900-ITX Motherboard (Mini-ITX Form Factor) • ASRock Q1900-ITX Quick Installation Guide • ASRock Q1900-ITX Support CD • 2 x Serial ATA (SATA) Data Cables (Optional...

User Manual
Page 8
...; 32-bit operating systems. Windows® 64-bit operating systems do not have such limitations. English 4 BIOS Feature Hardware Monitor OS Certifications • 1 x Front Panel Audio Connector • 1 x USB 2.0 Header (Supports 2 USB 2.0 ports) (Supports ESD Protection (ASRock Full Spike Protection)) • 1 x USB 3.0 Header by ASMedia ASM1074 (Supports 2 USB 3.0 ports) (Supports ESD Protection...
...; 32-bit operating systems. Windows® 64-bit operating systems do not have such limitations. English 4 BIOS Feature Hardware Monitor OS Certifications • 1 x Front Panel Audio Connector • 1 x USB 2.0 Header (Supports 2 USB 2.0 ports) (Supports ESD Protection (ASRock Full Spike Protection)) • 1 x USB 3.0 Header by ASMedia ASM1074 (Supports 2 USB 3.0 ports) (Supports ESD Protection...

User Manual
Page 9
1.3 Motherboard Layout 64Mb BIOS CPU_FAN1 DDR3_A1 Q1900-ITX PS2 Mouse PS2 Keyboard RoHS Q1900-ITX DVI1 VGA1 AT X P W R 1 DDR3_B1 Front USB 3.0 USB 2.0 T: USB3 B: USB4 CMOS Battery MINI_PCIE1 USB 3.0 T: USB3 Top: RJ-45 LAN B: USB4 HD_AUDIO1 1 Super I/O Top: CTR BASS Center: REAR SPK FRONT Top: LINE IN Center: AUDIO CODEC LPT1 1 PCIE1 USB1_2 1 SATA3_A2 SATA3_A1 SATA2_2 SATA2_1 COM1 1 TPMS1 1 CLRCMOS1 CI1 1 1 SPEAKER1 1 USB3_1_2 PANEL1 PLED PWRBTN 1 HDLED RESET Bottom: MIC IN HDMI Bottom: Optical SPDIF English 5
1.3 Motherboard Layout 64Mb BIOS CPU_FAN1 DDR3_A1 Q1900-ITX PS2 Mouse PS2 Keyboard RoHS Q1900-ITX DVI1 VGA1 AT X P W R 1 DDR3_B1 Front USB 3.0 USB 2.0 T: USB3 B: USB4 CMOS Battery MINI_PCIE1 USB 3.0 T: USB3 Top: RJ-45 LAN B: USB4 HD_AUDIO1 1 Super I/O Top: CTR BASS Center: REAR SPK FRONT Top: LINE IN Center: AUDIO CODEC LPT1 1 PCIE1 USB1_2 1 SATA3_A2 SATA3_A1 SATA2_2 SATA2_1 COM1 1 TPMS1 1 CLRCMOS1 CI1 1 1 SPEAKER1 1 USB3_1_2 PANEL1 PLED PWRBTN 1 HDLED RESET Bottom: MIC IN HDMI Bottom: Optical SPDIF English 5

User Manual
Page 17
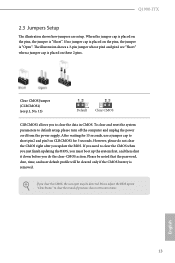
... clear the CMOS right after you clear the CMOS, the case open may be cleared only if the CMOS battery is removed. Please adjust the BIOS option "Clear Status" to default setup, please turn off the computer and unplug the power cord from the power supply. After waiting for 5 seconds. English... before you to short pin2 and pin3 on the pins, the jumper is "Open". However, please do the clear-CMOS action. If you update the BIOS. Q1900-ITX 2.3 Jumpers Setup The illustration shows how jumpers are "Short" when a jumper cap is placed on the pins, the jumper is "Short".
... clear the CMOS right after you clear the CMOS, the case open may be cleared only if the CMOS battery is removed. Please adjust the BIOS option "Clear Status" to default setup, please turn off the computer and unplug the power cord from the power supply. After waiting for 5 seconds. English... before you to short pin2 and pin3 on the pins, the jumper is "Open". However, please do the clear-CMOS action. If you update the BIOS. Q1900-ITX 2.3 Jumpers Setup The illustration shows how jumpers are "Short" when a jumper cap is placed on the pins, the jumper is "Short".

User Manual
Page 59
4.4 Tools Q1900-ITX Instant Flash Save UEFI files in your UEFI. Please setup network configuration before using Internet Flash. *For BIOS backup and recovery purpose, it is recommended to plug in your USB storage device and run Instant Flash to update your USB pen drive before using this function. 55 English Internet Flash ASRock Internet Flash downloads and updates the latest UEFI firmware version from our servers for you.
4.4 Tools Q1900-ITX Instant Flash Save UEFI files in your UEFI. Please setup network configuration before using Internet Flash. *For BIOS backup and recovery purpose, it is recommended to plug in your USB storage device and run Instant Flash to update your USB pen drive before using this function. 55 English Internet Flash ASRock Internet Flash downloads and updates the latest UEFI firmware version from our servers for you.

Quick Installation Guide
Page 3
Motherboard Layout 64Mb BIOS CPU_FAN1 DDR3_A1 Q1900-ITX PS2 Mouse PS2 Keyboard RoHS Q1900-ITX DVI1 VGA1 AT X P W R 1 DDR3_B1 Front USB 3.0 USB 2.0 T: USB3 B: USB4 CMOS Battery MINI_PCIE1 USB 3.0 T: USB3 Top: RJ-45 LAN B: USB4 HD_AUDIO1 1 Super I/O Top: CTR BASS Center: REAR SPK FRONT Top: LINE IN Center: AUDIO CODEC LPT1 1 PCIE1 USB1_2 1 SATA3_A2 SATA3_A1 SATA2_2 SATA2_1 COM1 1 TPMS1 1 CLRCMOS1 CI1 1 1 SPEAKER1 1 USB3_1_2 PANEL1 PLED PWRBTN 1 HDLED RESET Bottom: MIC IN HDMI Bottom: Optical SPDIF English 1
Motherboard Layout 64Mb BIOS CPU_FAN1 DDR3_A1 Q1900-ITX PS2 Mouse PS2 Keyboard RoHS Q1900-ITX DVI1 VGA1 AT X P W R 1 DDR3_B1 Front USB 3.0 USB 2.0 T: USB3 B: USB4 CMOS Battery MINI_PCIE1 USB 3.0 T: USB3 Top: RJ-45 LAN B: USB4 HD_AUDIO1 1 Super I/O Top: CTR BASS Center: REAR SPK FRONT Top: LINE IN Center: AUDIO CODEC LPT1 1 PCIE1 USB1_2 1 SATA3_A2 SATA3_A1 SATA2_2 SATA2_1 COM1 1 TPMS1 1 CLRCMOS1 CI1 1 1 SPEAKER1 1 USB3_1_2 PANEL1 PLED PWRBTN 1 HDLED RESET Bottom: MIC IN HDMI Bottom: Optical SPDIF English 1

Quick Installation Guide
Page 7
... • ASRock Q1900-ITX Motherboard (Mini-ITX Form Factor) • ASRock Q1900-ITX Quick Installation Guide • ASRock Q1900-ITX Support CD • 2 x Serial ATA (SATA) Data Cables (Optional) • 1 x I/O Panel Shield • 1 x WiFi Module Screw 5 English You may find the latest VGA cards and CPU support list on ASRock's website without notice. Because the motherboard specifications and the BIOS software might...
... • ASRock Q1900-ITX Motherboard (Mini-ITX Form Factor) • ASRock Q1900-ITX Quick Installation Guide • ASRock Q1900-ITX Support CD • 2 x Serial ATA (SATA) Data Cables (Optional) • 1 x I/O Panel Shield • 1 x WiFi Module Screw 5 English You may find the latest VGA cards and CPU support list on ASRock's website without notice. Because the motherboard specifications and the BIOS software might...

Quick Installation Guide
Page 10
...; 32-bit operating systems. Windows® 64-bit operating systems do not have such limitations. English 8 BIOS Feature Hardware Monitor OS Certifications • 1 x Front Panel Audio Connector • 1 x USB 2.0 Header (Supports 2 USB 2.0 ports) (Supports ESD Protection (ASRock Full Spike Protection)) • 1 x USB 3.0 Header by ASMedia ASM1074 (Supports 2 USB 3.0 ports) (Supports ESD Protection...
...; 32-bit operating systems. Windows® 64-bit operating systems do not have such limitations. English 8 BIOS Feature Hardware Monitor OS Certifications • 1 x Front Panel Audio Connector • 1 x USB 2.0 Header (Supports 2 USB 2.0 ports) (Supports ESD Protection (ASRock Full Spike Protection)) • 1 x USB 3.0 Header by ASMedia ASM1074 (Supports 2 USB 3.0 ports) (Supports ESD Protection...
Quick Installation Guide
Page 15
... clear and reset the system parameters to clear the record of previous chassis intrusion status. Please adjust the BIOS option "Clear Status" to default setup, please turn off the computer and unplug the power cord from the power supply. If no jumper cap is ... clear the CMOS when you just finish updating the BIOS, you must boot up the system first, and then shut it down before you clear the CMOS, the case open may be cleared only if the CMOS battery is "Short". English 13 Q1900-ITX 2.3 Jumpers Setup The illustration shows how jumpers are "Short...
... clear and reset the system parameters to clear the record of previous chassis intrusion status. Please adjust the BIOS option "Clear Status" to default setup, please turn off the computer and unplug the power cord from the power supply. If no jumper cap is ... clear the CMOS when you just finish updating the BIOS, you must boot up the system first, and then shut it down before you clear the CMOS, the case open may be cleared only if the CMOS battery is "Short". English 13 Q1900-ITX 2.3 Jumpers Setup The illustration shows how jumpers are "Short...


