
User Manual
Page 3
... 24 5. Contents 1 Introduction 4 1.1 Package Contents 4 1.2 Specifications 4 1.3 Motherboard Layout 6 1.4 ASRock I/OTM 7 2 Installation 8 2.1 Screw Holes 8 2.2 Pre-installation Precautions 8 2.3 CPU Installation 8 2.4 Installation of Heatsink and CPU fan 9 2.5 Installation of Memory Modules (DIMM 9 2.6 Expansion Slots 10 2.7 Jumpers Setup 10 2.8 Connectors 11 3 BIOS Setup 14 3.1 BIOS Setup Utility 14 3.1.1 BIOS Menu Bar 14 3.1.2 Legend Bar 14 3.2 Main Menu 15...
... 24 5. Contents 1 Introduction 4 1.1 Package Contents 4 1.2 Specifications 4 1.3 Motherboard Layout 6 1.4 ASRock I/OTM 7 2 Installation 8 2.1 Screw Holes 8 2.2 Pre-installation Precautions 8 2.3 CPU Installation 8 2.4 Installation of Heatsink and CPU fan 9 2.5 Installation of Memory Modules (DIMM 9 2.6 Expansion Slots 10 2.7 Jumpers Setup 10 2.8 Connectors 11 3 BIOS Setup 14 3.1 BIOS Setup Utility 14 3.1.1 BIOS Menu Bar 14 3.1.2 Legend Bar 14 3.2 Main Menu 15...
User Manual
Page 4
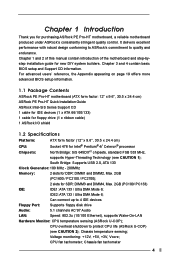
...users' reference, the Appendix appearing on page 19 offers more advanced BIOS setup information. 1.1 Package Contents ASRock PE Pro-HT motherboard (ATX form factor: 12" x 9.6", 30.5 x 24.4 cm) ASRock PE Pro-HT Quick Installation Guide ASRock Intel-SiS Series Support CD 1 cable for IDE devices (1 x...slots for DDR: DIMM1 and DIMM2, Max. 2GB (PC1600 / PC2100 / PC2700); 2 slots for purchasing ASRock PE Pro-HT motherboard, a reliable motherboard produced under ASRock's consistently stringent quality control. Chapter 1 and 2 of this manual contain introduction of the motherboard and step-bystep...
...users' reference, the Appendix appearing on page 19 offers more advanced BIOS setup information. 1.1 Package Contents ASRock PE Pro-HT motherboard (ATX form factor: 12" x 9.6", 30.5 x 24.4 cm) ASRock PE Pro-HT Quick Installation Guide ASRock Intel-SiS Series Support CD 1 cable for IDE devices (1 x...slots for DDR: DIMM1 and DIMM2, Max. 2GB (PC1600 / PC2100 / PC2700); 2 slots for purchasing ASRock PE Pro-HT motherboard, a reliable motherboard produced under ASRock's consistently stringent quality control. Chapter 1 and 2 of this manual contain introduction of the motherboard and step-bystep...
User Manual
Page 5
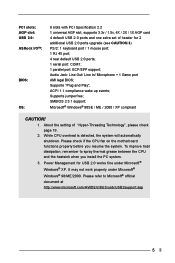
Supports jumperfree; About the setting of header for USB 2.0 works fine under Microsoft® Windows® 98/ME/2000. PCI slots: AGP slot: USB 2.0: ASRock I/OTM: BIOS: OS: 6 slots with PCI Specification 2.2 1 universal AGP slot, supports 3.3v / 1.5v, 4X / 2X / 1X AGP card 4 default USB 2.0 ports and one extra set of "Hyper... CPU fan on the motherboard functions properly before you install the PC system. 3. Audio Jack: Line Out/ Line In/ Microphone + 1 Game port AMI legal BIOS; Please refer to spray thermal grease between the CPU and the heatsink when you resume the system.
Supports jumperfree; About the setting of header for USB 2.0 works fine under Microsoft® Windows® 98/ME/2000. PCI slots: AGP slot: USB 2.0: ASRock I/OTM: BIOS: OS: 6 slots with PCI Specification 2.2 1 universal AGP slot, supports 3.3v / 1.5v, 4X / 2X / 1X AGP card 4 default USB 2.0 ports and one extra set of "Hyper... CPU fan on the motherboard functions properly before you install the PC system. 3. Audio Jack: Line Out/ Line In/ Microphone + 1 Game port AMI legal BIOS; Please refer to spray thermal grease between the CPU and the heatsink when you resume the system.
User Manual
Page 6
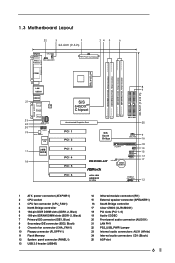
... PHY AUX1 CD1 1 Audio1 Audio CODEC Super I/O 11 2MB BIOS 18 8 7 SiS 645DXHT Chipset Accelerated Graphics Port 01 23 01 23 IDE2 IDE1 25 PCI 1 PCI 2 PCI 3 PCI 4 PCI 5 SiS South Bridge 9 CHA_FAN1 16 10 FLOPPY1 1 14 IR1 1 15 SPEAKER1 1 13 USB45 17 PE PRO-HT CLRCMOS1 CMOS Battery PCI 6 ATA133 USB2.0 5.1CH PANEL...
... PHY AUX1 CD1 1 Audio1 Audio CODEC Super I/O 11 2MB BIOS 18 8 7 SiS 645DXHT Chipset Accelerated Graphics Port 01 23 01 23 IDE2 IDE1 25 PCI 1 PCI 2 PCI 3 PCI 4 PCI 5 SiS South Bridge 9 CHA_FAN1 16 10 FLOPPY1 1 14 IR1 1 15 SPEAKER1 1 13 USB45 17 PE PRO-HT CLRCMOS1 CMOS Battery PCI 6 ATA133 USB2.0 5.1CH PANEL...
User Manual
Page 14
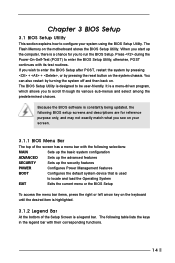
...is highlighted. 3.1.2 Legend Bar At the bottom of the Setup Screen is a legend bar. Chapter 3 BIOS Setup 3.1 BIOS Setup Utility This section explains how to configure your screen. 3.1.1 BIOS Menu Bar The top of the screen has a menu bar with their corresponding functions. 14 If you ...SECURITY Sets up the security features POWER Configures Power Management features BOOT Configures the default system device that is used to enter the BIOS Setup Utility, otherwise, POST continues with its various sub-menus and select among the predetermined choices. Press during the Power-On-Self...
...is highlighted. 3.1.2 Legend Bar At the bottom of the Setup Screen is a legend bar. Chapter 3 BIOS Setup 3.1 BIOS Setup Utility This section explains how to configure your screen. 3.1.1 BIOS Menu Bar The top of the screen has a menu bar with their corresponding functions. 14 If you ...SECURITY Sets up the security features POWER Configures Power Management features BOOT Configures the default system device that is used to enter the BIOS Setup Utility, otherwise, POST continues with its various sub-menus and select among the predetermined choices. Press during the Power-On-Self...

User Manual
Page 15
Dec Day: 01 - 31 Year: 1980 - 2099 PE Pro-HT BIOS P1.00 Pentium (R) 4 Family CPU 2100 MHz 512 KB F23 / 08 256 MB 256 MB / 333 MHz None None None F1:Help Esc:Exit :Select ... Second fields. System Time [Hour:Minute:Second] Set the system to the time that you enter the BIOS Setup Utility, the following screen appears. Main Advanced System Date System Time Floppy Drives IDE Devices BIOS Version Processor Type Processor Speed Cache Size Microcode Update Total Memory DDR1 DDR2 SDR1 SDR2 AMIBIOS SETUP...
Dec Day: 01 - 31 Year: 1980 - 2099 PE Pro-HT BIOS P1.00 Pentium (R) 4 Family CPU 2100 MHz 512 KB F23 / 08 256 MB 256 MB / 333 MHz None None None F1:Help Esc:Exit :Select ... Second fields. System Time [Hour:Minute:Second] Set the system to the time that you enter the BIOS Setup Utility, the following screen appears. Main Advanced System Date System Time Floppy Drives IDE Devices BIOS Version Processor Type Processor Speed Cache Size Microcode Update Total Memory DDR1 DDR2 SDR1 SDR2 AMIBIOS SETUP...
User Manual
Page 16
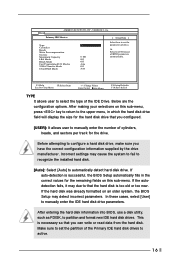
...number of cylinders, heads, and sectors per track for the remaining fields on an older system, the BIOS Setup may detect incorrect parameters. If the hard disk was already formatted on this sub-menu, press key...drives to automatically detect hard disk drive. After entering the hard disk information into BIOS, use a disk utility, such as FDISK, to manually enter the IDE hard disk drive parameters. If... auto-detection is successful, the BIOS Setup automatically fills in which the hard disk drive field will display the size for the...
...number of cylinders, heads, and sectors per track for the remaining fields on an older system, the BIOS Setup may detect incorrect parameters. If the hard disk was already formatted on this sub-menu, press key...drives to automatically detect hard disk drive. After entering the hard disk information into BIOS, use a disk utility, such as FDISK, to manually enter the IDE hard disk drive parameters. If... auto-detection is successful, the BIOS Setup automatically fills in which the hard disk drive field will display the size for the...
User Manual
Page 17
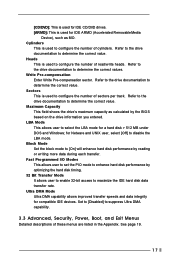
... is used to configure the number of sectors per track. Heads This is used for IDE ARMD (Accelerated RemovableMedia Device), such as calculated by the BIOS based on the drive information you entered. Fast Programmed I/O Modes This allows user to set the PIO mode to enhance hard disk performance by reading...
... is used to configure the number of sectors per track. Heads This is used for IDE ARMD (Accelerated RemovableMedia Device), such as calculated by the BIOS based on the drive information you entered. Fast Programmed I/O Modes This allows user to set the PIO mode to enhance hard disk performance by reading...
User Manual
Page 19
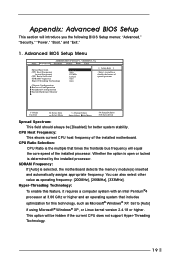
... This field should always be hidden if the current CPU does not support Hyper-Threading Technology. 19 This option will introduce you the following BIOS Setup menus: "Advanced," "Security," "Power," "Boot," and "Exit." 1. Hyper-Threading Technology: To enable this technology, such as ... Frequency: If [Auto] is selected, the motherboard detects the memory module(s) inserted and automatically assigns appropriate frequency. Appendix: Advanced BIOS Setup This section will be [Disabled] for this feature, it requires a computer system with an Intel Pentium®4 processor at...
... This field should always be hidden if the current CPU does not support Hyper-Threading Technology. 19 This option will introduce you the following BIOS Setup menus: "Advanced," "Security," "Power," "Boot," and "Exit." 1. Hyper-Threading Technology: To enable this technology, such as ... Frequency: If [Auto] is selected, the motherboard detects the memory module(s) inserted and automatically assigns appropriate frequency. Appendix: Advanced BIOS Setup This section will be [Disabled] for this feature, it requires a computer system with an Intel Pentium®4 processor at...

User Manual
Page 23
Password Check: Select the check point for "Password Check". If [Setup] option is selected, the "Password Check" is performed before BIOS setup. Restore on the system from the power-soft-off mode. PS/2 Keyboard Power On: Use this to enable or disable Ring-in ... ] Set the power state after an unexpected AC power loss. If [Always] option is selected, the "Password Check" is performed before both boot-up and BIOS Setup. 3. Power Setup Menu Main Advanced AMIBIOS SETUP UTILITY - Select [Auto] will enable this feature under Microsoft® Windows® 98 / ME. If [...
Password Check: Select the check point for "Password Check". If [Setup] option is selected, the "Password Check" is performed before BIOS setup. Restore on the system from the power-soft-off mode. PS/2 Keyboard Power On: Use this to enable or disable Ring-in ... ] Set the power state after an unexpected AC power loss. If [Always] option is selected, the "Password Check" is performed before both boot-up and BIOS Setup. 3. Power Setup Menu Main Advanced AMIBIOS SETUP UTILITY - Select [Auto] will enable this feature under Microsoft® Windows® 98 / ME. If [...
User Manual
Page 24
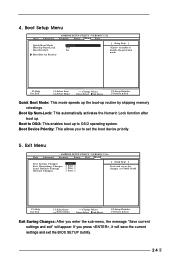
.... 5. Boot Device Priority: This allows you enter the sub-menu, the message "Save current settings and exit" will save the current settings and exit the BIOS SETUP Uutility. 24 Exit Menu Main Advanced AMIBIOS SETUP UTILITY - 4. Boot Setup Menu Main Advanced AMIBIOS SETUP UTILITY - Boot Up Num-Lock: This automatically activates...
.... 5. Boot Device Priority: This allows you enter the sub-menu, the message "Save current settings and exit" will save the current settings and exit the BIOS SETUP Uutility. 24 Exit Menu Main Advanced AMIBIOS SETUP UTILITY - 4. Boot Setup Menu Main Advanced AMIBIOS SETUP UTILITY - Boot Up Num-Lock: This automatically activates...

User Manual
Page 25
Discard Changes: After you enter the sub-menu, the message "Load setup original values" will be restored. All changes are discarded. 25 If you press , original values will appear. If you press , you will appear. Exit Discarding Changes: After you enter the submenu, the message "Quit without saving changes" will exit the BIOS Setup Utility without making any changes to the settings. Load Default Settings: After you press , it will appear. If you enter the submenu, the message "Load Default Settings" will load the default values for all the setup configuration.
Discard Changes: After you enter the sub-menu, the message "Load setup original values" will be restored. All changes are discarded. 25 If you press , original values will appear. If you press , you will appear. Exit Discarding Changes: After you enter the submenu, the message "Quit without saving changes" will exit the BIOS Setup Utility without making any changes to the settings. Load Default Settings: After you press , it will appear. If you enter the submenu, the message "Load Default Settings" will load the default values for all the setup configuration.


