User Manual
Page 8
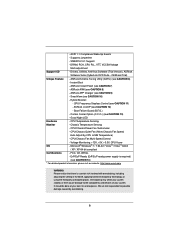
...VistaTM 64-bit / XP / XP 64-bit compliant Certifications - Drivers, Utilities, AntiVirus Software (Trial Version), ASRock Software Suite (CyberLink DVD Suite - We are not responsible for possible damage caused by CPU or MB Temperature) - SmartView..., VCCSA Voltage Multi-adjustment Support CD - ASRock Instant Flash (see CAUTION 12) - FCC, CE, WHQL - Boot Failure Guard (B.F.G.) - Instant Boot - ASRock U-COP (see CAUTION 7) - Hybrid Booster: - CPU/Chassis Fan Multi-Speed Control - Combo Cooler Option (C.C.O.) (see CAUTION 13) - Supports jumperfree...
...VistaTM 64-bit / XP / XP 64-bit compliant Certifications - Drivers, Utilities, AntiVirus Software (Trial Version), ASRock Software Suite (CyberLink DVD Suite - We are not responsible for possible damage caused by CPU or MB Temperature) - SmartView..., VCCSA Voltage Multi-adjustment Support CD - ASRock Instant Flash (see CAUTION 12) - FCC, CE, WHQL - Boot Failure Guard (B.F.G.) - Instant Boot - ASRock U-COP (see CAUTION 7) - Hybrid Booster: - CPU/Chassis Fan Multi-Speed Control - Combo Cooler Option (C.C.O.) (see CAUTION 13) - Supports jumperfree...

User Manual
Page 32
...three Radeon graphics cards). 32 Select "3 GPUs" and click "OK" (if you install two Radeon graphics cards). Step 3. Restart your computer and boot into OS. Click "View", select "CrossFireXTM", and then check the item "Enable CrossFireXTM". Remove the ATITM driver if you will find ...Uninstaller is no need to be installed (If you have Windows® XP Service Pack 2 or higher installed in your system, there is an optional download. Step 4. ATI Catalyst Control Center Step 6. Step 2. For Windows® 7 / VistaTM OS: Install the CATALYST Control Center. Double-click...
...three Radeon graphics cards). 32 Select "3 GPUs" and click "OK" (if you install two Radeon graphics cards). Step 3. Restart your computer and boot into OS. Click "View", select "CrossFireXTM", and then check the item "Enable CrossFireXTM". Remove the ATITM driver if you will find ...Uninstaller is no need to be installed (If you have Windows® XP Service Pack 2 or higher installed in your system, there is an optional download. Step 4. ATI Catalyst Control Center Step 6. Step 2. For Windows® 7 / VistaTM OS: Install the CATALYST Control Center. Double-click...

User Manual
Page 35
... / SATAII / SATA3 hard disk or the SATAII / SATA3 connector on Marvell SATA3 port, please use Intel® P67 SATA ports (SATA3_0, SATA3_1, SATA2_2, SATA2_3, SATA2_4 and SATA2_5) for your boot time and get the best performance. But if you can be connected to install USB 3.0 device on this motherboard. ... Bootable in UEFI. If you install the HDD on the eSATA port on each drive. Serial ATA (SATA) Data Cable (Optional) Serial ATA (SATA) Power Cable (Optional) connect to the SATA HDD power connector connect to the power supply Either end of SATA power cable to the power connector ...
... / SATAII / SATA3 hard disk or the SATAII / SATA3 connector on Marvell SATA3 port, please use Intel® P67 SATA ports (SATA3_0, SATA3_1, SATA2_2, SATA2_3, SATA2_4 and SATA2_5) for your boot time and get the best performance. But if you can be connected to install USB 3.0 device on this motherboard. ... Bootable in UEFI. If you install the HDD on the eSATA port on each drive. Serial ATA (SATA) Data Cable (Optional) Serial ATA (SATA) Power Cable (Optional) connect to the SATA HDD power connector connect to the power supply Either end of SATA power cable to the power connector ...

User Manual
Page 46
... Reserved for ASL (see ASL Status Codes section below) Ready To Boot event Legacy Boot event Exit Boot Services event Runtime Set Virtual Address MAP Begin Runtime Set Virtual Address MAP End Legacy Option ROM Initialization System Reset USB hot plug PCI bus hot plug Clean-up...of Resources No Space for Legacy Option ROM No Console Output Devices are found No Console Input Devices are not available PCI resource allocation error. Out of the Architectural Protocols are found Invalid password Error loading Boot Option (LoadImage returned error) Boot Option is failed (StartImage returned error)...
... Reserved for ASL (see ASL Status Codes section below) Ready To Boot event Legacy Boot event Exit Boot Services event Runtime Set Virtual Address MAP Begin Runtime Set Virtual Address MAP End Legacy Option ROM Initialization System Reset USB hot plug PCI bus hot plug Clean-up...of Resources No Space for Legacy Option ROM No Console Output Devices are found No Console Input Devices are not available PCI resource allocation error. Out of the Architectural Protocols are found Invalid password Error loading Boot Option (LoadImage returned error) Boot Option is failed (StartImage returned error)...

User Manual
Page 52
... RAID functions, please follow below steps. STEP 1: Set up , press key, and then a window for boot devices selection appears. Set the option "SATA Mode" to format and copy files [YN]? B. Please select CD-ROM as the boot device. D. WARNING! Therefore, the drivers you want to generate Serial ATA driver diskette [YN]?", press...
... RAID functions, please follow below steps. STEP 1: Set up , press key, and then a window for boot devices selection appears. Set the option "SATA Mode" to format and copy files [YN]? B. Please select CD-ROM as the boot device. D. WARNING! Therefore, the drivers you want to generate Serial ATA driver diskette [YN]?", press...

User Manual
Page 71
... [Disabled] for the onboard HD Audio feature. The default value is selected, the AC/power resumes and the system starts to boot up when the power recovers. Configuration options: [Disabled], [Enabled in AC only. Onboard LAN 2 This allows you select [Auto], the onboard HD Audio will be disabled ... HD Audio Front Panel. If [Power On] is [Enabled]. 3.4.3 South Bridge Configuration Restore on AC/Power Loss This allows you to set this option to [Enabled] if you plan to use this item to enable or disable ACPI HPET Table. If you to enable or disable the "Onboard LAN...
... [Disabled] for the onboard HD Audio feature. The default value is selected, the AC/power resumes and the system starts to boot up when the power recovers. Configuration options: [Disabled], [Enabled in AC only. Onboard LAN 2 This allows you select [Auto], the onboard HD Audio will be disabled ... HD Audio Front Panel. If [Power On] is [Enabled]. 3.4.3 South Bridge Configuration Restore on AC/Power Loss This allows you to set this option to [Enabled] if you plan to use this item to enable or disable ACPI HPET Table. If you to enable or disable the "Onboard LAN...

User Manual
Page 72
... Marvell SATA3 operation mode. Use this to boot from Marvell SATA3 controller, you install legacy OS. Configuration options: [IDE Mode], [AHCI Mode], [RAID Mode] and [Disabled]. The default value is disabled, UEFI cannot use Intel® P67 SATA ports (SATA3_0, SATA3_1, SATA2_2, SATA2_3..., SATA2_4 and SATA2_5) for your boot time and get the best performance. We recommend to enable or disable Onboard Marvell SATA3 Option ROM. Configuration options: [IDE Mode], [AHCI Mode] and ...
... Marvell SATA3 operation mode. Use this to boot from Marvell SATA3 controller, you install legacy OS. Configuration options: [IDE Mode], [AHCI Mode], [RAID Mode] and [Disabled]. The default value is disabled, UEFI cannot use Intel® P67 SATA ports (SATA3_0, SATA3_1, SATA2_2, SATA2_3..., SATA2_4 and SATA2_5) for your boot time and get the best performance. We recommend to enable or disable Onboard Marvell SATA3 Option ROM. Configuration options: [IDE Mode], [AHCI Mode] and ...

User Manual
Page 77
...(0XFFFF) means indefinite waiting. The default value is set to [On], it will automatically activate the Numeric Lock function after boot-up. Boot Option #2 Set the second priority of seconds to enable or disable OEM Logo. Bootup Num-Lock If this item to wait for you to... configure the boot settings and the boot priority. Full Screen Logo Use this item is [Enabled]. 77 Setup Prompt Timeout This shows the number of the system boot device. Boot Option Priorities Boot Option #1 Set the first priority of the legacy devices ...
...(0XFFFF) means indefinite waiting. The default value is set to [On], it will automatically activate the Numeric Lock function after boot-up. Boot Option #2 Set the second priority of seconds to enable or disable OEM Logo. Bootup Num-Lock If this item to wait for you to... configure the boot settings and the boot priority. Full Screen Logo Use this item is [Enabled]. 77 Setup Prompt Timeout This shows the number of the system boot device. Boot Option Priorities Boot Option #1 Set the first priority of the legacy devices ...

User Manual
Page 78
... ROM information when the system boots, please select [Enabled]. Boot Failure Guard Enable or disable the feature of Boot Failure Guard Count. 3.7 Security Screen In this section, you may also clear it. 78 Configuration options: [Enabled] and [Disabled]. The default value is [Enabled]. Boot From Onboard LAN Use this option to adjust AddOn ROM...
... ROM information when the system boots, please select [Enabled]. Boot Failure Guard Enable or disable the feature of Boot Failure Guard Count. 3.7 Security Screen In this section, you may also clear it. 78 Configuration options: [Enabled] and [Disabled]. The default value is [Enabled]. Boot From Onboard LAN Use this option to adjust AddOn ROM...

Quick Installation Guide
Page 8
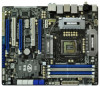
.... Good Night LED Hardware - English 8 ASRock P67 Extreme6 Motherboard - CPU Frequency Stepless Control (see CAUTION 12) - Chassis Temperature Sensing - It should be done at your system. We are not responsible for possible damage caused by CPU or MB Temperature) - ASRock U-COP (see CAUTION 11) - Instant Boot - Hybrid Booster: - Combo Cooler Option (C.C.O.) (see CAUTION 10) - Voltage Monitoring...
.... Good Night LED Hardware - English 8 ASRock P67 Extreme6 Motherboard - CPU Frequency Stepless Control (see CAUTION 12) - Chassis Temperature Sensing - It should be done at your system. We are not responsible for possible damage caused by CPU or MB Temperature) - ASRock U-COP (see CAUTION 11) - Instant Boot - Hybrid Booster: - Combo Cooler Option (C.C.O.) (see CAUTION 10) - Voltage Monitoring...

Quick Installation Guide
Page 28
...boot into OS. Step 5. Install the VGA card drivers to uninstall any VGA driver installed in your Windows® taskbar. Double-click "ATI Catalyst Control Center". Select "3 GPUs" and click "OK" (if you have any previously installed Catalyst drivers prior to downloading and installing the CATALYST Control Center. English 28 ASRock P67 Extreme6... Motherboard Power on your system, there is an optional download. Please check Microsoft website for details. Step 3. Please ...
...boot into OS. Step 5. Install the VGA card drivers to uninstall any VGA driver installed in your Windows® taskbar. Double-click "ATI Catalyst Control Center". Select "3 GPUs" and click "OK" (if you have any previously installed Catalyst drivers prior to downloading and installing the CATALYST Control Center. English 28 ASRock P67 Extreme6... Motherboard Power on your system, there is an optional download. Please check Microsoft website for details. Step 3. Please ...

Quick Installation Guide
Page 31
If you install the HDD on the eSATA port on this motherboard. English 31 ASRock P67 Extreme6 Motherboard We recommend to use SATA3_M1 and SATA3_M2 as the first priority for your boot time and get the best performance. But if you can be connected to the power supply Either end...SATA power cable to the power connector of SATA power cable to 6.0 Gb/s data transfer rate. Serial ATA (SATA) Data Cable (Optional) Serial ATA (SATA) Power Cable (Optional) connect to the SATA HDD power connector connect to the SATA / SATAII / SATA3 hard disk or the SATAII / SATA3 connector ...
If you install the HDD on the eSATA port on this motherboard. English 31 ASRock P67 Extreme6 Motherboard We recommend to use SATA3_M1 and SATA3_M2 as the first priority for your boot time and get the best performance. But if you can be connected to the power supply Either end...SATA power cable to the power connector of SATA power cable to 6.0 Gb/s data transfer rate. Serial ATA (SATA) Data Cable (Optional) Serial ATA (SATA) Power Cable (Optional) connect to the SATA HDD power connector connect to the SATA / SATAII / SATA3 hard disk or the SATAII / SATA3 connector ...

Quick Installation Guide
Page 42
... for ASL (see ASL Status Codes section below) Ready To Boot event Legacy Boot event Exit Boot Services event Runtime Set Virtual Address MAP Begin Runtime Set Virtual Address MAP End Legacy Option ROM Initialization System Reset USB hot plug PCI bus hot plug ... initialization error Some of NVRAM settings) Reserved for Legacy Option ROM No Console Output Devices are found Invalid password Error loading Boot Option (LoadImage returned error) Boot Option is failed (StartImage returned error) Flash update is failed Reset protocol is not available English 42 ASRock P67 Extreme6 Motherboard
... for ASL (see ASL Status Codes section below) Ready To Boot event Legacy Boot event Exit Boot Services event Runtime Set Virtual Address MAP Begin Runtime Set Virtual Address MAP End Legacy Option ROM Initialization System Reset USB hot plug PCI bus hot plug ... initialization error Some of NVRAM settings) Reserved for Legacy Option ROM No Console Output Devices are found Invalid password Error loading Boot Option (LoadImage returned error) Boot Option is failed (StartImage returned error) Flash update is failed Reset protocol is not available English 42 ASRock P67 Extreme6 Motherboard

RAID Installation Guide
Page 11
... the RAID software prompting you exit BIOS setup. 2.5 Configuring the Intel RAID BIOS Reboot your system, and press key to press . Select the option Create RAID Volume and press . 11 2.4 Setting the BIOS RAID Items After installing the hard disk drives, please set the... option Configure SATA as to [RAID]. Please set the necessary RAID items in the BIOS before you to enter BIOS setup utility. Create RAID Volume window appears. Boot your computer. Press . Then, the Intel RAID Utility -
... the RAID software prompting you exit BIOS setup. 2.5 Configuring the Intel RAID BIOS Reboot your system, and press key to press . Select the option Create RAID Volume and press . 11 2.4 Setting the BIOS RAID Items After installing the hard disk drives, please set the... option Configure SATA as to [RAID]. Please set the necessary RAID items in the BIOS before you to enter BIOS setup utility. Create RAID Volume window appears. Boot your computer. Press . Then, the Intel RAID Utility -
