User Manual
Page 9
...advanced proprietary hardware and software design, Intelligent Energy Saver is recommended to SATAII mode. Before you to access ASRock Instant Flash. You can press key during the POST or press key to BIOS setup menu to update system BIOS without sacrificing computing performance. Power Management for... the operation procedures of ASRock OC Tuner. Please visit our website for USB 2.0 works fine under Windows® ...
...advanced proprietary hardware and software design, Intelligent Energy Saver is recommended to SATAII mode. Before you to access ASRock Instant Flash. You can press key during the POST or press key to BIOS setup menu to update system BIOS without sacrificing computing performance. Power Management for... the operation procedures of ASRock OC Tuner. Please visit our website for USB 2.0 works fine under Windows® ...

User Manual
Page 33
... whether to it . Restore CPUID value back into memory. Set stack. Give control to flat mode with 4GB limit and GA20 enabled. Go to BIOS POST (ExecutePOSTKernel). 33
... whether to it . Restore CPUID value back into memory. Set stack. Give control to flat mode with 4GB limit and GA20 enabled. Go to BIOS POST (ExecutePOSTKernel). 33
User Manual
Page 34
...the system Initializes the interrupt controlling hardware (generally PIC) and interrupt vector table. Early CPU Init Start - Initializes the CPU. Early POST initialization of different Input Devices. See DIM Code Checkpoints section of the BIOS: Checkpoint 03 04 05 06 08 C0 C1 C2 C5...Initializes different devices through DIM. If the CMOS checksum is being done after Auto detection of PS/2 mouse. Initializes data variables that the POST INT09h handler gets control for EGA, and DMA controllers. Initialize CH-0 as mentioned in KBC port. Also, update the Kernel Variables....
...the system Initializes the interrupt controlling hardware (generally PIC) and interrupt vector table. Early CPU Init Start - Initializes the CPU. Early POST initialization of different Input Devices. See DIM Code Checkpoints section of the BIOS: Checkpoint 03 04 05 06 08 C0 C1 C2 C5...Initializes different devices through DIM. If the CMOS checksum is being done after Auto detection of PS/2 mouse. Initializes data variables that the POST INT09h handler gets control for EGA, and DMA controllers. Initialize CH-0 as mentioned in KBC port. Also, update the Kernel Variables....
User Manual
Page 35
... parameters. A9 Wait for DEL or ESC keys to OS Loader (typically INT19h). 35 Fill the free area in the system. AA Uninstall POST INT1Ch vector and INT09h vector. Set the window for displaying text information. 37 Displaying sign-on message, CPU information, setup key message, and...DMAC-2. 3A Initialize RTC date/time. 3B Test for error. 87 Execute BIOS setup if needed . Display total memory in the system. 3C Mid POST initialization of ESCD in memory test. A1 Clean-up work needed . AB Prepare BBS for OS boot including final MTRR values. Initialize the CPU's...
... parameters. A9 Wait for DEL or ESC keys to OS Loader (typically INT19h). 35 Fill the free area in the system. AA Uninstall POST INT1Ch vector and INT09h vector. Set the window for displaying text information. 37 Displaying sign-on message, CPU information, setup key message, and...DMAC-2. 3A Initialize RTC date/time. 3B Test for error. 87 Execute BIOS setup if needed . Display total memory in the system. 3C Mid POST initialization of ESCD in memory test. A1 Clean-up work needed . AB Prepare BBS for OS boot including final MTRR values. Initialize the CPU's...
User Manual
Page 41
... insert a floppy diskette into your optical drive to boot your optical drive first. Using SATA / SATAII HDDs with NCQ function STEP 1: Set Up BIOS. During POST at the beginning of system boot-up to bottom side to format and copy files [YN]? A. B. Insert the Support CD into the floppy drive, and...
... insert a floppy diskette into your optical drive to boot your optical drive first. Using SATA / SATAII HDDs with NCQ function STEP 1: Set Up BIOS. During POST at the beginning of system boot-up to bottom side to format and copy files [YN]? A. B. Insert the Support CD into the floppy drive, and...

User Manual
Page 44
Please press during the Power-On-Self-Test (POST) to get into the sub screen. 44 Chapter 3: BIOS SETUP UTILITY 3.1 Introduction This section explains how to use the BIOS SETUP UTILITY to configure your ... the motherboard stores the BIOS SETUP UTILITY. The BIOS FWH chip on the menu bar, and then press to enter the BIOS SETUP UTILITY, otherwise, POST will continue with the following selections: Main To set up the system time/date information Smart To load the BIOS according to enter the BIOS...
Please press during the Power-On-Self-Test (POST) to get into the sub screen. 44 Chapter 3: BIOS SETUP UTILITY 3.1 Introduction This section explains how to use the BIOS SETUP UTILITY to configure your ... the motherboard stores the BIOS SETUP UTILITY. The BIOS FWH chip on the menu bar, and then press to enter the BIOS SETUP UTILITY, otherwise, POST will continue with the following selections: Main To set up the system time/date information Smart To load the BIOS according to enter the BIOS...

User Manual
Page 66
Full Screen Logo Use this option to adjust AddOn ROM Display. The default value is [Enabled]. 66 Enabled: Displays OEM Logo instead of POST messages. +F1 F9 F10 ESC Select Screen Select Item Change Option General Help Load Defaults Save and Exit Exit v02.54 (C) Copyright 1985-2003, American ... Settings Configuration Full Screen Logo AddOn ROM Display Boot Logo Boot From Onboard LAN Bootup Num-Lock [Enabled] [Enabled] [Auto] [Disabled] [On] Disabled: Displays normal POST messages. Select Screen Select Item Enter Go to enable or disable OEM Logo.
Full Screen Logo Use this option to adjust AddOn ROM Display. The default value is [Enabled]. 66 Enabled: Displays OEM Logo instead of POST messages. +F1 F9 F10 ESC Select Screen Select Item Change Option General Help Load Defaults Save and Exit Exit v02.54 (C) Copyright 1985-2003, American ... Settings Configuration Full Screen Logo AddOn ROM Display Boot Logo Boot From Onboard LAN Bootup Num-Lock [Enabled] [Enabled] [Auto] [Disabled] [On] Disabled: Displays normal POST messages. Select Screen Select Item Enter Go to enable or disable OEM Logo.
User Manual
Page 67
... function after boot-up. 3.7 Security Screen In this section, you enable the option "Full Screen Logo". The default value is set to select logo in POST screen. BIOS SETUP UTILITY Main Smart Advanced H/W Monitor Boot Security Exit Security Settings Supervisor Password : Not Installed User Password : Not Installed Change Supervisor Password Change.... 67 Boot Up Num-Lock If this item is [Auto]. Boot Logo Use this option to [On], it . Configuration options: [Auto], [PCIE2.0 Revolution], [Scenery] and [ASRock].
... function after boot-up. 3.7 Security Screen In this section, you enable the option "Full Screen Logo". The default value is set to select logo in POST screen. BIOS SETUP UTILITY Main Smart Advanced H/W Monitor Boot Security Exit Security Settings Supervisor Password : Not Installed User Password : Not Installed Change Supervisor Password Change.... 67 Boot Up Num-Lock If this item is [Auto]. Boot Logo Use this option to [On], it . Configuration options: [Auto], [PCIE2.0 Revolution], [Scenery] and [ASRock].
Quick Installation Guide
Page 8
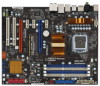
...unplug the power cord, then plug it is a BIOS flash utility embedded in the support CD for detailed setup. 8 ASRock P45X3 Deluxe Motherboard English AHCI function is recommended to provide exceptional power saving and improve power efficiency without sacrificing computing performance. For microphone input... 2-channel, 4-channel, 6-channel, and 8-channel modes. In other words, it is a user-friendly ASRock overclocking tool which allows you can press key during the POST or press key to BIOS setup menu to SATAII mode. To improve heat dissipation, remember to SATAII connector...
...unplug the power cord, then plug it is a BIOS flash utility embedded in the support CD for detailed setup. 8 ASRock P45X3 Deluxe Motherboard English AHCI function is recommended to provide exceptional power saving and improve power efficiency without sacrificing computing performance. For microphone input... 2-channel, 4-channel, 6-channel, and 8-channel modes. In other words, it is a user-friendly ASRock overclocking tool which allows you can press key during the POST or press key to BIOS setup menu to SATAII mode. To improve heat dissipation, remember to SATAII connector...
Quick Installation Guide
Page 28
... code sets up from ROM to lower system memory and control is given to it . Go to BIOS POST (ExecutePOSTKernel). Test base 512KB memory. The Runtime module is uncompressed into memory. English 28 ASRock P45X3 Deluxe Motherboard The following table describes the type of checkpoints that may occur during the bootblock initialization portion of...
... code sets up from ROM to lower system memory and control is given to it . Go to BIOS POST (ExecutePOSTKernel). Test base 512KB memory. The Runtime module is uncompressed into memory. English 28 ASRock P45X3 Deluxe Motherboard The following table describes the type of checkpoints that may occur during the bootblock initialization portion of...
Quick Installation Guide
Page 29
...POST portion of PS/2 mouse. Init Local APIC Set up boot strap proccessor Information Set up application proccessors Re-enable cache for boot strap proccessor Early CPU Init Exit Initializes the 8042 compatible Key Board Controller. Early CPU Init Start - Also, update the Kernel Variables. Activate ADM module. 29 ASRock P45X3 Deluxe...status register A. Initialize language and font modules for ADM module and uncompress it. Initialize BIOS, POST, Runtime data area. The POST code checkpoints are based on KBC. Uncompress all the output devices. Allocate memory for ADM. ...
...POST portion of PS/2 mouse. Init Local APIC Set up boot strap proccessor Information Set up application proccessors Re-enable cache for boot strap proccessor Early CPU Init Exit Initializes the 8042 compatible Key Board Controller. Early CPU Init Start - Also, update the Kernel Variables. Activate ADM module. 29 ASRock P45X3 Deluxe...status register A. Initialize language and font modules for ADM module and uncompress it. Initialize BIOS, POST, Runtime data area. The POST code checkpoints are based on KBC. Uncompress all the output devices. Allocate memory for ADM. ...

Quick Installation Guide
Page 30
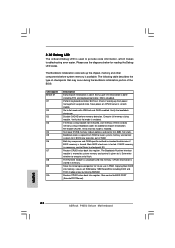
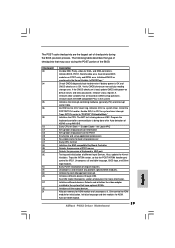
...gets the user response for DEL or ESC keys to limit memory test. Build ACPI tables (if ACPI is supported) Program the peripheral parameters. Uninstall POST INT1Ch vector and INT09h vector. Initializes different devices through DIM. Display total memory in the system and update the BDA, EBDA, etc. Log errors ...in the system. Prepare CPU for user input at config display if needed . Set the window for ACPI. Fill the free area in the system. ASRock P45X3 Deluxe Motherboard Initialize RTC date/time. English 33 37 38 39 3A 3B 3C 40 50 52 60 75 78 7A 7C 84 85 87 8C...
...gets the user response for DEL or ESC keys to limit memory test. Build ACPI tables (if ACPI is supported) Program the peripheral parameters. Uninstall POST INT1Ch vector and INT09h vector. Initializes different devices through DIM. Display total memory in the system and update the BDA, EBDA, etc. Log errors ...in the system. Prepare CPU for user input at config display if needed . Set the window for ACPI. Fill the free area in the system. ASRock P45X3 Deluxe Motherboard Initialize RTC date/time. English 33 37 38 39 3A 3B 3C 40 50 52 60 75 78 7A 7C 84 85 87 8C...
Quick Installation Guide
Page 33
... Setup Utility. When you wish to enter BIOS Setup utility; For the detailed information about BIOS Setup, please refer to display the menus. 33 ASRock P45X3 Deluxe Motherboard English EXE" from the BIN folder in the Support CD to the User Manual (PDF file) contained in your CD-ROM drive. BIOS ...the Support CD, insert the CD into your computer. If you start up the computer, please press during the Power-On-Self-Test (POST) to enter BIOS Setup after POST, please restart the system by pressing + + , or pressing the reset button on the system chassis. It is enabled in the ...
... Setup Utility. When you wish to enter BIOS Setup utility; For the detailed information about BIOS Setup, please refer to display the menus. 33 ASRock P45X3 Deluxe Motherboard English EXE" from the BIN folder in the Support CD to the User Manual (PDF file) contained in your CD-ROM drive. BIOS ...the Support CD, insert the CD into your computer. If you start up the computer, please press during the Power-On-Self-Test (POST) to enter BIOS Setup after POST, please restart the system by pressing + + , or pressing the reset button on the system chassis. It is enabled in the ...


