
User Manual
Page 4
... 64-bit Without RAID Functions 42 2.17.2 Installing Windows® VistaTM / VistaTM 64-bit Without RAID Functions 43 2.18 Untied Overclocking Technology 44 3 BIOS SETUP UTILITY 45 3.1 Introduction 45 3.1.1 BIOS Menu Bar 45 3.1.2 Navigation Keys 46 3.2 Main Screen 46 3.3 Smart Screen 47 3.4 Advanced Screen 48 3.4.1 Overclock Configuration 49 3.4.2 CPU Configuration 52 3.4.3 Chipset...
... 64-bit Without RAID Functions 42 2.17.2 Installing Windows® VistaTM / VistaTM 64-bit Without RAID Functions 43 2.18 Untied Overclocking Technology 44 3 BIOS SETUP UTILITY 45 3.1 Introduction 45 3.1.1 BIOS Menu Bar 45 3.1.2 Navigation Keys 46 3.2 Main Screen 46 3.3 Smart Screen 47 3.4 Advanced Screen 48 3.4.1 Overclock Configuration 49 3.4.2 CPU Configuration 52 3.4.3 Chipset...
User Manual
Page 5
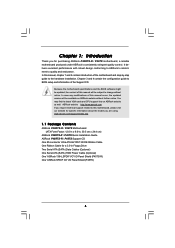
... (SATA) Data Cables (Optional) One Serial ATA (SATA) HDD Power Cable (Optional) One "ASRock 1394_SPDIF I/O" I/O Panel Shield (P45TS-R) One "ASRock SPDIF I/O" I/O Panel Shield (P45TS) 5 Chapter 3 and 4 contain the configuration guide to change without further notice. Because the motherboard specifications and the BIOS software might be updated, the content of this manual occur, the updated version...
... (SATA) Data Cables (Optional) One Serial ATA (SATA) HDD Power Cable (Optional) One "ASRock 1394_SPDIF I/O" I/O Panel Shield (P45TS-R) One "ASRock SPDIF I/O" I/O Panel Shield (P45TS) 5 Chapter 3 and 4 contain the configuration guide to change without further notice. Because the motherboard specifications and the BIOS software might be updated, the content of this manual occur, the updated version...

User Manual
Page 8
..., DRAM, NB, SB, VTT Voltage Multi-adjustment - Supports Smart BIOS Support CD - FCC, CE, WHQL * For detailed product information, please visit our website: http://www.asrock.com WARNING Please realize that there is a certain risk involved with...or using the thirdparty overclocking tools. T. (Intelligent Overclocking Technology) - CPU Frequency Stepless Control (see CAUTION 11) BIOS Feature - 8Mb AMI BIOS - CPU Quiet Fan - Hybrid Booster: - ASRock U-COP (see CAUTION 15) Certifications - Boot Failure Guard (B.F.G.) Hardware - Microsoft® Windows® 2000 / ...
..., DRAM, NB, SB, VTT Voltage Multi-adjustment - Supports Smart BIOS Support CD - FCC, CE, WHQL * For detailed product information, please visit our website: http://www.asrock.com WARNING Please realize that there is a certain risk involved with...or using the thirdparty overclocking tools. T. (Intelligent Overclocking Technology) - CPU Frequency Stepless Control (see CAUTION 11) BIOS Feature - 8Mb AMI BIOS - CPU Quiet Fan - Hybrid Booster: - ASRock U-COP (see CAUTION 15) Certifications - Boot Failure Guard (B.F.G.) Hardware - Microsoft® Windows® 2000 / ...
User Manual
Page 11
... Slots (Dual Channel C: DDR3_A1, DDR3_B1; Yellow) 6 2 x 240-pin DDR2 DIMM Slots (Dual Channel B: DDRII_A2, DDRII_B2; 1.4 Motherboard Layout (P45TS-R) 12 3 4 24.4cm (9.6 in) PS2 Mouse PS2 Keyboard 40 1 PS2_USB_PWR1 56 7 Coaxial SPDIF Optical SPDIF 39 38 37 36 35 34 ...CODEC 1 HDMI_SPDIF1 1 HD_AUDIO1 COM1 1 PCIE3 PCIE2 PCI Express 2.0 1 FSB3 1 FSB2 PCIE4 1 FSB1 1 WIFI/E PCI1 RoHS PCI2 CMOS Battery 8Mb BIOS VIA VT6308S Intel ICH10R SATAII_5 (Port4) SATAII_3 (Port2) SATAII_1 (Port0) SATAII_6 (Port5) SATAII_4 (Port3) SATAII_2 (Port1) PCI3 IR1 1 FLOPPY1 CLRCMOS1 ...
... Slots (Dual Channel C: DDR3_A1, DDR3_B1; Yellow) 6 2 x 240-pin DDR2 DIMM Slots (Dual Channel B: DDRII_A2, DDRII_B2; 1.4 Motherboard Layout (P45TS-R) 12 3 4 24.4cm (9.6 in) PS2 Mouse PS2 Keyboard 40 1 PS2_USB_PWR1 56 7 Coaxial SPDIF Optical SPDIF 39 38 37 36 35 34 ...CODEC 1 HDMI_SPDIF1 1 HD_AUDIO1 COM1 1 PCIE3 PCIE2 PCI Express 2.0 1 FSB3 1 FSB2 PCIE4 1 FSB1 1 WIFI/E PCI1 RoHS PCI2 CMOS Battery 8Mb BIOS VIA VT6308S Intel ICH10R SATAII_5 (Port4) SATAII_3 (Port2) SATAII_1 (Port0) SATAII_6 (Port5) SATAII_4 (Port3) SATAII_2 (Port1) PCI3 IR1 1 FLOPPY1 CLRCMOS1 ...

User Manual
Page 12
...USB9 ATX12V1 USB 2.0 T: USB2 B: USB3 USB 2.0 T: USB0 Top: RJ-45 B: USB1 eSATAII_TOP CPU_FAN1 FSB1600 DDR2 1066 DDR3 1333 IDE1 P45TS Dual Channel Quad Core CPU ATXPWR1 Top: SIDE SPK Center: REAR SPK Bottom: CTR BASS Top: LINE IN Center: FRONT Bottom: MIC... COM1 1 PCIE3 PCIE2 PCI Express 2.0 1 FSB3 1 FSB2 PCIE4 1 FSB1 1 WIFI/E PCI1 RoHS PCI2 PCI3 IR1 1 FLOPPY1 CLRCMOS1 1 CMOS Battery 8Mb BIOS Intel ICH10 SATAII_5 (Port4) SATAII_3 (Port2) SATAII_1 (Port0) SATAII_6 (Port5) SATAII_4 (Port3) SATAII_2 (Port1) CHA_FAN1 SPEAKER1 1 USB6_7 1 USB4_5 1 PLED PWRBTN...
...USB9 ATX12V1 USB 2.0 T: USB2 B: USB3 USB 2.0 T: USB0 Top: RJ-45 B: USB1 eSATAII_TOP CPU_FAN1 FSB1600 DDR2 1066 DDR3 1333 IDE1 P45TS Dual Channel Quad Core CPU ATXPWR1 Top: SIDE SPK Center: REAR SPK Bottom: CTR BASS Top: LINE IN Center: FRONT Bottom: MIC... COM1 1 PCIE3 PCIE2 PCI Express 2.0 1 FSB3 1 FSB2 PCIE4 1 FSB1 1 WIFI/E PCI1 RoHS PCI2 PCI3 IR1 1 FLOPPY1 CLRCMOS1 1 CMOS Battery 8Mb BIOS Intel ICH10 SATAII_5 (Port4) SATAII_3 (Port2) SATAII_1 (Port0) SATAII_6 (Port5) SATAII_4 (Port3) SATAII_2 (Port1) CHA_FAN1 SPEAKER1 1 USB6_7 1 USB4_5 1 PLED PWRBTN...

User Manual
Page 22
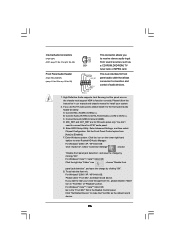
...enable +5VSB (standby) for PS/2 or USB wake up the system first, and then shut it requires 2 Amp and higher standby current provided by BIOS setting) you must boot up events. Please use a jumper cap to FSB1333 orFSB1600 (by power supply. Jumper Setting Description PS2_USB_PWR1 (see p.11/12 ...No. 9) 1_2 FSB3 FSB2 1_2 FSB1 1_2 Default When you update the BIOS. After waiting for 5 seconds. The il- Note: To select +5VSB, it down before you do not clear the CMOS right after you mount...
...enable +5VSB (standby) for PS/2 or USB wake up the system first, and then shut it requires 2 Amp and higher standby current provided by BIOS setting) you must boot up events. Please use a jumper cap to FSB1333 orFSB1600 (by power supply. Jumper Setting Description PS2_USB_PWR1 (see p.11/12 ...No. 9) 1_2 FSB3 FSB2 1_2 FSB1 1_2 Default When you update the BIOS. After waiting for 5 seconds. The il- Note: To select +5VSB, it down before you do not clear the CMOS right after you mount...
User Manual
Page 26
... panel wire on the lower right hand taskbar to the front panel audio header as default record device. Connect Mic_IN (MIC) to function correctly. Enter BIOS Setup Utility.
... panel wire on the lower right hand taskbar to the front panel audio header as default record device. Connect Mic_IN (MIC) to function correctly. Enter BIOS Setup Utility.
User Manual
Page 30
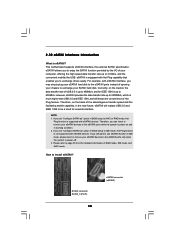
... USB 2.0 is power-off. 3. However, eSATAII provides the data transfer rate up to 3000Mb/s, which is eSATAII? If you set "Configure SATAII as " option in BIOS setup to IDE mode, Hot Plug function is up to 400Mb/s. How to AHCI or RAID mode, Hot Plug function is equipped with eSATAII devices... eSATAII Interface Introduction What is much higher than USB 2.0 and IEEE 1394, and still keeps the convenience of Hot Plug feature. Currently, on and in BIOS setup to install eSATAII?
... USB 2.0 is power-off. 3. However, eSATAII provides the data transfer rate up to 3000Mb/s, which is eSATAII? If you set "Configure SATAII as " option in BIOS setup to IDE mode, Hot Plug function is up to 400Mb/s. How to AHCI or RAID mode, Hot Plug function is equipped with eSATAII devices... eSATAII Interface Introduction What is much higher than USB 2.0 and IEEE 1394, and still keeps the convenience of Hot Plug feature. Currently, on and in BIOS setup to install eSATAII?
User Manual
Page 38
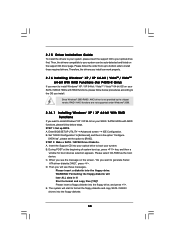
...compatible to your system can work properly. 2.16 Installing Windows® XP / XP 64-bit / VistaTM / VistaTM 64-bit With RAID Functions (For P45TS-R Only) If you want to install Windows® XP / XP 64-bit on your SATA / SATAII HDDs with RAID functions, please follow below ...174; XP / XP 64-bit With RAID Functions If you install. B. Insert the Support CD into the floppy drive, and press . D. Enter BIOS SETUP UTILITY Advanced screen IDE Configuration. Please follow below procedures according to the OS you want to install Windows® XP / XP 64-bit / VistaTM...
...compatible to your system can work properly. 2.16 Installing Windows® XP / XP 64-bit / VistaTM / VistaTM 64-bit With RAID Functions (For P45TS-R Only) If you want to install Windows® XP / XP 64-bit on your SATA / SATAII HDDs with RAID functions, please follow below ...174; XP / XP 64-bit With RAID Functions If you install. B. Insert the Support CD into the floppy drive, and press . D. Enter BIOS SETUP UTILITY Advanced screen IDE Configuration. Please follow below procedures according to the OS you want to install Windows® XP / XP 64-bit / VistaTM...
User Manual
Page 39
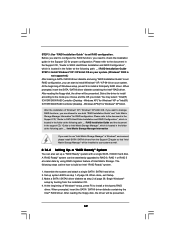
... that "Intel Matrix Storage Manager" will be installed to your system as well. 2.16.2 Setting Up a "RAID Ready" System You can also set up system BIOS as step 2 of page 38. Before you start to install a third-party RAID driver. After reading the floppy disk, the driver will be presented. 39...
... that "Intel Matrix Storage Manager" will be installed to your system as well. 2.16.2 Setting Up a "RAID Ready" System You can also set up system BIOS as step 2 of page 38. Before you start to install a third-party RAID driver. After reading the floppy disk, the driver will be presented. 39...
User Manual
Page 41
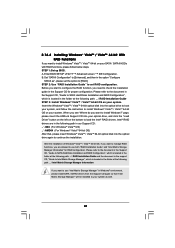
...64-bit OS) After that "Intel Matrix Storage Manager" will be installed to your system as ", please set RAID configuration. page, please insert the ASRock Support CD into your optical drive, and click the "Load Driver" button on the left on your system. Intel® RAID drivers are allowed to...VistaTM / VistaTM 64-bit With RAID Functions If you want to install Windows® VistaTM / VistaTM 64-bit on your system. STEP 1: Set up BIOS. B. Please refer to the document in the Support CD, "Guide to SATA Hard Disks Installation and RAID Configuration", which is located in Windows® ...
...64-bit OS) After that "Intel Matrix Storage Manager" will be installed to your system as ", please set RAID configuration. page, please insert the ASRock Support CD into your optical drive, and click the "Load Driver" button on the left on your system. Intel® RAID drivers are allowed to...VistaTM / VistaTM 64-bit With RAID Functions If you want to install Windows® VistaTM / VistaTM 64-bit on your system. STEP 1: Set up BIOS. B. Please refer to the document in the Support CD, "Guide to SATA Hard Disks Installation and RAID Configuration", which is located in Windows® ...

User Manual
Page 42
... SATAII driver diskette. Windows XP64)" for Windows® XP or "Intel(R) ICH10R SATA AHCI Controller (Desktop - Enter BIOS SETUP UTILITY Advanced screen IDE Configuration. Enter BIOS SETUP UTILITY Advanced screen IDE Configuration. B. Please make a SATA / SATAII driver diskette by the chipset vendor, RAID /...by following section 2.16.1 step 2 on your system. A. Using SATA / SATAII HDDs and eSATAII devices with NCQ function STEP 1: Set Up BIOS. Since Windows® 2000 RAID / AHCI driver is not supported.) After making a SATA / SATAII driver diskette, you install. A. Set ...
... SATAII driver diskette. Windows XP64)" for Windows® XP or "Intel(R) ICH10R SATA AHCI Controller (Desktop - Enter BIOS SETUP UTILITY Advanced screen IDE Configuration. Enter BIOS SETUP UTILITY Advanced screen IDE Configuration. B. Please make a SATA / SATAII driver diskette by the chipset vendor, RAID /...by following section 2.16.1 step 2 on your system. A. Using SATA / SATAII HDDs and eSATAII devices with NCQ function STEP 1: Set Up BIOS. Since Windows® 2000 RAID / AHCI driver is not supported.) After making a SATA / SATAII driver diskette, you install. A. Set ...

User Manual
Page 43
... optical drive again to install Windows® VistaTM / VistaTM 64-bit OS on your system, and follow below steps. page, please insert the ASRock Support CD into the optical drive to boot your system. STEP 2: Install Windows® VistaTM / VistaTM 64-bit OS on your system. Enter...RAID Functions If you want to install Windows® VistaTM / VistaTM 64-bit OS on your SATA / SATAII HDDs without NCQ function STEP 1: Set up BIOS. STEP 2: Install Windows® VistaTM / VistaTM 64-bit OS on the bottom to install Windows?" Insert the Windows® VistaTM / VistaTM 64-bit optical...
... optical drive again to install Windows® VistaTM / VistaTM 64-bit OS on your system, and follow below steps. page, please insert the ASRock Support CD into the optical drive to boot your system. STEP 2: Install Windows® VistaTM / VistaTM 64-bit OS on your system. Enter...RAID Functions If you want to install Windows® VistaTM / VistaTM 64-bit OS on your SATA / SATAII HDDs without NCQ function STEP 1: Set up BIOS. STEP 2: Install Windows® VistaTM / VistaTM 64-bit OS on the bottom to install Windows?" Insert the Windows® VistaTM / VistaTM 64-bit optical...
User Manual
Page 44
... untied during overclocking, FSB enjoys better margin due to fixed PCI / PCIE buses. Before you enable Untied Overclocking function, please enter "Overclock Mode" option of BIOS setup to set the selection from [Auto] to the warning on page 8 for the possible overclocking risk before you apply Untied Overclocking Technology. 44 Please...
... untied during overclocking, FSB enjoys better margin due to fixed PCI / PCIE buses. Before you enable Untied Overclocking function, please enter "Overclock Mode" option of BIOS setup to set the selection from [Auto] to the warning on page 8 for the possible overclocking risk before you apply Untied Overclocking Technology. 44 Please...

User Manual
Page 45
... the screen has a menu bar with its test routines. You may also restart by pressing the reset button on the motherboard stores the BIOS SETUP UTILITY. Because the BIOS software is constantly being updated, the following selections: Main To set up the system time/date information Advanced To set up the advanced... turning the system off and then back on the menu bar, and then press to get into the sub screen. 45 You may run the BIOS SETUP UTILITY when you wish to locate and load the Operating System Security To set up the computer. The...
... the screen has a menu bar with its test routines. You may also restart by pressing the reset button on the motherboard stores the BIOS SETUP UTILITY. Because the BIOS software is constantly being updated, the following selections: Main To set up the system time/date information Advanced To set up the advanced... turning the system off and then back on the menu bar, and then press to get into the sub screen. 45 You may run the BIOS SETUP UTILITY when you wish to locate and load the Operating System Security To set up the computer. The...

User Manual
Page 46
...the selected screen To display the General Help Screen To load optimal default values for the function description of each navigation key. P45TS-R BIOS SETUP UTILITY Main Smart Advanced H/W Monitor Boot Security Exit System Overview System Time System Date [14:00:09] [Thu 07/10/2008...] BIOS Version : P45TS-R P1.00 Processor Type : Intel (R) Core(TM)2 Duo CPU E7300 @ 2.66GHz (64bit) Processor Speed : 2666MHz Microcode Update : 10676/60B Cache Size : ...
...the selected screen To display the General Help Screen To load optimal default values for the function description of each navigation key. P45TS-R BIOS SETUP UTILITY Main Smart Advanced H/W Monitor Boot Security Exit System Overview System Time System Date [14:00:09] [Thu 07/10/2008...] BIOS Version : P45TS-R P1.00 Processor Type : Intel (R) Core(TM)2 Duo CPU E7300 @ 2.66GHz (64bit) Processor Speed : 2666MHz Microcode Update : 10676/60B Cache Size : ...

User Manual
Page 47
...be used for this item to specify the system date. 3.3 Smart Screen In the Smart screen, you select this item to your requirements. P45TS BIOS SETUP UTILITY Main Smart Advanced H/W Monitor Boot Security Exit System Overview System Time System Date [14:00:09] [Thu 07/10/2008...] BIOS Version : P45TS P1.00 Processor Type : Intel (R) Core(TM)2 Duo CPU E7300 @ 2.66GHz (64bit) Processor Speed : 2666MHz Microcode Update : 10676/60B Cache Size : 3072KB Total...
...be used for this item to specify the system date. 3.3 Smart Screen In the Smart screen, you select this item to your requirements. P45TS BIOS SETUP UTILITY Main Smart Advanced H/W Monitor Boot Security Exit System Overview System Time System Date [14:00:09] [Thu 07/10/2008...] BIOS Version : P45TS P1.00 Processor Type : Intel (R) Core(TM)2 Duo CPU E7300 @ 2.66GHz (64bit) Processor Speed : 2666MHz Microcode Update : 10676/60B Cache Size : 3072KB Total...

User Manual
Page 48
... Performance Setup AHCI Mode This performance setup AHCI mode may not be compatible with all system configurations. F5 key can be used for this operation. BIOS SETUP UTILITY Main Smart Advanced H/W Monitor Boot Security Exit Advanced Settings WARNING : Setting wrong values in this section, you may cause system to malfunction. Load...
... Performance Setup AHCI Mode This performance setup AHCI mode may not be compatible with all system configurations. F5 key can be used for this operation. BIOS SETUP UTILITY Main Smart Advanced H/W Monitor Boot Security Exit Advanced Settings WARNING : Setting wrong values in this section, you may cause system to malfunction. Load...

User Manual
Page 49
... ratio value of this item to enable powersavings. This item will find this item appear to allow you plan to enable this motherboard. 3.4.1 Overclock Configuration BIOS SETUP UTILITY Advanced Ratio Status Unlocked (Min:06, Max:12) Ratio Actual Value Ratio CMOS Setting Intel (R) SpeedStep(tm) tech. If you install Windows®...
... ratio value of this item to enable powersavings. This item will find this item appear to allow you plan to enable this motherboard. 3.4.1 Overclock Configuration BIOS SETUP UTILITY Advanced Ratio Status Unlocked (Min:06, Max:12) Ratio Actual Value Ratio CMOS Setting Intel (R) SpeedStep(tm) tech. If you install Windows®...
User Manual
Page 52
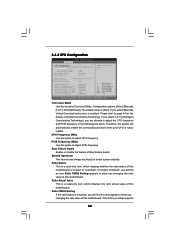
... of Untied Overclocking Technology. If you select [I .O.T.] and [Optimized]. Ratio Actual Value This is enabled. If it shows "Unlocked", you adopt supports 52 3.4.2 CPU Configuration BIOS SETUP UTILITY Advanced CPU Configuration Overclock Mode CPU Frequency (MHz) PCIE Frequency (MHz) Boot Failure Guard Spread Spectrum [Auto] [200] [100] [Enabled] [Auto] Ratio Status...
... of Untied Overclocking Technology. If you select [I .O.T.] and [Optimized]. Ratio Actual Value This is enabled. If it shows "Unlocked", you adopt supports 52 3.4.2 CPU Configuration BIOS SETUP UTILITY Advanced CPU Configuration Overclock Mode CPU Frequency (MHz) PCIE Frequency (MHz) Boot Failure Guard Spread Spectrum [Auto] [200] [100] [Enabled] [Auto] Ratio Status...


