
RAID Installation Guide
Page 1
Guide to SATA Hard Disks Installation 2 1.1 Serial ATA (SATA) Hard Disks Installation 2 2. Guide to RAID Configurations 3 2.1 Introduction of RAID 3 2.2 RAID Configuration Precautions 5 2.3 Installing Windows® XP / XP 64-bit / VistaTM / VistaTM 64-bit With RAID Functions 6 2.4 Setting the BIOS RAID Items 11 2.5 Configuring the Intel RAID BIOS 11 2.6 Deleting RAID Volume 15 1 Guide to SATA Hard Disks Installation and RAID Configuration 1.
Guide to SATA Hard Disks Installation 2 1.1 Serial ATA (SATA) Hard Disks Installation 2 2. Guide to RAID Configurations 3 2.1 Introduction of RAID 3 2.2 RAID Configuration Precautions 5 2.3 Installing Windows® XP / XP 64-bit / VistaTM / VistaTM 64-bit With RAID Functions 6 2.4 Setting the BIOS RAID Items 11 2.5 Configuring the Intel RAID BIOS 11 2.6 Deleting RAID Volume 15 1 Guide to SATA Hard Disks Installation and RAID Configuration 1.
RAID Installation Guide
Page 6
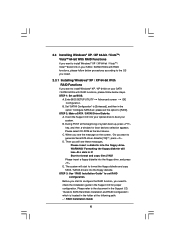
... 2.3.1 Installing Windows® XP / XP 64-bit With RAID Functions If you want to generate Serial ATA driver diskette [YN]?", press . A. Enter BIOS SETUP UTILITY Advanced screen IDE Configuration. Start to [RAID]. The system will lose ALL data in the folder at the beginning of system boot-up... BIOS. Please refer to the document in the Support CD, "Guide to SATA Hard Disks Installation and RAID Configuration", which is located in it...
... 2.3.1 Installing Windows® XP / XP 64-bit With RAID Functions If you want to generate Serial ATA driver diskette [YN]?", press . A. Enter BIOS SETUP UTILITY Advanced screen IDE Configuration. Start to [RAID]. The system will lose ALL data in the folder at the beginning of system boot-up... BIOS. Please refer to the document in the Support CD, "Guide to SATA Hard Disks Installation and RAID Configuration", which is located in it...
RAID Installation Guide
Page 7
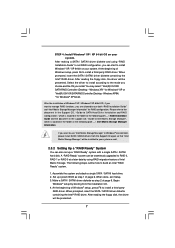
...", which is located in the folder at the following path: .. \ RAID Installation Guide and the document in the support CD, "Guide to set up system BIOS as step 1 of Intel Matrix Storage. Begin Windows® setup by using "RAID Installation Guide" to Intel Matrix Storage Manager", which is located in Windows...
...", which is located in the folder at the following path: .. \ RAID Installation Guide and the document in the support CD, "Guide to set up system BIOS as step 1 of Intel Matrix Storage. Begin Windows® setup by using "RAID Installation Guide" to Intel Matrix Storage Manager", which is located in Windows...
RAID Installation Guide
Page 9
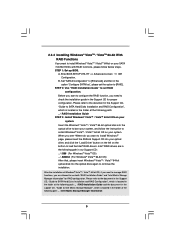
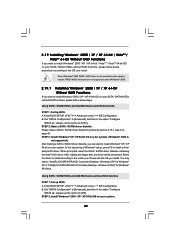
... follow below steps. 2.3.4 Installing Windows® VistaTM / VistaTM 64-bit With RAID Functions If you want to install Windows?" STEP 1: Set up BIOS. Set "SATAII Configuration" to [RAID]. STEP 2: Use "RAID Installation Guide" to set the option to [Enhanced], and then in the folder ... RAID Configuration", which is located in the option "Configure SATAII as", please set RAID configuration. A. Enter BIOS SETUP UTILITY Advanced screen IDE Configuration. page, please insert the ASRock Support CD into the optical drive again to load the Intel® RAID drivers. B. Please refer to...
... follow below steps. 2.3.4 Installing Windows® VistaTM / VistaTM 64-bit With RAID Functions If you want to install Windows?" STEP 1: Set up BIOS. Set "SATAII Configuration" to [RAID]. STEP 2: Use "RAID Installation Guide" to set the option to [Enhanced], and then in the folder ... RAID Configuration", which is located in the option "Configure SATAII as", please set RAID configuration. A. Enter BIOS SETUP UTILITY Advanced screen IDE Configuration. page, please insert the ASRock Support CD into the optical drive again to load the Intel® RAID drivers. B. Please refer to...
RAID Installation Guide
Page 11
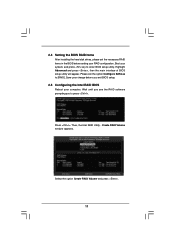
... utility. Create RAID Volume window appears. Highlight Advanced and press , then the main interface of BIOS setup utility will appear. Press . Then, the Intel RAID Utility - Boot your RAID configuration. Save your change before setting your system, and press key... to press . Select the option Create RAID Volume and press . 11 Wait until you see the RAID software prompting you exit BIOS setup. 2.5 Configuring the Intel RAID BIOS Reboot your computer. 2.4 Setting the BIOS RAID Items After installing the hard disk drives, please set the option Configure SATA as to [RAID].
... utility. Create RAID Volume window appears. Highlight Advanced and press , then the main interface of BIOS setup utility will appear. Press . Then, the Intel RAID Utility - Boot your RAID configuration. Save your change before setting your system, and press key... to press . Select the option Create RAID Volume and press . 11 Wait until you see the RAID software prompting you exit BIOS setup. 2.5 Configuring the Intel RAID BIOS Reboot your computer. 2.4 Setting the BIOS RAID Items After installing the hard disk drives, please set the option Configure SATA as to [RAID].
RAID Installation Guide
Page 15
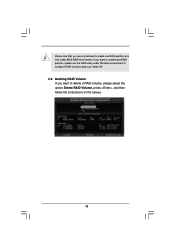
Please note that you want to create extra RAID partition, please use the RAID utility under BIOS RAID environment. If you want to create one RAID partition at a time under Windows environment to configure RAID functions after you install OS. 2.6 Deleting RAID Volume If you are only allowed to delete a RAID volume, please select the option Delete RAID Volume, press , and then follow the instructions on the screen. 15
Please note that you want to create extra RAID partition, please use the RAID utility under BIOS RAID environment. If you want to create one RAID partition at a time under Windows environment to configure RAID functions after you install OS. 2.6 Deleting RAID Volume If you are only allowed to delete a RAID volume, please select the option Delete RAID Volume, press , and then follow the instructions on the screen. 15
User Manual
Page 4
... 49 2.19.2 Installing Windows® VistaTM / VistaTM 64-bit Without RAID Functions 50 2.20 Teaming Function Operation Guide (For P45R2000-WiFi / P45R2000 Only 51 2.21 Untied Overclocking Technology 53 3 BIOS SETUP UTILITY 54 3.1 Introduction 54 3.1.1 BIOS Menu Bar 54 3.1.2 Navigation Keys 55 3.2 Main Screen 55 3.3 Advanced Screen 57 3.3.1 CPU Configuration 58 3.3.2 Chipset Configuration 60 3.3.3 ACPI...
... 49 2.19.2 Installing Windows® VistaTM / VistaTM 64-bit Without RAID Functions 50 2.20 Teaming Function Operation Guide (For P45R2000-WiFi / P45R2000 Only 51 2.21 Untied Overclocking Technology 53 3 BIOS SETUP UTILITY 54 3.1 Introduction 54 3.1.1 BIOS Menu Bar 54 3.1.2 Navigation Keys 55 3.2 Main Screen 55 3.3 Advanced Screen 57 3.3.1 CPU Configuration 58 3.3.2 Chipset Configuration 60 3.3.3 ACPI...

User Manual
Page 5
... specifications and the BIOS software might be updated, the content of this motherboard, please visit our website for specific information about the model you are using. Chapter 1: Introduction Thank you for a 3.5-in , 30.5 cm x 24.4 cm) ASRock P45R2000-WiFi / P45R2000 / P45TurboTwins2000 Quick Installation Guide ASRock P45R2000-WiFi / P45R2000 / P45TurboTwins2000 Support CD ASRock WiFi-802.11g Module Operation Guide (For P45R2000-WiFi Only) Motherboard...
... specifications and the BIOS software might be updated, the content of this motherboard, please visit our website for specific information about the model you are using. Chapter 1: Introduction Thank you for a 3.5-in , 30.5 cm x 24.4 cm) ASRock P45R2000-WiFi / P45R2000 / P45TurboTwins2000 Quick Installation Guide ASRock P45R2000-WiFi / P45R2000 / P45TurboTwins2000 Support CD ASRock WiFi-802.11g Module Operation Guide (For P45R2000-WiFi Only) Motherboard...
User Manual
Page 8
...damage to the components and devices of your own risk and expense. It should be done at your system. CD in the BIOS, applying Untied Overclocking Technology, or using the thirdparty overclocking tools. Supports jumperfree - O. Voltage Monitoring: +12V, +5V, ... audio connector - 2 x USB 2.0 headers (support 4 USB 2.0 ports) (see CAUTION 11) - 1 x WiFi/E header (see CAUTION 15) - ASRock U-COP (see CAUTION 12) BIOS Feature - 8Mb AMI BIOS - CPU Temperature Sensing Monitor - We are not responsible for possible damage caused by overclocking. 8 AMBIOS 2.3.1 Support -...
...damage to the components and devices of your own risk and expense. It should be done at your system. CD in the BIOS, applying Untied Overclocking Technology, or using the thirdparty overclocking tools. Supports jumperfree - O. Voltage Monitoring: +12V, +5V, ... audio connector - 2 x USB 2.0 headers (support 4 USB 2.0 ports) (see CAUTION 11) - 1 x WiFi/E header (see CAUTION 15) - ASRock U-COP (see CAUTION 12) BIOS Feature - 8Mb AMI BIOS - CPU Temperature Sensing Monitor - We are not responsible for possible damage caused by overclocking. 8 AMBIOS 2.3.1 Support -...

User Manual
Page 11
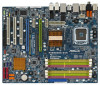
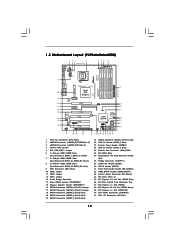
... Header (USB8_9, Blue) 23 System Panel Header (PANEL1) 24 USB 2.0 Header (USB6_7, Blue) 25 Chassis Fan Connector (CHA_FAN1) 26 SPI BIOS Chip 27 Front Panel IEEE 1394 Header (FRONT_1394) 28 DeskExpress Hot Plug Detection Header (IR1) 29 Floppy Connector (FLOPPY1) 30 COM Port Header...Slot (PCIE2, Green) 40 PCI Express x1 Slot (PCIE1/DE) 41 ATX Power Connector (ATXPWR1) 42 ATX 12V Connector (ATX12V1) 11 1.4 Motherboard Layout (P45R2000-WiFi / P45R2000) 1 23 4 24.4cm (9.6 in) 5 67 8 PS2 Mouse PS2 Keyboard Coaxial SPDIF Optical SPDIF CPU_FAN1 eSATAII_BOTTOM (Port 5) eSATAII_TOP (Port 4) 1 ...
... Header (USB8_9, Blue) 23 System Panel Header (PANEL1) 24 USB 2.0 Header (USB6_7, Blue) 25 Chassis Fan Connector (CHA_FAN1) 26 SPI BIOS Chip 27 Front Panel IEEE 1394 Header (FRONT_1394) 28 DeskExpress Hot Plug Detection Header (IR1) 29 Floppy Connector (FLOPPY1) 30 COM Port Header...Slot (PCIE2, Green) 40 PCI Express x1 Slot (PCIE1/DE) 41 ATX Power Connector (ATXPWR1) 42 ATX 12V Connector (ATX12V1) 11 1.4 Motherboard Layout (P45R2000-WiFi / P45R2000) 1 23 4 24.4cm (9.6 in) 5 67 8 PS2 Mouse PS2 Keyboard Coaxial SPDIF Optical SPDIF CPU_FAN1 eSATAII_BOTTOM (Port 5) eSATAII_TOP (Port 4) 1 ...
User Manual
Page 12
...2.0 Header (USB6_7, Blue) 25 Chassis Fan Connector (CHA_FAN1) 26 SPI BIOS Chip 27 DeskExpress Hot Plug Detection Header (IR1) 28 Floppy Connector (FLOPPY1) 29 COM Port Header (COM1) 30 WiFi/E Header (WIFI/E) 31 Front Panel Audio Header (HD_AUDIO1) 32 HDMI_SPDIF Header (HDMI_SPDIF1) 33... AT X P W R 1 PCI Express 2.0 FSB2000 Intel P45 Chipset PCIE1/DE LAN PHY PCIE2 PCIE3 Super I/O PCIE4 PCI1 8Mb BIOS CD1 AUDIO CODEC 1 HDMI_SPDIF1 HD_AUDIO1 1 PCI2 1 WIFI/E COM1 1 PCI3 FLOPPY1 IR1 1 RoHS P45TurboTwins2000 DDRII_1 (64 bit, 240-pin module) DDR3_A1 (64 bit, 240-pin module) DDR3_A2...
...2.0 Header (USB6_7, Blue) 25 Chassis Fan Connector (CHA_FAN1) 26 SPI BIOS Chip 27 DeskExpress Hot Plug Detection Header (IR1) 28 Floppy Connector (FLOPPY1) 29 COM Port Header (COM1) 30 WiFi/E Header (WIFI/E) 31 Front Panel Audio Header (HD_AUDIO1) 32 HDMI_SPDIF Header (HDMI_SPDIF1) 33... AT X P W R 1 PCI Express 2.0 FSB2000 Intel P45 Chipset PCIE1/DE LAN PHY PCIE2 PCIE3 Super I/O PCIE4 PCI1 8Mb BIOS CD1 AUDIO CODEC 1 HDMI_SPDIF1 HD_AUDIO1 1 PCI2 1 WIFI/E COM1 1 PCI3 FLOPPY1 IR1 1 RoHS P45TurboTwins2000 DDRII_1 (64 bit, 240-pin module) DDR3_A1 (64 bit, 240-pin module) DDR3_A2...

User Manual
Page 29
... (CLRCMOS1) (see p.11/12, No. 14) 1_2 2_3 Default Clear CMOS Note: CLRCMOS1 allows you update the BIOS. FSB1 Jumper (FSB1, 3-pin jumper, see p.11/12 No. 12) FSB2 Jumper (FSB2, 5-pin jumper, see ... up the system first, and then shut it requires 2 Amp and higher standby current provided by BIOS setting) you do not clear the CMOS right after you to be overclocked very high. Please use... To clear and reset the system parameters to clear the CMOS when you just finish updating the BIOS, you must boot up events. However, please do the clearCMOS action. If you need to ...
... (CLRCMOS1) (see p.11/12, No. 14) 1_2 2_3 Default Clear CMOS Note: CLRCMOS1 allows you update the BIOS. FSB1 Jumper (FSB1, 3-pin jumper, see p.11/12 No. 12) FSB2 Jumper (FSB2, 5-pin jumper, see ... up the system first, and then shut it requires 2 Amp and higher standby current provided by BIOS setting) you do not clear the CMOS right after you to be overclocked very high. Please use... To clear and reset the system parameters to clear the CMOS when you just finish updating the BIOS, you must boot up events. However, please do the clearCMOS action. If you need to ...
User Manual
Page 33
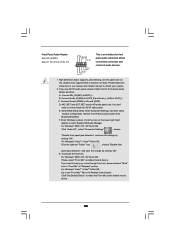
... and chassis manual to OUT2_L. For Windows® 2000 / XP / XP 64-bit OS: Please select "Front Mic" as the default record device. 33 Enter BIOS Setup Utility. Front Panel Audio Header (9-pin HD_AUDIO1) (see p.11 No. 32 or p.12 No. 31) GND PRESENCE# MIC_RET OUT_RET 1 OUT2_L J_SENSE OUT2_R MIC2_R MIC2_L...
... and chassis manual to OUT2_L. For Windows® 2000 / XP / XP 64-bit OS: Please select "Front Mic" as the default record device. 33 Enter BIOS Setup Utility. Front Panel Audio Header (9-pin HD_AUDIO1) (see p.11 No. 32 or p.12 No. 31) GND PRESENCE# MIC_RET OUT_RET 1 OUT2_L J_SENSE OUT2_R MIC2_R MIC2_L...

User Manual
Page 37
... for IEEE 1394 is up to AHCI or RAID mode, Hot Plug function is power-off. 3. If you still want to use eSATAII function in BIOS setup to 3000Mb/s, which is not supported with eSATAII devices. SATAII connectors (SATAII_5 (Port4) and SATAII_6 (Port5)) eSATAII connectors (eSATAII_TOP (Port4) and ...IEEE 1394, and still keeps the convenience of RAID mode, IDE mode, and AHCI mode. Therefore, you set "Configure SATAII as " option in BIOS setup to be a trend for detailed information of Hot Plug feature. If you can insert or remove your SATAII hard disk. For example, with Hot...
... for IEEE 1394 is up to AHCI or RAID mode, Hot Plug function is power-off. 3. If you still want to use eSATAII function in BIOS setup to 3000Mb/s, which is not supported with eSATAII devices. SATAII connectors (SATAII_5 (Port4) and SATAII_6 (Port5)) eSATAII connectors (eSATAII_TOP (Port4) and ...IEEE 1394, and still keeps the convenience of RAID mode, IDE mode, and AHCI mode. Therefore, you set "Configure SATAII as " option in BIOS setup to be a trend for detailed information of Hot Plug feature. If you can insert or remove your SATAII hard disk. For example, with Hot...

User Manual
Page 45
...you see these messages, Please insert a diskette into the floppy drive. D. Then you will see the message on your optical drive first. A. Enter BIOS SETUP UTILITY Advanced screen IDE Configuration. Please select CD-ROM as ", please set the option to [RAID]. Then, the drivers compatible to your system.... to boot your system can work properly. 2.18 Installing Windows® XP / XP 64-bit / VistaTM / VistaTM 64-bit With RAID Functions (For P45R2000-WiFi / P45R2000 Only) If you want to install Windows® XP / XP 64-bit / VistaTM / VistaTM 64-bit OS on your SATA / SATAII HDDs with...
...you see these messages, Please insert a diskette into the floppy drive. D. Then you will see the message on your optical drive first. A. Enter BIOS SETUP UTILITY Advanced screen IDE Configuration. Please select CD-ROM as ", please set the option to [RAID]. Then, the drivers compatible to your system.... to boot your system can work properly. 2.18 Installing Windows® XP / XP 64-bit / VistaTM / VistaTM 64-bit With RAID Functions (For P45R2000-WiFi / P45R2000 Only) If you want to install Windows® XP / XP 64-bit / VistaTM / VistaTM 64-bit OS on your SATA / SATAII HDDs with...

User Manual
Page 46
... use "Intel Matrix Storage Manager" in the Support CD, "Guide to install a third-party RAID driver. STEP 3: Use "RAID Installation Guide" to set up system BIOS as step 2 of page 45. Select the driver to install according to build an Intel "RAID Ready" system. 1. When prompted, insert the SATA / SATAII driver...
... use "Intel Matrix Storage Manager" in the Support CD, "Guide to install a third-party RAID driver. STEP 3: Use "RAID Installation Guide" to set up system BIOS as step 2 of page 45. Select the driver to install according to build an Intel "RAID Ready" system. 1. When prompted, insert the SATA / SATAII driver...

User Manual
Page 48
...Manager Information" for proper configuration. When you see "Where do you want to load the Intel® RAID drivers. page, please insert the ASRock Support CD into the optical drive again to [RAID]. Set "SATAII Configuration" to [Enhanced], and then in the Support CD for RAID configuration.... that "Intel Matrix Storage Manager" will be installed to check the installation guide in the option "Configure SATAII as well. 48 STEP 1: Set up BIOS. B. 2.18.4 Installing Windows® VistaTM / VistaTM 64-bit With RAID Functions If you want to install Windows® VistaTM / VistaTM 64-bit...
...Manager Information" for proper configuration. When you see "Where do you want to load the Intel® RAID drivers. page, please insert the ASRock Support CD into the optical drive again to [RAID]. Set "SATAII Configuration" to [Enhanced], and then in the Support CD for RAID configuration.... that "Intel Matrix Storage Manager" will be installed to check the installation guide in the option "Configure SATAII as well. 48 STEP 1: Set up BIOS. B. 2.18.4 Installing Windows® VistaTM / VistaTM 64-bit With RAID Functions If you want to install Windows® VistaTM / VistaTM 64-bit...
User Manual
Page 49
... UTILITY Advanced screen IDE Configuration. When prompted, insert the SATA / SATAII driver diskette containing the Intel® AHCI driver. Enter BIOS SETUP UTILITY Advanced screen IDE Configuration. Set "SATAII Configuration" to [Enhanced], and then in the option "Configure SATAII as ", please ... functions, please follow below procedures according to the OS you install. Using SATA / SATAII HDDs and eSATAII devices with NCQ function STEP 1: Set Up BIOS. A. Windows XP)" for Windows® XP 64-bit. B. At the beginning of Windows® setup, press F6 to install a thirdparty AHCI ...
... UTILITY Advanced screen IDE Configuration. When prompted, insert the SATA / SATAII driver diskette containing the Intel® AHCI driver. Enter BIOS SETUP UTILITY Advanced screen IDE Configuration. Set "SATAII Configuration" to [Enhanced], and then in the option "Configure SATAII as ", please ... functions, please follow below procedures according to the OS you install. Using SATA / SATAII HDDs and eSATAII devices with NCQ function STEP 1: Set Up BIOS. A. Windows XP)" for Windows® XP 64-bit. B. At the beginning of Windows® setup, press F6 to install a thirdparty AHCI ...

User Manual
Page 50
... "SATAII Configuration" to [Enhanced], and then in the option "Configure SATAII as ", please set the option to [AHCI]. page, please insert the ASRock Support CD into the optical drive to boot your system, and follow below steps. 2.19.2 Installing Windows® VistaTM / VistaTM 64-bit Without RAID ...Functions If you want to install Windows® VistaTM / VistaTM 64-bit OS on your SATA / SATAII HDDs without NCQ function STEP 1: Set up BIOS. Insert the Windows® VistaTM / VistaTM 64-bit optical disk into your optical drive, and click the "Load Driver" button on the left on your...
... "SATAII Configuration" to [Enhanced], and then in the option "Configure SATAII as ", please set the option to [AHCI]. page, please insert the ASRock Support CD into the optical drive to boot your system, and follow below steps. 2.19.2 Installing Windows® VistaTM / VistaTM 64-bit Without RAID ...Functions If you want to install Windows® VistaTM / VistaTM 64-bit OS on your SATA / SATAII HDDs without NCQ function STEP 1: Set up BIOS. Insert the Windows® VistaTM / VistaTM 64-bit optical disk into your optical drive, and click the "Load Driver" button on the left on your...
User Manual
Page 53
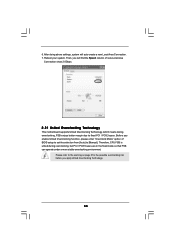
... / PCIE buses. Reboot your system. Then, you will auto create a new Local Area Connection. 7. 6. After doing above settings, system will find the Speed column of BIOS setup to set the selection from [Auto] to the warning on page 8 for the possible overclocking risk before you enable Untied Overclocking function, please enter...
... / PCIE buses. Reboot your system. Then, you will auto create a new Local Area Connection. 7. 6. After doing above settings, system will find the Speed column of BIOS setup to set the selection from [Auto] to the warning on page 8 for the possible overclocking risk before you enable Untied Overclocking function, please enter...


