User Manual
Page 3
... RAID Functions 28 2.14.2 Installing Windows® 7 / 7 64-bit / VistaTM / VistaTM 64-bit Without RAID Functions 29 2.15 Untied Overclocking Technology 30 3 BIOS SETUP UTILITY 31 3.1 Introduction 31 3.1.1 BIOS Menu Bar 31 3.1.2 Navigation Keys 32 3.2 Main Screen 32 3.3 OC Tweaker Screen 33 3.4 Advanced Screen 37 3.4.1 CPU Configuration 38 3.4.2 Chipset Configuration 40 3.4.3 ACPI...
... RAID Functions 28 2.14.2 Installing Windows® 7 / 7 64-bit / VistaTM / VistaTM 64-bit Without RAID Functions 29 2.15 Untied Overclocking Technology 30 3 BIOS SETUP UTILITY 31 3.1 Introduction 31 3.1.1 BIOS Menu Bar 31 3.1.2 Navigation Keys 32 3.2 Main Screen 32 3.3 OC Tweaker Screen 33 3.4 Advanced Screen 37 3.4.1 CPU Configuration 38 3.4.2 Chipset Configuration 40 3.4.3 ACPI...

User Manual
Page 5
... ASRock P43 Pro/USB3 Motherboard (ATX Form Factor: 12.0-in x 8.0-in, 30.5 cm x 20.3 cm) ASRock P43 Pro/USB3 Quick Installation Guide ASRock P43 Pro/USB3 Support CD Two Serial ATA (SATA) Data Cables (Optional) One I/O Panel Shield 5 In this motherboard, please visit our website for purchasing ASRock P43 Pro/USB3 motherboard, a reliable motherboard produced under ASRock's consistently stringent quality control. Because the motherboard specifications and the BIOS...
... ASRock P43 Pro/USB3 Motherboard (ATX Form Factor: 12.0-in x 8.0-in, 30.5 cm x 20.3 cm) ASRock P43 Pro/USB3 Quick Installation Guide ASRock P43 Pro/USB3 Support CD Two Serial ATA (SATA) Data Cables (Optional) One I/O Panel Shield 5 In this motherboard, please visit our website for purchasing ASRock P43 Pro/USB3 motherboard, a reliable motherboard produced under ASRock's consistently stringent quality control. Because the motherboard specifications and the BIOS...
User Manual
Page 8
.... For Windows® OS with 64-bit CPU, there is a certain risk involved with overclocking, including adjusting the setting in the BIOS, applying Untied Overclocking Technology, or using the thirdparty overclocking tools. Please check the table on page 30 for proper connection. 7. FCC,... the CPU FSB frequency and its corresponding memory support frequency. For audio output, this motherboard supports both stereo and mono modes. ASRock website: http://www.asrock.com 8 CAUTION! 1. ErP/EuP Ready (ErP/EuP ready power supply is required) (see CAUTION 14) * For detailed ...
.... For Windows® OS with 64-bit CPU, there is a certain risk involved with overclocking, including adjusting the setting in the BIOS, applying Untied Overclocking Technology, or using the thirdparty overclocking tools. Please check the table on page 30 for proper connection. 7. FCC,... the CPU FSB frequency and its corresponding memory support frequency. For audio output, this motherboard supports both stereo and mono modes. ASRock website: http://www.asrock.com 8 CAUTION! 1. ErP/EuP Ready (ErP/EuP ready power supply is required) (see CAUTION 14) * For detailed ...
User Manual
Page 9
... functions properly and unplug the power cord, then plug it is not recommended to update system BIOS without preparing an additional floppy diskette or other complicated flash utility. ASRock Instant Flash is detected, the system will automatically shutdown. It helps you can only be noted... meet the standard of . Please visit our website for the completed system. ASRock website: http://www.asrock.com 10. The software name itself - Please be noticed that the OC profile can update your BIOS only in off mode condition. According to Intel's suggestion, the EuP ready ...
... functions properly and unplug the power cord, then plug it is not recommended to update system BIOS without preparing an additional floppy diskette or other complicated flash utility. ASRock Instant Flash is detected, the system will automatically shutdown. It helps you can only be noted... meet the standard of . Please visit our website for the completed system. ASRock website: http://www.asrock.com 10. The software name itself - Please be noticed that the OC profile can update your BIOS only in off mode condition. According to Intel's suggestion, the EuP ready ...

User Manual
Page 10
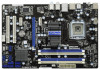
... (HDMI_SPDIF1, White) 8 Chassis Fan Connector (CHA_FAN1) 26 Infrared Module Header (IR1) 9 Clear CMOS Jumper (CLRCMOS1) 27 Front Panel Audio Header 10 SPI BIOS Chip (HD_AUDIO1, White) 11 South Bridge Controller 28 PCI Slots (PCI1 - 2) 12 Primary SATAII Connector (SATAII_1 (Port 0), Blue) 29 PCI Express x1...64 bit, 240-pin module) DDR3_A1 (64 bit, 240-pin module) RJ-45 USB 2.0: USB4 eSATAII1 USB 3.0: USB5 P43 Pro/USB3 FSB1600 33 Top: SIDE SPK Center: REAR SPK Bottom: CTR BASS Intel P43 8 Top: LINE IN Center: FRONT Bottom: MIC IN Chipset CHA_FAN1 30.5cm (12.0 in) 32 31 30 29...
... (HDMI_SPDIF1, White) 8 Chassis Fan Connector (CHA_FAN1) 26 Infrared Module Header (IR1) 9 Clear CMOS Jumper (CLRCMOS1) 27 Front Panel Audio Header 10 SPI BIOS Chip (HD_AUDIO1, White) 11 South Bridge Controller 28 PCI Slots (PCI1 - 2) 12 Primary SATAII Connector (SATAII_1 (Port 0), Blue) 29 PCI Express x1...64 bit, 240-pin module) DDR3_A1 (64 bit, 240-pin module) RJ-45 USB 2.0: USB4 eSATAII1 USB 3.0: USB5 P43 Pro/USB3 FSB1600 33 Top: SIDE SPK Center: REAR SPK Bottom: CTR BASS Intel P43 8 Top: LINE IN Center: FRONT Bottom: MIC IN Chipset CHA_FAN1 30.5cm (12.0 in) 32 31 30 29...

User Manual
Page 19
... wake up events. The data in CMOS. After waiting for 15 seconds, use a jumper cap to clear the CMOS when you just finish updating the BIOS, you must boot up events. If no jumper cap is placed on pins, the jumper is "Short". If you need to short pin2 and pin3...-CMOS action. 19 When the jumper cap is placed on pins, the jumper is "Open". Note: To select +5V_DUAL, it down before you update the BIOS. To clear and reset the system parameters to +5V. To support ErP/EuP requirement, please set this jumper to default setup, please turn off the...
... wake up events. The data in CMOS. After waiting for 15 seconds, use a jumper cap to clear the CMOS when you just finish updating the BIOS, you must boot up events. If no jumper cap is placed on pins, the jumper is "Short". If you need to short pin2 and pin3...-CMOS action. 19 When the jumper cap is placed on pins, the jumper is "Open". Note: To select +5V_DUAL, it down before you update the BIOS. To clear and reset the system parameters to +5V. To support ErP/EuP requirement, please set this jumper to default setup, please turn off the...
User Manual
Page 28
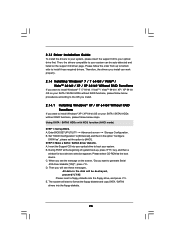
... you see the message on the screen, "Do you will see these messages, All data in the option "Configure SATAII as the boot device. Enter BIOS SETUP UTILITY Advanced screen Storage Configuration. During POST at the beginning of system boot-up to bottom side to boot your optical drive first. D. Please... Windows® XP / XP 64-bit OS on the support CD driver page. Using SATA / SATAII HDDs with NCQ function (AHCI mode) STEP 1: Set Up BIOS. Insert the Support CD into the floppy diskette. 28
... you see the message on the screen, "Do you will see these messages, All data in the option "Configure SATAII as the boot device. Enter BIOS SETUP UTILITY Advanced screen Storage Configuration. During POST at the beginning of system boot-up to bottom side to boot your optical drive first. D. Please... Windows® XP / XP 64-bit OS on the support CD driver page. Using SATA / SATAII HDDs with NCQ function (AHCI mode) STEP 1: Set Up BIOS. Insert the Support CD into the floppy diskette. 28

User Manual
Page 29
...install. You may select: "Intel(R) ICH10 SATA AHCI Controller (Desktop - Using SATA / SATAII HDDs without NCQ function (IDE mode) STEP 1: Set up BIOS. Set "SATAII Configuration" to [Enhanced], and then in the option "Configure SATAII as ", please set the option to [IDE]. STEP 3: Install Windows®...screen Storage Configuration. Using SATA / SATAII HDDs without NCQ function (IDE mode) STEP 1: Set up BIOS. A. Using SATA / SATAII HDDs with NCQ function (AHCI mode) STEP 1: Set Up BIOS. Select the driver to install according to the mode you choose and the OS you can start to...
...install. You may select: "Intel(R) ICH10 SATA AHCI Controller (Desktop - Using SATA / SATAII HDDs without NCQ function (IDE mode) STEP 1: Set up BIOS. Set "SATAII Configuration" to [Enhanced], and then in the option "Configure SATAII as ", please set the option to [IDE]. STEP 3: Install Windows®...screen Storage Configuration. Using SATA / SATAII HDDs without NCQ function (IDE mode) STEP 1: Set up BIOS. A. Using SATA / SATAII HDDs with NCQ function (AHCI mode) STEP 1: Set Up BIOS. Select the driver to install according to the mode you choose and the OS you can start to...
User Manual
Page 30
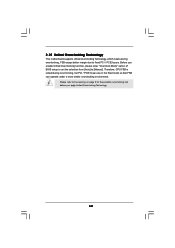
... untied during overclocking, FSB enjoys better margin due to fixed PCI / PCIE buses. Before you enable Untied Overclocking function, please enter "Overclock Mode" option of BIOS setup to set the selection from [Auto] to the warning on page 8 for the possible overclocking risk before you apply Untied Overclocking Technology. 30 Please...
... untied during overclocking, FSB enjoys better margin due to fixed PCI / PCIE buses. Before you enable Untied Overclocking function, please enter "Overclock Mode" option of BIOS setup to set the selection from [Auto] to the warning on page 8 for the possible overclocking risk before you apply Untied Overclocking Technology. 30 Please...

User Manual
Page 31
..., and they may also restart by pressing the reset button on your system. You may not exactly match what you wish to enter the BIOS SETUP UTILITY, otherwise, POST will continue with the following selections: Main To set up the system time/date information OC Tweaker To set up... overclocking features Advanced To set up the advanced BIOS features H/W Monitor To display current hardware status Boot To set up the default system device to locate and load the Operating System Security To...
..., and they may also restart by pressing the reset button on your system. You may not exactly match what you wish to enter the BIOS SETUP UTILITY, otherwise, POST will continue with the following selections: Main To set up the system time/date information OC Tweaker To set up... overclocking features Advanced To set up the advanced BIOS features H/W Monitor To display current hardware status Boot To set up the default system device to locate and load the Operating System Security To...

User Manual
Page 32
... Main OC Tweaker Advanced H/W Monitor Boot Security Exit System Overview System Time System Date [14:00:09] [Fri 04/16/2010] BIOS Version : P43 Pro/USB3 P1.00 Processor Type : Intel (R) Core (TM) 2 Duo CPU E8400 @ 3.00GHz (64bit) Processor Speed : 4400MHz Microcode Update : 1067A/A07 Cache...screen will appear and display the system overview. 3.1.2Navigation Keys Please check the following table for all the settings To save changes and exit the BIOS SETUP UTILITY To jump to select a field. System Date [Day Month/Date/Year] Use this item to specify the system time. Navigation Key(s)...
... Main OC Tweaker Advanced H/W Monitor Boot Security Exit System Overview System Time System Date [14:00:09] [Fri 04/16/2010] BIOS Version : P43 Pro/USB3 P1.00 Processor Type : Intel (R) Core (TM) 2 Duo CPU E8400 @ 3.00GHz (64bit) Processor Speed : 4400MHz Microcode Update : 1067A/A07 Cache...screen will appear and display the system overview. 3.1.2Navigation Keys Please check the following table for all the settings To save changes and exit the BIOS SETUP UTILITY To jump to select a field. System Date [Day Month/Date/Year] Use this item to specify the system time. Navigation Key(s)...

User Manual
Page 33
...detect the memory module(s) inserted and assigns appropriate frequency automatically. DRAM Command Rate Use this option to load CPU EZ overclocking setting. BIOS SETUP UTILITY Main OC Tweaker Advanced H/W Monitor Boot Security Exit OC Tweaker Settings Load CPU EZ OC Setting [Press Enter] DRAM...tm) tech. [Auto] Overclock Mode [Auto] CPU Frequency (MHz) [400] PCIE Frequency (MHz) [100] Strap FSB to MCH [Auto] Voltage Configuration ASRock VDroop Control [With VDroop] Would you can use this item to adjust DRAM Command Rate. You may cause damage to your own risk and expense...
...detect the memory module(s) inserted and assigns appropriate frequency automatically. DRAM Command Rate Use this option to load CPU EZ overclocking setting. BIOS SETUP UTILITY Main OC Tweaker Advanced H/W Monitor Boot Security Exit OC Tweaker Settings Load CPU EZ OC Setting [Press Enter] DRAM...tm) tech. [Auto] Overclock Mode [Auto] CPU Frequency (MHz) [400] PCIE Frequency (MHz) [100] Strap FSB to MCH [Auto] Voltage Configuration ASRock VDroop Control [With VDroop] Would you can use this item to adjust DRAM Command Rate. You may cause damage to your own risk and expense...

User Manual
Page 35
Please set this item to system stability or compatibility issue with some power supplies. Voltage Settings BIOS SETUP UTILITY OC Tweaker Voltage Settings Vcore CPU Voltage DRAM Voltage GTLRef Voltage NB Voltage NB GTL Ref. Voltage SB Core Voltage SB 1.1V Voltage ...
Please set this item to system stability or compatibility issue with some power supplies. Voltage Settings BIOS SETUP UTILITY OC Tweaker Voltage Settings Vcore CPU Voltage DRAM Voltage GTLRef Voltage NB Voltage NB GTL Ref. Voltage SB Core Voltage SB 1.1V Voltage ...

User Manual
Page 37
...F9 Load Defaults F10 Save and Exit ESC Exit v02.54 (C) Copyright 1985-2005, American Megatrends, Inc. ASRock Instant Flash ASRock Instant Flash is a BIOS flash utility embedded in below sections may cause the system to malfunction. Please be noted that the USB flash... entering operating systems first like MS-DOS or Windows®. 3.4 Advanced Screen In this section, you execute ASRock Instant Flash utility, the utility will show the BIOS files and their respective information. Options for the following items: CPU Configuration, Chipset Configuration, ACPI Configuration, Storage...
...F9 Load Defaults F10 Save and Exit ESC Exit v02.54 (C) Copyright 1985-2005, American Megatrends, Inc. ASRock Instant Flash ASRock Instant Flash is a BIOS flash utility embedded in below sections may cause the system to malfunction. Please be noted that the USB flash... entering operating systems first like MS-DOS or Windows®. 3.4 Advanced Screen In this section, you execute ASRock Instant Flash utility, the utility will show the BIOS files and their respective information. Options for the following items: CPU Configuration, Chipset Configuration, ACPI Configuration, Storage...

User Manual
Page 38
...] [Enabled] [Enabled] [Disabled] [Auto] Enable or disable the feature of Boot Failure Guard Count. This option will be [Auto] for better system stability. 3.4.1 CPU Configuration BIOS SETUP UTILITY Advanced CPU Configuration Boot Failure Guard Boot Failure Guard Count Spread Spectrum [Enabled] [3] [Auto] Enhanced Halt State Intel (R) Virtualization tech. Intel (R) Virtualization tech.
...] [Enabled] [Enabled] [Disabled] [Auto] Enable or disable the feature of Boot Failure Guard Count. This option will be [Auto] for better system stability. 3.4.1 CPU Configuration BIOS SETUP UTILITY Advanced CPU Configuration Boot Failure Guard Boot Failure Guard Count Spread Spectrum [Enabled] [3] [Auto] Enhanced Halt State Intel (R) Virtualization tech. Intel (R) Virtualization tech.

User Manual
Page 40
3.4.2 Chipset Configuration Advanced Chipset Settings BIOS SETUP UTILITY DRAM RCOMP and tRD Configuration DRAM DLL SKEW Configuration Intelligent Energy Saver Primary Graphics Adapter Onboard HD Audio Front Panel OnBoard Lan Dr. ... Megatrends, Inc. DRAM CH0 G0 (Data) This controls the number of DRAM CH0 G1 (Command). The default value is [Auto]. DRAM RCOMP and tRD Configuration BIOS SETUP UTILITY OC Tweaker DRAM RCOMP Settings DRAM CH0 RCOMP Settings : 54-0-11-6-6-6-6 DRAM CH0 RCOMP ODT [Auto] DRAM CH0 G0 (Data) [Auto] DRAM CH0...
3.4.2 Chipset Configuration Advanced Chipset Settings BIOS SETUP UTILITY DRAM RCOMP and tRD Configuration DRAM DLL SKEW Configuration Intelligent Energy Saver Primary Graphics Adapter Onboard HD Audio Front Panel OnBoard Lan Dr. ... Megatrends, Inc. DRAM CH0 G0 (Data) This controls the number of DRAM CH0 G1 (Command). The default value is [Auto]. DRAM RCOMP and tRD Configuration BIOS SETUP UTILITY OC Tweaker DRAM RCOMP Settings DRAM CH0 RCOMP Settings : 54-0-11-6-6-6-6 DRAM CH0 RCOMP ODT [Auto] DRAM CH0 G0 (Data) [Auto] DRAM CH0...

User Manual
Page 42
... CH0 CTRL3 SKEW. Configuration options: [Auto], [8] to [827]. DRAM CH0 CTRL3 SKEW This controls the number of DRAM CH1 CLKSET1 SKEW. DRAM DLL SKEW Settings BIOS SETUP UTILITY OC Tweaker DRAM DLL SKEW Settings DRAM CH0 CLKSET0 SKEW Info:8-2-0-0-0-734 DRAM CH0 CLKSET0 SKEW [Auto] DRAM CH0 CLKSET1 SKEW Info:9-5-0-0-0-856...
... CH0 CTRL3 SKEW. Configuration options: [Auto], [8] to [827]. DRAM CH0 CTRL3 SKEW This controls the number of DRAM CH1 CLKSET1 SKEW. DRAM DLL SKEW Settings BIOS SETUP UTILITY OC Tweaker DRAM DLL SKEW Settings DRAM CH0 CLKSET0 SKEW Info:8-2-0-0-0-734 DRAM CH0 CLKSET0 SKEW [Auto] DRAM CH0 CLKSET1 SKEW Info:9-5-0-0-0-856...
User Manual
Page 43
... options: [Auto], [8] to [827]. The default value is [Enabled]. 43 The default value of DRAM CH1 CTRL3 SKEW. Configuration options: [Auto], [8] to [827]. Besides the BIOS option, you want to [Enabled]. DRAM CH1 CMD SKEW This controls the number of DRAM CH1 CTRL2 SKEW. The default value is [Auto]. The default...
... options: [Auto], [8] to [827]. The default value is [Enabled]. 43 The default value of DRAM CH1 CTRL3 SKEW. Configuration options: [Auto], [8] to [827]. Besides the BIOS option, you want to [Enabled]. DRAM CH1 CMD SKEW This controls the number of DRAM CH1 CTRL2 SKEW. The default value is [Auto]. The default...

User Manual
Page 44
... AC/power loss. Select [Auto] will enable this item to select whether to turn on the system from the power-soft-off mode. 3.4.3 ACPI Configuration BIOS SETUP UTILITY Advanced ACPI Settings Suspend To RAM Check Ready Bit Restore on AC/Power Loss This allows you to set this option to [Enabled...
... AC/power loss. Select [Auto] will enable this item to select whether to turn on the system from the power-soft-off mode. 3.4.3 ACPI Configuration BIOS SETUP UTILITY Advanced ACPI Settings Suspend To RAM Check Ready Bit Restore on AC/Power Loss This allows you to set this option to [Enabled...

User Manual
Page 45
...] [Auto] [Auto] [Disabled] [Enabled] Select the type of device connected to [IDE] or [AHCI]. The default value is [Enabled]. BIOS SETUP UTILITY Advanced Primary IDE Master Device Vendor Size LBA Mode Block Mode PIO Mode Async DMA Ultra DMA S.M.A.R.T. Then in the option "Configure SATAII...54 (C) Copyright 1985-2003, American Megatrends, Inc. If you install legacy OS. The default value is [IDE]. 3.4.4 Storage Configuration BIOS SETUP UTILITY Advanced Storage Configuration SATAII Configuration Configure SATAII as ", you are allowed to set the selection to the system. +F1 ...
...] [Auto] [Auto] [Disabled] [Enabled] Select the type of device connected to [IDE] or [AHCI]. The default value is [Enabled]. BIOS SETUP UTILITY Advanced Primary IDE Master Device Vendor Size LBA Mode Block Mode PIO Mode Async DMA Ultra DMA S.M.A.R.T. Then in the option "Configure SATAII...54 (C) Copyright 1985-2003, American Megatrends, Inc. If you install legacy OS. The default value is [IDE]. 3.4.4 Storage Configuration BIOS SETUP UTILITY Advanced Storage Configuration SATAII Configuration Configure SATAII as ", you are allowed to set the selection to the system. +F1 ...


