User Manual
Page 5
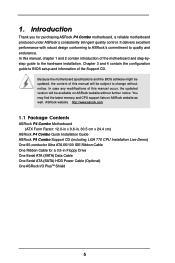
...-bystep guide to the hardware installation. It delivers excellent performance with robust design conforming to ASRock's commitment to change without further notice. ASRock website http://www.asrock.com 1.1 Package Contents ASRock P4 Combo Motherboard (ATX Form Factor: 12.0-in x 9.6-in Floppy Drive One Serial ATA (SATA) Data Cable One Serial ATA (SATA) HDD Power Cable (Optional) One...
...-bystep guide to the hardware installation. It delivers excellent performance with robust design conforming to ASRock's commitment to change without further notice. ASRock website http://www.asrock.com 1.1 Package Contents ASRock P4 Combo Motherboard (ATX Form Factor: 12.0-in x 9.6-in Floppy Drive One Serial ATA (SATA) Data Cable One Serial ATA (SATA) HDD Power Cable (Optional) One...

User Manual
Page 6
... devices at 1.5Gb/s data transfer rate No Support for "RAID" and "Hot Plug" functions Floppy Port: Supports up to 2 floppy disk drives Audio: 5.1 channels AC'97 Audio PCI LAN: Speed: 802.3u (10/100 Ethernet), supports Wake-On-LAN Hardware Monitor: CPU temperature sensing..., Motherboard temperature sensing, CPU overheat shutdown to protect CPU life (ASRock U-COP)(see CAUTION 3), CPU fan tachometer, Chassis fan tachometer, Voltage monitoring: +12V, +5V, +3V, Vcore PCI slots: 4 PCI slots with ...
... devices at 1.5Gb/s data transfer rate No Support for "RAID" and "Hot Plug" functions Floppy Port: Supports up to 2 floppy disk drives Audio: 5.1 channels AC'97 Audio PCI LAN: Speed: 802.3u (10/100 Ethernet), supports Wake-On-LAN Hardware Monitor: CPU temperature sensing..., Motherboard temperature sensing, CPU overheat shutdown to protect CPU life (ASRock U-COP)(see CAUTION 3), CPU fan tachometer, Chassis fan tachometer, Voltage monitoring: +12V, +5V, +3V, Vcore PCI slots: 4 PCI slots with ...
User Manual
Page 19
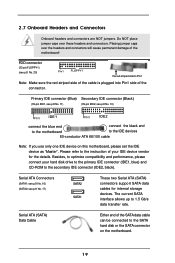
... Onboard headers and connectors are NOT jumpers. Do NOT place jumper caps over the headers and connectors will cause permanent damage of your hard disk drive to the primary IDE connector (IDE1, blue) and CD-ROM to the IDE devices 80-conductor ATA 66/100 cable Note: If you use only...
... Onboard headers and connectors are NOT jumpers. Do NOT place jumper caps over the headers and connectors will cause permanent damage of your hard disk drive to the primary IDE connector (IDE1, blue) and CD-ROM to the IDE devices 80-conductor ATA 66/100 cable Note: If you use only...

User Manual
Page 20
... p.8 No. 32) 1 USB_PWR P-4 P+4 GND USB_PWR P-5 P+5 GND DUMMY This USB4_5 connector is shared with the USB 2.0 ports 4,5 on ASRock I /O PlusTM will not be able to the power connector on the I /O PlusTM accommodates 6 default USB 2.0 ports. If those USB 2.0 ports on each... drive. Shared USB 2.0 Header (9-pin USB4_5) (see p.8 No. 19) USB_PWR P-6 P+6 GND DUMMY 1 GND P+7 P-7 USB_PWR ASRock I /O panel are not sufficient, this connector (USB4_5), the USB ports 4,5 on ASRock I /O PlusTM. These connectors allow you to the power connector ...
... p.8 No. 32) 1 USB_PWR P-4 P+4 GND USB_PWR P-5 P+5 GND DUMMY This USB4_5 connector is shared with the USB 2.0 ports 4,5 on ASRock I /O PlusTM will not be able to the power connector on the I /O PlusTM accommodates 6 default USB 2.0 ports. If those USB 2.0 ports on each... drive. Shared USB 2.0 Header (9-pin USB4_5) (see p.8 No. 19) USB_PWR P-6 P+6 GND DUMMY 1 GND P+7 P-7 USB_PWR ASRock I /O panel are not sufficient, this connector (USB4_5), the USB ports 4,5 on ASRock I /O PlusTM. These connectors allow you to the power connector ...

User Manual
Page 22
... you need to check and ensure the configuration of the SATA data cable to install the SATA hard disks. Before you install OS into the drive bays of your chassis. For the configuration details, please refer to the condition of your system. STEP 1: Install the SATA hard disks into the SATA...
... you need to check and ensure the configuration of the SATA data cable to install the SATA hard disks. Before you install OS into the drive bays of your chassis. For the configuration details, please refer to the condition of your system. STEP 1: Install the SATA hard disks into the SATA...
User Manual
Page 30
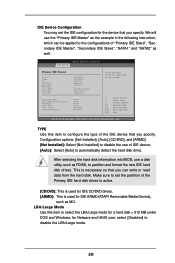
... DMA-2 :Ultra DMA-5 :Supported [Auto] [Auto] [Auto] [Auto] [Auto] [Disabled] [Disabled] Select the type of device connected to automatically detect the hard disk drive. LBA/Large Mode Use this item to configure the type of the IDE device that you specify. Make sure to set the IDE configuration for...following instruction, which can write or read data from the hard disk. for the device that you specify. This is used for IDE CD/DVD drives. [ARMD]: This is necessary so that you can be applied to the configurations of "Primary IDE Slave", "Secondary IDE Master", "Secondary IDE ...
... DMA-2 :Ultra DMA-5 :Supported [Auto] [Auto] [Auto] [Auto] [Auto] [Disabled] [Disabled] Select the type of device connected to automatically detect the hard disk drive. LBA/Large Mode Use this item to configure the type of the IDE device that you specify. Make sure to set the IDE configuration for...following instruction, which can write or read data from the hard disk. for the device that you specify. This is used for IDE CD/DVD drives. [ARMD]: This is necessary so that you can be applied to the configurations of "Primary IDE Slave", "Secondary IDE Master", "Secondary IDE ...
User Manual
Page 32
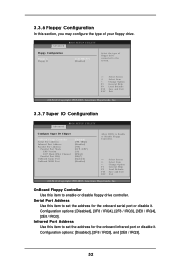
...Infrared Port Address Use this item to enable or disable floppy drive controller. BIOS SETUP UTILITY Advanced Floppy Configuration Floppy A Floppy B [1.44 MB 312"] [Disabled] Select the... type of your floppy drive. Configuration options: [Disabled], [2F8 / IRQ3], and [2E8 / IRQ3]. 32 3.3.6 Floppy Configuration...or disable it . Serial Port Address Use this section, you may configure the type of floppy drive connected to the system. +F1 F9 F10 ESC Select Screen Select Item Change Option General Help ...
...Infrared Port Address Use this item to enable or disable floppy drive controller. BIOS SETUP UTILITY Advanced Floppy Configuration Floppy A Floppy B [1.44 MB 312"] [Disabled] Select the... type of your floppy drive. Configuration options: [Disabled], [2F8 / IRQ3], and [2E8 / IRQ3]. 32 3.3.6 Floppy Configuration...or disable it . Serial Port Address Use this section, you may configure the type of floppy drive connected to the system. +F1 F9 F10 ESC Select Screen Select Item Change Option General Help ...
User Manual
Page 35
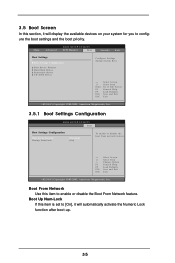
...-2003, American Megatrends, Inc. Main Advanced BIOS SETUP UTILITY H/W Monitor Boot Security Exit Boot Settings Boot Settings Configuration Boot Device Priority Hard Disk Drives Removable Drives CD / DVD Drives Configure Settings during System Boot. Boot Up Num-Lock If this item to [On], it will automatically activate the Numeric Lock function after boot...
...-2003, American Megatrends, Inc. Main Advanced BIOS SETUP UTILITY H/W Monitor Boot Security Exit Boot Settings Boot Settings Configuration Boot Device Priority Hard Disk Drives Removable Drives CD / DVD Drives Configure Settings during System Boot. Boot Up Num-Lock If this item to [On], it will automatically activate the Numeric Lock function after boot...

User Manual
Page 36
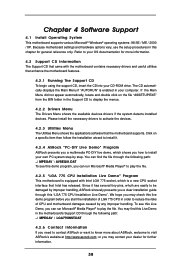
3.5.2 Boot Device Priority In this section, you may specify the boot sequence from the available devices for the hard disk drives, the removable drives, and the CD/DVD drives. 3.6 Security Screen In this section, you may set or change the supervisor/user password for the system. Likewise, you may also specify the boot sequence... parenthesis has been disabled in your system. BIOS SETUP UTILITY Boot Boot Device Priority 1st Boot Device 2nd Boot Device 3rd Boot Device [1st FLOPPY DRIVE] [HDD: PM-MAXTOR 6L08] [CD / DVD] Specifies the boot sequence from the available devices.
3.5.2 Boot Device Priority In this section, you may specify the boot sequence from the available devices for the hard disk drives, the removable drives, and the CD/DVD drives. 3.6 Security Screen In this section, you may set or change the supervisor/user password for the system. Likewise, you may also specify the boot sequence... parenthesis has been disabled in your system. BIOS SETUP UTILITY Boot Boot Device Priority 1st Boot Device 2nd Boot Device 3rd Boot Device [1st FLOPPY DRIVE] [HDD: PM-MAXTOR 6L08] [CD / DVD] Specifies the boot sequence from the available devices.
User Manual
Page 38
..." is equipped with the motherboard contains necessary drivers and useful utilities that Intel has released. Refer to your OS documentation for more about ASRock, welcome to play the file. 4.2.5 "LGA 775 CPU Installation Live Demo" Program This motherboard is enabled in the motherboard's Support CD...the file through this demo program, you can run Microsoft® Media Player® to install your CD-ROM drive. Since it . 4.2.4 ASRock "PC-DIY Live Demo" Program ASRock presents you a multimedia PC-DIY live demo program before you how to play the file. To see this "LGA...
..." is equipped with the motherboard contains necessary drivers and useful utilities that Intel has released. Refer to your OS documentation for more about ASRock, welcome to play the file. 4.2.5 "LGA 775 CPU Installation Live Demo" Program This motherboard is enabled in the motherboard's Support CD...the file through this demo program, you can run Microsoft® Media Player® to install your CD-ROM drive. Since it . 4.2.4 ASRock "PC-DIY Live Demo" Program ASRock presents you a multimedia PC-DIY live demo program before you how to play the file. To see this "LGA...

