
User Manual
Page 3
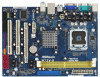
Contents 1 Introduction 5 1.1 Package Contents 5 1.2 Specifications 6 1.3 Motherboard Layout (N73PV-S 9 1.4 Motherboard Layout (N73V-S 10 1.5 I/O Panel 11 2 Installation 12 2.1 Screw Holes 12 2.2 Pre-installation Precautions 12 2.3 CPU Installation 13 2.4 Installation of Heatsink and CPU fan 15 2.5 Installation of Memory Modules (DIMM 16 2.6 Expansion Slots (PCI and PCI Express Slots 17 2.7 Easy Multi Monitor Feature 18 2.8 Jumpers...
Contents 1 Introduction 5 1.1 Package Contents 5 1.2 Specifications 6 1.3 Motherboard Layout (N73PV-S 9 1.4 Motherboard Layout (N73V-S 10 1.5 I/O Panel 11 2 Installation 12 2.1 Screw Holes 12 2.2 Pre-installation Precautions 12 2.3 CPU Installation 13 2.4 Installation of Heatsink and CPU fan 15 2.5 Installation of Memory Modules (DIMM 16 2.6 Expansion Slots (PCI and PCI Express Slots 17 2.7 Easy Multi Monitor Feature 18 2.8 Jumpers...

User Manual
Page 6
... - Supports Untied Overclocking Technology (see CAUTION 1) - NVIDIA® GeForce 7050 / nForce 610i (N73V-S) - 2 x DDR2 DIMM slots - Integrated NVIDIA® GeForce 7100 (N73PV-S) - DX9.0 VGA, Pixel Shader 3.0 - shared memory 256MB (see CAUTION 3) - 1 x PCI Express x16 slot - 1 x PCI Express x1 ...PCI slots - Supports Wake-On-LAN I /O Connector - capacity of system memory: 16GB (see CAUTION 4) - 5.1 CH Windows® VistaTM Premium Level HD Audio (ALC662 Audio Codec) - Integrated NVIDIA® GeForce 7050 (N73V-S) - Supports EM64T CPU - Max. NVIDIA® GeForce 7100 / nForce...
... - Supports Untied Overclocking Technology (see CAUTION 1) - NVIDIA® GeForce 7050 / nForce 610i (N73V-S) - 2 x DDR2 DIMM slots - Integrated NVIDIA® GeForce 7100 (N73PV-S) - DX9.0 VGA, Pixel Shader 3.0 - shared memory 256MB (see CAUTION 3) - 1 x PCI Express x16 slot - 1 x PCI Express x1 ...PCI slots - Supports Wake-On-LAN I /O Connector - capacity of system memory: 16GB (see CAUTION 4) - 5.1 CH Windows® VistaTM Premium Level HD Audio (ALC662 Audio Codec) - Integrated NVIDIA® GeForce 7050 (N73V-S) - Supports EM64T CPU - Max. NVIDIA® GeForce 7100 / nForce...

User Manual
Page 8
...of Intelligent Energy Saver. Before you install the PC system. 8 This motherboard supports Untied Overclocking Technology. ASRock website: http://www.asrock.com 8. ASRock website: http://www.asrock.com 9. To improve heat dissipation, remember to spray thermal grease between the CPU and the heatsink when ... and Windows® VistaTM 64-bit with 64-bit CPU, there is detected, the system will automatically shutdown. The maximum shared memory size is able to SATAII connector directly. 6. Please check NVIDIA® website for system usage under Microsoft® Windows® ...
...of Intelligent Energy Saver. Before you install the PC system. 8 This motherboard supports Untied Overclocking Technology. ASRock website: http://www.asrock.com 8. ASRock website: http://www.asrock.com 9. To improve heat dissipation, remember to spray thermal grease between the CPU and the heatsink when ... and Windows® VistaTM 64-bit with 64-bit CPU, there is detected, the system will automatically shutdown. The maximum shared memory size is able to SATAII connector directly. 6. Please check NVIDIA® website for system usage under Microsoft® Windows® ...

User Manual
Page 16
... to the motherboard and the DIMM if you force the DIMM into the slot until the retaining clips at incorrect orientation. Step 2. Step 1. 2.5 Installation of Memory Modules (DIMM) This motherboard provides two 240-pin DDR2 (Double Data Rate 2) DIMM slots.
... to the motherboard and the DIMM if you force the DIMM into the slot until the retaining clips at incorrect orientation. Step 2. Step 1. 2.5 Installation of Memory Modules (DIMM) This motherboard provides two 240-pin DDR2 (Double Data Rate 2) DIMM slots.
User Manual
Page 18
.../D-Sub connector of the add-on PCI Express VGA card. 3. Boot your system. Please make sure that you can adjust the parameters of the system memory. Set up a multi monitor environment: 1. F. Please refer to the following steps to install it again. 5. Connect the D-Sub monitor cable to display a ...the internal onboard VGA and the external add-on PCI Express VGA card, you do not adjust the BIOS setup, the default value of "Share Memory", [Auto], will be designated as appropriate for the diaplay icon identified by the number 2. Install the NVIDIA® PCI Express VGA card to...
.../D-Sub connector of the add-on PCI Express VGA card. 3. Boot your system. Please make sure that you can adjust the parameters of the system memory. Set up a multi monitor environment: 1. F. Please refer to the following steps to install it again. 5. Connect the D-Sub monitor cable to display a ...the internal onboard VGA and the external add-on PCI Express VGA card, you do not adjust the BIOS setup, the default value of "Share Memory", [Auto], will be designated as appropriate for the diaplay icon identified by the number 2. Install the NVIDIA® PCI Express VGA card to...

User Manual
Page 33
... your system. If you start up the system time/date information Smart To load the BIOS according to choose among the selections on . The SPI Memory on the motherboard stores the BIOS SETUP UTILITY.
... your system. If you start up the system time/date information Smart To load the BIOS according to choose among the selections on . The SPI Memory on the motherboard stores the BIOS SETUP UTILITY.

User Manual
Page 34
...-S P1.00 Processor Type : Intel (R) Core(TM)2 Duo CPU E4600 @ 2.40GHz (64bit) Processor Speed : 2400MHz Microcode Update : 6FD/A3 Cache Size : 2048KB Total Memory : 512MB with 64MB shared memory DDRII_1 DDRII_2 : None : 512MB/333MHz (DDRII667) Use [Enter], [TAB] or [SHIFT-TAB] to select a field. System Date [Day Month/Date/Year] Use this...
...-S P1.00 Processor Type : Intel (R) Core(TM)2 Duo CPU E4600 @ 2.40GHz (64bit) Processor Speed : 2400MHz Microcode Update : 6FD/A3 Cache Size : 2048KB Total Memory : 512MB with 64MB shared memory DDRII_1 DDRII_2 : None : 512MB/333MHz (DDRII667) Use [Enter], [TAB] or [SHIFT-TAB] to select a field. System Date [Day Month/Date/Year] Use this...

User Manual
Page 35
... a field. Use [+] or [-] to specify the system time. N73V-S BIOS SETUP UTILITY Main Smart Advanced H/W Monitor Boot Security Exit System Overview System Time System Date [14:00:09] [Fri 12/12/2008] BIOS Version : N73V-S P1.00 Processor Type : Intel (R) Core(TM)2 Duo CPU ...E4600 @ 2.40GHz (64bit) Processor Speed : 2400MHz Microcode Update : 6FD/A3 Cache Size : 2048KB Total Memory : 512MB with 64MB shared memory DDRII_1 DDRII_2 : None : 512MB/333MHz (DDRII667) Use [Enter...
... a field. Use [+] or [-] to specify the system time. N73V-S BIOS SETUP UTILITY Main Smart Advanced H/W Monitor Boot Security Exit System Overview System Time System Date [14:00:09] [Fri 12/12/2008] BIOS Version : N73V-S P1.00 Processor Type : Intel (R) Core(TM)2 Duo CPU ...E4600 @ 2.40GHz (64bit) Processor Speed : 2400MHz Microcode Update : 6FD/A3 Cache Size : 2048KB Total Memory : 512MB with 64MB shared memory DDRII_1 DDRII_2 : None : 512MB/333MHz (DDRII667) Use [Enter...

User Manual
Page 37
...] [200] [100] [Enabled] [Disabled] [Disabled] [Disabled] Ratio Status Ratio Actual Value Unlocked (Min:06, Max:12) 12 Enhanced Halt State CPU Thermal Throttling No-Excute Memory Protection Intel (R) SpeedStep (tm) tech. [Disabled] [Enabled] [Disabled] [Auto] Select the over clock mode. +F1 F9 F10 ESC Select Screen Select Item Change Option General...
...] [200] [100] [Enabled] [Disabled] [Disabled] [Disabled] Ratio Status Ratio Actual Value Unlocked (Min:06, Max:12) 12 Enhanced Halt State CPU Thermal Throttling No-Excute Memory Protection Intel (R) SpeedStep (tm) tech. [Disabled] [Enabled] [Disabled] [Auto] Select the over clock mode. +F1 F9 F10 ESC Select Screen Select Item Change Option General...
User Manual
Page 38
... Technology is a read-only item, which displays the ratio actual value of this feature, it requires a computer system with "No Execute (NX) Memory Protection" can utilize the additional hardware capabilities provided by malicious software to [Enabled] if using Microsoft® Windows® XP, or Linux kernel version 2.4.18 ... no hardware support from overheated. When this technology, such as default. This option will be hidden if the current CPU does not support No-Excute Memory Protection.
... Technology is a read-only item, which displays the ratio actual value of this feature, it requires a computer system with "No Execute (NX) Memory Protection" can utilize the additional hardware capabilities provided by malicious software to [Enabled] if using Microsoft® Windows® XP, or Linux kernel version 2.4.18 ... no hardware support from overheated. When this technology, such as default. This option will be hidden if the current CPU does not support No-Excute Memory Protection.

User Manual
Page 40
...you to adjust onboard GPU clock. Flexibility Option The default value of this to [Enabled]. Primary Graphics Adapter This item will detect the memory module(s) inserted and assigns appropriate frequency automatically. Configuration options: [Auto], [32MB], [64MB], [128MB] and [256MB]. Configuration options: ...400MHz (DDRII800)] and [Manual]. OnBoard GPU Clock Use this feature is [Auto]. Configuration options: [Auto] and [Manual]. Share Memory This allows you select [Auto], the onboard HD Audio will allow better tolerance for the onboard HD Audio feature. The default value...
...you to adjust onboard GPU clock. Flexibility Option The default value of this to [Enabled]. Primary Graphics Adapter This item will detect the memory module(s) inserted and assigns appropriate frequency automatically. Configuration options: [Auto], [32MB], [64MB], [128MB] and [256MB]. Configuration options: ...400MHz (DDRII800)] and [Manual]. OnBoard GPU Clock Use this feature is [Auto]. Configuration options: [Auto] and [Manual]. Share Memory This allows you select [Auto], the onboard HD Audio will allow better tolerance for the onboard HD Audio feature. The default value...

Quick Installation Guide
Page 6
... with LED (ACT/LINK LED and SPEED LED) - LGA 775 for N73PV-S only - 1 x ATA133 IDE connector (supports 2 x IDE devices) ASRock N73PV-S / N73V-S Motherboard English Supports Untied Overclocking Technology (see CAUTION 1) - capacity of system memory: 16GB (see CAUTION 3) - 1 x PCI Express x16 slot - 1 x PCI Express x1 slot - 2 x PCI slots - Integrated NVIDIA® GeForce 7100 (N73PV...
... with LED (ACT/LINK LED and SPEED LED) - LGA 775 for N73PV-S only - 1 x ATA133 IDE connector (supports 2 x IDE devices) ASRock N73PV-S / N73V-S Motherboard English Supports Untied Overclocking Technology (see CAUTION 1) - capacity of system memory: 16GB (see CAUTION 3) - 1 x PCI Express x16 slot - 1 x PCI Express x1 slot - 2 x PCI slots - Integrated NVIDIA® GeForce 7100 (N73PV...

Quick Installation Guide
Page 8
...To improve heat dissipation, remember to spray thermal grease between the CPU and the heatsink when you to the operating system limitation, the actual memory size may be less than the recommended CPU bus frequencies may cause the instability of "User Manual" in the support CD to adjust your... installing SATAII hard disk to SATAII connector directly. 6. Featuring an advanced proprietary hardware and software design, Intelligent Energy Saver is a user-friendly ASRock overclocking tool which allows you install the PC system. 8 ASRock N73PV-S / N73V-S Motherboard English CAUTION! 1.
...To improve heat dissipation, remember to spray thermal grease between the CPU and the heatsink when you to the operating system limitation, the actual memory size may be less than the recommended CPU bus frequencies may cause the instability of "User Manual" in the support CD to adjust your... installing SATAII hard disk to SATAII connector directly. 6. Featuring an advanced proprietary hardware and software design, Intelligent Energy Saver is a user-friendly ASRock overclocking tool which allows you install the PC system. 8 ASRock N73PV-S / N73V-S Motherboard English CAUTION! 1.

Quick Installation Guide
Page 12
...DIMM matches the break on the slot. English The DIMM only fits in place and the DIMM is properly seated. 12 ASRock N73PV-S / N73V-S Motherboard Firmly insert the DIMM into the slot at both ends fully snap back in one correct orientation. It will ...cause permanent damage to disconnect power supply before adding or removing DIMMs or the system components. Unlock a DIMM slot by pressing the retaining clips outward. 2.3 Installation of Memory...
...DIMM matches the break on the slot. English The DIMM only fits in place and the DIMM is properly seated. 12 ASRock N73PV-S / N73V-S Motherboard Firmly insert the DIMM into the slot at both ends fully snap back in one correct orientation. It will ...cause permanent damage to disconnect power supply before adding or removing DIMMs or the system components. Unlock a DIMM slot by pressing the retaining clips outward. 2.3 Installation of Memory...
Quick Installation Guide
Page 14
...can adjust the parameters of the multi-monitor according to be designated as Secondary. If you select is less than the total capability of "Share Memory", [Auto], will be your card, one , two and three. For Windows® XP / XP 64-bit OS: Right click the ...the DVI-D monitor cable to the VGA/DVI-D connector of the multi-monitor according to this monitor". Click the number "2" icon. 14 ASRock N73PV-S / N73V-S Motherboard English 2.5 Easy Multi Monitor Feature This motherboard supports Multi Monitor upgrade. Connect another D-Sub monitor cable to enable the function of...
...can adjust the parameters of the multi-monitor according to be designated as Secondary. If you select is less than the total capability of "Share Memory", [Auto], will be your card, one , two and three. For Windows® XP / XP 64-bit OS: Right click the ...the DVI-D monitor cable to the VGA/DVI-D connector of the multi-monitor according to this monitor". Click the number "2" icon. 14 ASRock N73PV-S / N73V-S Motherboard English 2.5 Easy Multi Monitor Feature This motherboard supports Multi Monitor upgrade. Connect another D-Sub monitor cable to enable the function of...

Quick Installation Guide
Page 22
... CD into your computer. EXE" from the BIN folder in the Support CD. 4. If you to scroll through its test routines. BIOS Information The Flash Memory on the file "ASSETUP. If the Main Menu does not appear automatically, locate and double-click on the motherboard stores BIOS Setup Utility. The Support... is designed to select among the predetermined choices. The BIOS Setup program is a menu-driven program, which allows you wish to display the menus. 22 ASRock N73PV-S / N73V-S Motherboard English
... CD into your computer. EXE" from the BIN folder in the Support CD. 4. If you to scroll through its test routines. BIOS Information The Flash Memory on the file "ASSETUP. If the Main Menu does not appear automatically, locate and double-click on the motherboard stores BIOS Setup Utility. The Support... is designed to select among the predetermined choices. The BIOS Setup program is a menu-driven program, which allows you wish to display the menus. 22 ASRock N73PV-S / N73V-S Motherboard English

