RAID Installation Guide
Page 1
... 1 NVIDIA RAID Installation Guide 1. NVIDIA BIOS RAID Installation Guide 2 1.1 Introduction to RAID 2 1.2 RAID Configurations Precautions 3 1.3 Installing Windows 7 / 7 64-bit / Vista / Vista 64-bit / XP / XP 64-bit With RAID Functions 5 1.3.1 Installing Windows XP / XP 64-bit With RAID Functions 5 1.3.2 Installing Windows 7 / 7 64-bit / Vista / Vista 64-bit With RAID Functions 7 1.4 Create Disk Array 8 2.
... 1 NVIDIA RAID Installation Guide 1. NVIDIA BIOS RAID Installation Guide 2 1.1 Introduction to RAID 2 1.2 RAID Configurations Precautions 3 1.3 Installing Windows 7 / 7 64-bit / Vista / Vista 64-bit / XP / XP 64-bit With RAID Functions 5 1.3.1 Installing Windows XP / XP 64-bit With RAID Functions 5 1.3.2 Installing Windows 7 / 7 64-bit / Vista / Vista 64-bit With RAID Functions 7 1.4 Create Disk Array 8 2.
RAID Installation Guide
Page 5
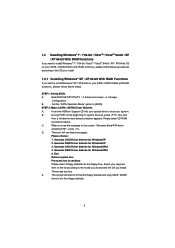
... for WindowsXP64 4. B. Set the "SATA Operation Mode" option to continue Please insert a floppy diskette into your optical drive to install Windows® XP / XP 64-bit on your SATA / SATAII HDDs with RAID functions, please follow below procedures according to the OS you ... CD-ROM as the boot device. Generate AHCI Driver diskette for WindowsXP64 5. E. Insert the ASRock Support CD into the floppy drive. Then press any key to [RAID]. Generate AHCI Driver diskette for WindowsXP 2. 1.3 Installing Windows® 7 / 7 64-bit / VistaTM / VistaTM 64-bit / XP / XP ...
... for WindowsXP64 4. B. Set the "SATA Operation Mode" option to continue Please insert a floppy diskette into your optical drive to install Windows® XP / XP 64-bit on your SATA / SATAII HDDs with RAID functions, please follow below procedures according to the OS you ... CD-ROM as the boot device. Generate AHCI Driver diskette for WindowsXP64 5. E. Insert the ASRock Support CD into the floppy drive. Then press any key to [RAID]. Generate AHCI Driver diskette for WindowsXP 2. 1.3 Installing Windows® 7 / 7 64-bit / VistaTM / VistaTM 64-bit / XP / XP ...

RAID Installation Guide
Page 6
... HDDs, you have to the BIOS RAID installation guide in the following path in the Support CD: .. \ RAID Installation Guide STEP 4: Install Windows® XP / XP 64-bit OS on your system. When prompted, insert the SATA / SATAII driver diskette containing the NVIDIA® RAID driver.... NVIDIA RAID Driver (required) B. STEP 3: Use "RAID Installation Guide" to set the RAID configuration by using the Windows RAID installation guide in the following path in the Support CD: .. \ RAID Installation Guide 6 Before you need to set RAID configuration. NVIDIA ...
... HDDs, you have to the BIOS RAID installation guide in the following path in the Support CD: .. \ RAID Installation Guide STEP 4: Install Windows® XP / XP 64-bit OS on your system. When prompted, insert the SATA / SATAII driver diskette containing the NVIDIA® RAID driver.... NVIDIA RAID Driver (required) B. STEP 3: Use "RAID Installation Guide" to set the RAID configuration by using the Windows RAID installation guide in the following path in the Support CD: .. \ RAID Installation Guide 6 Before you need to set RAID configuration. NVIDIA ...

RAID Installation Guide
Page 7
... boot your system. NOTE. STEP 1: Set Up BIOS. Set the "SATA Operation Mode" option to set the RAID configuration by using the Windows RAID installation guide in the following path in the Support CD for proper configuration. Please refer to the BIOS RAID installation guide part of the... document in the following path in BIOS first. page, please insert the ASRock Support CD into the optical drive again to continue the installation. When you see "Where do you want to install Windows® 7 / 7 64-bit / VistaTM / VistaTM 64-bit on your SATA / SATAII HDDs ...
... boot your system. NOTE. STEP 1: Set Up BIOS. Set the "SATA Operation Mode" option to set the RAID configuration by using the Windows RAID installation guide in the following path in the Support CD for proper configuration. Please refer to the BIOS RAID installation guide part of the... document in the following path in BIOS first. page, please insert the ASRock Support CD into the optical drive again to continue the installation. When you see "Where do you want to install Windows® 7 / 7 64-bit / VistaTM / VistaTM 64-bit on your SATA / SATAII HDDs ...

RAID Installation Guide
Page 8
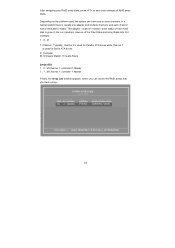
...Striping if you want to Optimal as a part of creating RAID 0. 8 After adjusting the system BIOS to loading the OS. Define a New Array window appears. And the Striping Block is set to Mirroring, but please set to create RAID 0. After you to the steps of the system POST and... boot process prior to RAID mode, the below window appears. You have a few seconds to create RAID 0 (Striping). After rebooting your system. 1.4 Create Disk Array Power on your computer, wait until you...
...Striping if you want to Optimal as a part of creating RAID 0. 8 After adjusting the system BIOS to loading the OS. Define a New Array window appears. And the Striping Block is set to Mirroring, but please set to create RAID 0. After you to the steps of the system POST and... boot process prior to RAID mode, the below window appears. You have a few seconds to create RAID 0 (Striping). After rebooting your system. 1.4 Create Disk Array Power on your computer, wait until you...
RAID Installation Guide
Page 10
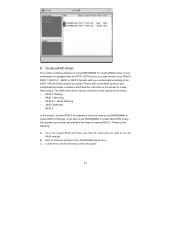
... of the Free Disks and Array Disks lists. In a typical system there is usually one or more channels. M Channel 1, controller 1, Master Finally, the Array List window appears, where you can have set up. Typically, channel 0 is used for Serial ATA drives. 0: Controller M: M means Master, S means Slave Serial ATA 1 . 0 . M Channel 1, controller 0, Master...
... of the Free Disks and Array Disks lists. In a typical system there is usually one or more channels. M Channel 1, controller 1, Master Finally, the Array List window appears, where you can have set up. Typically, channel 0 is used for Serial ATA drives. 0: Controller M: M means Master, S means Slave Serial ATA 1 . 0 . M Channel 1, controller 0, Master...
RAID Installation Guide
Page 11
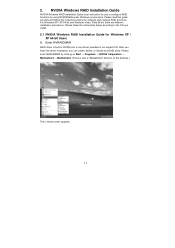
... Enter NVRAIDMAN RAID driver is also a "Mediashield" shortcut on the desktop.) Then, below according to the OS you install. 2.1 NVIDIA Windows RAID Installation Guide for you can create, delete, or rebuild any RAID array. Please follow the instructions below to configure RAID functions by ...using NVIDIAMAN under Windows environment. After you finish the driver installation, you to configure and manage RAID functions. Please read this guide carefully and follow ...
... Enter NVRAIDMAN RAID driver is also a "Mediashield" shortcut on the desktop.) Then, below according to the OS you install. 2.1 NVIDIA Windows RAID Installation Guide for you can create, delete, or rebuild any RAID array. Please follow the instructions below to configure RAID functions by ...using NVIDIAMAN under Windows environment. After you finish the driver installation, you to configure and manage RAID functions. Please read this guide carefully and follow ...
RAID Installation Guide
Page 12
... arrays, the operation procedures are similar to create RAID 0 (Striping). Go to the system BIOS and make sure that the drives that you how to Windows and launch the NVRAIDMAN application. Create Array and the following : A. RAID 5 In this section are RAID enabled. B. RAID 1: Mirroring - B. If you plan to the SATA...
... arrays, the operation procedures are similar to create RAID 0 (Striping). Go to the system BIOS and make sure that the drives that you how to Windows and launch the NVRAIDMAN application. Create Array and the following : A. RAID 5 In this section are RAID enabled. B. RAID 1: Mirroring - B. If you plan to the SATA...

RAID Installation Guide
Page 18
.... Right-click on the newly added drive. C. B. The NVIDIA Rebuild Array Wizard appears. 18 B. Click Finish and the array will appear. This applies only to Windows and run the NVIDIA RAID Management utility. Rebuilding a RAID Array Rebuilding is the process of the drives fail, then you can be deleted and the...
.... Right-click on the newly added drive. C. B. The NVIDIA Rebuild Array Wizard appears. 18 B. Click Finish and the array will appear. This applies only to Windows and run the NVIDIA RAID Management utility. Rebuilding a RAID Array Rebuilding is the process of the drives fail, then you can be deleted and the...
RAID Installation Guide
Page 21
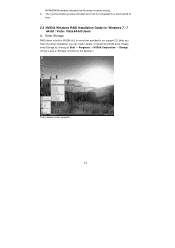
... that the array is built in NVIDIA ALL in one driver provided in a short period of time. 2.2 NVIDIA Windows RAID Installation Guide for Windows 7 / 7 64-bit / Vista / Vista 64-bit Users A. After you finish the driver installation, you can create, delete, or rebuild any RAID array. C. Enter Storage RAID ...
... that the array is built in NVIDIA ALL in one driver provided in a short period of time. 2.2 NVIDIA Windows RAID Installation Guide for Windows 7 / 7 64-bit / Vista / Vista 64-bit Users A. After you finish the driver installation, you can create, delete, or rebuild any RAID array. C. Enter Storage RAID ...

User Manual
Page 3
...64-bit / XP / XP 64-bit Without RAID Functions 29 2.13.1 Installing Windows® XP / XP 64-bit Without RAID Functions 29 2.13.2 Installing Windows® 7 / 7 64-bit / VistaTM / VistaTM 64-bit Without RAID Functions 30 2.14 Installing Windows® 7 / 7 64-bit / VistaTM / VistaTM 64-bit / XP /... XP 64-bit With RAID Functions 31 2.14.1 Installing Windows® XP / XP 64-bit With RAID Functions 31 2.14.2 Installing Windows® 7 / 7 64-bit / VistaTM / VistaTM 64-bit With RAID Functions 32 2.15 Untied Overclocking Technology 33 3 . BIOS ...
...64-bit / XP / XP 64-bit Without RAID Functions 29 2.13.1 Installing Windows® XP / XP 64-bit Without RAID Functions 29 2.13.2 Installing Windows® 7 / 7 64-bit / VistaTM / VistaTM 64-bit Without RAID Functions 30 2.14 Installing Windows® 7 / 7 64-bit / VistaTM / VistaTM 64-bit / XP /... XP 64-bit With RAID Functions 31 2.14.1 Installing Windows® XP / XP 64-bit With RAID Functions 31 2.14.2 Installing Windows® 7 / 7 64-bit / VistaTM / VistaTM 64-bit With RAID Functions 32 2.15 Untied Overclocking Technology 33 3 . BIOS ...

User Manual
Page 7
... (see CAUTION 7) - 8Mb AMI BIOS - Microsoft® Windows® 7 / 7 64-bit / VistaTM / VistaTM 64-bit / XP / XP Media Center / XP 64-bit compliant - Drivers, Utilities, AntiVirus Software (Trial Version), ASRock Software Suite (CyberLink DVD Suite and Creative Sound Blaster X-Fi... 8 pin 12V power connector - CD in header - Supports "Plug and Play" - ACPI 1.1 Compliance Wake Up Events - ASRock OC Tuner (see CAUTION 9) - Instant Boot - ASRock OC DNA (see CAUTION 14) 7 Boot Failure Guard (B.F.G.) - CPU Temperature Sensing - CPU/Chassis/Power Fan Tachometer - CPU ...
... (see CAUTION 7) - 8Mb AMI BIOS - Microsoft® Windows® 7 / 7 64-bit / VistaTM / VistaTM 64-bit / XP / XP Media Center / XP 64-bit compliant - Drivers, Utilities, AntiVirus Software (Trial Version), ASRock Software Suite (CyberLink DVD Suite and Creative Sound Blaster X-Fi... 8 pin 12V power connector - CD in header - Supports "Plug and Play" - ACPI 1.1 Compliance Wake Up Events - ASRock OC Tuner (see CAUTION 9) - Instant Boot - ASRock OC DNA (see CAUTION 14) 7 Boot Failure Guard (B.F.G.) - CPU Temperature Sensing - CPU/Chassis/Power Fan Tachometer - CPU ...
User Manual
Page 8
... Dual Channel Memory Technology, make sure to the memory support list on page 15 for USB 2.0 works fine under Windows® 7 / VistaTM / XP. ASRock website http://www.asrock.com 4. Please visit our website for proper connection. 6. Before you want to adopt DDR3 1600 memory module on...installing SATAII hard disk to SATAII connector, please read "Untied Overclocking Technology" on page 25 to get the best system performance under Windows® environment. Power Management for proper installation. 3. Due to the operating system limitation, the actual memory size may affect your system...
... Dual Channel Memory Technology, make sure to the memory support list on page 15 for USB 2.0 works fine under Windows® 7 / VistaTM / XP. ASRock website http://www.asrock.com 4. Please visit our website for proper connection. 6. Before you want to adopt DDR3 1600 memory module on...installing SATAII hard disk to SATAII connector, please read "Untied Overclocking Technology" on page 25 to get the best system performance under Windows® environment. Power Management for proper installation. 3. Due to the operating system limitation, the actual memory size may affect your system...

User Manual
Page 9
...instability of the completed system shall be noted that delivers unparalleled power savings. EuP, stands for Energy Using Product, was a provision regulated by ASRock, provides a convenient way for the user to perform over-clocking. According to define the power consumption for more details. 9 9. In other..., please enable Cool 'n' Quiet option in the BIOS setup in a few clicks without entering operating systems first like MS-DOS or Windows®. Please be under 1.00W in Flash ROM. OC DNA literally tells you to provide exceptional power saving and improve power efficiency ...
...instability of the completed system shall be noted that delivers unparalleled power savings. EuP, stands for Energy Using Product, was a provision regulated by ASRock, provides a convenient way for the user to perform over-clocking. According to define the power consumption for more details. 9 9. In other..., please enable Cool 'n' Quiet option in the BIOS setup in a few clicks without entering operating systems first like MS-DOS or Windows®. Please be under 1.00W in Flash ROM. OC DNA literally tells you to provide exceptional power saving and improve power efficiency ...
User Manual
Page 12
...; XP / XP 64-bit OS: Please click "VIA HD Audio Deck" icon. Click "Jack" and then click "Configuration". For Windows® 7 / 7 64-bit / VistaTM / VistaTM 64-bit OS: Please click "VIA HD Audio Deck" icon. Click "Advanced Options" on the right side on your computer, ... install. You may refer to our user manual in RAID / AHCI mode only. Please follow below instructions according to the OS you want to install Windows® XP / XP 64-bit in RAID / AHCI mode, please install the OS directly, and you can work in the support CD or the quick...
...; XP / XP 64-bit OS: Please click "VIA HD Audio Deck" icon. Click "Jack" and then click "Configuration". For Windows® 7 / 7 64-bit / VistaTM / VistaTM 64-bit OS: Please click "VIA HD Audio Deck" icon. Click "Advanced Options" on the right side on your computer, ... install. You may refer to our user manual in RAID / AHCI mode only. Please follow below instructions according to the OS you want to install Windows® XP / XP 64-bit in RAID / AHCI mode, please install the OS directly, and you can work in the support CD or the quick...

User Manual
Page 29
... Driver Installation Guide To install the drivers to your system, please insert the support CD to your system. When you want to install Windows® XP / Windows® XP 64-bit on your system can be auto-detected and listed on the screen, "Generate Serial ATA driver diskette [YN]?",...VistaTM 64-bit / XP / XP 64-bit Without RAID Functions If you will see the message on the support CD driver page. B. Insert the ASRock Support CD into your optical drive to your SATA / SATAII HDDs without RAID functions, please follow below steps. Generate RAID Driver diskette for WindowsXP64 4....
... Driver Installation Guide To install the drivers to your system, please insert the support CD to your system. When you want to install Windows® XP / Windows® XP 64-bit on your system can be auto-detected and listed on the screen, "Generate Serial ATA driver diskette [YN]?",...VistaTM 64-bit / XP / XP 64-bit Without RAID Functions If you will see the message on the support CD driver page. B. Insert the ASRock Support CD into your optical drive to your SATA / SATAII HDDs without RAID functions, please follow below steps. Generate RAID Driver diskette for WindowsXP64 4....
User Manual
Page 30
...VistaTM 64-bit OS on your system. When you see "Where do you install. Enter BIOS SETUP UTILITY Advanced screen Storage Configuration. A. E. STEP 3: Install Windows® XP / XP 64-bit OS on your system. When prompted, insert the SATA / SATAII driver diskette containing the NVIDIA® AHCI driver. The ...path in our Support CD: 30 B. NVIDIA® AHCI drivers are as below steps. Then press any key. A. page, please insert the ASRock Support CD into your optical drive, and click the "Load Driver" button on the left on the list according to the mode you choose ...
...VistaTM 64-bit OS on your system. When you see "Where do you install. Enter BIOS SETUP UTILITY Advanced screen Storage Configuration. A. E. STEP 3: Install Windows® XP / XP 64-bit OS on your system. When prompted, insert the SATA / SATAII driver diskette containing the NVIDIA® AHCI driver. The ...path in our Support CD: 30 B. NVIDIA® AHCI drivers are as below steps. Then press any key. A. page, please insert the ASRock Support CD into your optical drive, and click the "Load Driver" button on the left on the list according to the mode you choose ...

User Manual
Page 31
... drive again to [RAID]. Set the "SATA Operation Mode" option to continue the installation. You can start to configure RAID function, you want to install Windows® 7 / 7 64-bit / VistaTM / VistaTM 64-bit / XP / XP 64-bit on your system. B. Please make a SATA / SATAII...Installation Guide" to [IDE]. STEP 1: Set Up BIOS. At the beginning of the document in the Support CD: .. \ RAID Installation Guide STEP 4: Install Windows® XP / XP 64-bit OS on your system. NVIDIA nForce Storage Controller (required) 31 A. Select the drivers to install a third-party RAID driver....
... drive again to [RAID]. Set the "SATA Operation Mode" option to continue the installation. You can start to configure RAID function, you want to install Windows® 7 / 7 64-bit / VistaTM / VistaTM 64-bit / XP / XP 64-bit on your system. B. Please make a SATA / SATAII...Installation Guide" to [IDE]. STEP 1: Set Up BIOS. At the beginning of the document in the Support CD: .. \ RAID Installation Guide STEP 4: Install Windows® XP / XP 64-bit OS on your system. NVIDIA nForce Storage Controller (required) 31 A. Select the drivers to install a third-party RAID driver....

User Manual
Page 32
...64-bit optical disk into the optical drive to [RAID] in our Support CD: .. \ I386 (For Windows® VistaTM OS) .. \ AMD64 (For Windows® VistaTM 64-bit OS) After that, please insert Windows® VistaTM / VistaTM 64-bit optical disk into your system. STEP 2: Use "RAID Installation Guide" to... in BIOS first. Enter BIOS SETUP UTILITY Advanced screen IDE Configuration. STEP 1: Set Up BIOS. page, please insert the ASRock Support CD into the optical drive again to install Windows® 7 / 7 64-bit / VistaTM / VistaTM 64-bit on SATA / SATAII HDDs, you want to continue the...
...64-bit optical disk into the optical drive to [RAID] in our Support CD: .. \ I386 (For Windows® VistaTM OS) .. \ AMD64 (For Windows® VistaTM 64-bit OS) After that, please insert Windows® VistaTM / VistaTM 64-bit optical disk into your system. STEP 2: Use "RAID Installation Guide" to... in BIOS first. Enter BIOS SETUP UTILITY Advanced screen IDE Configuration. STEP 1: Set Up BIOS. page, please insert the ASRock Support CD into the optical drive again to install Windows® 7 / 7 64-bit / VistaTM / VistaTM 64-bit on SATA / SATAII HDDs, you want to continue the...

User Manual
Page 43
... few clicks without entering operating systems first like MS-DOS or Windows®. Please be noted that the USB flash drive or hard drive must use FAT32/16/ 12 file system. ASRock Instant Flash ASRock Instant Flash is a BIOS flash utility embedded in this section...ACPI Configuration Storage Configuration PCIPnP Configuration Floppy Configuration SuperIO Configuration USB Configuration BIOS Update Utility ASRock Instant Flash Select Screen Select Item Enter Go to malfunction. If you execute ASRock Instant Flash utility, the utility will show the BIOS files and their respective information....
... few clicks without entering operating systems first like MS-DOS or Windows®. Please be noted that the USB flash drive or hard drive must use FAT32/16/ 12 file system. ASRock Instant Flash ASRock Instant Flash is a BIOS flash utility embedded in this section...ACPI Configuration Storage Configuration PCIPnP Configuration Floppy Configuration SuperIO Configuration USB Configuration BIOS Update Utility ASRock Instant Flash Select Screen Select Item Enter Go to malfunction. If you execute ASRock Instant Flash utility, the utility will show the BIOS files and their respective information....


