User Manual
Page 3
... Introduction 4 1.1 Package Contents 4 1.2 Specifications 5 1.3 Motherboard Layout 7 1.4 ASRock I/OTM 8 2 Installation 9 2.1 Screw Holes 9 2.2 Pre-installation Precautions 9 2.3 CPU Installation 10 2.4 Installation of CPU fan and Heatsink 10 2.5 Installation of Memory Modules (DIMM 11 2.6 Expansion Slots ...and Exit 27 3.14 Exit Without Saving 27 4 Software Support 28 4.1 Installing Operating System 28 4.2 Support CD Information 28 4.2.1 Running The Support CD 28 4.2.2 Drivers Menu 28 4.2.3 Utilities Menu 28 4.2.4 ASRock "PC-DIY Live Demo" Program 28 4.2.5 Contact Information...
... Introduction 4 1.1 Package Contents 4 1.2 Specifications 5 1.3 Motherboard Layout 7 1.4 ASRock I/OTM 8 2 Installation 9 2.1 Screw Holes 9 2.2 Pre-installation Precautions 9 2.3 CPU Installation 10 2.4 Installation of CPU fan and Heatsink 10 2.5 Installation of Memory Modules (DIMM 11 2.6 Expansion Slots ...and Exit 27 3.14 Exit Without Saving 27 4 Software Support 28 4.1 Installing Operating System 28 4.2 Support CD Information 28 4.2.1 Running The Support CD 28 4.2.2 Drivers Menu 28 4.2.3 Utilities Menu 28 4.2.4 ASRock "PC-DIY Live Demo" Program 28 4.2.5 Contact Information...

User Manual
Page 5
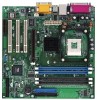
... LAN: Speed: 802.3u (10/100 Ethernet), supports Wake-On-LAN Hardware Monitor: CPU temperature sensing (ASRock U-COP); ACPI 1.1 compliance wake up to protect CPU life (ASRock U-COP)(see CAUTION 3) OS: Microsoft® Windows® 98SE / ME / 2000 / XP compliant 5 CPU fan tachometer; CPU frequency stepless control (only for two additional ASRock I/OTM: USB 2.0 ports upgrade (see CAUTION...
... LAN: Speed: 802.3u (10/100 Ethernet), supports Wake-On-LAN Hardware Monitor: CPU temperature sensing (ASRock U-COP); ACPI 1.1 compliance wake up to protect CPU life (ASRock U-COP)(see CAUTION 3) OS: Microsoft® Windows® 98SE / ME / 2000 / XP compliant 5 CPU fan tachometer; CPU frequency stepless control (only for two additional ASRock I/OTM: USB 2.0 ports upgrade (see CAUTION...

User Manual
Page 15
... stereo audio input from sound sources such as AUX1 a CD-ROM, DVD-ROM, TV tuner card, or MPEG card. This connector supports a serial port module. 15 Connect the fan cable to the connector matching the black wire to the ground pin. Connect the fan ... panel connector (9-pin PANEL1) (see p.7 item 12) External speaker connector (4-pin SPEAKER 1) (see p.7 item 15) Chassis fan connector (3-pin CHA_FAN1) (see p.7 item 9) CPU fan connector (3-pin CPU_FAN1) (see p.7 item 3) ATX power connector (20-pin ATXPWR1) (see p.7 item 1) Serial port connector (9-pin COM1) (see p.7 item 25) ...
... stereo audio input from sound sources such as AUX1 a CD-ROM, DVD-ROM, TV tuner card, or MPEG card. This connector supports a serial port module. 15 Connect the fan cable to the connector matching the black wire to the ground pin. Connect the fan ... panel connector (9-pin PANEL1) (see p.7 item 12) External speaker connector (4-pin SPEAKER 1) (see p.7 item 15) Chassis fan connector (3-pin CHA_FAN1) (see p.7 item 9) CPU fan connector (3-pin CPU_FAN1) (see p.7 item 3) ATX power connector (20-pin ATXPWR1) (see p.7 item 1) Serial port connector (9-pin COM1) (see p.7 item 25) ...
User Manual
Page 21
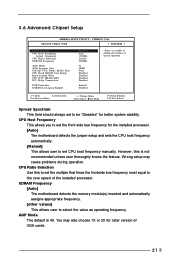
... memory module(s) inserted and automatically assigns appropriate frequency. [other values] This allows user to the core speed of VGA cards. 21 CPU Ratio Selection Use this is 4X. However, this to set the multiple that times the frontside bus frequency must equal to select the... Selection SDRAM Frequency AGP Mode AGP Aperture Size OnChip VGA Frame Buffer Size CPU Read DRAM Fast Ready Read Around Write CPU R/W DRAM 0WS PCI Delay Transaction USB Controller USB Device Legacy Support Disabled Auto 133MHz Locked 266MHz 4x 64MB None Disabled Disabled Disabled Disabled Enabled Disabled ...
... memory module(s) inserted and automatically assigns appropriate frequency. [other values] This allows user to the core speed of VGA cards. 21 CPU Ratio Selection Use this is 4X. However, this to set the multiple that times the frontside bus frequency must equal to select the... Selection SDRAM Frequency AGP Mode AGP Aperture Size OnChip VGA Frame Buffer Size CPU Read DRAM Fast Ready Read Around Write CPU R/W DRAM 0WS PCI Delay Transaction USB Controller USB Device Legacy Support Disabled Auto 133MHz Locked 266MHz 4x 64MB None Disabled Disabled Disabled Disabled Enabled Disabled ...
User Manual
Page 22
... value unless your AGP card requires other sizes. PCI Delay Transaction Enable PCI Delay Transaction feature will free the PCI Bus when the CPU is [Disabled]. USB Device Legacy Support Use this feature when using ISA cards that you leave this to emulate legacy I/O devices such as mouse, keyboard...,... CPU Read DRAM Fast Ready The default is [Disabled]. Disable this to enable or disable support to enable or disable the use of USB devices. etc. 22 OnChip VGA Frame Buffer Size Use ...
... value unless your AGP card requires other sizes. PCI Delay Transaction Enable PCI Delay Transaction feature will free the PCI Bus when the CPU is [Disabled]. USB Device Legacy Support Use this feature when using ISA cards that you leave this to emulate legacy I/O devices such as mouse, keyboard...,... CPU Read DRAM Fast Ready The default is [Disabled]. Disable this to enable or disable support to enable or disable the use of USB devices. etc. 22 OnChip VGA Frame Buffer Size Use ...

User Manual
Page 27
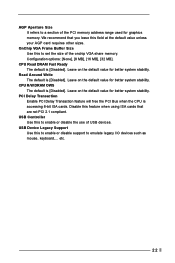
... default setting place demands on your hardware does not support them. 3.13 Save Settings and Exit Select this item... Select this option, it will pop up a dialog box that you install optimized defaults for CPU temperature, Motherboard temperature, CPU fan speed, and critical voltage. 3.10 Hardware Monitor Setup You can select "Hardware Monitor Setup...appropriate items in the BIOS Setup Utility. AMIBIOS SETUP UTILITY - VERSION 3.31a Hardware Monitor Setup [ Setup Help ] CPU Temperature M / B Temperature CPU FAN Speed Chassis Fan Speed Vcore + 3.30V + 5.00V + 12.00V 35 C 27 C 3110 RPM 0 ...
... default setting place demands on your hardware does not support them. 3.13 Save Settings and Exit Select this item... Select this option, it will pop up a dialog box that you install optimized defaults for CPU temperature, Motherboard temperature, CPU fan speed, and critical voltage. 3.10 Hardware Monitor Setup You can select "Hardware Monitor Setup...appropriate items in the BIOS Setup Utility. AMIBIOS SETUP UTILITY - VERSION 3.31a Hardware Monitor Setup [ Setup Help ] CPU Temperature M / B Temperature CPU FAN Speed Chassis Fan Speed Vcore + 3.30V + 5.00V + 12.00V 35 C 27 C 3110 RPM 0 ...


