User Manual
Page 3
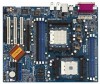
... (PCI Express X1, PCI and AGP Slots) ..... 16 2.6 Jumpers Setup 17 2.7 Onboard Headers and Connectors 18 2.8 Serial ATA (SATA) Hard Disks Installation 21 2.9 Making An SATA Driver Diskette 21 3. Introduction 5 1.1 Package Contents 5 1.2 Specifications 6 1.3 Motherboard Layout 9 1.4 ASRock 8CH I/O 10 2. BIOS SETUP UTILITY 22 3.1 Introduction 22 3.1.1 BIOS Menu Bar 22 3.1.2 Navigation Keys 23 3.2 Main Screen 23...
... (PCI Express X1, PCI and AGP Slots) ..... 16 2.6 Jumpers Setup 17 2.7 Onboard Headers and Connectors 18 2.8 Serial ATA (SATA) Hard Disks Installation 21 2.9 Making An SATA Driver Diskette 21 3. Introduction 5 1.1 Package Contents 5 1.2 Specifications 6 1.3 Motherboard Layout 9 1.4 ASRock 8CH I/O 10 2. BIOS SETUP UTILITY 22 3.1 Introduction 22 3.1.1 BIOS Menu Bar 22 3.1.2 Navigation Keys 23 3.2 Main Screen 23...

User Manual
Page 21
... [YN]?", press . Formatting the floppy diskette will see the message on your system. STEP 5: The system will start to make an SATA driver diskette before you will guide you to format and copy files [YN]? STEP 4: Then you see these messages, Please insert a diskette into the drive bays ... system boot-up, press key, and then a window for boot devices selection appears. STEP 3: When you will lose ALL data in it! STEP 1: Insert the ASRock Support CD into the floppy drive, and press . 2.8 Serial ATA (SATA) Hard Disks Installation This motherboard supports Serial ATA...
... [YN]?", press . Formatting the floppy diskette will see the message on your system. STEP 5: The system will start to make an SATA driver diskette before you will guide you to format and copy files [YN]? STEP 4: Then you see these messages, Please insert a diskette into the drive bays ... system boot-up, press key, and then a window for boot devices selection appears. STEP 3: When you will lose ALL data in it! STEP 1: Insert the ASRock Support CD into the floppy drive, and press . 2.8 Serial ATA (SATA) Hard Disks Installation This motherboard supports Serial ATA...


