User Manual
Page 3
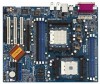
..., PCI and AGP Slots) ..... 16 2.6 Jumpers Setup 17 2.7 Onboard Headers and Connectors 18 2.8 Serial ATA (SATA) Hard Disks Installation 21 2.9 Making An SATA Driver Diskette 21 3. BIOS SETUP UTILITY 22 3.1 Introduction 22 3.1.1 BIOS Menu Bar 22 3.1.2 Navigation Keys 23 3.2 Main Screen 23 3.3 Advanced Screen 24 3.3.1 CPU Configuration ... 34 3.5.1 Boot Settings Configuration 35 3.5.2 Boot Device Priority 35 3.6 Security Screen 36 3.7 Exit Screen 37 3 Introduction 5 1.1 Package Contents 5 1.2 Specifications 6 1.3 Motherboard Layout 9 1.4 ASRock 8CH I/O 10 2. Contents 1.
..., PCI and AGP Slots) ..... 16 2.6 Jumpers Setup 17 2.7 Onboard Headers and Connectors 18 2.8 Serial ATA (SATA) Hard Disks Installation 21 2.9 Making An SATA Driver Diskette 21 3. BIOS SETUP UTILITY 22 3.1 Introduction 22 3.1.1 BIOS Menu Bar 22 3.1.2 Navigation Keys 23 3.2 Main Screen 23 3.3 Advanced Screen 24 3.3.1 CPU Configuration ... 34 3.5.1 Boot Settings Configuration 35 3.5.2 Boot Device Priority 35 3.6 Security Screen 36 3.7 Exit Screen 37 3 Introduction 5 1.1 Package Contents 5 1.2 Specifications 6 1.3 Motherboard Layout 9 1.4 ASRock 8CH I/O 10 2. Contents 1.

User Manual
Page 21
...format and copy files [YN]? STEP 2: During POST at the beginning of the SATA data cable to format the floppy diskette and copy SATA drivers into the floppy diskette. 21 WARNING! Formatting the floppy diskette will start the OS installation. STEP 5: The system will lose ALL data in it... boot-up, press key, and then a window for boot devices selection appears. STEP 4: Connect the other end of your chassis. STEP 1: Insert the ASRock Support CD into the floppy drive, and press . Please select CDROM as the boot device. STEP 3: When you see these messages, Please insert a diskette...
...format and copy files [YN]? STEP 2: During POST at the beginning of the SATA data cable to format the floppy diskette and copy SATA drivers into the floppy diskette. 21 WARNING! Formatting the floppy diskette will start the OS installation. STEP 5: The system will lose ALL data in it... boot-up, press key, and then a window for boot devices selection appears. STEP 4: Connect the other end of your chassis. STEP 1: Insert the ASRock Support CD into the floppy drive, and press . Please select CDROM as the boot device. STEP 3: When you see these messages, Please insert a diskette...
User Manual
Page 38
...on a specific item then follow the installation wizard to display the menus. 4.2.2 Drivers Menu The Drivers Menu shows the available devices drivers including ASRock Express GbL PCI Express LAN card driver if the system detects the installed devices. Refer to activate the devices. 4.2.3 ...Running The Support CD To begin using the support CD, insert the CD into your computer. 4. Please install the necessary drivers to your OS documentation for general reference only. Software Support 4.1 Install Operating System This motherboard supports various Microsoft® Windows&#...
...on a specific item then follow the installation wizard to display the menus. 4.2.2 Drivers Menu The Drivers Menu shows the available devices drivers including ASRock Express GbL PCI Express LAN card driver if the system detects the installed devices. Refer to activate the devices. 4.2.3 ...Running The Support CD To begin using the support CD, insert the CD into your computer. 4. Please install the necessary drivers to your OS documentation for general reference only. Software Support 4.1 Install Operating System This motherboard supports various Microsoft® Windows&#...
User Manual
Page 39
...group, click the "Settings..." Click the "Power..." From the Windows 98SE/ME operating system, click the Start button. Click the Performance combo list box, to enable AMD's Cool 'n' QuietTM technology: 1. Automatic mode is strongly recommended to implement settings. If you are using ...operating system, please follow the instruction below to select desired mode. The following dialog box appears. 5. Click OK to install "AMD Processor Driver" from the "Support CD" first. From the Power Options Properties dialog box, select AMD's Cool 'n' QuietTM Technology tab. 5. When using...
...group, click the "Settings..." Click the "Power..." From the Windows 98SE/ME operating system, click the Start button. Click the Performance combo list box, to enable AMD's Cool 'n' QuietTM technology: 1. Automatic mode is strongly recommended to implement settings. If you are using ...operating system, please follow the instruction below to select desired mode. The following dialog box appears. 5. Click OK to install "AMD Processor Driver" from the "Support CD" first. From the Power Options Properties dialog box, select AMD's Cool 'n' QuietTM Technology tab. 5. When using...


