User Manual
Page 3
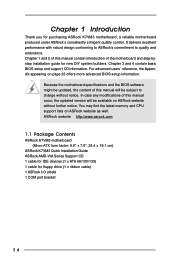
...4 1.1 Package Contents 4 1.2 Specifications 5 1.3 Motherboard Layout 7 1.4 ASRock I/OTM 8 2 Installation 9 2.1 Screw Holes 9 2.2 Pre-installation Precautions 9 2.3 CPU Installation 10 2.4 Installation of Heatsink and CPU fan 10 2.5 Installation of Memory Modules (DIMM 11 2.6 Expansion Slots 12 2.7 Jumpers Setup 13 2.8 ...Operating System 22 4.2 Support CD Information 22 4.2.1 Running Support CD 22 4.2.2 Drivers Menu 22 4.2.3 Utilities Menu 22 4.2.4 ASRock "PC-DIY Live Demo" Program 22 4.2.5 Contact Information 22 Appendix 23 1. Security Menu 27 3. Boot Menu 29 ...
...4 1.1 Package Contents 4 1.2 Specifications 5 1.3 Motherboard Layout 7 1.4 ASRock I/OTM 8 2 Installation 9 2.1 Screw Holes 9 2.2 Pre-installation Precautions 9 2.3 CPU Installation 10 2.4 Installation of Heatsink and CPU fan 10 2.5 Installation of Memory Modules (DIMM 11 2.6 Expansion Slots 12 2.7 Jumpers Setup 13 2.8 ...Operating System 22 4.2 Support CD Information 22 4.2.1 Running Support CD 22 4.2.2 Drivers Menu 22 4.2.3 Utilities Menu 22 4.2.4 ASRock "PC-DIY Live Demo" Program 22 4.2.5 Contact Information 22 Appendix 23 1. Security Menu 27 3. Boot Menu 29 ...
User Manual
Page 4
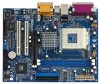
... to change without further notice. You may find the latest memory and CPU support lists on page 23 offers more advanced BIOS setup information. Chapter 1 Introduction Thank you for purchasing ASRock K7VM3 motherboard, a reliable motherboard produced under ASRock's consistently stringent quality control. Because the motherboard specifications and the BIOS software might be updated, the...
... to change without further notice. You may find the latest memory and CPU support lists on page 23 offers more advanced BIOS setup information. Chapter 1 Introduction Thank you for purchasing ASRock K7VM3 motherboard, a reliable motherboard produced under ASRock's consistently stringent quality control. Because the motherboard specifications and the BIOS software might be updated, the...

User Manual
Page 5
...(10/100 Ethernet), supports Wake-On-LAN Hardware Monitor: CPU temperature sensing; CPU fan tachometer; ACPI 1.1 compliance wake up to protect CPU life (ASRock U-COP)(see CAUTION 1); Chassis fan tachometer PCI slots: 2 slots with PCI Specification 2.2 AGP slot: 1 AGP slot, supports 1.5V, 4X AGP ...AthlonTM / AthlonTM XP/ DuronTM processor Chipsets: North Bridge: VIA KM266Pro, FSB@200/266/333 MHz South Bridge: VIA VT8235, supports USB 2.0, ATA 133 Memory: 2 DDR DIMM slots: DDR1 and DDR2 PC2100 (DDR266) / PC2700 (DDR333), Max. 2GB IDE: IDE1: ATA 133 / Ultra DMA Mode 6;...
...(10/100 Ethernet), supports Wake-On-LAN Hardware Monitor: CPU temperature sensing; CPU fan tachometer; ACPI 1.1 compliance wake up to protect CPU life (ASRock U-COP)(see CAUTION 1); Chassis fan tachometer PCI slots: 2 slots with PCI Specification 2.2 AGP slot: 1 AGP slot, supports 1.5V, 4X AGP ...AthlonTM / AthlonTM XP/ DuronTM processor Chipsets: North Bridge: VIA KM266Pro, FSB@200/266/333 MHz South Bridge: VIA VT8235, supports USB 2.0, ATA 133 Memory: 2 DDR DIMM slots: DDR1 and DDR2 PC2100 (DDR266) / PC2700 (DDR333), Max. 2GB IDE: IDE1: ATA 133 / Ultra DMA Mode 6;...
User Manual
Page 6
... / 2000 SP4. Power Management for USB 2.0 works fine under Microsoft® Windows® 98/ ME. It may cause the instability of K7VM3 is detected, the system will also be overclocked proportionally. Please refer to spray ther mal grease between the CPU and the heatsink when you resume... the system. When the CPU frequency of the system or damage the CPU. 6 Frequencies other clocks, such as PCI clock, AGP clock, and Memory clock will automatically shutdown. CAUTION! 1. Do NOT use a 3.3V AGP card on the motherboard functions properly before you install the PC system. 2....
... / 2000 SP4. Power Management for USB 2.0 works fine under Microsoft® Windows® 98/ ME. It may cause the instability of K7VM3 is detected, the system will also be overclocked proportionally. Please refer to spray ther mal grease between the CPU and the heatsink when you resume... the system. When the CPU frequency of the system or damage the CPU. 6 Frequencies other clocks, such as PCI clock, AGP clock, and Memory clock will automatically shutdown. CAUTION! 1. Do NOT use a 3.3V AGP card on the motherboard functions properly before you install the PC system. 2....
User Manual
Page 11
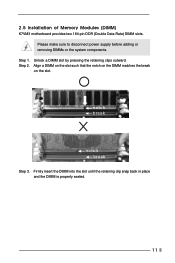
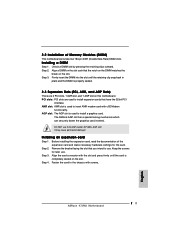
Unlock a DIMM slot by pressing the retaining clips outward. Please make sure to disconnect power supply before adding or removing DIMMs or the system components. Step 2. Align a DIMM on the slot such that the notch on the DIMM matches the break on the slot. Firmly insert the DIMM into the slot until the retaining clip snap back in place and the DIMM is properly seated. 11 Step 1. 2.5 Installation of Memory Modules (DIMM) K7VM3 motherboard provides two 184-pin DDR (Double Data Rate) DIMM slots. notch break notch break Step 3.
Unlock a DIMM slot by pressing the retaining clips outward. Please make sure to disconnect power supply before adding or removing DIMMs or the system components. Step 2. Align a DIMM on the slot such that the notch on the DIMM matches the break on the slot. Firmly insert the DIMM into the slot until the retaining clip snap back in place and the DIMM is properly seated. 11 Step 1. 2.5 Installation of Memory Modules (DIMM) K7VM3 motherboard provides two 184-pin DDR (Double Data Rate) DIMM slots. notch break notch break Step 3.

User Manual
Page 18
... only, and they may not exactly match what you to be user-friendly. You may also restart by pressing the reset button on . The Flash Memory on your system. Chapter 3 BIOS Setup 3.1 BIOS Setup Utility This section explains how to use the BIOS Setup Utility to configure your screen. 3.1.1 BIOS Menu...
... only, and they may not exactly match what you to be user-friendly. You may also restart by pressing the reset button on . The Flash Memory on your system. Chapter 3 BIOS Setup 3.1 BIOS Setup Utility This section explains how to use the BIOS Setup Utility to configure your screen. 3.1.1 BIOS Menu...
User Manual
Page 19
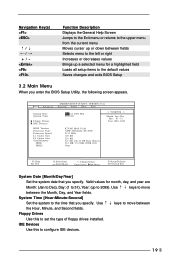
... to 2099). Main Advanced System Date System Time Floppy Drives IDE Devices BIOS Version Processor Type Processor Speed L1 Cache Size L2 Cache Size Total Memory DDR1 DDR2 AMIBIOS SETUP UTILITY - Use keys to move between the Hour, Minute, and Second fields. Floppy Drives Use this to set the type of... Devices Use this to configure IDE devices. 19 Dec Day: 01 - 31 Year: 1980 - 2099 K7VM3 BIOS P1.00 AMD Athlon(tm) XP 2600+ 2133 MHz 128 KB 256 KB 512 MB with 64 MB Share Memory 512 MB / 133 MHz (DDR 266) None F1:Help Esc:Exit :Select Item :Select Menu...
... to 2099). Main Advanced System Date System Time Floppy Drives IDE Devices BIOS Version Processor Type Processor Speed L1 Cache Size L2 Cache Size Total Memory DDR1 DDR2 AMIBIOS SETUP UTILITY - Use keys to move between the Hour, Minute, and Second fields. Floppy Drives Use this to set the type of... Devices Use this to configure IDE devices. 19 Dec Day: 01 - 31 Year: 1980 - 2099 K7VM3 BIOS P1.00 AMD Athlon(tm) XP 2600+ 2133 MHz 128 KB 256 KB 512 MB with 64 MB Share Memory 512 MB / 133 MHz (DDR 266) None F1:Help Esc:Exit :Select Item :Select Menu...
User Manual
Page 23
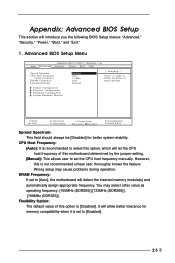
...+/-:Change Values Enter:Select Sub-Menu F9:Setup Defaults F10:Save & Exit Spread Spectrum: This field should always be [Disabled] for memory compatibility when it is set the CPU host frequency manually. CPU Host Frequency: [Auto]: It is recommended to [Auto], the motherboard...Main Advanced AMIBIOS SETUP UTILITY - However, this is not recommended unless user thoroughly knows the feature. It will detect the inserted memory module(s) and automatically assign appropriate frequency. VERSION 3.31a Security Power Boot Exit Spread Spectrum CPU Host Frequency Actual Frequency DRAM Frequency...
...+/-:Change Values Enter:Select Sub-Menu F9:Setup Defaults F10:Save & Exit Spread Spectrum: This field should always be [Disabled] for memory compatibility when it is set the CPU host frequency manually. CPU Host Frequency: [Auto]: It is recommended to [Auto], the motherboard...Main Advanced AMIBIOS SETUP UTILITY - However, this is not recommended unless user thoroughly knows the feature. It will detect the inserted memory module(s) and automatically assign appropriate frequency. VERSION 3.31a Security Power Boot Exit Spread Spectrum CPU Host Frequency Actual Frequency DRAM Frequency...

User Manual
Page 24
... specifications requires other sizes. VERSION 3.31a Chipset Configuration [ Setup Help ] AGP Mode AGP Aperture Size AGP Fast Write Onboard VGA Share Memory PCI Delay Transaction USB Controller USB Device Legacy Support SDRAM CAS# Latency Over Vcore Voltage VCCM Voltage V-Link Speed Auto 128MB Disabled Auto ...AGP Fast Write: This allows you to enable or disable the feature of USB controller. VCCM Voltage: This Feature allows you to adjust Memory interface Voltage The default value is accessing 8-bit ISA cards. It is [Disabled]. F1:Help Esc:Previous Menu :Select Item +/-:Change ...
... specifications requires other sizes. VERSION 3.31a Chipset Configuration [ Setup Help ] AGP Mode AGP Aperture Size AGP Fast Write Onboard VGA Share Memory PCI Delay Transaction USB Controller USB Device Legacy Support SDRAM CAS# Latency Over Vcore Voltage VCCM Voltage V-Link Speed Auto 128MB Disabled Auto ...AGP Fast Write: This allows you to enable or disable the feature of USB controller. VCCM Voltage: This Feature allows you to adjust Memory interface Voltage The default value is accessing 8-bit ISA cards. It is [Disabled]. F1:Help Esc:Previous Menu :Select Item +/-:Change ...

User Manual
Page 29
... Help ] to set the boot device priority. 29 Boot From Network: Use this is enabled, it will speed up the boot-up routine by skipping memory retestings. 4. Boot Device Priority F1:Help Esc:Exit :Select Item :Select Menu +/-:Change Values Enter:Select Sub-Menu F9:Setup Defaults F10:Save & Exit Quick...
... Help ] to set the boot device priority. 29 Boot From Network: Use this is enabled, it will speed up the boot-up routine by skipping memory retestings. 4. Boot Device Priority F1:Help Esc:Exit :Select Item :Select Menu +/-:Change Values Enter:Select Sub-Menu F9:Setup Defaults F10:Save & Exit Quick...
Quick Installation Guide
Page 4
... software might be updated, the content of the motherboard can be subject to protect CPU life (ASRock U-COP)(see CAUTION 2) AMR slot: 1 slot, supports AMR modem card English 4 ASRock K7VM3 Motherboard Voltage monitoring: +12V, +5V, +3V, Vcore; IDE2: ATA 133 / Ultra DMA...be available on ASRock website as well. 1. You may find the latest memory and CPU support lists on ASRock website without notice. Can connect up to quality and endurance. Introduction Thank you for purchasing ASRock K7VM3 motherboard, a reliable motherboard produced under ASRock's consistently stringent ...
... software might be updated, the content of the motherboard can be subject to protect CPU life (ASRock U-COP)(see CAUTION 2) AMR slot: 1 slot, supports AMR modem card English 4 ASRock K7VM3 Motherboard Voltage monitoring: +12V, +5V, +3V, Vcore; IDE2: ATA 133 / Ultra DMA...be available on ASRock website as well. 1. You may find the latest memory and CPU support lists on ASRock website without notice. Can connect up to quality and endurance. Introduction Thank you for purchasing ASRock K7VM3 motherboard, a reliable motherboard produced under ASRock's consistently stringent ...
Quick Installation Guide
Page 5
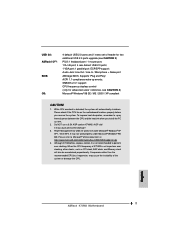
... RJ 45 port; 4 rear default USB 2.0 ports; 1 VGA port; 1 parallel port: ECP/EPP support; Although K7VM3 offers stepless control, it is not recommended to perform over clocking, other than the recommended CPU bus frequencies may cause the ...® Windows® 98/ ME. Please check if the CPU fan on K7VM3's AGP slot! It may cause permanent damage! 3. English 5 ASRock K7VM3 Motherboard USB 2.0: ASRock I/OTM: BIOS: OS: 4 default USB 2.0 ports and 1 extra set to... CAUTION! 1. Frequencies other clocks, such as PCI clock, AGP clock, and Memory clock will automatically shutdown.
... RJ 45 port; 4 rear default USB 2.0 ports; 1 VGA port; 1 parallel port: ECP/EPP support; Although K7VM3 offers stepless control, it is not recommended to perform over clocking, other than the recommended CPU bus frequencies may cause the ...® Windows® 98/ ME. Please check if the CPU fan on K7VM3's AGP slot! It may cause permanent damage! 3. English 5 ASRock K7VM3 Motherboard USB 2.0: ASRock I/OTM: BIOS: OS: 4 default USB 2.0 ports and 1 extra set to... CAUTION! 1. Frequencies other clocks, such as PCI clock, AGP clock, and Memory clock will automatically shutdown.
Quick Installation Guide
Page 7
...slot has a special locking mechanism which can securely fasten the graphics card inserted. Before installing the expansion card, read the documentation of Memory Modules (DIMM) This motherboard provides two 184-pin DDR (Double Data Rate) DIMM slots. Step 3. Align a DIMM on the slot...install a graphics card. It may cause permanent damage! AGP slot: The AGP slot is used to insert AMR modem card with screws. 7 ASRock K7VM3 Motherboard English Keep the screws for the card. Step 2. Fasten the card to the chassis with v.92 Modem functionality. 2.2 Installation of the ...
...slot has a special locking mechanism which can securely fasten the graphics card inserted. Before installing the expansion card, read the documentation of Memory Modules (DIMM) This motherboard provides two 184-pin DDR (Double Data Rate) DIMM slots. Step 3. Align a DIMM on the slot...install a graphics card. It may cause permanent damage! AGP slot: The AGP slot is used to insert AMR modem card with screws. 7 ASRock K7VM3 Motherboard English Keep the screws for the card. Step 2. Fasten the card to the chassis with v.92 Modem functionality. 2.2 Installation of the ...
Quick Installation Guide
Page 12
BIOS Information The Flash Memory on the file ASSETUP. The BIOS Setup program is a menu-driven program, which shows you how to install your own PC system step by pressing + + , ... allows you start up the computer, please press during the Power-On-Self-Test (POST) to scroll through the following path: ..\ MPEGAV \ AVSEQ01.DAT 12 ASRock K7VM3 Motherboard English To begin using the Support CD, insert the CD into your computer. When you to enter BIOS Setup utility; 3.
BIOS Information The Flash Memory on the file ASSETUP. The BIOS Setup program is a menu-driven program, which shows you how to install your own PC system step by pressing + + , ... allows you start up the computer, please press during the Power-On-Self-Test (POST) to scroll through the following path: ..\ MPEGAV \ AVSEQ01.DAT 12 ASRock K7VM3 Motherboard English To begin using the Support CD, insert the CD into your computer. When you to enter BIOS Setup utility; 3.

