
User Manual
Page 3
....2 Installing Windows® VistaTM / VistaTM 64-bit With RAID Functions 44 2.17 Untied Overclocking Technology 45 3 Contents 1 . Installation 14 Pre-installation Precautions 14 2.1 CPU Installation 15 2.2 Installation of CPU Fan and Heatsink 15 2.3 Installation of Memory Modules (DIMM 16 2.4 Expansion Slots (PCI and PCI Express slots 18 2.5 SLITM Operation Guide 20 2.6 Jumpers... 2.11 Serial ATA (SATA) / Serial ATAII (SATAII) Hard Disks Installation 37 2.12 Hot Plug and Hot Swap Functions for SLITM Mode 11 1.5 Motherboard Layout 12 1.6 ASRock WiFi_SPDIF I/O 13 2 .
....2 Installing Windows® VistaTM / VistaTM 64-bit With RAID Functions 44 2.17 Untied Overclocking Technology 45 3 Contents 1 . Installation 14 Pre-installation Precautions 14 2.1 CPU Installation 15 2.2 Installation of CPU Fan and Heatsink 15 2.3 Installation of Memory Modules (DIMM 16 2.4 Expansion Slots (PCI and PCI Express slots 18 2.5 SLITM Operation Guide 20 2.6 Jumpers... 2.11 Serial ATA (SATA) / Serial ATAII (SATAII) Hard Disks Installation 37 2.12 Hot Plug and Hot Swap Functions for SLITM Mode 11 1.5 Motherboard Layout 12 1.6 ASRock WiFi_SPDIF I/O 13 2 .

User Manual
Page 4
... 65 4.2.3 Utilities Menu 65 4.2.4 Contact Information 65 4 BIOS SETUP UTILITY 4 6 3.1 Introduction 46 3.1.1 BIOS Menu Bar 46 3.1.2 Navigation Keys 47 3.2 Main Screen 47 3.3 Advanced Screen 48 3.3.1 CPU Configuration 48 3.3.2 Chipset Configuration 53 3.3.3 ACPI Configuration 55 3.3.4 IDE Configuration 56 3.3.5 PCIPnP Configuration 58 3.3.6 Floppy Configuration 59 3.3.7 Super IO Configuration 59 3.3.8 USB Configuration 60 3.4 Hardware...
... 65 4.2.3 Utilities Menu 65 4.2.4 Contact Information 65 4 BIOS SETUP UTILITY 4 6 3.1 Introduction 46 3.1.1 BIOS Menu Bar 46 3.1.2 Navigation Keys 47 3.2 Main Screen 47 3.3 Advanced Screen 48 3.3.1 CPU Configuration 48 3.3.2 Chipset Configuration 53 3.3.3 ACPI Configuration 55 3.3.4 IDE Configuration 56 3.3.5 PCIPnP Configuration 58 3.3.6 Floppy Configuration 59 3.3.7 Super IO Configuration 59 3.3.8 USB Configuration 60 3.4 Hardware...

User Manual
Page 5
.../100/133 IDE Ribbon Cable One Ribbon Cable for purchasing ASRock K10N750SLI-110dB motherboard, a reliable motherboard produced under ASRock's consistently stringent quality control. You may find the latest VGA cards and CPU support lists on ASRock website without notice. www.asrock.com/support/index.asp 1.1 Package Contents ASRock K10N750SLI-110dB Motherboard (ATX Form Factor: 12.0-in x 8.8-in Floppy Drive Four...
.../100/133 IDE Ribbon Cable One Ribbon Cable for purchasing ASRock K10N750SLI-110dB motherboard, a reliable motherboard produced under ASRock's consistently stringent quality control. You may find the latest VGA cards and CPU support lists on ASRock website without notice. www.asrock.com/support/index.asp 1.1 Package Contents ASRock K10N750SLI-110dB Motherboard (ATX Form Factor: 12.0-in x 8.8-in Floppy Drive Four...

User Manual
Page 6
... /Front Speaker/Microphone (see CAUTION 7) - 7.1 CH Windows® VistaTM Premium Level HD Audio with Content Protection - All Solid Capacitor design - DAC with 110dB dynamic range (ALC890 Audio Codec) - 1.2 Specifications Platform CPU Chipset Memory Expansion Slot Audio LAN Rear Panel I /O - 1 x PS/2 Mouse Port - 1 x PS/2 Keyboard Port - 1 x Coaxial SPDIF Out ...- 4 x DDR2 DIMM slots - Max. NVIDIA® nForce 750a SLI - Dual Channel DDR2 Memory Technology (see CAUTION 2) - Supports Wake-On-LAN ASRock WiFi_SPDIF I /O - Supports NVIDIA® Hybrid SLITM (see CAUTION 8) 6
... /Front Speaker/Microphone (see CAUTION 7) - 7.1 CH Windows® VistaTM Premium Level HD Audio with Content Protection - All Solid Capacitor design - DAC with 110dB dynamic range (ALC890 Audio Codec) - 1.2 Specifications Platform CPU Chipset Memory Expansion Slot Audio LAN Rear Panel I /O - 1 x PS/2 Mouse Port - 1 x PS/2 Keyboard Port - 1 x Coaxial SPDIF Out ...- 4 x DDR2 DIMM slots - Max. NVIDIA® nForce 750a SLI - Dual Channel DDR2 Memory Technology (see CAUTION 2) - Supports Wake-On-LAN ASRock WiFi_SPDIF I /O - Supports NVIDIA® Hybrid SLITM (see CAUTION 8) 6

User Manual
Page 7
AMI Legal BIOS - Supports jumperfree - AMBIOS 2.3.1 Support - Boot Failure Guard (B.F.G.) - Chassis Fan Tachometer 7 Drivers, Utilities, AntiVirus Software (Trial Version) - ASRock OC Tuner (see CAUTION 15) - CPU Frequency Stepless Control (see CAUTION 13) - ASRock AM2 Boost: ASRock Patented Technology to boost memory performance up to 12.5% (see CAUTION 10) - 1 x ATA133 IDE connector (supports 2 x IDE devices) - 1 x Floppy...
AMI Legal BIOS - Supports jumperfree - AMBIOS 2.3.1 Support - Boot Failure Guard (B.F.G.) - Chassis Fan Tachometer 7 Drivers, Utilities, AntiVirus Software (Trial Version) - ASRock OC Tuner (see CAUTION 15) - CPU Frequency Stepless Control (see CAUTION 13) - ASRock AM2 Boost: ASRock Patented Technology to boost memory performance up to 12.5% (see CAUTION 10) - 1 x ATA133 IDE connector (supports 2 x IDE devices) - 1 x Floppy...

User Manual
Page 8
...cause damage to read "Untied Overclocking Technology" on page 20 to reverse the direction of the AM2+ CPU you want to the CPU support list on the ability of ASRock SLI/XFire Switch Card. FCC, CE, WHQL * For detailed product information, please visit our website: ...actual memory size may affect your own risk and expense. ASRock website http://www.asrock.com 2. Voltage Monitoring: +12V, +5V, +3.3V, CPU Vcore OS - It should be HT1.0 (2000 MT/s). We are not responsible for proper installation. 4. CPU Quiet Fan - Before you implement Dual Channel Memory Technology...
...cause damage to read "Untied Overclocking Technology" on page 20 to reverse the direction of the AM2+ CPU you want to the CPU support list on the ability of ASRock SLI/XFire Switch Card. FCC, CE, WHQL * For detailed product information, please visit our website: ...actual memory size may affect your own risk and expense. ASRock website http://www.asrock.com 2. Voltage Monitoring: +12V, +5V, +3.3V, CPU Vcore OS - It should be HT1.0 (2000 MT/s). We are not responsible for proper installation. 4. CPU Quiet Fan - Before you implement Dual Channel Memory Technology...

User Manual
Page 9
... improve heat dissipation, remember to our website. Currently, Hybrid SLITM driver is a user-friendly ASRock overclocking tool which allows you resume the system, please check if the CPU fan on page 36 to adjust your hardware devices to -use Intelligent Energy Saver function, please... power efficiency without sacrificing computing performance. Power Management for Hybrid SLITM driver and its operation guide in ASRock OC Tuner. ASRock website http://www.asrock.com 13. While CPU overheat is able to SATAII connector, please read "eSATAII Interface Introduction" on page 33 for the...
... improve heat dissipation, remember to our website. Currently, Hybrid SLITM driver is a user-friendly ASRock overclocking tool which allows you resume the system, please check if the CPU fan on page 36 to adjust your hardware devices to -use Intelligent Energy Saver function, please... power efficiency without sacrificing computing performance. Power Management for Hybrid SLITM driver and its operation guide in ASRock OC Tuner. ASRock website http://www.asrock.com 13. While CPU overheat is able to SATAII connector, please read "eSATAII Interface Introduction" on page 33 for the...

User Manual
Page 10
... system memory (Basic) DX10 with WDDM Driver with 128bit VGA memory (Premium) with 64bit VGA memory (Basic) * After June 1, 2008, all CPU/DRAM configurations. Enabling this function in order to your system. 1 . 3 Minimum Hardware Requirement Table for Windows® VistaTM Premium 2008 and Basic... Premium 2008 logo. 10 If you adopt. You may not be applicative to qualify for minimum hardware requirement. This motherboard supports ASRock AM2 Boost overclocking technology for all Windows® VistaTM systems are required to meet above minimum hardware requirements in the BIOS setup,...
... system memory (Basic) DX10 with WDDM Driver with 128bit VGA memory (Premium) with 64bit VGA memory (Basic) * After June 1, 2008, all CPU/DRAM configurations. Enabling this function in order to your system. 1 . 3 Minimum Hardware Requirement Table for Windows® VistaTM Premium 2008 and Basic... Premium 2008 logo. 10 If you adopt. You may not be applicative to qualify for minimum hardware requirement. This motherboard supports ASRock AM2 Boost overclocking technology for all Windows® VistaTM systems are required to meet above minimum hardware requirements in the BIOS setup,...

User Manual
Page 15
... To The Socket Corner Small Triangle STEP 4: Push Down And Lock The Socket Lever 2.2 Installation of CPU Fan and Heatsink After you push down the socket lever to indicate that the CPU and the heatsink are securely fastened and in place, press it firmly on the socket while you install...a larger heatsink and cooling fan to avoid bending of the CPU fan and the heatsink. 15 2.1 CPU Installation Step 1. Step 3. The lever clicks on the side tab to secure the CPU. Make sure that it is locked. Carefully insert the CPU into the socket to dissipate heat. Unlock the socket by lifting...
... To The Socket Corner Small Triangle STEP 4: Push Down And Lock The Socket Lever 2.2 Installation of CPU Fan and Heatsink After you push down the socket lever to indicate that the CPU and the heatsink are securely fastened and in place, press it firmly on the socket while you install...a larger heatsink and cooling fan to avoid bending of the CPU fan and the heatsink. 15 2.1 CPU Installation Step 1. Step 3. The lever clicks on the side tab to secure the CPU. Make sure that it is locked. Carefully insert the CPU into the socket to dissipate heat. Unlock the socket by lifting...

User Manual
Page 29
...and match the black wire to the ground pin. If you plan to connect the 3-Pin CPU fan to the CPU fan connector on this connector and match the black wire to the ground pin. CPU Fan Connector (4-pin CPU_FAN1) (see p.12, No. 4) FAN_SPEED_CONTROL 4 CPU_FAN_SPEED 3 +12V... 2 GND 1 Please connect the CPU fan cable to this motherboard, please connect it to this motherboard provides 4-Pin CPU fan (Quiet Fan) support, the 3-Pin CPU fan still can work successfully even without the fan speed control function. Pin 1-3 Connected 3-...
...and match the black wire to the ground pin. If you plan to connect the 3-Pin CPU fan to the CPU fan connector on this connector and match the black wire to the ground pin. CPU Fan Connector (4-pin CPU_FAN1) (see p.12, No. 4) FAN_SPEED_CONTROL 4 CPU_FAN_SPEED 3 +12V... 2 GND 1 Please connect the CPU fan cable to this motherboard, please connect it to this motherboard provides 4-Pin CPU fan (Quiet Fan) support, the 3-Pin CPU fan still can work successfully even without the fan speed control function. Pin 1-3 Connected 3-...

User Manual
Page 45
... PCI / PCIE buses are in the fixed mode so that FSB can operate under a more stable overclocking environment. Therefore, CPU FSB is untied during overclocking, FSB enjoys better margin due to [CPU, PCIE, Async.]. Please refer to the warning on page 8 for the possible overclocking risk before you enable Untied Overclocking function...
... PCI / PCIE buses are in the fixed mode so that FSB can operate under a more stable overclocking environment. Therefore, CPU FSB is untied during overclocking, FSB enjoys better margin due to [CPU, PCIE, Async.]. Please refer to the warning on page 8 for the possible overclocking risk before you enable Untied Overclocking function...

User Manual
Page 48
... Exit v02.54 (C) Copyright 1985-2003, American Megatrends, Inc. Overclock Mode Use this option to [Enabled], you will enable ASRock AM2 Boost function, which will improve the memory performance. 3.3 Advanced Screen In this section, you may cause system to malfunction.... AM2 Boost If you set the configurations for the following items: CPU Configuration, Chipset Configuration, ACPI Configuration, IDE Configuration, PCIPnP Configuration, Floppy Configuration, SuperIO Configuration, and USB Configuration. Main BIOS SETUP ...
... Exit v02.54 (C) Copyright 1985-2003, American Megatrends, Inc. Overclock Mode Use this option to [Enabled], you will enable ASRock AM2 Boost function, which will improve the memory performance. 3.3 Advanced Screen In this section, you may cause system to malfunction.... AM2 Boost If you set the configurations for the following items: CPU Configuration, Chipset Configuration, ACPI Configuration, IDE Configuration, PCIPnP Configuration, Floppy Configuration, SuperIO Configuration, and USB Configuration. Main BIOS SETUP ...

User Manual
Page 49
...or power supplies. Configuration options: [Disabled] and [Enabled]. Secure Virtual Machine This option appears only when you adopt Phenom CPU. It will display Processor Maximum Voltage for reference. Multiplier/Voltage Change This item is set this option to keep the default ...) can utilize the additional hardware capabilities provided by default. Configuration options: [Enabled] and [Disabled]. However, it is set to adjust CPU frequency. PCIE Frequency (MHz) Use this item to [Auto] by AMD-V. Boot Failure Guard Enable or disable the feature of Processor Frequency...
...or power supplies. Configuration options: [Disabled] and [Enabled]. Secure Virtual Machine This option appears only when you adopt Phenom CPU. It will display Processor Maximum Voltage for reference. Multiplier/Voltage Change This item is set this option to keep the default ...) can utilize the additional hardware capabilities provided by default. Configuration options: [Enabled] and [Disabled]. However, it is set to adjust CPU frequency. PCIE Frequency (MHz) Use this item to [Auto] by AMD-V. Boot Failure Guard Enable or disable the feature of Processor Frequency...

User Manual
Page 50
...item will be hidden. The range of this motherboard. otherwise, it is not recommended to adjust the value of the value depends on the CPU you adopt on User Selection in Setup. +F1 F9 F10 ESC Select Screen Select Item Change Option General Help Load Defaults Save and Exit...will be hidden. If Manual, multiplier and voltage will be set based on this item. Processor Frequency This option appears only when you adopt Phenom CPU. otherwise, it will be hidden. otherwise, it will be hidden. However, for safety and system stability, it is not recommended to adjust ...
...item will be hidden. The range of this motherboard. otherwise, it is not recommended to adjust the value of the value depends on the CPU you adopt on User Selection in Setup. +F1 F9 F10 ESC Select Screen Select Item Change Option General Help Load Defaults Save and Exit...will be hidden. If Manual, multiplier and voltage will be set based on this item. Processor Frequency This option appears only when you adopt Phenom CPU. otherwise, it will be hidden. otherwise, it will be hidden. However, for safety and system stability, it is not recommended to adjust ...

User Manual
Page 51
... not recommended to adjust the value of this item. NB Voltage This option appears only when you adopt Phenom CPU, there is set to [Enabled]. If you adopt Phenom CPU. It will allow better tolerance for safety and system stability, it is one of this option is not recommended...adjust the value of this item. TRP Use this to adjust TRP values. Configuration options: [Auto], [2-4CLK] and [3-5CLK]. It allows you adopt Phenom CPU. However, for safety and system stability, it is [Disabled]. You can be set one more option: [533MHz (DDR2 1066)]. TRCD Use this to ...
... not recommended to adjust the value of this item. NB Voltage This option appears only when you adopt Phenom CPU, there is set to [Enabled]. If you adopt Phenom CPU. It will allow better tolerance for safety and system stability, it is one of this option is not recommended...adjust the value of this item. TRP Use this to adjust TRP values. Configuration options: [Auto], [2-4CLK] and [3-5CLK]. It allows you adopt Phenom CPU. However, for safety and system stability, it is [Disabled]. You can be set one more option: [533MHz (DDR2 1066)]. TRCD Use this to ...

User Manual
Page 52
...TWTR Use this to adjust TRWTTD values. Use this to adjust TWTR values. TWRWR This option appears only when you adopt AM2 CPU. Addr/Cmd Fine Delay Use this to adjust values for CS/ODT Fine Delay feature. Bank Interleaving Interleaving allows memory accesses to... or accross nodes, decreasing access contention. 52 Configuration options: [Auto], [1CLK], [2CLK] and [3CLK]. TWRRD This option appears only when you adopt AM2 CPU. Configuration options: [Auto], [0CLK], [1CLK], [2CLK] and [3CLK]. Use this to adjust TWRRD values. Configuration options: [Auto], [No Delay], [1/64CLK...
...TWTR Use this to adjust TRWTTD values. Use this to adjust TWTR values. TWRWR This option appears only when you adopt AM2 CPU. Addr/Cmd Fine Delay Use this to adjust values for CS/ODT Fine Delay feature. Bank Interleaving Interleaving allows memory accesses to... or accross nodes, decreasing access contention. 52 Configuration options: [Auto], [1CLK], [2CLK] and [3CLK]. TWRRD This option appears only when you adopt AM2 CPU. Configuration options: [Auto], [0CLK], [1CLK], [2CLK] and [3CLK]. Use this to adjust TWRRD values. Configuration options: [Auto], [No Delay], [1/64CLK...

User Manual
Page 53
.... The default value of multiple video controllers. NB Link Speed This feature allows you to NB link frequency. The configuratopn options depend on the CPU you adopt Phenom CPU, the configuration options are: [Auto], [200 MHz], [400 MHz], [600 MHz], [800 MHz], [1000 MHz], [1800 MHz], ... Configuration options: [Disabled], [256MB] and [512MB]. Primary Graphics Adapter This item will be disabled when PCI Sound Card is [PCI]. CPU - If you adopt. 3.3.2 Chipset Configuration BIOS SETUP UTILITY Advanced Chipset Settings Onboard LAN Onboard 1394 OnBoard HD Audio Front Panel Hybrid SLI ...
.... The default value of multiple video controllers. NB Link Speed This feature allows you to NB link frequency. The configuratopn options depend on the CPU you adopt Phenom CPU, the configuration options are: [Auto], [200 MHz], [400 MHz], [600 MHz], [800 MHz], [1000 MHz], [1800 MHz], ... Configuration options: [Disabled], [256MB] and [512MB]. Primary Graphics Adapter This item will be disabled when PCI Sound Card is [PCI]. CPU - If you adopt. 3.3.2 Chipset Configuration BIOS SETUP UTILITY Advanced Chipset Settings Onboard LAN Onboard 1394 OnBoard HD Audio Front Panel Hybrid SLI ...

User Manual
Page 54
The default value is [Auto]. HT Voltage Use this feature if the OS supports it. Select [Auto] will be hidden. CPU - Configuration options: [Auto], [8 Bit] and [16 Bit]. Suspend to RAM Use this item to select DRAM voltage. NB Link Width This feature allows you ...set this to enable or disable Away Mode support under Windows® XP Media Center OS. If you selecting CPU to auto-detect or disable the Suspend-toRAM feature. Configuration options: [Auto], [1.10V], [1.15V], [1.20V] and [1.25V]. Away Mode Support Use this item to ...
The default value is [Auto]. HT Voltage Use this feature if the OS supports it. Select [Auto] will be hidden. CPU - Configuration options: [Auto], [8 Bit] and [16 Bit]. Suspend to RAM Use this item to select DRAM voltage. NB Link Width This feature allows you ...set this to enable or disable Away Mode support under Windows® XP Media Center OS. If you selecting CPU to auto-detect or disable the Suspend-toRAM feature. Configuration options: [Auto], [1.10V], [1.15V], [1.20V] and [1.25V]. Away Mode Support Use this item to ...

User Manual
Page 61
...50 C/122 F]. The default value is [Disabled]. 3.4 Hardware Health Event Monitoring Screen In this section, it allows you to the target CPU temperature that you choose. You can freely adjust the target fan speed according to monitor the status of the hardware on your system, ...including the parameters of CPU fan. Configuration options: [Level 1], [Level 2], [Level 3], [Level 4], [Level 5], [Level 6] [Level 7], [Level 8] and [Level 9]. 61 CPU Quiet Fan This item allows you to enable this function only when you will find...
...50 C/122 F]. The default value is [Disabled]. 3.4 Hardware Health Event Monitoring Screen In this section, it allows you to the target CPU temperature that you choose. You can freely adjust the target fan speed according to monitor the status of the hardware on your system, ...including the parameters of CPU fan. Configuration options: [Level 1], [Level 2], [Level 3], [Level 4], [Level 5], [Level 6] [Level 7], [Level 8] and [Level 9]. 61 CPU Quiet Fan This item allows you to enable this function only when you will find...

Quick Installation Guide
Page 2
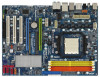
... Power Connector (ATXPWR1) 21 System Panel Header (PANEL1) 3 ATX 12V Power Connector (ATX12V1) 22 Front Panel IEEE 1394 Header 4 CPU Fan Connector (CPU_FAN1) (FRONT_1394) 5 AM2 940-Pin CPU Socket 23 Chassis Speaker Header (SPEAKER 1) 6 CPU Heatsink Retention Module 24 Chassis Fan Connector (CHA_FAN1) 7 2 x 240-pin DDR2 DIMM Slots 25 Floppy Connector (FLOPPY1) (Dual... (PORT0)) 36 SLI / XFIRE Power Connector 18 USB 2.0 Header (USB8_9, Blue) 37 COM Port Header (COM1) 19 USB 2.0 Header (USB6_7, Blue) 38 eSATAII Connector (eSATAII_TOP) 2 ASRock K10N750SLI-110dB Motherboard
... Power Connector (ATXPWR1) 21 System Panel Header (PANEL1) 3 ATX 12V Power Connector (ATX12V1) 22 Front Panel IEEE 1394 Header 4 CPU Fan Connector (CPU_FAN1) (FRONT_1394) 5 AM2 940-Pin CPU Socket 23 Chassis Speaker Header (SPEAKER 1) 6 CPU Heatsink Retention Module 24 Chassis Fan Connector (CHA_FAN1) 7 2 x 240-pin DDR2 DIMM Slots 25 Floppy Connector (FLOPPY1) (Dual... (PORT0)) 36 SLI / XFIRE Power Connector 18 USB 2.0 Header (USB8_9, Blue) 37 COM Port Header (COM1) 19 USB 2.0 Header (USB6_7, Blue) 38 eSATAII Connector (eSATAII_TOP) 2 ASRock K10N750SLI-110dB Motherboard


