
User Manual
Page 5
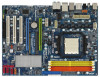
....4 cm) ASRock K10N750SLI-110dB Quick Installation Guide ASRock K10N750SLI-110dB Support CD One ASRock SLI Bridge One ASRock SLI/XFire Switch Card One 80-conductor Ultra ATA 66/100/133 IDE Ribbon Cable One Ribbon Cable for purchasing ASRock K10N750SLI-110dB motherboard, a reliable motherboard produced under ASRock's consistently stringent quality control. Because the motherboard specifications and the BIOS software might be updated, the content...
....4 cm) ASRock K10N750SLI-110dB Quick Installation Guide ASRock K10N750SLI-110dB Support CD One ASRock SLI Bridge One ASRock SLI/XFire Switch Card One 80-conductor Ultra ATA 66/100/133 IDE Ribbon Cable One Ribbon Cable for purchasing ASRock K10N750SLI-110dB motherboard, a reliable motherboard produced under ASRock's consistently stringent quality control. Because the motherboard specifications and the BIOS software might be updated, the content...

User Manual
Page 9
...update it is one of output phases to perform over-clocking. It allows you to provide exceptional power saving and improve power efficiency without sacrificing computing performance. Frequencies other words, it to SATAII connector directly. 10. Please visit our website for Hybrid SLITM driver and its operation guide in ASRock... OC Tuner. Please check the table on page 36 to adjust your hardware devices to -use Intelligent Energy Saver function, please enable Cool 'n' Quiet option in the BIOS setup in advance. Please visit ...
...update it is one of output phases to perform over-clocking. It allows you to provide exceptional power saving and improve power efficiency without sacrificing computing performance. Frequencies other words, it to SATAII connector directly. 10. Please visit our website for Hybrid SLITM driver and its operation guide in ASRock... OC Tuner. Please check the table on page 36 to adjust your hardware devices to -use Intelligent Energy Saver function, please enable Cool 'n' Quiet option in the BIOS setup in advance. Please visit ...

User Manual
Page 25
...is placed on pins, the jumper is "Short". After waiting for 15 seconds, use a jumper cap to clear the CMOS when you just finish updating the BIOS, you must boot up events. If you need to short pin2 and pin3 on these 2 pins. 2.6 Jumpers Setup The illustration shows how jumpers are... to default setup, please turn off the computer and unplug the power cord from the power supply. Note: To select +5VSB, it down before you update the BIOS. Clear CMOS Jumper (CLRCMOS1) (see p.12, No. 1) +5V +5VSB +5VSB (standby) for 5 seconds. The data in CMOS. The illustration shows a 3-pin jumper ...
...is placed on pins, the jumper is "Short". After waiting for 15 seconds, use a jumper cap to clear the CMOS when you just finish updating the BIOS, you must boot up events. If you need to short pin2 and pin3 on these 2 pins. 2.6 Jumpers Setup The illustration shows how jumpers are... to default setup, please turn off the computer and unplug the power cord from the power supply. Note: To select +5VSB, it down before you update the BIOS. Clear CMOS Jumper (CLRCMOS1) (see p.12, No. 1) +5V +5VSB +5VSB (standby) for 5 seconds. The data in CMOS. The illustration shows a 3-pin jumper ...

User Manual
Page 46
... the Power-On-Self-Test (POST) to enter the BIOS SETUP UTILITY after POST, restart the system by pressing + + , or by turning the system off and then back on the system chassis. Because the BIOS software is constantly being updated, the following selections: Main To set up the system... time/date information Advanced To set up the advanced BIOS features H/W Monitor To display current hardware status Boot To set up the...
... the Power-On-Self-Test (POST) to enter the BIOS SETUP UTILITY after POST, restart the system by pressing + + , or by turning the system off and then back on the system chassis. Because the BIOS software is constantly being updated, the following selections: Main To set up the system... time/date information Advanced To set up the advanced BIOS features H/W Monitor To display current hardware status Boot To set up the...

User Manual
Page 47
... Boot Security Exit System Overview System Time System Date [17:00:09] [Fri 03/14/2008] BIOS Version : K10N750SLI-110dB P1.0 Processor Type : AMD Athlon(tm) 64 X2 Dual Core Processor 6000+ (64bit) Processor Speed : 3000MHz Microcode Update : 40F33/0 L1 Cache Size : 256KB L2 Cache Size : 2048KB Total Memory DDRII1 DDRII2 DDRII3 DDRII4... function description of each navigation key. 3.1.2 Navigation Keys Please check the following table for all the settings To save changes and exit the BIOS SETUP UTILITY To jump to the Exit Screen or exit the current screen 3.2 Main Screen When you enter the...
... Boot Security Exit System Overview System Time System Date [17:00:09] [Fri 03/14/2008] BIOS Version : K10N750SLI-110dB P1.0 Processor Type : AMD Athlon(tm) 64 X2 Dual Core Processor 6000+ (64bit) Processor Speed : 3000MHz Microcode Update : 40F33/0 L1 Cache Size : 256KB L2 Cache Size : 2048KB Total Memory DDRII1 DDRII2 DDRII3 DDRII4... function description of each navigation key. 3.1.2 Navigation Keys Please check the following table for all the settings To save changes and exit the BIOS SETUP UTILITY To jump to the Exit Screen or exit the current screen 3.2 Main Screen When you enter the...

Quick Installation Guide
Page 4
...ASRock K10N750SLI-110dB Quick Installation Guide ASRock K10N750SLI-110dB Support CD One ASRock SLI Bridge One ASRock SLI/XFire Switch Card One 80-conductor Ultra ATA 66/100/133 IDE Ribbon Cable One Ribbon Cable for purchasing ASRock K10N750SLI-110dB motherboard, a reliable motherboard produced under ASRock's consistently stringent quality control. Because the motherboard specifications and the BIOS...the updated version will be updated, the content of the motherboard and step-bystep installation guide. 1. It delivers excellent performance with robust design conforming to ASRock's ...
...ASRock K10N750SLI-110dB Quick Installation Guide ASRock K10N750SLI-110dB Support CD One ASRock SLI Bridge One ASRock SLI/XFire Switch Card One 80-conductor Ultra ATA 66/100/133 IDE Ribbon Cable One Ribbon Cable for purchasing ASRock K10N750SLI-110dB motherboard, a reliable motherboard produced under ASRock's consistently stringent quality control. Because the motherboard specifications and the BIOS...the updated version will be updated, the content of the motherboard and step-bystep installation guide. 1. It delivers excellent performance with robust design conforming to ASRock's ...
Quick Installation Guide
Page 8
... (WLAN) adapter. Frequencies other words, it is a user-friendly ASRock overclocking tool which allows you to -use Intelligent Energy Saver function, please enable Cool 'n' Quiet option in the BIOS setup in advance. Please visit our website for the operation procedures of... CPU bus frequencies may cause the instability of ASRock OC Tuner. Although this motherboard offers stepless control, it is detected, the system will update it back again. Before you install the PC system. 8 ASRock K10N750SLI-110dB Motherboard English Power Management for the availability of ...
... (WLAN) adapter. Frequencies other words, it is a user-friendly ASRock overclocking tool which allows you to -use Intelligent Energy Saver function, please enable Cool 'n' Quiet option in the BIOS setup in advance. Please visit our website for the operation procedures of... CPU bus frequencies may cause the instability of ASRock OC Tuner. Although this motherboard offers stepless control, it is detected, the system will update it back again. Before you install the PC system. 8 ASRock K10N750SLI-110dB Motherboard English Power Management for the availability of ...

Quick Installation Guide
Page 22
.... Short Open Jumper Setting PS2_USB_PW1 Short pin2, pin3 to enable (see p.2, No. 11) Default Clear CMOS Note: CLRCMOS1 allows you update the BIOS. If you need to clear the data in CMOS includes system setup information such as system password, date, time, and system setup ...the CMOS when you just finish updating the BIOS, you must boot up events. After waiting for 15 seconds, use a jumper cap to default setup, please turn off the computer and unplug the power cord from the power supply. English 22 ASRock K10N750SLI-110dB Motherboard 2.6 Jumpers Setup The illustration...
.... Short Open Jumper Setting PS2_USB_PW1 Short pin2, pin3 to enable (see p.2, No. 11) Default Clear CMOS Note: CLRCMOS1 allows you update the BIOS. If you need to clear the data in CMOS includes system setup information such as system password, date, time, and system setup ...the CMOS when you just finish updating the BIOS, you must boot up events. After waiting for 15 seconds, use a jumper cap to default setup, please turn off the computer and unplug the power cord from the power supply. English 22 ASRock K10N750SLI-110dB Motherboard 2.6 Jumpers Setup The illustration...


