

User Manual
Page 2
... from any defect or error in the documentation or product. he Lithium battery adopted on this motherboard contains Perchlorate, a toxic substance controlled in this documentation, ASRock does not provide warranty of any indirect, special, incidental, or consequential damages (including damages for...any kind, either expressed or implied, including but not limited to infringe. Version 1.0 Published October 2014 Copyright©2014 ASRock INC. Products and corporate names appearing in Perchlorate Best Management Practices (BMP) regulations passed by the purchaser for informational use...
... from any defect or error in the documentation or product. he Lithium battery adopted on this motherboard contains Perchlorate, a toxic substance controlled in this documentation, ASRock does not provide warranty of any indirect, special, incidental, or consequential damages (including damages for...any kind, either expressed or implied, including but not limited to infringe. Version 1.0 Published October 2014 Copyright©2014 ASRock INC. Products and corporate names appearing in Perchlorate Best Management Practices (BMP) regulations passed by the purchaser for informational use...

User Manual
Page 3
... 2 1.3 Motherboard Layout 5 1.4 I/O Panel 7 Chapter 2 Installation 8 2.1 Installing the CPU 9 2.2 Installing the CPU Fan and Heatsink 12 2.3 Installing Memory Modules (DIMM) 13 2.4 Expansion Slots (PCI Express Slots) 15 2.5 Jumpers Setup 16 2.6 Onboard Headers and Connectors 17 Chapter 3 Software and Utilities Operation 21 3.1 Installing Drivers 21 3.2 A-Tuning 22 3.3 Intel® Smart Connect Technology 28 3.4 ASRock...
... 2 1.3 Motherboard Layout 5 1.4 I/O Panel 7 Chapter 2 Installation 8 2.1 Installing the CPU 9 2.2 Installing the CPU Fan and Heatsink 12 2.3 Installing Memory Modules (DIMM) 13 2.4 Expansion Slots (PCI Express Slots) 15 2.5 Jumpers Setup 16 2.6 Onboard Headers and Connectors 17 Chapter 3 Software and Utilities Operation 21 3.1 Installing Drivers 21 3.2 A-Tuning 22 3.3 Intel® Smart Connect Technology 28 3.4 ASRock...
User Manual
Page 5
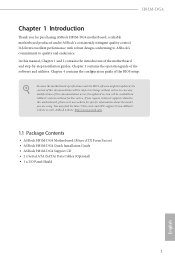
... might be updated, the content of this documentation occur, the updated version will be available on ASRock's website as well. ASRock website http://www.asrock.com. 1.1 Package Contents • ASRock H81M-DG4 Motherboard (Micro ATX Form Factor) • ASRock H81M-DG4 Quick Installation Guide • ASRock H81M-DG4 Support CD • 2 x Serial ATA (SATA) Data Cables (Optional) • 1 x I/O Panel Shield 1 English It delivers...
... might be updated, the content of this documentation occur, the updated version will be available on ASRock's website as well. ASRock website http://www.asrock.com. 1.1 Package Contents • ASRock H81M-DG4 Motherboard (Micro ATX Form Factor) • ASRock H81M-DG4 Quick Installation Guide • ASRock H81M-DG4 Support CD • 2 x Serial ATA (SATA) Data Cables (Optional) • 1 x I/O Panel Shield 1 English It delivers...

User Manual
Page 9
1.3 Motherboard Layout 1 H81M-DG4 2 USB 2.0 T: USB1 B: USB0 PS2 Keyboard /Mouse CPU_FAN1 18 ATX12V1 DVI1 DDR3_A1 (64 bit, 240-pin module) DDR3_B1 (64 bit, 240-pin module) ATXPWR1 VGA1 3 PLED PWRBTN 1 HDLED RESET PANEL1 USB 3.0 T: USB1 B: USB0 LAN H81M-DG4 4 5 USB 2.0 T: USB3 B: USB2 Top: RJ-45 Intel RoHS 6 PLED1 7 1 1 SATA_0 SATA_1 SATA_2 SATA_3 H81 CLRCMOS1 8 USB6_7 USB4_5...
1.3 Motherboard Layout 1 H81M-DG4 2 USB 2.0 T: USB1 B: USB0 PS2 Keyboard /Mouse CPU_FAN1 18 ATX12V1 DVI1 DDR3_A1 (64 bit, 240-pin module) DDR3_B1 (64 bit, 240-pin module) ATXPWR1 VGA1 3 PLED PWRBTN 1 HDLED RESET PANEL1 USB 3.0 T: USB1 B: USB0 LAN H81M-DG4 4 5 USB 2.0 T: USB3 B: USB2 Top: RJ-45 Intel RoHS 6 PLED1 7 1 1 SATA_0 SATA_1 SATA_2 SATA_3 H81 CLRCMOS1 8 USB6_7 USB4_5...

User Manual
Page 12
.... • Whenever you uninstall any motherboard settings. • Make sure to you install the motherboard, study the coniguration of the following precautions before installing or removing the motherboard. Pre-installation Precautions Take note of your motherboard directly on a grounded anti-static pad... the power cord before you install motherboard components or change any components, place them on a carpet. Before you and damages to motherboard components. • In order to avoid damage from static electricity to the motherboard's components, NEVER place your chassis ...
.... • Whenever you uninstall any motherboard settings. • Make sure to you install the motherboard, study the coniguration of the following precautions before installing or removing the motherboard. Pre-installation Precautions Take note of your motherboard directly on a grounded anti-static pad... the power cord before you install motherboard components or change any components, place them on a carpet. Before you and damages to motherboard components. • In order to avoid damage from static electricity to the motherboard's components, NEVER place your chassis ...

User Manual
Page 15
he cover must be placed if you wish to return the motherboard for ater service. 11 English H81M-DG4 Please save and replace the cover if the processor is removed.
he cover must be placed if you wish to return the motherboard for ater service. 11 English H81M-DG4 Please save and replace the cover if the processor is removed.

User Manual
Page 17
...memory module installed. 3. H81M-DG4 2.3 Installing Memory Modules (DIMM) his motherboard provides two 240-pin DDR3 (Double Data Rate 3) DIMM slots, and supports Dual Channel Memory Technology. 1. It is unable to activate Dual Channel Memory Technology with only one correct orientation. otherwise, this motherboard and DIMM may be ... pairs. 2. For dual channel coniguration, you force the DIMM into a DDR3 slot; It will cause permanent damage to the motherboard and the DIMM if you always need to install a DDR or DDR2 memory module into the slot at incorrect orientation. 13 English
...memory module installed. 3. H81M-DG4 2.3 Installing Memory Modules (DIMM) his motherboard provides two 240-pin DDR3 (Double Data Rate 3) DIMM slots, and supports Dual Channel Memory Technology. 1. It is unable to activate Dual Channel Memory Technology with only one correct orientation. otherwise, this motherboard and DIMM may be ... pairs. 2. For dual channel coniguration, you force the DIMM into a DDR3 slot; It will cause permanent damage to the motherboard and the DIMM if you always need to install a DDR or DDR2 memory module into the slot at incorrect orientation. 13 English

User Manual
Page 19
PCIe slots: PCIE1 (PCIe 2.0 x1 slot) is used for the card before you start the installation. PCIE2 (PCIe 2.0 x16 slot) is used for PCI Express x16 lane width graphics cards. 15 English Before installing an expansion card, please make necessary hardware settings for PCI Express x1 lane width cards. Please read the documentation of or the power cord is switched of the expansion card and make sure that the power supply is unplugged. H81M-DG4 2.4 Expansion Slots (PCI Express Slots) here are 2 PCI Express slots on the motherboard.
PCIe slots: PCIE1 (PCIe 2.0 x1 slot) is used for the card before you start the installation. PCIE2 (PCIe 2.0 x16 slot) is used for PCI Express x16 lane width graphics cards. 15 English Before installing an expansion card, please make necessary hardware settings for PCI Express x1 lane width cards. Please read the documentation of or the power cord is switched of the expansion card and make sure that the power supply is unplugged. H81M-DG4 2.4 Expansion Slots (PCI Express Slots) here are 2 PCI Express slots on the motherboard.

User Manual
Page 21
... to the pin assignments below. PLED (System Power LED): Connect to perform a normal restart. You may difer by chassis. RESET (Reset Switch): Connect to the motherboard. Do NOT place jumper caps over the headers and connectors will cause permanent damage to the reset switch on when the system is in S3... consists of when the system is operating. Placing jumper caps over these headers and connectors. English 17 he LED is on the chassis front panel. H81M-DG4 2.6 Onboard Headers and Connectors Onboard headers and connectors are matched correctly.
... to the pin assignments below. PLED (System Power LED): Connect to perform a normal restart. You may difer by chassis. RESET (Reset Switch): Connect to the motherboard. Do NOT place jumper caps over the headers and connectors will cause permanent damage to the reset switch on when the system is in S3... consists of when the system is operating. Placing jumper caps over these headers and connectors. English 17 he LED is on the chassis front panel. H81M-DG4 2.6 Onboard Headers and Connectors Onboard headers and connectors are matched correctly.

User Manual
Page 22
... below: A. If you use an AC'97 audio panel, please install it to 6.0 Gb/s data transfer rate. D. MIC_RET and OUT_RET are two headers on this motherboard. English 18 Connect Audio_R (RIN) to OUT2_R and Audio_L (LIN) to the "FrontMic" Tab in our manual and chassis manual to the front audio panel...
... below: A. If you use an AC'97 audio panel, please install it to 6.0 Gb/s data transfer rate. D. MIC_RET and OUT_RET are two headers on this motherboard. English 18 Connect Audio_R (RIN) to OUT2_R and Audio_L (LIN) to the "FrontMic" Tab in our manual and chassis manual to the front audio panel...

User Manual
Page 23
.... ATX 12V Power Connector (4-pin ATX12V1) (see p.5, No. 7) PLEDPLED+ PLED+ 1 Please connect the chassis power LED to this header. H81M-DG4 Chassis Speaker Header (4-pin SPEAKER1) (see p.5, No. 13) GND +12V CHA_FAN_SPEED FAN_SPEED_CONTROL Please connect fan cables to the fan connectors and match ... connect it along Pin 1 and Pin 13. ATX Power Connector (24-pin ATXPWR1) (see p.5, No. 1) +12V CPU_FAN_SPEED GND FAN_SPEED_CONTROL his motherboard provides an 4-pin ATX 12V power connector. 19 English To use a 20-pin ATX power supply, please plug it to Pin 1-3. he LED...
.... ATX 12V Power Connector (4-pin ATX12V1) (see p.5, No. 7) PLEDPLED+ PLED+ 1 Please connect the chassis power LED to this header. H81M-DG4 Chassis Speaker Header (4-pin SPEAKER1) (see p.5, No. 13) GND +12V CHA_FAN_SPEED FAN_SPEED_CONTROL Please connect fan cables to the fan connectors and match ... connect it along Pin 1 and Pin 13. ATX Power Connector (24-pin ATXPWR1) (see p.5, No. 1) +12V CPU_FAN_SPEED GND FAN_SPEED_CONTROL his motherboard provides an 4-pin ATX 12V power connector. 19 English To use a 20-pin ATX power supply, please plug it to Pin 1-3. he LED...

User Manual
Page 24
A TPM system also helps enhance network security, protects digital identities, and ensures platform integrity. TPM Header (17-pin TPMS1) (see p.5, No. 15) 1 GND Signal his motherboard supports CASE OPEN detection feature that detects if the chassis cove has been removed. English 20 his feature requires a chassis with chassis intrusion detection design. ...
A TPM system also helps enhance network security, protects digital identities, and ensures platform integrity. TPM Header (17-pin TPMS1) (see p.5, No. 15) 1 GND Signal his motherboard supports CASE OPEN detection feature that detects if the chassis cove has been removed. English 20 his feature requires a chassis with chassis intrusion detection design. ...
User Manual
Page 25
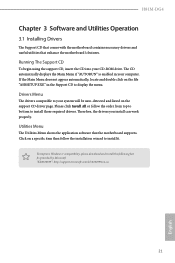
Drivers Menu he Utilities Menu shows the application sotware that enhance the motherboard's features. Click on a speciic item then follow the order from top to bottom to your system will be auto-detected and listed on the ile ...display the menu. "KB2720599": http://support.microsot.com/kb/2720599/en-us 21 English he Support CD that comes with the motherboard contains necessary drivers and useful utilities that the motherboard supports. H81M-DG4 Chapter 3 Software and Utilities Operation 3.1 Installing Drivers he CD automatically displays the Main Menu if "AUTORUN" is enabled in the...
Drivers Menu he Utilities Menu shows the application sotware that enhance the motherboard's features. Click on a speciic item then follow the order from top to bottom to your system will be auto-detected and listed on the ile ...display the menu. "KB2720599": http://support.microsot.com/kb/2720599/en-us 21 English he Support CD that comes with the motherboard contains necessary drivers and useful utilities that the motherboard supports. H81M-DG4 Chapter 3 Software and Utilities Operation 3.1 Installing Drivers he CD automatically displays the Main Menu if "AUTORUN" is enabled in the...

User Manual
Page 28
... Key Plug in the USB Key and let your computer log in red color). HDD, SSD and optical disk drives are all supported. Dehumidiier Prevent motherboard damages due to windows automatically! he fans will automatically shit to the next speed level when the assigned temperature is a hard disk health monitoring utility...
... Key Plug in the USB Key and let your computer log in red color). HDD, SSD and optical disk drives are all supported. Dehumidiier Prevent motherboard damages due to windows automatically! he fans will automatically shit to the next speed level when the assigned temperature is a hard disk health monitoring utility...

User Manual
Page 32
... SATA mode to avoid loss. 1. Please backup any important data before operating to AHCI. If Windows 8.1/8/7 is not in Windows Registry Editor. It saves your motherboard supports this feature. • Operating system: Microsot Windows 8.1/8/7 (32- If your system is already installed under IDE mode, directly changing the SATA mode to AHCI...
... SATA mode to avoid loss. 1. Please backup any important data before operating to AHCI. If Windows 8.1/8/7 is not in Windows Registry Editor. It saves your motherboard supports this feature. • Operating system: Microsot Windows 8.1/8/7 (32- If your system is already installed under IDE mode, directly changing the SATA mode to AHCI...

User Manual
Page 37
... to the Internet to download apps from the ASRock APP Shop. 3.4.1 UI Overview Category Panel Hot News Information Panel Category Panel: he ASRock APP Shop is an online store for purchasing and downloading sotware applications for your motherboard up to date simply with a few clicks....website of the selected news and know more. 33 English Information Panel: he hot news section displays the various latest news. H81M-DG4 3.4 ASRock APP Shop he category panel contains several category tabs or buttons that when selected the information panel below displays the relative information....
... to the Internet to download apps from the ASRock APP Shop. 3.4.1 UI Overview Category Panel Hot News Information Panel Category Panel: he ASRock APP Shop is an online store for purchasing and downloading sotware applications for your motherboard up to date simply with a few clicks....website of the selected news and know more. 33 English Information Panel: he hot news section displays the various latest news. H81M-DG4 3.4 ASRock APP Shop he category panel contains several category tabs or buttons that when selected the information panel below displays the relative information....
User Manual
Page 49
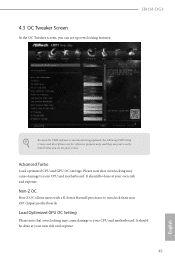
Non-Z OC Non-Z OC allows users with a K-Series Haswell processor to your CPU and motherboard. Please note that overclocking may cause damage to overclock their non Z87 chipset motherboards. Advanced Turbo Load optimized CPU and GPU OC settings. Load Optimized GPU OC Setting Please note that ... at your own risk and expense. 45 English H81M-DG4 Because the UEFI sotware is constantly being updated, the following UEFI setup screens and descriptions are for reference purpose only, and they may cause damage to your CPU and motherboard. 4.3 OC Tweaker Screen In the OC Tweaker ...
Non-Z OC Non-Z OC allows users with a K-Series Haswell processor to your CPU and motherboard. Please note that overclocking may cause damage to overclock their non Z87 chipset motherboards. Advanced Turbo Load optimized CPU and GPU OC settings. Load Optimized GPU OC Setting Please note that ... at your own risk and expense. 45 English H81M-DG4 Because the UEFI sotware is constantly being updated, the following UEFI setup screens and descriptions are for reference purpose only, and they may cause damage to your CPU and motherboard. 4.3 OC Tweaker Screen In the OC Tweaker ...

User Manual
Page 50
... Duration Power Limit Conigure Package Power Limit 1 in watts. When the limit is exceeded, the CPU ratio will be the same as your CPU and motherboard. It should be lowered immediately. A lower limit can protect the CPU and save power, while a higher limit may improve performance. 46 English CPU Ratio he...
... Duration Power Limit Conigure Package Power Limit 1 in watts. When the limit is exceeded, the CPU ratio will be the same as your CPU and motherboard. It should be lowered immediately. A lower limit can protect the CPU and save power, while a higher limit may improve performance. 46 English CPU Ratio he...

User Manual
Page 51
.... Override: he voltage is selected, the motherboard will detect the memory module(s) inserted and assign the appropriate frequency automatically. 47 English GT Voltage Ofset Conigure the voltage added to overclock the DDR3 memory and perform beyond standard speciications. DRAM Frequency If [Auto] is ixed. H81M-DG4 Primary Plane Current Limit Conigure the current...
.... Override: he voltage is selected, the motherboard will detect the memory module(s) inserted and assign the appropriate frequency automatically. 47 English GT Voltage Ofset Conigure the voltage added to overclock the DDR3 memory and perform beyond standard speciications. DRAM Frequency If [Auto] is ixed. H81M-DG4 Primary Plane Current Limit Conigure the current...

User Manual
Page 72
... a fan mode for CPU Fans 1, or choose Customize to monitor the status of the hardware on your system, including the parameters of the CPU temperature, motherboard temperature, fan speed and voltage.
... a fan mode for CPU Fans 1, or choose Customize to monitor the status of the hardware on your system, including the parameters of the CPU temperature, motherboard temperature, fan speed and voltage.

