
User Manual
Page 4
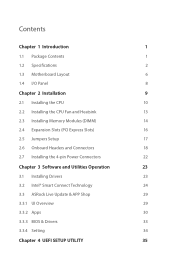
... 8 Chapter 2 Installation 9 2.1 Installing the CPU 10 2.2 Installing the CPU Fan and Heatsink 13 2.3 Installing Memory Modules (DIMM) 14 2.4 Expansion Slots (PCI Express Slots) 16 2.5 Jumpers Setup 17 2.6 Onboard Headers and Connectors 18 2.7 Installing the 4-pin Power Connectors 22 Chapter 3 Software and Utilities Operation 23 3.1 Installing Drivers 23 3.2 Intel® Smart Connect...
... 8 Chapter 2 Installation 9 2.1 Installing the CPU 10 2.2 Installing the CPU Fan and Heatsink 13 2.3 Installing Memory Modules (DIMM) 14 2.4 Expansion Slots (PCI Express Slots) 16 2.5 Jumpers Setup 17 2.6 Onboard Headers and Connectors 18 2.7 Installing the 4-pin Power Connectors 22 Chapter 3 Software and Utilities Operation 23 3.1 Installing Drivers 23 3.2 Intel® Smart Connect...
User Manual
Page 6
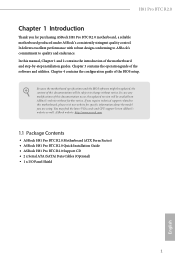
Chapter 3 contains the operation guide of the BIOS setup. ASRock website http://www.asrock.com. 1.1 Package Contents • ASRock H81 Pro BTC R2.0 Motherboard (ATX Form Factor) • ASRock H81 Pro BTC R2.0 Quick Installation Guide • ASRock H81 Pro BTC R2.0 Support CD • 2 x Serial ATA (SATA) Data Cables (Optional) • 1 x I/O Panel Shield 1 English If you require technical support related to quality and endurance. It delivers ...
Chapter 3 contains the operation guide of the BIOS setup. ASRock website http://www.asrock.com. 1.1 Package Contents • ASRock H81 Pro BTC R2.0 Motherboard (ATX Form Factor) • ASRock H81 Pro BTC R2.0 Quick Installation Guide • ASRock H81 Pro BTC R2.0 Support CD • 2 x Serial ATA (SATA) Data Cables (Optional) • 1 x I/O Panel Shield 1 English If you require technical support related to quality and endurance. It delivers ...

User Manual
Page 22
... be noted that the password, date, time, and user default profile will be cleared only if the CMOS battery is placed on these 2 pins. H81 Pro BTC R2.0 2.5 Jumpers Setup The illustration shows how jumpers are "Short" when a jumper cap is placed on the pins, the jumper is "Open". If you need to short pin2... the CMOS right after you do the clear-CMOS action. Clear CMOS Jumper (CLRCMOS1) (see p.6, No. 23) Default Clear CMOS CLRCMOS1 allows you to default setup, please turn off the computer and unplug the power cord from the power supply. When the jumper cap is removed.
... be noted that the password, date, time, and user default profile will be cleared only if the CMOS battery is placed on these 2 pins. H81 Pro BTC R2.0 2.5 Jumpers Setup The illustration shows how jumpers are "Short" when a jumper cap is placed on the pins, the jumper is "Open". If you need to short pin2... the CMOS right after you do the clear-CMOS action. Clear CMOS Jumper (CLRCMOS1) (see p.6, No. 23) Default Clear CMOS CLRCMOS1 allows you to default setup, please turn off the computer and unplug the power cord from the power supply. When the jumper cap is removed.
User Manual
Page 30
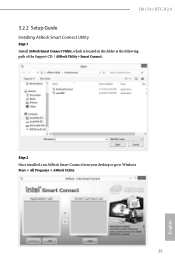
Step 2 Once installed, run ASRock Smart Connect from your desktop or go to Windows Start -> All Programs -> ASRock Utility. 25 English H81 Pro BTC R2.0 3.2.2 Setup Guide Installing ASRock Smart Connect Utility Step 1 Install ASRock Smart Connect Utility, which is located in the folder at the following path of the Support CD: \ ASRock Utility > Smart Connect.
Step 2 Once installed, run ASRock Smart Connect from your desktop or go to Windows Start -> All Programs -> ASRock Utility. 25 English H81 Pro BTC R2.0 3.2.2 Setup Guide Installing ASRock Smart Connect Utility Step 1 Install ASRock Smart Connect Utility, which is located in the folder at the following path of the Support CD: \ ASRock Utility > Smart Connect.

User Manual
Page 40
... chassis. If you wish to configure your screen. 4.1.1 UEFI Menu Bar The top of system configuration tools, cool sound effects and stunning visuals. H81 Pro BTC R2.0 Chapter 4 UEFI SETUP UTILITY 4.1 Introduction ASRock Interactive UEFI is constantly being updated, the following selections: Main For setting system time/date information OC Tweaker For overclocking configurations Advanced For...
... chassis. If you wish to configure your screen. 4.1.1 UEFI Menu Bar The top of system configuration tools, cool sound effects and stunning visuals. H81 Pro BTC R2.0 Chapter 4 UEFI SETUP UTILITY 4.1 Introduction ASRock Interactive UEFI is constantly being updated, the following selections: Main For setting system time/date information OC Tweaker For overclocking configurations Advanced For...

User Manual
Page 41
... to the bottom of each navigation key. 4.1.2 Navigation Keys Use < > key or < > key to choose among the selections on /off Discard changes and exit the SETUP UTILITY Load optimal default values for the descriptions of the screen To display the General Help Screen Toggle sound on the menu bar, and use... the mouse to click your required item. Navigation Key(s) Description + / - Please check the following table for all the settings Save changes and exit the SETUP UTILITY Print screen Jump to the Exit Screen or exit the current screen English 36
... to the bottom of each navigation key. 4.1.2 Navigation Keys Use < > key or < > key to choose among the selections on /off Discard changes and exit the SETUP UTILITY Load optimal default values for the descriptions of the screen To display the General Help Screen Toggle sound on the menu bar, and use... the mouse to click your required item. Navigation Key(s) Description + / - Please check the following table for all the settings Save changes and exit the SETUP UTILITY Print screen Jump to the Exit Screen or exit the current screen English 36
User Manual
Page 42
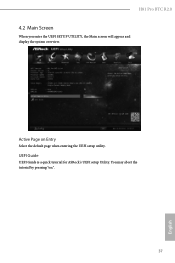
UEFI Guide UEFI Guide is a quick tutorial for ASRock's UEFI setup Utility. H81 Pro BTC R2.0 4.2 Main Screen When you enter the UEFI SETUP UTILITY, the Main screen will appear and display the system overview. You may abort the tutorial by pressing "esc". 37 English Active Page on Entry Select the default page when entering the UEFI setup utility.
UEFI Guide UEFI Guide is a quick tutorial for ASRock's UEFI setup Utility. H81 Pro BTC R2.0 4.2 Main Screen When you enter the UEFI SETUP UTILITY, the Main screen will appear and display the system overview. You may abort the tutorial by pressing "esc". 37 English Active Page on Entry Select the default page when entering the UEFI setup utility.
User Manual
Page 43
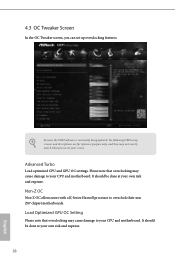
...-Z OC Non-Z OC allows users with a K-Series Haswell processor to your CPU and motherboard. Because the UEFI software is constantly being updated, the following UEFI setup screens and descriptions are for reference purpose only, and they may cause damage to overclock their non Z87 chipset motherboards.
...-Z OC Non-Z OC allows users with a K-Series Haswell processor to your CPU and motherboard. Because the UEFI software is constantly being updated, the following UEFI setup screens and descriptions are for reference purpose only, and they may cause damage to overclock their non Z87 chipset motherboards.

User Manual
Page 62
Select UEFI Setup Only to disable legacy USB support. Intel USB 3.0 Mode Enable or disable all the USB 2.0 ports. If you encounter USB compatibility issues it is recommended to select [Smart Auto]. 4.4.7 USB Configuration H81 Pro BTC R2.0 USB Controller Enable or disable all the USB 3.0 ports. It is recommended to support USB devices under the UEFI setup and Windows/Linux operating systems only. Legacy USB Support Enable or disable Legacy OS Support for USB 3.0 devices. 57 English Legacy USB 3.0 Support Enable or disable Legacy OS Support for USB 2.0 devices.
Select UEFI Setup Only to disable legacy USB support. Intel USB 3.0 Mode Enable or disable all the USB 2.0 ports. If you encounter USB compatibility issues it is recommended to select [Smart Auto]. 4.4.7 USB Configuration H81 Pro BTC R2.0 USB Controller Enable or disable all the USB 3.0 ports. It is recommended to support USB devices under the UEFI setup and Windows/Linux operating systems only. Legacy USB Support Enable or disable Legacy OS Support for USB 3.0 devices. 57 English Legacy USB 3.0 Support Enable or disable Legacy OS Support for USB 2.0 devices.
User Manual
Page 64
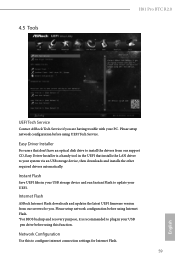
... Flash to configure internet connection settings for you are having trouble with your UEFI. Network Configuration Use this function. 4.5 Tools H81 Pro BTC R2.0 UEFI Tech Service Contact ASRock Tech Service if you . Please setup network configuration before using this to update your PC. Instant Flash Save UEFI files in the UEFI that installs the LAN...
... Flash to configure internet connection settings for you are having trouble with your UEFI. Network Configuration Use this function. 4.5 Tools H81 Pro BTC R2.0 UEFI Tech Service Contact ASRock Tech Service if you . Please setup network configuration before using this to update your PC. Instant Flash Save UEFI files in the UEFI that installs the LAN...
User Manual
Page 65
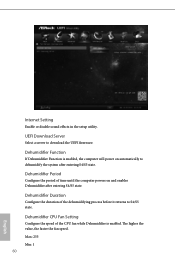
Internet Setting Enable or disable sound effects in the setup utility. Dehumidifier Function If Dehumidifier Function is enabled. The higher the value, the faster the fan speed. Dehumidifier Duration Configure the duration of the CPU ...
Internet Setting Enable or disable sound effects in the setup utility. Dehumidifier Function If Dehumidifier Function is enabled. The higher the value, the faster the fan speed. Dehumidifier Duration Configure the duration of the CPU ...

User Manual
Page 68
... CMOS or run the Restart to be turned on or off when the system boots up . Fast Boot Fast Boot minimizes your system for the setup hot key. H81 Pro BTC R2.0 4.7 Boot Screen This section displays the available devices on your computer's boot time. Please note that the only way to enter this UEFI...
... CMOS or run the Restart to be turned on or off when the system boots up . Fast Boot Fast Boot minimizes your system for the setup hot key. H81 Pro BTC R2.0 4.7 Boot Screen This section displays the available devices on your computer's boot time. Please note that the only way to enter this UEFI...

User Manual
Page 71
... authority to remove the password. Secure Boot Enable to remove the password. Leave it blank and press enter to change the settings in the UEFI Setup Utility. You may set or change the supervisor/user password for the user account. 4.8 Security Screen In this section you may also clear the user...
... authority to remove the password. Secure Boot Enable to remove the password. Leave it blank and press enter to change the settings in the UEFI Setup Utility. You may set or change the supervisor/user password for the user account. 4.8 Security Screen In this section you may also clear the user...

User Manual
Page 72
... Load UEFI default values for this operation. Discard Changes When you select this option the following message, "Discard changes and exit setup?" The F9 key can be used for all changes. will pop out. will pop out. will pop out. Select [OK] to... When you select this option the following message, "Save configuration changes and exit setup?" Launch EFI Shell from filesystem device Copy shellx64.efi to the root directory to discard all options. 4.9 Exit Screen H81 Pro BTC R2.0 Save Changes and Exit When you select this option the following message, "Discard...
... Load UEFI default values for this operation. Discard Changes When you select this option the following message, "Discard changes and exit setup?" The F9 key can be used for all changes. will pop out. will pop out. will pop out. Select [OK] to... When you select this option the following message, "Save configuration changes and exit setup?" Launch EFI Shell from filesystem device Copy shellx64.efi to the root directory to discard all options. 4.9 Exit Screen H81 Pro BTC R2.0 Save Changes and Exit When you select this option the following message, "Discard...


