
User Manual
Page 4
...Specifications 2 1.3 Motherboard Layout 6 1.4 I/O Panel 8 Chapter 2 Installation 9 2.1 Installing the CPU 10 2.2 Installing the CPU Fan and Heatsink 13 2.3 Installing Memory Modules (DIMM) 14 2.4 Expansion Slots (PCI Express Slots) 16 2.5 Jumpers Setup 17 2.6 Onboard Headers and Connectors 18 2.7 Installing the 4-pin Power Connectors 22 Chapter 3 Software and Utilities Operation 23 3.1 Installing Drivers 23 3.2 Intel® Smart Connect Technology 24 3.3 ASRock Live Update & APP Shop 29 3.3.1 UI Overview 29 3.3.2 Apps 30 3.3.3 BIOS & Drivers 33 3.3.4 Setting...
...Specifications 2 1.3 Motherboard Layout 6 1.4 I/O Panel 8 Chapter 2 Installation 9 2.1 Installing the CPU 10 2.2 Installing the CPU Fan and Heatsink 13 2.3 Installing Memory Modules (DIMM) 14 2.4 Expansion Slots (PCI Express Slots) 16 2.5 Jumpers Setup 17 2.6 Onboard Headers and Connectors 18 2.7 Installing the 4-pin Power Connectors 22 Chapter 3 Software and Utilities Operation 23 3.1 Installing Drivers 23 3.2 Intel® Smart Connect Technology 24 3.3 ASRock Live Update & APP Shop 29 3.3.1 UI Overview 29 3.3.2 Apps 30 3.3.3 BIOS & Drivers 33 3.3.4 Setting...
User Manual
Page 6
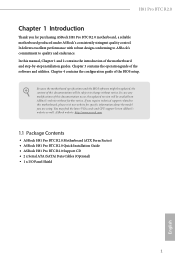
...8226; ASRock H81 Pro BTC R2.0 Quick Installation Guide • ASRock H81 Pro BTC R2.0 Support CD • 2 x Serial ATA (SATA) Data Cables (Optional) • 1 x I/O Panel Shield 1 English It delivers excellent performance with robust design conforming to ASRock's commitment to this motherboard, please visit our website for specific information about the model you for purchasing ASRock H81 Pro BTC R2.0 motherboard, a reliable motherboard produced under ASRock's consistently stringent quality control. In case any modifications of this documentation will be subject to change without...
...8226; ASRock H81 Pro BTC R2.0 Quick Installation Guide • ASRock H81 Pro BTC R2.0 Support CD • 2 x Serial ATA (SATA) Data Cables (Optional) • 1 x I/O Panel Shield 1 English It delivers excellent performance with robust design conforming to ASRock's commitment to this motherboard, please visit our website for specific information about the model you for purchasing ASRock H81 Pro BTC R2.0 motherboard, a reliable motherboard produced under ASRock's consistently stringent quality control. In case any modifications of this documentation will be subject to change without...

User Manual
Page 8
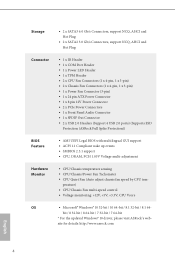
H81 Pro BTC R2.0 • Supports Auto Lip Sync, Deep Color (12bpc), xvYCC and HBR (High Bit Rate Audio) with HDMI Port (Compliant HDMI monitor is required) • Supports HDCP with HDMI Port • Supports Full HD 1080p Blu-ray (BD) playback with HDMI Port Audio • 5.1 CH HD Audio (Realtek ALC662 Audio Codec) • Supports Surge Protection (ASRock Full Spike Protection) LAN • PCIE x1 Gigabit LAN 10/100/1000 Mb/s • Realtek RTL8111GR • Supports Wake-On-WAN...
H81 Pro BTC R2.0 • Supports Auto Lip Sync, Deep Color (12bpc), xvYCC and HBR (High Bit Rate Audio) with HDMI Port (Compliant HDMI monitor is required) • Supports HDCP with HDMI Port • Supports Full HD 1080p Blu-ray (BD) playback with HDMI Port Audio • 5.1 CH HD Audio (Realtek ALC662 Audio Codec) • Supports Surge Protection (ASRock Full Spike Protection) LAN • PCIE x1 Gigabit LAN 10/100/1000 Mb/s • Realtek RTL8111GR • Supports Wake-On-WAN...
User Manual
Page 9
... x 4-pin, 1 x 3-pin) • 2 x Chassis Fan Connectors (1 x 4-pin, 1 x 3-pin) • 1 x Power Fan Connector (3-pin) • 1 x 24 pin ATX Power Connector • 1 x 8 pin 12V Power Connector • 2 x PCIe Power Connectors • 1 x Front Panel Audio Connector • 1 x SPDIF Out Connector • 2 x USB 2.0 Headers (Support 4 USB 2.0 ports) (Supports ESD Protection (ASRock Full Spike Protection)) BIOS Feature • AMI UEFI Legal BIOS with multilingual GUI support • ACPI 1.1 Compliant wake up events • SMBIOS 2.3.1 support • CPU, DRAM, PCH 1.05V Voltage multi...
... x 4-pin, 1 x 3-pin) • 2 x Chassis Fan Connectors (1 x 4-pin, 1 x 3-pin) • 1 x Power Fan Connector (3-pin) • 1 x 24 pin ATX Power Connector • 1 x 8 pin 12V Power Connector • 2 x PCIe Power Connectors • 1 x Front Panel Audio Connector • 1 x SPDIF Out Connector • 2 x USB 2.0 Headers (Support 4 USB 2.0 ports) (Supports ESD Protection (ASRock Full Spike Protection)) BIOS Feature • AMI UEFI Legal BIOS with multilingual GUI support • ACPI 1.1 Compliant wake up events • SMBIOS 2.3.1 support • CPU, DRAM, PCH 1.05V Voltage multi...
User Manual
Page 10
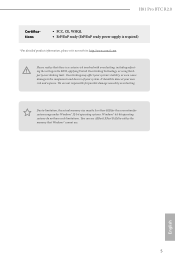
.... It should be less than 4GB for the reservation for possible damage caused by overclocking. H81 Pro BTC R2.0 Certifications • FCC, CE, WHQL • ErP/EuP ready (ErP/EuP ready power supply is required) * For detailed product information, please visit our website: http://www.asrock.com Please realize that Windows® cannot use. Overclocking may be done at your system.
.... It should be less than 4GB for the reservation for possible damage caused by overclocking. H81 Pro BTC R2.0 Certifications • FCC, CE, WHQL • ErP/EuP ready (ErP/EuP ready power supply is required) * For detailed product information, please visit our website: http://www.asrock.com Please realize that Windows® cannot use. Overclocking may be done at your system.
User Manual
Page 12
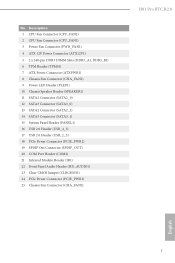
...ATXPWR1) 8 Chassis Fan Connector (CHA_FAN1) 9 Power LED Header (PLED1) 10 Chassis Speaker Header (SPEAKER1) 11 SATA2 Connector (SATA2_0) 12 SATA3 Connector (SATA3_0) 13 SATA2 Connector (SATA2_1) 14 SATA3 Connector (SATA3_1) 15 System Panel Header (PANEL1) 16 USB 2.0 Header (USB_4_5) 17 USB 2.0 Header (USB_2_3) 18 PCIe Power Connector (PCIE_PWR2) 19 SPDIF Out Connector (SPDIF_OUT) 20 COM Port Header (COM2) 21 Infrared Module Header (IR1) 22 Front Panel Audio Header (HD_AUDIO1) 23 Clear CMOS Jumper (CLRCMOS1) 24 PCIe Power Connector (PCIE_PWR1) 25 Chassis Fan Connector (CHA_FAN2) H81 Pro BTC R2...
...ATXPWR1) 8 Chassis Fan Connector (CHA_FAN1) 9 Power LED Header (PLED1) 10 Chassis Speaker Header (SPEAKER1) 11 SATA2 Connector (SATA2_0) 12 SATA3 Connector (SATA3_0) 13 SATA2 Connector (SATA2_1) 14 SATA3 Connector (SATA3_1) 15 System Panel Header (PANEL1) 16 USB 2.0 Header (USB_4_5) 17 USB 2.0 Header (USB_2_3) 18 PCIe Power Connector (PCIE_PWR2) 19 SPDIF Out Connector (SPDIF_OUT) 20 COM Port Header (COM2) 21 Infrared Module Header (IR1) 22 Front Panel Audio Header (HD_AUDIO1) 23 Clear CMOS Jumper (CLRCMOS1) 24 PCIe Power Connector (PCIE_PWR1) 25 Chassis Fan Connector (CHA_FAN2) H81 Pro BTC R2...
User Manual
Page 14
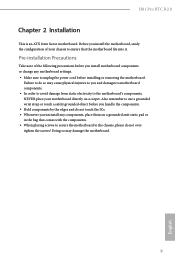
H81 Pro BTC R2.0 Chapter 2 Installation This is an ATX form factor motherboard. Also remember to use a grounded wrist strap or touch a safety grounded object before you handle the components. • Hold components by the edges and do not touch the ICs. • Whenever you uninstall any motherboard settings. • Make sure to unplug the power cord before you install motherboard components or change any...
H81 Pro BTC R2.0 Chapter 2 Installation This is an ATX form factor motherboard. Also remember to use a grounded wrist strap or touch a safety grounded object before you handle the components. • Hold components by the edges and do not touch the ICs. • Whenever you uninstall any motherboard settings. • Make sure to unplug the power cord before you install motherboard components or change any...

User Manual
Page 22
... the computer and unplug the power cord from the power supply. To clear and reset the system parameters to clear the data in CMOS. If you update the BIOS. The illustration shows a 3-pin jumper whose pin1 and pin2 are setup. However, please do the clear-CMOS action. English 17 Please be noted that the password, date, time, and user default profile will be cleared only if the CMOS battery is "Short".
... the computer and unplug the power cord from the power supply. To clear and reset the system parameters to clear the data in CMOS. If you update the BIOS. The illustration shows a 3-pin jumper whose pin1 and pin2 are setup. However, please do the clear-CMOS action. English 17 Please be noted that the password, date, time, and user default profile will be cleared only if the CMOS battery is "Short".
User Manual
Page 24
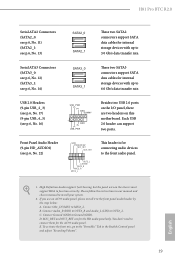
... the front audio panel. 1. B. D. MIC_RET and OUT_RET are two headers on the chassis must support HDA to function correctly. Connect Ground (GND) to install your system. 2. H81 Pro BTC R2.0 Serial ATA2 Connectors (SATA2_0: see p.6, No. 11) (SATA2_1: see p.6, No. 13) SATA2_0 SATA2_1 These two SATA2 connectors support SATA data cables for internal storage devices with up to 3.0 Gb/s data transfer rate. Please follow the instructions in the Realtek Control panel and adjust...
... the front audio panel. 1. B. D. MIC_RET and OUT_RET are two headers on the chassis must support HDA to function correctly. Connect Ground (GND) to install your system. 2. H81 Pro BTC R2.0 Serial ATA2 Connectors (SATA2_0: see p.6, No. 11) (SATA2_1: see p.6, No. 13) SATA2_0 SATA2_1 These two SATA2 connectors support SATA data cables for internal storage devices with up to 3.0 Gb/s data transfer rate. Please follow the instructions in the Realtek Control panel and adjust...
User Manual
Page 26
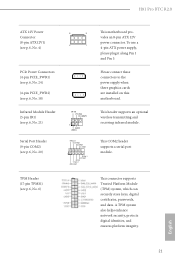
... 8-pin ATX 12V power connector. This connector supports Trusted Platform Module (TPM) system, which can securely store keys, digital certificates, passwords, and data. This COM2 header supports a serial port module. To use a 4-pin ATX power supply, please plug it along Pin 1 and Pin 5. A TPM system also helps enhance network security, protects digital identities, and ensures platform integrity. 1 English 21 Please connect these connectors to the power supply when three graphics cards are installed on this motherboard. This header supports an optional wireless...
... 8-pin ATX 12V power connector. This connector supports Trusted Platform Module (TPM) system, which can securely store keys, digital certificates, passwords, and data. This COM2 header supports a serial port module. To use a 4-pin ATX power supply, please plug it along Pin 1 and Pin 5. A TPM system also helps enhance network security, protects digital identities, and ensures platform integrity. 1 English 21 Please connect these connectors to the power supply when three graphics cards are installed on this motherboard. This header supports an optional wireless...
User Manual
Page 27
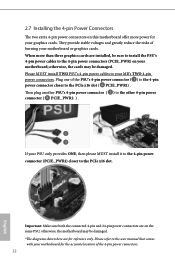
.... Then plug another PSU's 4-pin power connector ( 2 ) to the PCIe x16 slot ( A PCIE_PWR1) . otherwise, the motherboard may be damaged. *The diagrams shown here are on the same PSU; Please MUST install TWO PSU's 4-pin power cables to your PSU only provides ONE, then please MUST install it to the 4-pin power connector (PCIE_PWR1) closer to the user manual that comes with your motherboard or graphics cards. A 1 2 B If your MB's TWO 4-pin power connectors. They...
.... Then plug another PSU's 4-pin power connector ( 2 ) to the PCIe x16 slot ( A PCIE_PWR1) . otherwise, the motherboard may be damaged. *The diagrams shown here are on the same PSU; Please MUST install TWO PSU's 4-pin power cables to your PSU only provides ONE, then please MUST install it to the 4-pin power connector (PCIE_PWR1) closer to the user manual that comes with your motherboard or graphics cards. A 1 2 B If your MB's TWO 4-pin power connectors. They...
User Manual
Page 28
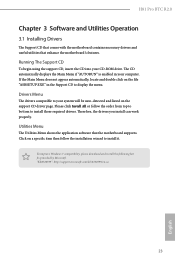
.... Drivers Menu The drivers compatible to install those required drivers. To improve Windows 7 compatibility, please download and install the following hot fix provided by Microsoft. Therefore, the drivers you install can work properly. The CD automatically displays the Main Menu if "AUTORUN" is enabled in the Support CD to install it. Please click Install All or follow the installation wizard to display the menu. H81 Pro BTC R2.0 Chapter 3 Software and Utilities Operation 3.1 Installing Drivers The Support CD that comes with the motherboard...
.... Drivers Menu The drivers compatible to install those required drivers. To improve Windows 7 compatibility, please download and install the following hot fix provided by Microsoft. Therefore, the drivers you install can work properly. The CD automatically displays the Main Menu if "AUTORUN" is enabled in the Support CD to install it. Please click Install All or follow the installation wizard to display the menu. H81 Pro BTC R2.0 Chapter 3 Software and Utilities Operation 3.1 Installing Drivers The Support CD that comes with the motherboard...
User Manual
Page 29
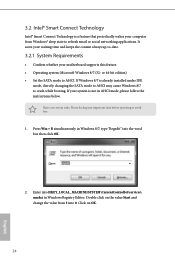
... Editor. Click on the value Start and change the value from Windows® sleep state to avoid loss. 1. or 64-bit edition) • Set the SATA mode to crash while booting. There are certain risks. 3.2 Intel® Smart Connect Technology Intel® Smart Connect Technology is a feature that periodically wakes your computer from 3 into 0. If your motherboard supports this feature. • Operating system: Microsoft Windows 8/7 (32- Please backup any...
... Editor. Click on the value Start and change the value from Windows® sleep state to avoid loss. 1. or 64-bit edition) • Set the SATA mode to crash while booting. There are certain risks. 3.2 Intel® Smart Connect Technology Intel® Smart Connect Technology is a feature that periodically wakes your computer from 3 into 0. If your motherboard supports this feature. • Operating system: Microsoft Windows 8/7 (32- Please backup any...
User Manual
Page 30
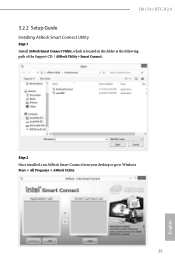
Step 2 Once installed, run ASRock Smart Connect from your desktop or go to Windows Start -> All Programs -> ASRock Utility. 25 English H81 Pro BTC R2.0 3.2.2 Setup Guide Installing ASRock Smart Connect Utility Step 1 Install ASRock Smart Connect Utility, which is located in the folder at the following path of the Support CD: \ ASRock Utility > Smart Connect.
Step 2 Once installed, run ASRock Smart Connect from your desktop or go to Windows Start -> All Programs -> ASRock Utility. 25 English H81 Pro BTC R2.0 3.2.2 Setup Guide Installing ASRock Smart Connect Utility Step 1 Install ASRock Smart Connect Utility, which is located in the folder at the following path of the Support CD: \ ASRock Utility > Smart Connect.
User Manual
Page 32
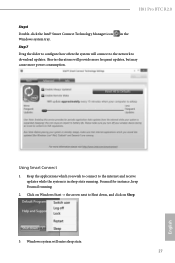
H81 Pro BTC R2.0 Step 6 Double-click the Intel® Smart Connect Technology Manager icon Windows system tray. Using Smart Connect 1. Keep the applications which you wish to connect to Shut down, and click on Windows Start -> the arrow next to the internet and receive updates while the system is in the Step 7 Drag the slider to configure how often the system will connect to the network to download updates. Click...
H81 Pro BTC R2.0 Step 6 Double-click the Intel® Smart Connect Technology Manager icon Windows system tray. Using Smart Connect 1. Keep the applications which you wish to connect to Shut down, and click on Windows Start -> the arrow next to the internet and receive updates while the system is in the Step 7 Drag the slider to configure how often the system will connect to the network to download updates. Click...
User Manual
Page 34
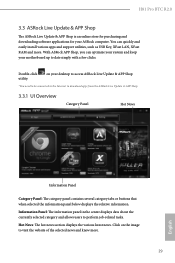
... install various apps and support utilities, such as USB Key, XFast LAN, XFast RAM and more . 29 English Click on your ASRock computer. You can optimize your system and keep your motherboard up to visit the website of the selected news and know more . Information Panel: The information panel in the center displays data about the currently selected category and allows users to download...
... install various apps and support utilities, such as USB Key, XFast LAN, XFast RAM and more . 29 English Click on your ASRock computer. You can optimize your system and keep your motherboard up to visit the website of the selected news and know more . Information Panel: The information panel in the center displays data about the currently selected category and allows users to download...

User Manual
Page 40
H81 Pro BTC R2.0 Chapter 4 UEFI SETUP UTILITY 4.1 Introduction ASRock Interactive UEFI is constantly being updated, the following selections: Main For setting system time/date information OC Tweaker For overclocking configurations Advanced For advanced system configurations Tool Useful tools H/W Monitor Displays current hardware status Boot For configuring boot settings and boot priority Security For security settings Exit Exit the current screen or the UEFI Setup Utility 35 English You may run the UEFI SETUP UTILITY by pressing or right after POST, restart the...
H81 Pro BTC R2.0 Chapter 4 UEFI SETUP UTILITY 4.1 Introduction ASRock Interactive UEFI is constantly being updated, the following selections: Main For setting system time/date information OC Tweaker For overclocking configurations Advanced For advanced system configurations Tool Useful tools H/W Monitor Displays current hardware status Boot For configuring boot settings and boot priority Security For security settings Exit Exit the current screen or the UEFI Setup Utility 35 English You may run the UEFI SETUP UTILITY by pressing or right after POST, restart the...
User Manual
Page 44
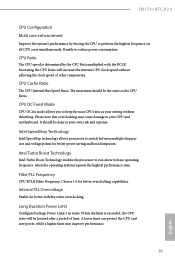
... processor to reduce power consumption. Disable to run above its base operating frequency when the operating system requests the highest performance state. CPU OC Fixed Mode CPU OC fix mode allows you to perform the highest frequency on all CPU cores simultaneously. Filter PLL Frequency CPU BCLK Filter Frequency. When the limit is determined by forcing the CPU to keep the max CPU ratio as the CPU Ratio. H81 Pro BTC R2.0 CPU Configuration...
... processor to reduce power consumption. Disable to run above its base operating frequency when the operating system requests the highest performance state. CPU OC Fixed Mode CPU OC fix mode allows you to perform the highest frequency on all CPU cores simultaneously. Filter PLL Frequency CPU BCLK Filter Frequency. When the limit is determined by forcing the CPU to keep the max CPU ratio as the CPU Ratio. H81 Pro BTC R2.0 CPU Configuration...
User Manual
Page 55
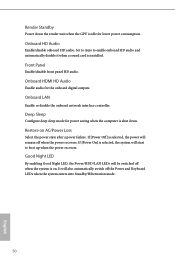
... a power failure. Set to Auto to boot up when the power recovers. Onboard LAN Enable or disable the onboard network interface controller. Good Night LED By enabling Good Night LED, the Power/HDD/LAN LEDs will also automatically switch off the Power and Keyboard LEDs when the system enters into Standby/Hibernation mode. 50 English It will be switched off when the power recovers. Onboard HDMI HD Audio Enable audio for lower power consumption. Deep Sleep Configure deep sleep mode for power saving when the computer is installed. Front Panel Enable/disable front panel...
... a power failure. Set to Auto to boot up when the power recovers. Onboard LAN Enable or disable the onboard network interface controller. Good Night LED By enabling Good Night LED, the Power/HDD/LAN LEDs will also automatically switch off the Power and Keyboard LEDs when the system enters into Standby/Hibernation mode. 50 English It will be switched off when the power recovers. Onboard HDMI HD Audio Enable audio for lower power consumption. Deep Sleep Configure deep sleep mode for power saving when the computer is installed. Front Panel Enable/disable front panel...
User Manual
Page 64
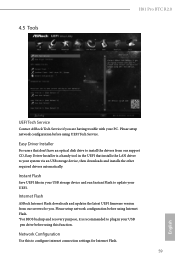
... H81 Pro BTC R2.0 UEFI Tech Service Contact ASRock Tech Service if you . Instant Flash Save UEFI files in your USB storage device and run Instant Flash to plug in the UEFI that installs the LAN driver to configure internet connection settings for you are having trouble with your UEFI. Network Configuration Use this function. Please setup network configuration before using this to your USB pen drive before using Internet Flash. *For BIOS backup and recovery purpose, it is a handy tool in your system via an USB storage device, then downloads and installs...
... H81 Pro BTC R2.0 UEFI Tech Service Contact ASRock Tech Service if you . Instant Flash Save UEFI files in your USB storage device and run Instant Flash to plug in the UEFI that installs the LAN driver to configure internet connection settings for you are having trouble with your UEFI. Network Configuration Use this function. Please setup network configuration before using this to your USB pen drive before using Internet Flash. *For BIOS backup and recovery purpose, it is a handy tool in your system via an USB storage device, then downloads and installs...


