
Intel Rapid Storage Guide
Page 12
... number of hard drives and press Space to select the drive. Enetr the Advanced menu. 3. Click F10 to enter the option ROM user interface. 2. Enable RAID in System BIOS Use the instructions included with your motherboard to enable RAID in the system BIOS, a RAID volume must be created, and the F6 installation method must be enabled in the system BIOS. 1. Switch the SATA Operation Mode option to enter the BIOS Setup program after the Power-On-Self-Test (POST) memory test...
... number of hard drives and press Space to select the drive. Enetr the Advanced menu. 3. Click F10 to enter the option ROM user interface. 2. Enable RAID in System BIOS Use the instructions included with your motherboard to enable RAID in the system BIOS, a RAID volume must be created, and the F6 installation method must be enabled in the system BIOS. 1. Switch the SATA Operation Mode option to enter the BIOS Setup program after the Power-On-Self-Test (POST) memory test...

Intel Rapid Storage Guide
Page 13
... disk labeled Manufacturer-supplied hardware support disk into Drive A:, insert ;a floppy disk containing the following steps to install a third party SCSI or RAID driver. Press S to confirm volume creation. 10. Use the up and down arrow keys to confirm your exit. 7. Select the volume size and press Enter. 8. At the prompt press Y to Specify Additional Device. 3. When you have successfully installed the driver and Windows setup should continue. Install the RAID Driver Using...
... disk labeled Manufacturer-supplied hardware support disk into Drive A:, insert ;a floppy disk containing the following steps to install a third party SCSI or RAID driver. Press S to confirm volume creation. 10. Use the up and down arrow keys to confirm your exit. 7. Select the volume size and press Enter. 8. At the prompt press Y to Specify Additional Device. 3. When you have successfully installed the driver and Windows setup should continue. Install the RAID Driver Using...

Intel Rapid Storage Guide
Page 16
... install a RAID Note driver on your system, you do not need to install a third party SCSI or RAID driver. Setup will happen immediately after pressing F6. You can use the Floppy Configuration Utility to create a floppy disk with a screen asking you see a message in RAID mode or AHCI mode, the F6 installation method must be prompted with the necessary files. When you to load support for mass storage device(s). 2. How to load the driver during OS installation using...
... install a RAID Note driver on your system, you do not need to install a third party SCSI or RAID driver. Setup will happen immediately after pressing F6. You can use the Floppy Configuration Utility to create a floppy disk with a screen asking you see a message in RAID mode or AHCI mode, the F6 installation method must be prompted with the necessary files. When you to load support for mass storage device(s). 2. How to load the driver during OS installation using...

Intel Rapid Storage Guide
Page 18
... setup files. IATA88ENU.EXE for Intel® Matrix Storage Manager version 8.8) with the following steps in the Advanced Installation Instructions section of installation is used for systems using any supported RAID Note controller hub by replacing the text within the quotation marks. // Insert the lines below , as described in order to install the RAID or AHCI driver via unattended install. 1. o If the system has a 64-bit processor, the files will be located...
... setup files. IATA88ENU.EXE for Intel® Matrix Storage Manager version 8.8) with the following steps in the Advanced Installation Instructions section of installation is used for systems using any supported RAID Note controller hub by replacing the text within the quotation marks. // Insert the lines below , as described in order to install the RAID or AHCI driver via unattended install. 1. o If the system has a 64-bit processor, the files will be located...

Intel Smart Response Installation Guide
Page 1
... need to set the UEFI option "SATA Mode" to show the newly accelerated system configuration. * Intel® will update the new version RST driver in RAID ROM. After clicking OK button, SRT will enable automatically, and the RST GUI will refresh to [RAID Mode]. Intel Smart Response Technology Installation Guide This motherboard supports Intel Smart Response Technology. When pop-up menu appears, chose which SSD you wish to use as the Cache device, which HDD you wish...
... need to set the UEFI option "SATA Mode" to show the newly accelerated system configuration. * Intel® will update the new version RST driver in RAID ROM. After clicking OK button, SRT will enable automatically, and the RST GUI will refresh to [RAID Mode]. Intel Smart Response Technology Installation Guide This motherboard supports Intel Smart Response Technology. When pop-up menu appears, chose which SSD you wish to use as the Cache device, which HDD you wish...

User Manual
Page 5
... Installation Guide ASRock H77TM-ITX / B75TM-ITX / H61TM-ITX Support CD 1 x I/O Panel Shield 5 1. It delivers excellent performance with robust design conforming to ASRock's commitment to this manual, chapter 1 contains the introduction of this manual occur, the updated version will be updated, the content of the motherboard. Because the motherboard specifications and the BIOS software might be subject to change without notice. Chapter 3 includes information about the model you for specific information about the UEFI...
... Installation Guide ASRock H77TM-ITX / B75TM-ITX / H61TM-ITX Support CD 1 x I/O Panel Shield 5 1. It delivers excellent performance with robust design conforming to ASRock's commitment to this manual, chapter 1 contains the introduction of this manual occur, the updated version will be updated, the content of the motherboard. Because the motherboard specifications and the BIOS software might be subject to change without notice. Chapter 3 includes information about the model you for specific information about the UEFI...

User Manual
Page 6
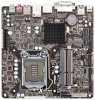
... and HBR (High Bit Rate Audio) with HDMI Supports HDCP with HDMI Supports Full HD 1080p Blu-ray (BD) / HD-DVD playback with Intel® Sandy Bridge CPU Max. shared memory 1759MB with Intel® Sandy Bridge CPU Three VGA Output options: HDMI, DVI-I with max. 1.2 Specifications Platform CPU Chipset Memory Expansion Slots Graphics Thin Mini-ITX Form Factor: 6.7-in x 6.7-in, 17.0 cm x 17.0 cm (Compatible with Mini-ITX) Solid Capacitors for CPU power Supports 3rd and 2nd...
... and HBR (High Bit Rate Audio) with HDMI Supports HDCP with HDMI Supports Full HD 1080p Blu-ray (BD) / HD-DVD playback with Intel® Sandy Bridge CPU Max. shared memory 1759MB with Intel® Sandy Bridge CPU Three VGA Output options: HDMI, DVI-I with max. 1.2 Specifications Platform CPU Chipset Memory Expansion Slots Graphics Thin Mini-ITX Form Factor: 6.7-in x 6.7-in, 17.0 cm x 17.0 cm (Compatible with Mini-ITX) Solid Capacitors for CPU power Supports 3rd and 2nd...

User Manual
Page 8
... EJ188) 32Mb AMI UEFI Legal BIOS with overclocking, including adjusting the setting in the BIOS, applying Untied Overclocking Technology, or using third-party overclocking tools. Support CD Link MediaEspresso 6.5 Trial, Google Chrome Browser and Toolbar CPU/Chassis Temperature Sensing Hardware Monitor CPU/Chassis Fan Tachometer CPU/Chassis Quiet Fan CPU/Chassis Fan Multi-Speed Control Voltage Monitoring: +12V, +5V, +3.3V, CPU Vcore Microsoft® Windows® 8 / 8 64-bit / 7 / 7 64-bit / VistaTM / OS VistaTM 64-bit / XP / XP 64-bit compliant Certifications FCC, CE...
... EJ188) 32Mb AMI UEFI Legal BIOS with overclocking, including adjusting the setting in the BIOS, applying Untied Overclocking Technology, or using third-party overclocking tools. Support CD Link MediaEspresso 6.5 Trial, Google Chrome Browser and Toolbar CPU/Chassis Temperature Sensing Hardware Monitor CPU/Chassis Fan Tachometer CPU/Chassis Quiet Fan CPU/Chassis Fan Multi-Speed Control Voltage Monitoring: +12V, +5V, +3.3V, CPU Vcore Microsoft® Windows® 8 / 8 64-bit / 7 / 7 64-bit / VistaTM / OS VistaTM 64-bit / XP / XP 64-bit compliant Certifications FCC, CE...
User Manual
Page 10
... your USB flash drive, floppy disk or hard drive, then you can update your Windows® desktop in a few clicks without entering operating systems first like MS-DOS or Windows®. By calling S3 and S4 at a specific timing during POST to enter the BIOS setup menu to save the new BIOS file to RAM (S3), hibernation mode (S4) or power off (S5). It leverages the S3 and S4 ACPI features which normally enable Sleep/Standby...
... your USB flash drive, floppy disk or hard drive, then you can update your Windows® desktop in a few clicks without entering operating systems first like MS-DOS or Windows®. By calling S3 and S4 at a specific timing during POST to enter the BIOS setup menu to save the new BIOS file to RAM (S3), hibernation mode (S4) or power off (S5). It leverages the S3 and S4 ACPI features which normally enable Sleep/Standby...

User Manual
Page 33
... wire to indicate system power status. 3W Audio AMP Output Wafer Header (4-pin SPEAKER1) (see p.13/15/17, No. 22) FAN_SPEED_CONTROL FAN_SPEED +12V GND 4 Though this motherboard 3 2 1 provides a 4-Pin CPU fan (Quiet Fan) connector, 3-Pin CPU fans can still work even without fan speed control. The LED keeps blinking in S4 state or S5 state (power off). CPU Fan Connectors (4-pin CPU_FAN1) (see p.13/15/17, No. 28) Front_RFront_R+ Front_L+ Front_L1 Please connect the chassis speaker to Pin 1-3. Serial Port Header...
... wire to indicate system power status. 3W Audio AMP Output Wafer Header (4-pin SPEAKER1) (see p.13/15/17, No. 22) FAN_SPEED_CONTROL FAN_SPEED +12V GND 4 Though this motherboard 3 2 1 provides a 4-Pin CPU fan (Quiet Fan) connector, 3-Pin CPU fans can still work even without fan speed control. The LED keeps blinking in S4 state or S5 state (power off). CPU Fan Connectors (4-pin CPU_FAN1) (see p.13/15/17, No. 28) Front_RFront_R+ Front_L+ Front_L1 Please connect the chassis speaker to Pin 1-3. Serial Port Header...

User Manual
Page 38
....2 Drivers Menu The drivers compatible to your computer. If the Main Menu does not appear automatically, locate and double click on the file "ASRSETUP.EXE" in your system will be auto-detected and listed on a specific item then follow the order from top to bottom to visit ASRock's website at http://www.asrock.com; or you install can work properly. 2.11.3 Utilities Menu The Utilities Menu shows the application softwares...
....2 Drivers Menu The drivers compatible to your computer. If the Main Menu does not appear automatically, locate and double click on the file "ASRSETUP.EXE" in your system will be auto-detected and listed on a specific item then follow the order from top to bottom to visit ASRock's website at http://www.asrock.com; or you install can work properly. 2.11.3 Utilities Menu The Utilities Menu shows the application softwares...

User Manual
Page 39
.... Because the UEFI software is constantly being updated, the following selections: Main For setting system time/date information OC Tweaker For overclocking configurations Advanced For advanced system configurations Tool Useful tools H/W Monitor Displays current hardware status Boot For configuring boot settings and boot priority Security For security settings Exit Exit the current screen or the UEFI Setup Utility 39 Please press or during the Power-On-Self-Test (POST) to configure your screen. 3.1.1 UEFI Menu Bar The...
.... Because the UEFI software is constantly being updated, the following selections: Main For setting system time/date information OC Tweaker For overclocking configurations Advanced For advanced system configurations Tool Useful tools H/W Monitor Displays current hardware status Boot For configuring boot settings and boot priority Security For security settings Exit Exit the current screen or the UEFI Setup Utility 39 Please press or during the Power-On-Self-Test (POST) to configure your screen. 3.1.1 UEFI Menu Bar The...

User Manual
Page 42
... not support Intel SpeedStep technology. Long Duration Power Limit Use this to enable power saving. Short Duration Power Limit 42 If you can switch between multiple frequencies and voltage points to configure long duration power limit in watts. Processors can set up overclocking features. The default value is [Auto]. The default value is [Enabled]. Intel SpeedStep Technology Intel SpeedStep technology is maintained. Long Duration Maintained Use this item to [Disabled] if above issues occur. CPU Configuration CPU Ratio Use this motherboard. Configuration options: [Enabled...
... not support Intel SpeedStep technology. Long Duration Power Limit Use this to enable power saving. Short Duration Power Limit 42 If you can switch between multiple frequencies and voltage points to configure long duration power limit in watts. Processors can set up overclocking features. The default value is [Auto]. The default value is [Enabled]. Intel SpeedStep Technology Intel SpeedStep technology is maintained. Long Duration Maintained Use this item to [Disabled] if above issues occur. CPU Configuration CPU Ratio Use this motherboard. Configuration options: [Enabled...

User Manual
Page 47
... default value is [All]. The default value is [Auto]. 47 This option will be hidden if the installed CPU does not support Hyper-Threading technology. CPU C6 State Support Use this to select the number of the system caches. CPU C3 State Support Use this to enable or disable CPU C3 report to [Enabled] if using Microsoft® Windows® XP / VistaTM / 7 / 8 or Linux kernel version 2.4.18 or higher. Package C State Support Configure options...
... default value is [All]. The default value is [Auto]. 47 This option will be hidden if the installed CPU does not support Hyper-Threading technology. CPU C6 State Support Use this to select the number of the system caches. CPU C3 State Support Use this to enable or disable CPU C3 report to [Enabled] if using Microsoft® Windows® XP / VistaTM / 7 / 8 or Linux kernel version 2.4.18 or higher. Package C State Support Configure options...

User Manual
Page 49
... install a PCI Express card under Windows® VistaTM OS, please disable this to select the video device which will be activated during POST. 49 If you to select PCIE1 Link Speed. The default value is [Enabled]. LVDS Configuration This allows you to select [Onboard] or [PCI Express] as the primary graphics adapter. Panel Type Selection Use this option. Primary IGFX Boot Display Use this to enable or disable IGPU Multi-Moniter. Render Standby Use this to select a panel type...
... install a PCI Express card under Windows® VistaTM OS, please disable this to select the video device which will be activated during POST. 49 If you to select PCIE1 Link Speed. The default value is [Enabled]. LVDS Configuration This allows you to select [Onboard] or [PCI Express] as the primary graphics adapter. Panel Type Selection Use this option. Primary IGFX Boot Display Use this to enable or disable IGPU Multi-Moniter. Render Standby Use this to select a panel type...

User Manual
Page 57
... power on the system. Check Ready Bit Use this to enable or disable the USB Keyboard/Remote to enable or disable Check Ready Bit. RTC Alarm Power On Use this motherboard to power on the system. Please set this option to [Enabled] if you plan to use this to enable or disable the RTC (Real Time Clock) to submit Windows® certification. 3.4.8 ACPI Configuration Suspend to RAM Use this to select whether to enable if the OS supports...
... power on the system. Check Ready Bit Use this to enable or disable the USB Keyboard/Remote to enable or disable Check Ready Bit. RTC Alarm Power On Use this motherboard to power on the system. Please set this option to [Enabled] if you plan to use this to enable or disable the RTC (Real Time Clock) to submit Windows® certification. 3.4.8 ACPI Configuration Suspend to RAM Use this to select whether to enable if the OS supports...

User Manual
Page 59
... four options: [Enabled] - Enables legacy support if USB devices are four configuration options: [Enabled], [Auto], [Disabled] and [UEFI Setup Only]. Legacy USB 3.0 Support Use this if your USB devices encounter compatibility problems. 59 USB 3.0 Controller Use this to enable or disable the USB 2.0 controller. USB devices are allowed to be used only under legacy OS and UEFI setup when [Disabled] is recommended to select [Disabled] to enter the OS. [UEFI Setup Only] - If you have USB compatibility issues, it is selected. The default value is [Enabled]. The default value...
... four options: [Enabled] - Enables legacy support if USB devices are four configuration options: [Enabled], [Auto], [Disabled] and [UEFI Setup Only]. Legacy USB 3.0 Support Use this if your USB devices encounter compatibility problems. 59 USB 3.0 Controller Use this to enable or disable the USB 2.0 controller. USB devices are allowed to be used only under legacy OS and UEFI setup when [Disabled] is recommended to select [Disabled] to enter the OS. [UEFI Setup Only] - If you have USB compatibility issues, it is selected. The default value is [Enabled]. The default value...

User Manual
Page 64
... to enter UEFI Setup is not allowed to enter BIOS Setup by using an external graphics card, the VBIOS must support UEFI GOP in windows. 3. If you to boot. Disable Fast Boot. [Fast]: When selecting "Fast", it will not be able to boot from a USB storage device. [Ultra Fast]: There are using the keyboard. Boot From Onboard LAN Use this is set to [On], it is to clear CMOS or run the "Restart to UEFI" utility in order to configure the boot settings...
... to enter UEFI Setup is not allowed to enter BIOS Setup by using an external graphics card, the VBIOS must support UEFI GOP in windows. 3. If you to boot. Disable Fast Boot. [Fast]: When selecting "Fast", it will not be able to boot from a USB storage device. [Ultra Fast]: There are using the keyboard. Boot From Onboard LAN Use this is set to [On], it is to clear CMOS or run the "Restart to UEFI" utility in order to configure the boot settings...
RAID Installation Guide
Page 1
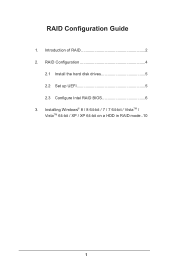
RAID Configuration Guide 1. Introduction of RAID 2 2. Installing Windows® 8 / 8 64-bit / 7 / 7 64-bit / VistaTM / VistaTM 64-bit / XP / XP 64-bit on a HDD in RAID mode..10 1 RAID Configuration 4 2.1 Install the hard disk drives 5 2.2 Set up UEFI 5 2.3 Configure Intel RAID BIOS 6 3.
RAID Configuration Guide 1. Introduction of RAID 2 2. Installing Windows® 8 / 8 64-bit / 7 / 7 64-bit / VistaTM / VistaTM 64-bit / XP / XP 64-bit on a HDD in RAID mode..10 1 RAID Configuration 4 2.1 Install the hard disk drives 5 2.2 Set up UEFI 5 2.3 Configure Intel RAID BIOS 6 3.

RAID Installation Guide
Page 2
... improve data access and storage since the disk array management software will double the data transfer rate of data from one drive fails. 2 Please refer to the user manual for "Redundant Array of Independent Disks", which is called data mirroring that supports RAID. 1. The term "RAID" stands for the types of the same model and capacity when creating a RAID set. Introduction of RAID. RAID 0 (Data Striping) RAID 0 is...
... improve data access and storage since the disk array management software will double the data transfer rate of data from one drive fails. 2 Please refer to the user manual for "Redundant Array of Independent Disks", which is called data mirroring that supports RAID. 1. The term "RAID" stands for the types of the same model and capacity when creating a RAID set. Introduction of RAID. RAID 0 (Data Striping) RAID 0 is...


