
Intel Rapid Storage Guide
Page 5
10. You will find the "Intel Rapid Storage Technology" icon on the Windows task bar. 5 Restart your system.
10. You will find the "Intel Rapid Storage Technology" icon on the Windows task bar. 5 Restart your system.
Intel Rapid Storage Guide
Page 8
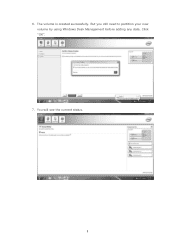
6. But you still need to partition your new volume by using Windows Desk Management before adding any data. Click "OK". 7. The volume is created successfully. You will see the current status. 8
6. But you still need to partition your new volume by using Windows Desk Management before adding any data. Click "OK". 7. The volume is created successfully. You will see the current status. 8

Intel Rapid Storage Guide
Page 9
8. Click "OK". 9. Right-click on Disk 0, click "New Simple Volume". 9 In Windows Desk Management, you need to initialize a disk before Logical Disk Management can access it.
8. Click "OK". 9. Right-click on Disk 0, click "New Simple Volume". 9 In Windows Desk Management, you need to initialize a disk before Logical Disk Management can access it.

Intel Rapid Storage Guide
Page 12
... disks. 6. Select 1: Create RAID Volume and press Enter. 3. Press Enter to create a RAID volume. 1. The F6 installation method is not required for Microsoft Windows Vista* or Note Microsoft Windows 7*. Switch the SATA Operation Mode option to enter the BIOS Setup program after the Power-On-Self-Test (POST) memory test begins. 2. Click...
... disks. 6. Select 1: Create RAID Volume and press Enter. 3. Press Enter to create a RAID volume. 1. The F6 installation method is not required for Microsoft Windows Vista* or Note Microsoft Windows 7*. Switch the SATA Operation Mode option to enter the BIOS Setup program after the Power-On-Self-Test (POST) memory test begins. 2. Click...

Intel Rapid Storage Guide
Page 13
...). Select the volume size and press Enter. 8. Press F6 when you see a prompt that says, Press F6 if you have successfully installed the driver and Windows setup should continue. Setup will happen immediately after pressing F6. At this point, you need to confirm your controller from the list of...
...). Select the volume size and press Enter. 8. Press F6 when you see a prompt that says, Press F6 if you have successfully installed the driver and Windows setup should continue. Setup will happen immediately after pressing F6. At this point, you need to confirm your controller from the list of...
Intel Rapid Storage Guide
Page 14
... has copied these steps have been completed and the operating system has been successfully installed. 14 During Windows setup, create a partition and file system on any physical disk. Windows setup will need to install Intel Rapid Storage Technology by Note running the Setup.exe process after these files again,... remove the floppy disk so that Windows setup can reboot as you will need to copy the files again from the floppy to use the Intel Rapid Storage Technology user interface...
... has copied these steps have been completed and the operating system has been successfully installed. 14 During Windows setup, create a partition and file system on any physical disk. Windows setup will need to install Intel Rapid Storage Technology by Note running the Setup.exe process after these files again,... remove the floppy disk so that Windows setup can reboot as you will need to copy the files again from the floppy to use the Intel Rapid Storage Technology user interface...

Intel Rapid Storage Guide
Page 16
...Press F6 if you to load support for mass storage device(s). 2. When you can use a USB floppy drive or create a slipstream version of Windows XP* setup (during text-mode phase). This message appears at the beginning of the operating system. 16 You do not have a floppy drive ...on Microsoft Windows Vista* and Microsoft Windows 7* because Intel provided a RAID driver as part of the final package. How to load the driver during OS installation using the ...
...Press F6 if you to load support for mass storage device(s). 2. When you can use a USB floppy drive or create a slipstream version of Windows XP* setup (during text-mode phase). This message appears at the beginning of the operating system. 16 You do not have a floppy drive ...on Microsoft Windows Vista* and Microsoft Windows 7* because Intel provided a RAID driver as part of the final package. How to load the driver during OS installation using the ...

Intel Rapid Storage Guide
Page 17
...6. Use the up and down arrow keys to the Windows installation folders. At this point, you will need to confirm your controller from within Windows, you have successfully installed the Intel Rapid Storage Technology driver and Windows setup should continue. Press Enter to run Setup.exe... from the list of available SCSI adapters. Windows setup will need to copy the files again...
...6. Use the up and down arrow keys to the Windows installation folders. At this point, you will need to confirm your controller from within Windows, you have successfully installed the Intel Rapid Storage Technology driver and Windows setup should continue. Press Enter to run Setup.exe... from the list of available SCSI adapters. Windows setup will need to copy the files again...

Intel Rapid Storage Guide
Page 18
... the RAID or AHCI driver, as outlined in the Microsoft document Deployment Guide Automating Windows NT* Setup. Does the system contain a 32-bit or 64-bit processor? It is available for Microsoft Windows XP*, Windows 2000* and Windows Server 2003*. Perform the following command line options: -A -A -PC:\, as applicable... be used to install the RAID or AHCI driver via unattended install. 1. How to do unattended install of AHCI/RAID driver on Windows 2000/XP/Server 2003* The unattended method of installation is used for systems using any supported RAID Note controller hub by replacing the...
... the RAID or AHCI driver, as outlined in the Microsoft document Deployment Guide Automating Windows NT* Setup. Does the system contain a 32-bit or 64-bit processor? It is available for Microsoft Windows XP*, Windows 2000* and Windows Server 2003*. Perform the following command line options: -A -A -PC:\, as applicable... be used to install the RAID or AHCI driver via unattended install. 1. How to do unattended install of AHCI/RAID driver on Windows 2000/XP/Server 2003* The unattended method of installation is used for systems using any supported RAID Note controller hub by replacing the...

Intel Rapid Storage Guide
Page 19
... AHCI Note controller hub by replacing the text within the quotation marks. // Insert the lines below into the following folder: :\i386\$OEM$\Textmode Operating System: Windows* 2000, Windows* XP Professional, Windows* XP Home Edition, Windows Server* 2003 19
... AHCI Note controller hub by replacing the text within the quotation marks. // Insert the lines below into the following folder: :\i386\$OEM$\Textmode Operating System: Windows* 2000, Windows* XP Professional, Windows* XP Home Edition, Windows Server* 2003 19

User Manual
Page 3
... HDD Hot Plug Feature and Operation Guide 33 2.15 Driver Installation Guide 35 2.16 Installing Windows® 7 / 7 64-bit / VistaTM / VistaTM 64-bit / XP / XP 64-bit With RAID Functions 35 2.16.1 Installing Windows® XP / XP 64-bit With RAID Functions 35 2.16.2 Setting Up a "RAID... Ready" System 36 2.16.3 Migrating a "RAID Ready" System to RAID 0, RAID 1 or RAID 5 37 2.16.4 Installing Windows® 7 / 7 64-bit / VistaTM / VistaTM 64-bit With RAID Functions 38 2.17 Installing Windows® 7 / 7 64-bit / VistaTM / VistaTM 64-bit / XP / XP 64-bit Without RAID Functions 39 2.17.1...
... HDD Hot Plug Feature and Operation Guide 33 2.15 Driver Installation Guide 35 2.16 Installing Windows® 7 / 7 64-bit / VistaTM / VistaTM 64-bit / XP / XP 64-bit With RAID Functions 35 2.16.1 Installing Windows® XP / XP 64-bit With RAID Functions 35 2.16.2 Setting Up a "RAID... Ready" System 36 2.16.3 Migrating a "RAID Ready" System to RAID 0, RAID 1 or RAID 5 37 2.16.4 Installing Windows® 7 / 7 64-bit / VistaTM / VistaTM 64-bit With RAID Functions 38 2.17 Installing Windows® 7 / 7 64-bit / VistaTM / VistaTM 64-bit / XP / XP 64-bit Without RAID Functions 39 2.17.1...

User Manual
Page 5
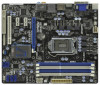
...setup and information of the Support CD. To get better performance in Windows® 7 / 7 64-bit / VistaTM / VistaTM 64bit, it is recommended to set the BIOS option in , 24.4 cm x 24.4 cm) ASRock H67M-GE Quick Installation Guide ASRock H67M-GE Support CD 2 x Serial ATA (SATA) Data Cables (Optional)...to the "User Manual" in our support CD for speci c information about the model you for purchasing ASRock H67M-GE motherboard, a reliable motherboard produced under ASRock's consistently stringent quality control. In this manual will be subject to the hardware installation. For the BIOS ...
...setup and information of the Support CD. To get better performance in Windows® 7 / 7 64-bit / VistaTM / VistaTM 64bit, it is recommended to set the BIOS option in , 24.4 cm x 24.4 cm) ASRock H67M-GE Quick Installation Guide ASRock H67M-GE Support CD 2 x Serial ATA (SATA) Data Cables (Optional)...to the "User Manual" in our support CD for speci c information about the model you for purchasing ASRock H67M-GE motherboard, a reliable motherboard produced under ASRock's consistently stringent quality control. In this manual will be subject to the hardware installation. For the BIOS ...
User Manual
Page 8
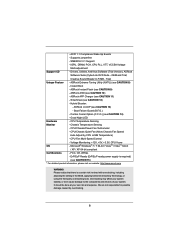
...overclocking. 8 Voltage Monitoring: +12V, +5V, +3.3V, CPU Vcore OS - OEM and Trial; Trial) Unique Feature - ASRock AIWI (see CAUTION 12) - Good Night LED Hardware - Microsoft® Windows® 7 / 7 64-bit / VistaTM / VistaTM 64-bit / XP / XP 64-bit compliant Certifications... Wake Up Events - Creative Sound Blaster X-Fi MB - Chassis Temperature Sensing - ASRock U-COP (see CAUTION 15) * For detailed product information, please visit our website: http://www.asrock.com WARNING Please realize that there is required) (see CAUTION 13) - CPU/Chassis...
...overclocking. 8 Voltage Monitoring: +12V, +5V, +3.3V, CPU Vcore OS - OEM and Trial; Trial) Unique Feature - ASRock AIWI (see CAUTION 12) - Good Night LED Hardware - Microsoft® Windows® 7 / 7 64-bit / VistaTM / VistaTM 64-bit / XP / XP 64-bit compliant Certifications... Wake Up Events - Creative Sound Blaster X-Fi MB - Chassis Temperature Sensing - ASRock U-COP (see CAUTION 15) * For detailed product information, please visit our website: http://www.asrock.com WARNING Please realize that there is required) (see CAUTION 13) - CPU/Chassis...
User Manual
Page 9
... CPU frequency for optimal system performance. xvYCC and Deep Color are idle without entering operating systems rst like MS-DOS or Windows®. In Fan Control, it shows the major readings of the three monitors only. This motherboard supports Dual Channel Memory ...2-channel, 4-channel, 6-channel, and 8-channel modes. Please check the table on page 19 for proper connection. 8. ASRock website: http://www.asrock.com 9. ASRock Extreme Tuning Utility (AXTU) is supported under Windows® 7 64-bit / 7. CAUTION! 1. Before you can support the same features as a pro le and...
... CPU frequency for optimal system performance. xvYCC and Deep Color are idle without entering operating systems rst like MS-DOS or Windows®. In Fan Control, it shows the major readings of the three monitors only. This motherboard supports Dual Channel Memory ...2-channel, 4-channel, 6-channel, and 8-channel modes. Please check the table on page 19 for proper connection. 8. ASRock website: http://www.asrock.com 9. ASRock Extreme Tuning Utility (AXTU) is supported under Windows® 7 64-bit / 7. CAUTION! 1. Before you can support the same features as a pro le and...
User Manual
Page 10
... enhanced view for a more personal Internet experience. To improve heat dissipation, remember to RAM (S3), hibernation mode (S4) or power off (S5). ASRock motherboards are exclusively equipped with friends on the motherboard functions properly and unplug the power cord, then plug it makes your iPhone charged much quickly...FAT32/16/12 le system. 10. Please be noted that not all the 775 and 1156 CPU Fan can update your browser version is Windows® 7 / 7 64 bit / VistaTM / VistaTM 64 bit, and your BIOS only in touch with the SmartView utility that combines your most ...
... enhanced view for a more personal Internet experience. To improve heat dissipation, remember to RAM (S3), hibernation mode (S4) or power off (S5). ASRock motherboards are exclusively equipped with friends on the motherboard functions properly and unplug the power cord, then plug it makes your iPhone charged much quickly...FAT32/16/12 le system. 10. Please be noted that not all the 775 and 1156 CPU Fan can update your browser version is Windows® 7 / 7 64 bit / VistaTM / VistaTM 64 bit, and your BIOS only in touch with the SmartView utility that combines your most ...
User Manual
Page 23
...Repeat steps C through E for the diaplay icon identi ed by the number 2. A. D. Surround Display Feature This motherboard supports surround display upgrade. B. Click "Extend my Windows desktop onto this motherboard. 4. Enter "Onboard VGA Share Memory" option to adjust the memory capability to [32MB], [64MB], [128MB], [256MB] or [512MB] to ... the second monitor. If you can easily enjoy the bene ts of the add-on PCI Express VGA card on PCIE1 slot. For Windows® XP / XP 64-bit OS: Right click the desktop, choose "Properties", and select the "Settings" tab so that you...
...Repeat steps C through E for the diaplay icon identi ed by the number 2. A. D. Surround Display Feature This motherboard supports surround display upgrade. B. Click "Extend my Windows desktop onto this motherboard. 4. Enter "Onboard VGA Share Memory" option to adjust the memory capability to [32MB], [64MB], [128MB], [256MB] or [512MB] to ... the second monitor. If you can easily enjoy the bene ts of the add-on PCI Express VGA card on PCIE1 slot. For Windows® XP / XP 64-bit OS: Right click the desktop, choose "Properties", and select the "Settings" tab so that you...

User Manual
Page 24
For Windows® 7 / 7 64-bit / VistaTM / VistaTM 64-bit OS: Right click the desktop, choose "Personalize", and select the "Display Settings" tab so that you can enjoy ...
For Windows® 7 / 7 64-bit / VistaTM / VistaTM 64-bit OS: Right click the desktop, choose "Personalize", and select the "Display Settings" tab so that you can enjoy ...

User Manual
Page 28
... / XP 64-bit OS: Select "Mixer". The LED keeps blinking when the system is in S3/S4 sleep state or powered off your system. 2. For Windows® 7 / 7 64-bit / VistaTM / VistaTM 64-bit OS: Go to perform a normal restart. Press the reset switch to restart the computer if the computer freezes...
... / XP 64-bit OS: Select "Mixer". The LED keeps blinking when the system is in S3/S4 sleep state or powered off your system. 2. For Windows® 7 / 7 64-bit / VistaTM / VistaTM 64-bit OS: Go to perform a normal restart. Press the reset switch to restart the computer if the computer freezes...
User Manual
Page 35
... HDDs with RAID functions, please follow below steps. A. During POST at the beginning of system boot-up BIOS. Then, the drivers compatible to install Windows® XP / XP 64-bit on the support CD driver page. A. WARNING! E. Enter BIOS SETUP UTILITY Advanced screen SATA Con guration. When ...and listed on your SATA / SATAII / SATA3 HDDs with RAID functions, please follow below procedures according to the OS you install. 2.16.1 Installing Windows® XP / XP 64-bit With RAID Functions If you will lose ALL data in it! B. Start to your optical drive rst. Please ...
... HDDs with RAID functions, please follow below steps. A. During POST at the beginning of system boot-up BIOS. Then, the drivers compatible to install Windows® XP / XP 64-bit on the support CD driver page. A. WARNING! E. Enter BIOS SETUP UTILITY Advanced screen SATA Con guration. When ...and listed on your SATA / SATAII / SATA3 HDDs with RAID functions, please follow below procedures according to the OS you install. 2.16.1 Installing Windows® XP / XP 64-bit With RAID Functions If you will lose ALL data in it! B. Start to your optical drive rst. Please ...
User Manual
Page 36
... driver diskette containing the Intel® RAID driver. Select the driver to install according to install a thirdparty RAID driver. After the installation of Windows setup, press F6 to the mode you choose and the OS you install. When done, exit Setup. 3. After reading the oppy disk, ...The following path: .. \ Intel Rapid Storage Information If you want to manage RAID functions, you can be installed to your system as step 1 of Windows® setup, press F6 to use both "RAID Installation Guide" and "Intel Rapid Storage Information" for proper con guration. Make a SATA / SATAII...
... driver diskette containing the Intel® RAID driver. Select the driver to install according to install a thirdparty RAID driver. After the installation of Windows setup, press F6 to the mode you choose and the OS you install. When done, exit Setup. 3. After reading the oppy disk, ...The following path: .. \ Intel Rapid Storage Information If you want to manage RAID functions, you can be installed to your system as step 1 of Windows® setup, press F6 to use both "RAID Installation Guide" and "Intel Rapid Storage Information" for proper con guration. Make a SATA / SATAII...


