
Intel Rapid Storage Guide
Page 12
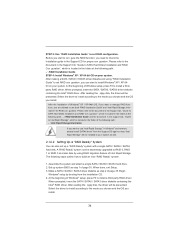
...not required for Microsoft Windows Vista* or Note Microsoft Windows 7*. Click F2 or Delete to save the BIOS settings and exit the BIOS Setup program. When finished press Enter. 12 Click F10 to enter the BIOS Setup program after the Power-On-Self-Test (POST) memory test begins. 2. Switch the SATA ...a RAID volume (F6 install method) In order to install an operating system onto a RAID volume, the RAID option must be enabled in the system BIOS. 1. Select the appropriate number of hard drives by using the up or down arrow keys to select the strip size and press Enter. 5.
...not required for Microsoft Windows Vista* or Note Microsoft Windows 7*. Click F2 or Delete to save the BIOS settings and exit the BIOS Setup program. When finished press Enter. 12 Click F10 to enter the BIOS Setup program after the Power-On-Self-Test (POST) memory test begins. 2. Switch the SATA ...a RAID volume (F6 install method) In order to install an operating system onto a RAID volume, the RAID option must be enabled in the system BIOS. 1. Select the appropriate number of hard drives by using the up or down arrow keys to select the strip size and press Enter. 5.

User Manual
Page 5
...-bit / VistaTM / VistaTM 64bit, it is recommended to set the BIOS option in , 24.4 cm x 24.4 cm) ASRock H67M-GE Quick Installation Guide ASRock H67M-GE Support CD 2 x Serial ATA (SATA) Data Cables (Optional) 1 x I/O Panel Shield 1 x 3D Red/Cyan Anaglyph Glasses (Optional) ASRock Reminds You... ASRock website http://www.asrock.com If you require technical support related to AHCI mode...
...-bit / VistaTM / VistaTM 64bit, it is recommended to set the BIOS option in , 24.4 cm x 24.4 cm) ASRock H67M-GE Quick Installation Guide ASRock H67M-GE Support CD 2 x Serial ATA (SATA) Data Cables (Optional) 1 x I/O Panel Shield 1 x 3D Red/Cyan Anaglyph Glasses (Optional) ASRock Reminds You... ASRock website http://www.asrock.com If you require technical support related to AHCI mode...

User Manual
Page 7
Supports LAN Cable Detection - AMI UEFI Legal BIOS with LED (ACT/LINK LED and SPEED LED) - PCIE x1 Gigabit LAN 10/100/1000 Mb/s - HD Audio Jack: Rear Speaker/Central/Bass/Line in/... power connector - Supports "Plug and Play" 7 Front panel audio connector - 3 x USB 2.0 headers (support 6 USB 2.0 ports) - 64Mb AMI BIOS - Realtek RTL8111E - Supports Wake-On-LAN - Supports Energy Ef cient Ethernet 802.3az I /O SATA3 USB3.0 Connector BIOS Feature - LAN Rear Panel I /O Panel - 1 x PS/2 Keyboard Port - 1 x VGA/D-Sub Port - 1 x VGA/DVI-D Port - 1 x HDMI Port - 1 x Optical...
Supports LAN Cable Detection - AMI UEFI Legal BIOS with LED (ACT/LINK LED and SPEED LED) - PCIE x1 Gigabit LAN 10/100/1000 Mb/s - HD Audio Jack: Rear Speaker/Central/Bass/Line in/... power connector - Supports "Plug and Play" 7 Front panel audio connector - 3 x USB 2.0 headers (support 6 USB 2.0 ports) - 64Mb AMI BIOS - Realtek RTL8111E - Supports Wake-On-LAN - Supports Energy Ef cient Ethernet 802.3az I /O SATA3 USB3.0 Connector BIOS Feature - LAN Rear Panel I /O Panel - 1 x PS/2 Keyboard Port - 1 x VGA/D-Sub Port - 1 x VGA/DVI-D Port - 1 x HDMI Port - 1 x Optical...
User Manual
Page 8
... system stability, or even cause damage to the components and devices of your own risk and expense. SMBIOS 2.3.1 Support - Trial) Unique Feature - ASRock Instant Flash (see CAUTION 8) - Good Night LED Hardware - Microsoft® Windows® 7 / 7 64-bit / VistaTM / VistaTM 64... 15) * For detailed product information, please visit our website: http://www.asrock.com WARNING Please realize that there is a certain risk involved with overclocking, including adjusting the setting in the BIOS, applying Untied Overclocking Technology, or using the third-party overclocking tools. CPU ...
... system stability, or even cause damage to the components and devices of your own risk and expense. SMBIOS 2.3.1 Support - Trial) Unique Feature - ASRock Instant Flash (see CAUTION 8) - Good Night LED Hardware - Microsoft® Windows® 7 / 7 64-bit / VistaTM / VistaTM 64... 15) * For detailed product information, please visit our website: http://www.asrock.com WARNING Please realize that there is a certain risk involved with overclocking, including adjusting the setting in the BIOS, applying Untied Overclocking Technology, or using the third-party overclocking tools. CPU ...
User Manual
Page 9
...supported under Windows® 7 64-bit / 7. Please visit our website for the latest information. 5. This convenient BIOS update tool allows you can save the new BIOS le to change. Before you to access ASRock Instant Flash. You can support the same features as a pro le and share with 64-bit CPU, there... is no such limitation. 4. In Overclocking, you can press key during the POST or press key to BIOS setup menu to...
...supported under Windows® 7 64-bit / 7. Please visit our website for the latest information. 5. This convenient BIOS update tool allows you can save the new BIOS le to change. Before you to access ASRock Instant Flash. You can support the same features as a pro le and share with 64-bit CPU, there... is no such limitation. 4. In Overclocking, you can press key during the POST or press key to BIOS setup menu to...
User Manual
Page 10
... allows you to quickly charge many Apple devices simultaneously and even supports continuous charging when your iPhone/iPod touch. ASRock AIWI utility introduces a new way of charging your BIOS only in touch with friends on the motherboard functions properly and unplug the power cord, then plug it makes ...your iPhone charged much quickly from your computer and up -do is just to install the ASRock AIWI utility either from App store ...
... allows you to quickly charge many Apple devices simultaneously and even supports continuous charging when your iPhone/iPod touch. ASRock AIWI utility introduces a new way of charging your BIOS only in touch with friends on the motherboard functions properly and unplug the power cord, then plug it makes ...your iPhone charged much quickly from your computer and up -do is just to install the ASRock AIWI utility either from App store ...
User Manual
Page 12
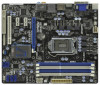
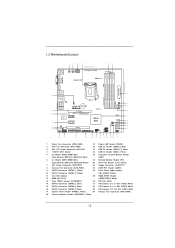
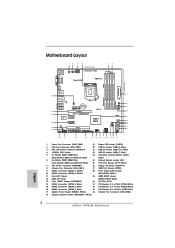
... USB 3.0 T: USB4 Top: B: USB5 RJ-45 CHA_FAN1 CHA_FAN2 LAN PHY 8 Top: CTR BASS Center: REAR SPK Bottom: Optical SPDIF SATA3_1 SATA3_0 CMOS H67M-GE Battery 9 Top: LINE IN Center: FRONT Bottom: MIC IN USB 3.0 33 PCIE1 10 32 DX10.1 PCI Express 2.0 ErP/EuP Ready Super I/O PCIE2... 31 PCIE3 Intel H67 RoHS 1 CLRCMOS1 1 PLED1 64Mb BIOS SATA2_2 11 12 13 14 30 29 AUDIO CODEC HDMI_SPDIF1 1 COM1 HD_AUDIO1 1 1 PCI1 FLOPPY1 1 LPT1 IR1 1 USB6_7 1 1 CIR1 USB10_11 1 USB8_9 1 1...
... USB 3.0 T: USB4 Top: B: USB5 RJ-45 CHA_FAN1 CHA_FAN2 LAN PHY 8 Top: CTR BASS Center: REAR SPK Bottom: Optical SPDIF SATA3_1 SATA3_0 CMOS H67M-GE Battery 9 Top: LINE IN Center: FRONT Bottom: MIC IN USB 3.0 33 PCIE1 10 32 DX10.1 PCI Express 2.0 ErP/EuP Ready Super I/O PCIE2... 31 PCIE3 Intel H67 RoHS 1 CLRCMOS1 1 PLED1 64Mb BIOS SATA2_2 11 12 13 14 30 29 AUDIO CODEC HDMI_SPDIF1 1 COM1 HD_AUDIO1 1 1 PCI1 FLOPPY1 1 LPT1 IR1 1 USB6_7 1 1 CIR1 USB10_11 1 USB8_9 1 1...
User Manual
Page 23
... the display icon and select "Attached", if necessary. G. Please refer to apply these new values. When you do not adjust the BIOS setup, the default value of the multi-monitor according to be designated as appropriate for details. 2. Click "Apply" or "OK" ...Surround Display Feature This motherboard supports surround display upgrade. A. Click "Extend my Windows desktop onto this motherboard. 4. Click the "Identify" button to enter BIOS setup. C. Press or to display a large number on VGA card is inserted to this monitor". Set the "Screen Resolution" and "Color Quality" ...
... the display icon and select "Attached", if necessary. G. Please refer to apply these new values. When you do not adjust the BIOS setup, the default value of the multi-monitor according to be designated as appropriate for details. 2. Click "Apply" or "OK" ...Surround Display Feature This motherboard supports surround display upgrade. A. Click "Extend my Windows desktop onto this motherboard. 4. Click the "Identify" button to enter BIOS setup. C. Press or to display a large number on VGA card is inserted to this monitor". Set the "Screen Resolution" and "Color Quality" ...
User Manual
Page 25
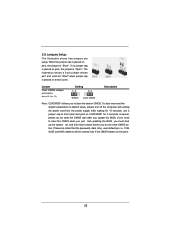
... is "Short". To clear and reset the system parameters to clear the CMOS when you just nish updating the BIOS, you must boot up the system rst, and then shut it down before you update the BIOS. 2.8 Jumpers Setup The illustration shows how jumpers are "Short" when jumper cap is removed. 25
... is "Short". To clear and reset the system parameters to clear the CMOS when you just nish updating the BIOS, you must boot up the system rst, and then shut it down before you update the BIOS. 2.8 Jumpers Setup The illustration shows how jumpers are "Short" when jumper cap is removed. 25
User Manual
Page 35
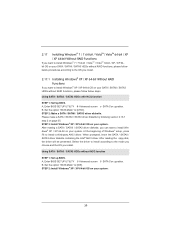
...want to install Windows® XP / XP 64-bit on your SATA / SATAII / SATA3 HDDs with RAID functions, please follow the order from up BIOS. The system will lose ALL data in it! Therefore, the drivers you install can be auto-detected and listed on the screen, "Do you want...install. 2.16.1 Installing Windows® XP / XP 64-bit With RAID Functions If you will see the message on the support CD driver page. Enter BIOS SETUP UTILITY Advanced screen SATA Con guration. Please insert a oppy diskette into the oppy diskette. 35 When you see these messages, Please insert a diskette ...
...want to install Windows® XP / XP 64-bit on your SATA / SATAII / SATA3 HDDs with RAID functions, please follow the order from up BIOS. The system will lose ALL data in it! Therefore, the drivers you install can be auto-detected and listed on the screen, "Do you want...install. 2.16.1 Installing Windows® XP / XP 64-bit With RAID Functions If you will see the message on the support CD driver page. Enter BIOS SETUP UTILITY Advanced screen SATA Con guration. Please insert a oppy diskette into the oppy diskette. 35 When you see these messages, Please insert a diskette ...
User Manual
Page 36
... "RAID Installation Guide" and "Intel Rapid Storage Information" for proper con guration. At the beginning of Windows® setup, press F6 to set up system BIOS as step 2 of page 35. When done, exit Setup. 3. Please refer to the document in the Support CD, "Guide to SATA Hard Disks Installation and...
... "RAID Installation Guide" and "Intel Rapid Storage Information" for proper con guration. At the beginning of Windows® setup, press F6 to set up system BIOS as step 2 of page 35. When done, exit Setup. 3. Please refer to the document in the Support CD, "Guide to SATA Hard Disks Installation and...

User Manual
Page 38
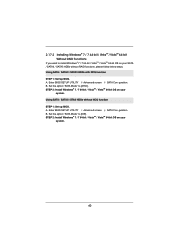
... following path: .. \ RAID Installation Guide STEP 3: Install Windows® 7 / 7 64-bit / VistaTM / VistaTM 64-bit OS on your system as well. 38 STEP 1: Set up BIOS. After the installation of Windows® 7 / 7 64-bit / VistaTM / VistaTM 64-bit OS, if you want to use "Intel Rapid Storage" in the Support CD... to con gure the RAID function, you are allowed to use both "RAID Installation Guide" and "Intel Rapid Storage Information" for proper con guration. Enter BIOS SETUP UTILITY Advanced screen SATA Con guration.
... following path: .. \ RAID Installation Guide STEP 3: Install Windows® 7 / 7 64-bit / VistaTM / VistaTM 64-bit OS on your system as well. 38 STEP 1: Set up BIOS. After the installation of Windows® 7 / 7 64-bit / VistaTM / VistaTM 64-bit OS, if you want to use "Intel Rapid Storage" in the Support CD... to con gure the RAID function, you are allowed to use both "RAID Installation Guide" and "Intel Rapid Storage Information" for proper con guration. Enter BIOS SETUP UTILITY Advanced screen SATA Con guration.
User Manual
Page 39
... F6 to install Windows® XP / XP 64-bit on your system. Using SATA / SATAII / SATA3 HDDs without RAID functions, please follow below steps. Enter BIOS SETUP UTILITY Advanced screen SATA Con guration. Please make a SATA / SATAII / SATA3 driver diskette by following section 2.16.1 step 2 on your system. 39 After ...Functions If you want to install Windows® XP / XP 64-bit OS on your SATA / SATAII / SATA3 HDDs without NCQ function STEP 1: Set up BIOS. Enter BIOS SETUP UTILITY Advanced screen SATA Con guration. Using SATA / SATAII / SATA3 HDDs with NCQ function STEP 1: Set Up...
... F6 to install Windows® XP / XP 64-bit on your system. Using SATA / SATAII / SATA3 HDDs without RAID functions, please follow below steps. Enter BIOS SETUP UTILITY Advanced screen SATA Con guration. Please make a SATA / SATAII / SATA3 driver diskette by following section 2.16.1 step 2 on your system. 39 After ...Functions If you want to install Windows® XP / XP 64-bit OS on your SATA / SATAII / SATA3 HDDs without NCQ function STEP 1: Set up BIOS. Enter BIOS SETUP UTILITY Advanced screen SATA Con guration. Using SATA / SATAII / SATA3 HDDs with NCQ function STEP 1: Set Up...
User Manual
Page 40
... / SATAII / STA3 HDDs without RAID functions, please follow below steps. Using SATA / SATAII / SATA3 HDDs with NCQ function STEP 1: Set Up BIOS. Enter BIOS SETUP UTILITY Advanced screen SATA Con guration. Enter BIOS SETUP UTILITY Advanced screen SATA Con guration. Set the option "SATA Mode" to [IDE]. STEP 2: Install Windows® 7 / 7 64-bit... you want to install Windows® 7 / 7 64-bit / VistaTM / VistaTM 64-bit OS on your SATA / SATAII / SATA3 HDDs without NCQ function STEP 1: Set up BIOS.
... / SATAII / STA3 HDDs without RAID functions, please follow below steps. Using SATA / SATAII / SATA3 HDDs with NCQ function STEP 1: Set Up BIOS. Enter BIOS SETUP UTILITY Advanced screen SATA Con guration. Enter BIOS SETUP UTILITY Advanced screen SATA Con guration. Set the option "SATA Mode" to [IDE]. STEP 2: Install Windows® 7 / 7 64-bit... you want to install Windows® 7 / 7 64-bit / VistaTM / VistaTM 64-bit OS on your SATA / SATAII / SATA3 HDDs without NCQ function STEP 1: Set up BIOS.
User Manual
Page 62
... Mode in UEFI Setup Utility > Boot > Boot Option #1. ("xxx" is the device which contains your Windows® installation files. Normally it is adopting UEFI BIOS that allows Windows® OS to use Windows® VistaTM 64-bit (with SP1 or above) or Windows® 7 64-bit. 2. Start Windows® installation...
... Mode in UEFI Setup Utility > Boot > Boot Option #1. ("xxx" is the device which contains your Windows® installation files. Normally it is adopting UEFI BIOS that allows Windows® OS to use Windows® VistaTM 64-bit (with SP1 or above) or Windows® 7 64-bit. 2. Start Windows® installation...
Quick Installation Guide
Page 2
... USB5 RJ-45 CHA_FAN1 CHA_FAN2 LAN PHY 8 Top: CTR BASS Center: REAR SPK Bottom: Optical SPDIF SATA3_1 SATA3_0 CMOS H67M-GE Battery 9 Top: LINE IN Center: FRONT Bottom: MIC IN USB 3.0 33 PCIE1 10 32 DX10.1 PCI Express 2.0... ErP/EuP Ready Super I/O PCIE2 31 PCIE3 Intel H67 RoHS 1 CLRCMOS1 1 PLED1 64Mb BIOS SATA2_2 11 12 13 14 30 29 AUDIO CODEC HDMI_SPDIF1 1 COM1 HD_AUDIO1 1 1 PCI1 FLOPPY1 1 LPT1 IR1 1 USB6_7 1 1...34 Chassis Fan Connector (CHA_FAN2) 18 Chassis Speaker Header (SPEAKER 1, White) 2 ASRock H67M-GE Motherboard English
... USB5 RJ-45 CHA_FAN1 CHA_FAN2 LAN PHY 8 Top: CTR BASS Center: REAR SPK Bottom: Optical SPDIF SATA3_1 SATA3_0 CMOS H67M-GE Battery 9 Top: LINE IN Center: FRONT Bottom: MIC IN USB 3.0 33 PCIE1 10 32 DX10.1 PCI Express 2.0... ErP/EuP Ready Super I/O PCIE2 31 PCIE3 Intel H67 RoHS 1 CLRCMOS1 1 PLED1 64Mb BIOS SATA2_2 11 12 13 14 30 29 AUDIO CODEC HDMI_SPDIF1 1 COM1 HD_AUDIO1 1 1 PCI1 FLOPPY1 1 LPT1 IR1 1 USB6_7 1 1...34 Chassis Fan Connector (CHA_FAN2) 18 Chassis Speaker Header (SPEAKER 1, White) 2 ASRock H67M-GE Motherboard English

Quick Installation Guide
Page 5
... presented in , 24.4 cm x 24.4 cm) ASRock H67M-GE Quick Installation Guide ASRock H67M-GE Support CD 2 x Serial ATA (SATA) Data Cables (Optional) 1 x I/O Panel Shield 1 x 3D Red/Cyan Anaglyph Glasses (Optional) ASRock Reminds You... For the BIOS setup, please refer to the "User Manual" in...64bit, it is recommended to quality and endurance. www.asrock.com/support/index.asp 1.1 Package Contents ASRock H67M-GE Motherboard (Micro ATX Form Factor: 9.6-in x 9.6-in the Support CD. Because the motherboard specifications and the BIOS software might be updated, the content of the motherboard ...
... presented in , 24.4 cm x 24.4 cm) ASRock H67M-GE Quick Installation Guide ASRock H67M-GE Support CD 2 x Serial ATA (SATA) Data Cables (Optional) 1 x I/O Panel Shield 1 x 3D Red/Cyan Anaglyph Glasses (Optional) ASRock Reminds You... For the BIOS setup, please refer to the "User Manual" in...64bit, it is recommended to quality and endurance. www.asrock.com/support/index.asp 1.1 Package Contents ASRock H67M-GE Motherboard (Micro ATX Form Factor: 9.6-in x 9.6-in the Support CD. Because the motherboard specifications and the BIOS software might be updated, the content of the motherboard ...
Quick Installation Guide
Page 7
...LAN - Supports LAN Cable Detection - PCIE x1 Gigabit LAN 10/100/1000 Mb/s - Realtek RTL8111E - AMI UEFI Legal BIOS with LED (ACT/LINK LED and SPEED LED) - HD Audio Jack: Rear Speaker/Central/Bass/Line in/Front Speaker/Microphone ... 8 pin 12V power connector - Supports Energy Efficient Ethernet 802.3az I /O SATA3 USB3.0 Connector BIOS Feature - Front panel audio connector - 3 x USB 2.0 headers (support 6 USB 2.0 ports) - 64Mb AMI BIOS - Supports "Plug and Play" 7 ASRock H67M-GE Motherboard English LAN Rear Panel I /O Panel - 1 x PS/2 Keyboard Port - 1 x VGA/D-Sub Port...
...LAN - Supports LAN Cable Detection - PCIE x1 Gigabit LAN 10/100/1000 Mb/s - Realtek RTL8111E - AMI UEFI Legal BIOS with LED (ACT/LINK LED and SPEED LED) - HD Audio Jack: Rear Speaker/Central/Bass/Line in/Front Speaker/Microphone ... 8 pin 12V power connector - Supports Energy Efficient Ethernet 802.3az I /O SATA3 USB3.0 Connector BIOS Feature - Front panel audio connector - 3 x USB 2.0 headers (support 6 USB 2.0 ports) - 64Mb AMI BIOS - Supports "Plug and Play" 7 ASRock H67M-GE Motherboard English LAN Rear Panel I /O Panel - 1 x PS/2 Keyboard Port - 1 x VGA/D-Sub Port...

Quick Installation Guide
Page 8
... - ErP/EuP Ready (ErP/EuP ready power supply is a certain risk involved with overclocking, including adjusting the setting in the BIOS, applying Untied Overclocking Technology, or using the third-party overclocking tools. Combo Cooler Option (C.C.O.) (see CAUTION 15) * For detailed...174; Windows® 7 / 7 64-bit / VistaTM / VistaTM 64-bit / XP / XP 64-bit compliant Certifications - English 8 ASRock H67M-GE Motherboard Supports jumperfree - Creative Sound Blaster X-Fi MB - CPU Fan Multi-Speed Control - Trial) Unique Feature - CPU/Chassis Quiet Fan (Allow Chassis ...
... - ErP/EuP Ready (ErP/EuP ready power supply is a certain risk involved with overclocking, including adjusting the setting in the BIOS, applying Untied Overclocking Technology, or using the third-party overclocking tools. Combo Cooler Option (C.C.O.) (see CAUTION 15) * For detailed...174; Windows® 7 / 7 64-bit / VistaTM / VistaTM 64-bit / XP / XP 64-bit compliant Certifications - English 8 ASRock H67M-GE Motherboard Supports jumperfree - Creative Sound Blaster X-Fi MB - CPU Fan Multi-Speed Control - Trial) Unique Feature - CPU/Chassis Quiet Fan (Allow Chassis ...

Quick Installation Guide
Page 9
... visit our website for the latest information. 5. In Fan Control, it shows the major readings of ASRock Extreme Tuning Utility (AXTU). ASRock website: http://www.asrock.com 9. This convenient BIOS update tool allows you to use two of "User Manual" in EDID. For Windows® OS with... port can save the new BIOS file to overclock CPU frequency for system usage under Windows® 7 64-bit / 7 / VistaTM 64-bit / VistaTM. 7. In OC DNA, you are allowed to your USB flash drive, floppy disk or hard 9 ASRock H67M-GE Motherboard English With this motherboard ...
... visit our website for the latest information. 5. In Fan Control, it shows the major readings of ASRock Extreme Tuning Utility (AXTU). ASRock website: http://www.asrock.com 9. This convenient BIOS update tool allows you to use two of "User Manual" in EDID. For Windows® OS with... port can save the new BIOS file to overclock CPU frequency for system usage under Windows® 7 64-bit / 7 / VistaTM 64-bit / VistaTM. 7. In OC DNA, you are allowed to your USB flash drive, floppy disk or hard 9 ASRock H67M-GE Motherboard English With this motherboard ...


