
User Manual
Page 4
2.18.2 Installing Windows® 7 / 7 64-bit / VistaTM / VistaTM 64-bit Without RAID Functions 43 3 UEFI SETUP UTILITY 44 3.1 Introduction 44 3.1.1 UEFI Menu Bar 44 3.1.2 Navigation Keys 45 3.2 Main Screen 45 3.3 OC Tweaker Screen 46 3.4 Advanced Screen 49 3.4.1 CPU Con guration 50 3.4.2 Intel IGD SWSCI OpRegion Con ...
2.18.2 Installing Windows® 7 / 7 64-bit / VistaTM / VistaTM 64-bit Without RAID Functions 43 3 UEFI SETUP UTILITY 44 3.1 Introduction 44 3.1.1 UEFI Menu Bar 44 3.1.2 Navigation Keys 45 3.2 Main Screen 45 3.3 OC Tweaker Screen 46 3.4 Advanced Screen 49 3.4.1 CPU Con guration 50 3.4.2 Intel IGD SWSCI OpRegion Con ...

User Manual
Page 44
...following selections: Main To set up the system time/date information OC Tweaker To set up overclocking features Advanced To set up the advanced UEFI features H/W Monitor To display current hardware status Boot To set up the default system device to locate and load the Operating System Security To... set up the computer. Chapter 3: UEFI SETUP UTILITY 3.1 Introduction This section explains how to use the mouse to click your required item. 44 If you start up the security ...
...following selections: Main To set up the system time/date information OC Tweaker To set up overclocking features Advanced To set up the advanced UEFI features H/W Monitor To display current hardware status Boot To set up the default system device to locate and load the Operating System Security To... set up the computer. Chapter 3: UEFI SETUP UTILITY 3.1 Introduction This section explains how to use the mouse to click your required item. 44 If you start up the security ...

User Manual
Page 45
3.1.2 Navigation Keys Please check the following table for all the settings To save changes and exit the UEFI SETUP UTILITY To jump to select items To change option for the selected items To bring up the selected screen To display the General Help ... or right to select Screens Moves cursor up or down to the Exit Screen or exit the current screen 3.2 Main Screen When you enter the UEFI SETUP UTILITY, the Main screen will appear and display the system overview. 45
3.1.2 Navigation Keys Please check the following table for all the settings To save changes and exit the UEFI SETUP UTILITY To jump to select items To change option for the selected items To bring up the selected screen To display the General Help ... or right to select Screens Moves cursor up or down to the Exit Screen or exit the current screen 3.2 Main Screen When you enter the UEFI SETUP UTILITY, the Main screen will appear and display the system overview. 45

User Manual
Page 49
...in Flash ROM. Please be noted that the USB ash drive or hard drive must use FAT32/16/12 le system. ASRock Instant Flash ASRock Instant Flash is a UEFI flash utility embedded in this section may set the con gurations for the following items: CPU Con guration, Intel IGD ... then you can update your system after UEFI update process completes. 49 This convenient UEFI update tool allows you execute ASRock Instant Flash utility, the utility will show the UEFI les and their respective information. If you to update your UEFI, and reboot your UEFI only in a few clicks without entering operating...
...in Flash ROM. Please be noted that the USB ash drive or hard drive must use FAT32/16/12 le system. ASRock Instant Flash ASRock Instant Flash is a UEFI flash utility embedded in this section may set the con gurations for the following items: CPU Con guration, Intel IGD ... then you can update your system after UEFI update process completes. 49 This convenient UEFI update tool allows you execute ASRock Instant Flash utility, the utility will show the UEFI les and their respective information. If you to update your UEFI, and reboot your UEFI only in a few clicks without entering operating...
User Manual
Page 58
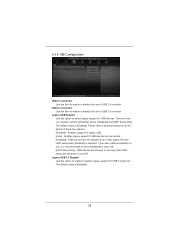
... Only]. The default value is [Enabled]. There are allowed to use of USB 2.0 controller. Please refer to enable or disable the use under UEFI setup and Windows / Linux OS. Enables legacy support if USB devices are not allowed to use of USB 3.0 controller. Enables support for USB devices. ...If you have USB compatibility issue, it is recommended to select [Disabled] to enable or disable the use only under legacy OS and UEFI setup when [Disabled] is selected. USB devices are connected. [Disabled] - 3.4.8 USB Configuration USB 2.0 Controller Use this item to enter OS...
... Only]. The default value is [Enabled]. There are allowed to use of USB 2.0 controller. Please refer to enable or disable the use under UEFI setup and Windows / Linux OS. Enables legacy support if USB devices are not allowed to use of USB 3.0 controller. Enables support for USB devices. ...If you have USB compatibility issue, it is recommended to select [Disabled] to enable or disable the use only under legacy OS and UEFI setup when [Disabled] is selected. USB devices are connected. [Disabled] - 3.4.8 USB Configuration USB 2.0 Controller Use this item to enter OS...

User Manual
Page 62
F9 key can be used for all changes. Select [OK] to discard all the setup questions. Select [OK] to exit the UEFI SETUP UTILITY without saving any changes. Discard Changes When you select this option, it will pop-out the following message, "Discard changes and exit setup?"... changes and exit setup?" Select [OK] to Launch EFI Shell application (Shell64.efi) from filesystem device Attempts to save the changes and exit the UEFI SETUP UTILITY. 3.8 Exit Screen Save Changes and Exit When you select this option, it will pop-out the following message, "Discard changes?" Load...
F9 key can be used for all changes. Select [OK] to discard all the setup questions. Select [OK] to exit the UEFI SETUP UTILITY without saving any changes. Discard Changes When you select this option, it will pop-out the following message, "Discard changes and exit setup?"... changes and exit setup?" Select [OK] to Launch EFI Shell application (Shell64.efi) from filesystem device Attempts to save the changes and exit the UEFI SETUP UTILITY. 3.8 Exit Screen Save Changes and Exit When you select this option, it will pop-out the following message, "Discard changes?" Load...

User Manual
Page 64
.... Please install the hotfix file from Microsoft®: http://support.microsoft.com/kb/979903 64 Please make sure to boot in UEFI Setup Utility > Advanced > Storage Configuration > SATA Mode. 3. Press or at system POST and choose the item... "UEFI:xxx" to install the operating system. 1. Set AHCI Mode in UEFI Setup Utility > Boot > Boot Option #1. ("xxx" is adopting UEFI BIOS that allows Windows® OS to be formatted by GPT (GUID Partition Table). Choose the...
.... Please install the hotfix file from Microsoft®: http://support.microsoft.com/kb/979903 64 Please make sure to boot in UEFI Setup Utility > Advanced > Storage Configuration > SATA Mode. 3. Press or at system POST and choose the item... "UEFI:xxx" to install the operating system. 1. Set AHCI Mode in UEFI Setup Utility > Boot > Boot Option #1. ("xxx" is adopting UEFI BIOS that allows Windows® OS to be formatted by GPT (GUID Partition Table). Choose the...

Quick Installation Guide
Page 183
... 조절 지원 CD ASRock 소 CyberLink DVD 세트 ) (OEM - ASRock APP Charger ( 주의 11 참조 ) - ErP/EuP 지원 (ErP/EuP ( 주의 15 참조 ) http://www.asrock.com 한 국 어 BIOS Untied Overclocking Technology ASRock H67M-GE/HT Motherboard 183 CPU CPU - - GUI AMI UEFI 적합형 BIOS - Instant...
... 조절 지원 CD ASRock 소 CyberLink DVD 세트 ) (OEM - ASRock APP Charger ( 주의 11 참조 ) - ErP/EuP 지원 (ErP/EuP ( 주의 15 참조 ) http://www.asrock.com 한 국 어 BIOS Untied Overclocking Technology ASRock H67M-GE/HT Motherboard 183 CPU CPU - - GUI AMI UEFI 적합형 BIOS - Instant...

Quick Installation Guide
Page 271
... on a large size HDD (>2TB). Press or at system POST and choose the item "UEFI:xxx" to boot. 4. Please make sure to install the operating system. 1. Choose the item "UEFI:xxx" to boot in UEFI Setup Utility > Advanced > Storage Configuration > SATA Mode. 3. Please install the ...64257;x file from Microsoft®: http://support.microsoft.com/kb/979903 Installing OS on a HDD Larger Than 2TB This motherboard is adopting UEFI BIOS that allows Windows® OS to be formatted by GPT (GUID Partition Table). Start Windows® installation. 5. Please follow below ...
... on a large size HDD (>2TB). Press or at system POST and choose the item "UEFI:xxx" to boot. 4. Please make sure to install the operating system. 1. Choose the item "UEFI:xxx" to boot in UEFI Setup Utility > Advanced > Storage Configuration > SATA Mode. 3. Please install the ...64257;x file from Microsoft®: http://support.microsoft.com/kb/979903 Installing OS on a HDD Larger Than 2TB This motherboard is adopting UEFI BIOS that allows Windows® OS to be formatted by GPT (GUID Partition Table). Start Windows® installation. 5. Please follow below ...

