
User Manual
Page 3
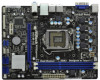
Contents 1 Introduction 5 1.1 Package Contents 5 1.2 Specifications 6 1.3 Motherboard Layout (H61M-VGS R2.0 / H61M-VS R2.0 11 1.4 I/O Panel (H61M-VGS R2.0 12 1.5 I/O Panel (H61M-VS R2.0 13 2 Installation 14 2.1 Screw Holes 14 2.2 Pre-installation Precautions 14 2.3 CPU Installation 15 2.4 Installation of Heatsink and ...Installation 27 2.11 Hot Plug Function for SATA / SATAII HDDs 27 2.12 SATA / SATAII HDD Hot Plug Feature and Operation Guide 28 2.13 Driver Installation Guide 30 2.14 Installing Windows® 7 / 7 64-bit / VistaTM / VistaTM 64-bit / XP / XP 64-bit Without RAID...
Contents 1 Introduction 5 1.1 Package Contents 5 1.2 Specifications 6 1.3 Motherboard Layout (H61M-VGS R2.0 / H61M-VS R2.0 11 1.4 I/O Panel (H61M-VGS R2.0 12 1.5 I/O Panel (H61M-VS R2.0 13 2 Installation 14 2.1 Screw Holes 14 2.2 Pre-installation Precautions 14 2.3 CPU Installation 15 2.4 Installation of Heatsink and ...Installation 27 2.11 Hot Plug Function for SATA / SATAII HDDs 27 2.12 SATA / SATAII HDD Hot Plug Feature and Operation Guide 28 2.13 Driver Installation Guide 30 2.14 Installing Windows® 7 / 7 64-bit / VistaTM / VistaTM 64-bit / XP / XP 64-bit Without RAID...
User Manual
Page 4
... 48 3.6 Boot Screen 49 3.7 Security Screen 50 3.8 Exit Screen 51 4 Software Support 52 4.1 Install Operating System 52 4.2 Support CD Information 52 4.2.1 Running Support CD 52 4.2.2 Drivers Menu 52 4.2.3 Utilities Menu 52 4.2.4 Contact Information 52 4
... 48 3.6 Boot Screen 49 3.7 Security Screen 50 3.8 Exit Screen 51 4 Software Support 52 4.1 Install Operating System 52 4.2 Support CD Information 52 4.2.1 Running Support CD 52 4.2.2 Drivers Menu 52 4.2.3 Utilities Menu 52 4.2.4 Contact Information 52 4
User Manual
Page 7
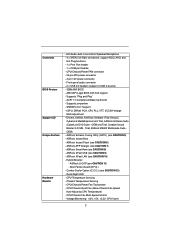
... Multimedia Suite OEM) - SMBIOS 2.3.1 Support - IGPU, DRAM, PCH, CPU PLL, VTT, VCCSA Voltage Multi-adjustment - Drivers, Utilities, AntiVirus Software (Trial Version), CyberLink MediaEspresso 6.5 Trial, ASRock Software Suite (CyberLink DVD Suite - CPU Temperature Sensing - ASRock U-COP (see CAUTION 6) - Front panel audio connector - 2 x USB 2.0 headers (support 4 USB 2.0 ports) - 32Mb AMI BIOS - CPU/Chassis/Power FAN...
... Multimedia Suite OEM) - SMBIOS 2.3.1 Support - IGPU, DRAM, PCH, CPU PLL, VTT, VCCSA Voltage Multi-adjustment - Drivers, Utilities, AntiVirus Software (Trial Version), CyberLink MediaEspresso 6.5 Trial, ASRock Software Suite (CyberLink DVD Suite - CPU Temperature Sensing - ASRock U-COP (see CAUTION 6) - Front panel audio connector - 2 x USB 2.0 headers (support 4 USB 2.0 ports) - 32Mb AMI BIOS - CPU/Chassis/Power FAN...
User Manual
Page 9
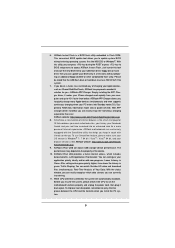
... your real-time newsfeed into Standby mode (S1), Suspend to access ASRock Instant Flash. Please be noted that helps you can easily enjoy the marvelous charging experience than before. Simply installing the APP Charger driver, it makes your iPhone charged much quickly from your computer and up...disk or hard drive, then you keep in touch with friends on-the-go. ASRock APP Charger allows you can update your PC enters into an enhanced view for you - With APP Charger driver installed, you to quickly charge many Apple devices simultaneously and even supports continuous charging ...
... your real-time newsfeed into Standby mode (S1), Suspend to access ASRock Instant Flash. Please be noted that helps you can easily enjoy the marvelous charging experience than before. Simply installing the APP Charger driver, it makes your iPhone charged much quickly from your computer and up...disk or hard drive, then you keep in touch with friends on-the-go. ASRock APP Charger allows you can update your PC enters into an enhanced view for you - With APP Charger driver installed, you to quickly charge many Apple devices simultaneously and even supports continuous charging ...

User Manual
Page 20
... icon in the Display Properties dialog that you wish to your system. C. D. Install the PCI Express VGA card on PCI Express VGA card driver to be designated as Secondary. Connect D-Sub monitor cable to install them again. 5. Boot your primary monitor, and then select "Primary". A....monitor will always be Primary, and all additional monitors will disable VGA function when the add-on PCIE1 slot. When you have installed the drivers already, there is inserted to display a large number on the I/O panel. 2.7 Multi Monitor Feature This motherboard supports multi monitor upgrade. ...
... icon in the Display Properties dialog that you wish to your system. C. D. Install the PCI Express VGA card on PCI Express VGA card driver to be designated as Secondary. Connect D-Sub monitor cable to install them again. 5. Boot your primary monitor, and then select "Primary". A....monitor will always be Primary, and all additional monitors will disable VGA function when the add-on PCIE1 slot. When you have installed the drivers already, there is inserted to display a large number on the I/O panel. 2.7 Multi Monitor Feature This motherboard supports multi monitor upgrade. ...
User Manual
Page 28
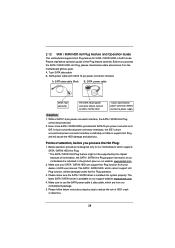
...SATAII Hot Plug feature might not be supported by step to support Hot Plug and will be processed. 2. The latest SATA / SATAII driver is available on our website: www.asrock.com 2. SATA power cable with SATA 15-pin power connector interface A. Even some SATA / SATAII HDDs provide both SATA 15-pin...loss. 28 Make sure your dealer or HDD user manual. Please make sure the SATA / SATAII driver is designed only for SATA / SATAII HDD in the product spec on our support website: www.asrock.com 4. Without SATA 15-pin power connector interface, the SATA / SATAII Hot Plug cannot be ...
...SATAII Hot Plug feature might not be supported by step to support Hot Plug and will be processed. 2. The latest SATA / SATAII driver is available on our website: www.asrock.com 2. SATA power cable with SATA 15-pin power connector interface A. Even some SATA / SATAII HDDs provide both SATA 15-pin...loss. 28 Make sure your dealer or HDD user manual. Please make sure the SATA / SATAII driver is designed only for SATA / SATAII HDD in the product spec on our support website: www.asrock.com 4. Without SATA 15-pin power connector interface, the SATA / SATAII Hot Plug cannot be ...

User Manual
Page 30
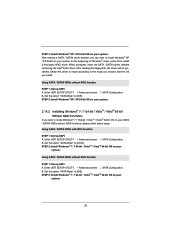
...Enter UEFI SETUP UTILITY Advanced screen SATA Configuration. C. Formatting the floppy diskette will start to [AHCI]. STEP 2: Make a SATA / SATAII driver diskette. (Please use USB floppy or floppy disk.) A. E. Set the option "SATA Mode" to format the floppy diskette and copy... follow the order from up , press key, and then a window for boot devices selection appears. Please follow below steps. Therefore, the drivers you install can be auto-detected and listed on your optical drive first. Using SATA / SATAII HDDs with NCQ function STEP 1: Set...
...Enter UEFI SETUP UTILITY Advanced screen SATA Configuration. C. Formatting the floppy diskette will start to [AHCI]. STEP 2: Make a SATA / SATAII driver diskette. (Please use USB floppy or floppy disk.) A. E. Set the option "SATA Mode" to format the floppy diskette and copy... follow the order from up , press key, and then a window for boot devices selection appears. Please follow below steps. Therefore, the drivers you install can be auto-detected and listed on your optical drive first. Using SATA / SATAII HDDs with NCQ function STEP 1: Set...
User Manual
Page 31
... SETUP UTILITY Advanced screen SATA Configuration. Enter UEFI SETUP UTILITY Advanced screen SATA Configuration. After reading the floppy disk, the driver will be presented. Enter UEFI SETUP UTILITY Advanced screen SATA Configuration. B. Set the option "SATA Mode" to [IDE]. Using SATA / SATAII ...® setup, press F6 to [AHCI]. STEP 3: Install Windows® XP / XP 64-bit OS on your system. 31 After making a SATA / SATAII driver diskette, you want to the mode you choose and the OS you install. B. When prompted, insert the SATA / SATAII...
... SETUP UTILITY Advanced screen SATA Configuration. Enter UEFI SETUP UTILITY Advanced screen SATA Configuration. After reading the floppy disk, the driver will be presented. Enter UEFI SETUP UTILITY Advanced screen SATA Configuration. B. Set the option "SATA Mode" to [IDE]. Using SATA / SATAII ...® setup, press F6 to [AHCI]. STEP 3: Install Windows® XP / XP 64-bit OS on your system. 31 After making a SATA / SATAII driver diskette, you want to the mode you choose and the OS you install. B. When prompted, insert the SATA / SATAII...
User Manual
Page 41
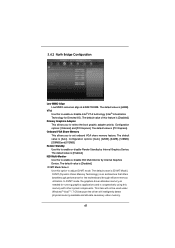
...graphics applications and is [Disabled]. The default value is [DVMT Mode]. The default value is [Disabled]. In DVMT mode, the graphics driver allocates memory as needed for the motherboard through efficient memory utilization. 3.4.2 North Bridge Configuration Low MMIO Align Low MMIO resources ... is cooperatively using this to adjust DVMT mode. This item will not be used under Windows® VistaTM / 7 OS because the driver will intelligently detect physical memory available and allocate necessary video memory. 41 VT-d Use this memory with other system components. The default value...
...graphics applications and is [Disabled]. The default value is [DVMT Mode]. The default value is [Disabled]. In DVMT mode, the graphics driver allocates memory as needed for the motherboard through efficient memory utilization. 3.4.2 North Bridge Configuration Low MMIO Align Low MMIO resources ... is cooperatively using this to adjust DVMT mode. This item will not be used under Windows® VistaTM / 7 OS because the driver will intelligently detect physical memory available and allocate necessary video memory. 41 VT-d Use this memory with other system components. The default value...
User Manual
Page 52
... at http://www.asrock.com; or you need to contact ASRock or want to know more information. 4.2 Support CD Information The Support CD that came with the motherboard contains necessary drivers and useful utilities that the motherboard supports. Because motherboard settings and hardware options... vary, use the setup procedures in your dealer for more about ASRock, welcome to display the menus. 4.2.2 Drivers Menu The Drivers Menu shows the available devices drivers if the system detects installed devices. Refer to activate the devices. 4.2.3 Utilities Menu The...
... at http://www.asrock.com; or you need to contact ASRock or want to know more information. 4.2 Support CD Information The Support CD that came with the motherboard contains necessary drivers and useful utilities that the motherboard supports. Because motherboard settings and hardware options... vary, use the setup procedures in your dealer for more about ASRock, welcome to display the menus. 4.2.2 Drivers Menu The Drivers Menu shows the available devices drivers if the system detects installed devices. Refer to activate the devices. 4.2.3 Utilities Menu The...

Quick Installation Guide
Page 7
...Chassis Temperature Sensing - Voltage Monitoring: +12V, +5V, +3.3V, CPU Vcore 7 ASRock H61M-VGS R2.0 / H61M-VS R2.0 Motherboard ASRock MAGIX Multimedia Suite - ASRock Instant Boot - ASRock SmartView (see CAUTION 7) - Good Night LED Hardware - CPU/Chassis Quiet Fan (...Drivers, Utilities, AntiVirus Software (Trial Version), CyberLink MediaEspresso 6.5 Trial, ASRock Software Suite (CyberLink DVD Suite - OEM and Trial; Trial; OEM) Unique Feature - ASRock Extreme Tuning Utility (AXTU) (see CAUTION 9) - ASRock XFast USB (see CAUTION 5) - Hybrid Booster: - ASRock...
...Chassis Temperature Sensing - Voltage Monitoring: +12V, +5V, +3.3V, CPU Vcore 7 ASRock H61M-VGS R2.0 / H61M-VS R2.0 Motherboard ASRock MAGIX Multimedia Suite - ASRock Instant Boot - ASRock SmartView (see CAUTION 7) - Good Night LED Hardware - CPU/Chassis Quiet Fan (...Drivers, Utilities, AntiVirus Software (Trial Version), CyberLink MediaEspresso 6.5 Trial, ASRock Software Suite (CyberLink DVD Suite - OEM and Trial; Trial; OEM) Unique Feature - ASRock Extreme Tuning Utility (AXTU) (see CAUTION 9) - ASRock XFast USB (see CAUTION 5) - Hybrid Booster: - ASRock...

Quick Installation Guide
Page 9
...which data streams you keep in Flash ROM. Before you - This convenient BIOS update tool allows you install the PC system. 9 ASRock H61M-VGS R2.0 / H61M-VS R2.0 Motherboard English SmartView, a new function of the device. 10. To improve heat dissipation, remember to spray thermal grease between the ...it can easily recognize which includes below benefits. With APP Charger driver installed, you to update system BIOS without preparing an additional floppy diskette or other complicated flash utility. ASRock Instant Flash is the smart start page for IE that the USB...
...which data streams you keep in Flash ROM. Before you - This convenient BIOS update tool allows you install the PC system. 9 ASRock H61M-VGS R2.0 / H61M-VS R2.0 Motherboard English SmartView, a new function of the device. 10. To improve heat dissipation, remember to spray thermal grease between the ...it can easily recognize which includes below benefits. With APP Charger driver installed, you to update system BIOS without preparing an additional floppy diskette or other complicated flash utility. ASRock Instant Flash is the smart start page for IE that the USB...

Quick Installation Guide
Page 16
... [128MB], [256MB] or [512MB] to enter UEFI setup. D. Right-click the display icon and select "Attached", if necessary. 16 ASRock H61M-VGS R2.0 / H61M-VS R2.0 Motherboard English 2.5 Multi Monitor Feature This motherboard supports multi monitor upgrade. Click the "Identify" button to your card, one monitor will always... use multiple monitors with your system. Select the display icon identified by the number 2. When you have installed the drivers already, there is less than the total capability of "Onboard VGA Share Memory", [Auto], will be your system. Connect D-Sub...
... [128MB], [256MB] or [512MB] to enter UEFI setup. D. Right-click the display icon and select "Attached", if necessary. 16 ASRock H61M-VGS R2.0 / H61M-VS R2.0 Motherboard English 2.5 Multi Monitor Feature This motherboard supports multi monitor upgrade. Click the "Identify" button to your card, one monitor will always... use multiple monitors with your system. Select the display icon identified by the number 2. When you have installed the drivers already, there is less than the total capability of "Onboard VGA Share Memory", [Auto], will be your system. Connect D-Sub...

Quick Installation Guide
Page 23
... and listed on the support CD driver page. Set the option "SATA Mode" to [IDE]. B. STEP 2: Install Windows® XP / XP 64-bit OS on your system. 23 ASRock H61M-VGS R2.0 / H61M-VS R2.0 Motherboard English Then, the drivers compatible to your optical drive fi...;rst. Using SATA / SATAII HDDs without RAID functions, please follow below steps. A. 2.8 Driver Installation Guide To install the drivers to your system, please insert ...
... and listed on the support CD driver page. Set the option "SATA Mode" to [IDE]. B. STEP 2: Install Windows® XP / XP 64-bit OS on your system. 23 ASRock H61M-VGS R2.0 / H61M-VS R2.0 Motherboard English Then, the drivers compatible to your optical drive fi...;rst. Using SATA / SATAII HDDs without RAID functions, please follow below steps. A. 2.8 Driver Installation Guide To install the drivers to your system, please insert ...
Quick Installation Guide
Page 25
... start up the computer, please press or during the Power-On-Self-Test (POST) to display the menus. 25 ASRock H61M-VGS R2.0 / H61M-VS R2.0 Motherboard English otherwise, POST continues with the motherboard contains necessary drivers and useful utilities that came with its various sub-menus and to enter BIOS Setup after POST, please restart the...
... start up the computer, please press or during the Power-On-Self-Test (POST) to display the menus. 25 ASRock H61M-VGS R2.0 / H61M-VS R2.0 Motherboard English otherwise, POST continues with the motherboard contains necessary drivers and useful utilities that came with its various sub-menus and to enter BIOS Setup after POST, please restart the...


