
User Manual
Page 1
All rights reserved. 1 H61M-VGS R2.0 / H61M-VS R2.0 User Manual Version 1.0 Published September 2011 Copyright©2011 ASRock INC.
All rights reserved. 1 H61M-VGS R2.0 / H61M-VS R2.0 User Manual Version 1.0 Published September 2011 Copyright©2011 ASRock INC.

User Manual
Page 5
... recommended to set the BIOS option in , 22.6 cm x 17.3 cm) ASRock H61M-VGS R2.0 / H61M-VS R2.0 Quick Installation Guide ASRock H61M-VGS R2.0 / H61M-VS R2.0 Support CD 2 x Serial ATA (SATA) Data Cables (Optional) 1 x I/O Panel Shield ASRock Reminds You... In this manual occur, the updated version will be available on ASRock website as well. Chapter 3 and 4 contain the configuration guide...
... recommended to set the BIOS option in , 22.6 cm x 17.3 cm) ASRock H61M-VGS R2.0 / H61M-VS R2.0 Quick Installation Guide ASRock H61M-VGS R2.0 / H61M-VS R2.0 Support CD 2 x Serial ATA (SATA) Data Cables (Optional) 1 x I/O Panel Shield ASRock Reminds You... In this manual occur, the updated version will be available on ASRock website as well. Chapter 3 and 4 contain the configuration guide...

Quick Installation Guide
Page 1
... fitness for a particular purpose. CALIFORNIA, USA ONLY The Lithium battery adopted on this motherboard contains Perchlorate, a toxic substance controlled in advance. All rights reserved. 1 ASRock H61M-VGS R2.0 / H61M-VS R2.0 Motherboard English In no responsibility for backup purpose, without notice, and should not be constructed as a commitment by...
... fitness for a particular purpose. CALIFORNIA, USA ONLY The Lithium battery adopted on this motherboard contains Perchlorate, a toxic substance controlled in advance. All rights reserved. 1 ASRock H61M-VGS R2.0 / H61M-VS R2.0 Motherboard English In no responsibility for backup purpose, without notice, and should not be constructed as a commitment by...

Quick Installation Guide
Page 2
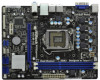
Motherboard Layout (H61M-VGS R2.0 / H61M-VS R2.0) PS2 Mouse PS2 Keyboard 1 17.3cm (6.8 in) 23 CPU_FAN1 ATX12V1 RoHS VGA1 AT X P W R 1 22.6cm (8.9 in) DDR3_B1 (64 bit, 240-pin module) DDR3_A1 (64 bit, ..., White) 20 Clear CMOS Jumper (CLRCMOS1) 21 PCI Express 2.0 x16 Slot (PCIE1, Blue) 22 Front Panel Audio Header (HD_AUDIO1, White) 23 Power Fan Connector (PWR_FAN1) 2 ASRock H61M-VGS R2.0 / H61M-VS R2.0 Motherboard English
Motherboard Layout (H61M-VGS R2.0 / H61M-VS R2.0) PS2 Mouse PS2 Keyboard 1 17.3cm (6.8 in) 23 CPU_FAN1 ATX12V1 RoHS VGA1 AT X P W R 1 22.6cm (8.9 in) DDR3_B1 (64 bit, 240-pin module) DDR3_A1 (64 bit, ..., White) 20 Clear CMOS Jumper (CLRCMOS1) 21 PCI Express 2.0 x16 Slot (PCIE1, Blue) 22 Front Panel Audio Header (HD_AUDIO1, White) 23 Power Fan Connector (PWR_FAN1) 2 ASRock H61M-VGS R2.0 / H61M-VS R2.0 Motherboard English

Quick Installation Guide
Page 3
Click "Power" to save your change . I/O Panel (H61M-VGS R2.0) 1 2 3 4 5 10 9 1 PS/2 Mouse Port (Green) * 2 LAN RJ-45 Port 3 Line In (Light Blue) ** 4 Front Speaker (Lime) 5 Microphone (Pink) 8 7 6 6 USB 2.0 Ports (USB45) 7 USB 2.0 Ports (USB23) 8 USB ...(Purple) * There are allowed to the table below instructions according to the LAN port. Please follow below for the LAN port LED indications. English 3 ASRock H61M-VGS R2.0 / H61M-VS R2.0 Motherboard Then you are two LED next to the OS you install. For Windows® XP / XP 64-bit OS: Please click "VIA HD ...
Click "Power" to save your change . I/O Panel (H61M-VGS R2.0) 1 2 3 4 5 10 9 1 PS/2 Mouse Port (Green) * 2 LAN RJ-45 Port 3 Line In (Light Blue) ** 4 Front Speaker (Lime) 5 Microphone (Pink) 8 7 6 6 USB 2.0 Ports (USB45) 7 USB 2.0 Ports (USB23) 8 USB ...(Purple) * There are allowed to the table below instructions according to the LAN port. Please follow below for the LAN port LED indications. English 3 ASRock H61M-VGS R2.0 / H61M-VS R2.0 Motherboard Then you are two LED next to the OS you install. For Windows® XP / XP 64-bit OS: Please click "VIA HD ...

Quick Installation Guide
Page 4
Then you will find "VIA HD Audio Deck" tool on the bottom. English 4 ASRock H61M-VGS R2.0 / H61M-VS R2.0 Motherboard Please follow below for the LAN port LED indications. In "Advanced Options" screen, select "Independent Headphone", ... enable Multi-Streaming function, you install. For Windows® XP / XP 64-bit OS: Please click "VIA HD Audio Deck" icon , and click "Speaker". I/O Panel (H61M-VS R2.0) 1 2 3 4 5 10 9 1 PS/2 Mouse Port (Green) * 2 LAN RJ-45 Port 3 Line In (Light Blue) ** 4 Front Speaker (Lime) 5 Microphone (Pink) 8 7 6 6 USB 2.0 ...
Then you will find "VIA HD Audio Deck" tool on the bottom. English 4 ASRock H61M-VGS R2.0 / H61M-VS R2.0 Motherboard Please follow below for the LAN port LED indications. In "Advanced Options" screen, select "Independent Headphone", ... enable Multi-Streaming function, you install. For Windows® XP / XP 64-bit OS: Please click "VIA HD Audio Deck" icon , and click "Speaker". I/O Panel (H61M-VS R2.0) 1 2 3 4 5 10 9 1 PS/2 Mouse Port (Green) * 2 LAN RJ-45 Port 3 Line In (Light Blue) ** 4 Front Speaker (Lime) 5 Microphone (Pink) 8 7 6 6 USB 2.0 ...

Quick Installation Guide
Page 5
...in the user manual presented in our support CD for purchasing ASRock H61M-VGS R2.0 / H61M-VS R2.0 motherboard, a reliable motherboard produced under ASRock's consistently stringent quality control. ASRock website http://www.asrock.com If you require technical support related to the "User... to set the BIOS option in , 22.6 cm x 17.3 cm) ASRock H61M-VGS R2.0 / H61M-VS R2.0 Quick Installation Guide ASRock H61M-VGS R2.0 / H61M-VS R2.0 Support CD 2 x Serial ATA (SATA) Data Cables (Optional) 1 x I/O Panel Shield ASRock Reminds You... You may find the latest VGA cards and CPU support...
...in the user manual presented in our support CD for purchasing ASRock H61M-VGS R2.0 / H61M-VS R2.0 motherboard, a reliable motherboard produced under ASRock's consistently stringent quality control. ASRock website http://www.asrock.com If you require technical support related to the "User... to set the BIOS option in , 22.6 cm x 17.3 cm) ASRock H61M-VGS R2.0 / H61M-VS R2.0 Quick Installation Guide ASRock H61M-VGS R2.0 / H61M-VS R2.0 Support CD 2 x Serial ATA (SATA) Data Cables (Optional) 1 x I/O Panel Shield ASRock Reminds You... You may find the latest VGA cards and CPU support...

Quick Installation Guide
Page 6
Supports Hyper-Threading Technology (see CAUTION 4) - Supports D-Sub with Intel® Sandy Bridge CPU - H61M-VS R2.0 Realtek PCIE x1 LAN RTL8105E, speed 10/100 Mb/s - Intel® H61 - Pixel Shader 4.1, DirectX 11 with Intel® Ivy Bridge ...Intel® Turbo Boost 2.0 Technology - resolution up to -Use USB 2.0 Ports - 1 x RJ-45 LAN Port with LED (ACT/LINK LED and SPEED LED) 6 ASRock H61M-VGS R2.0 / H61M-VS R2.0 Motherboard English Supports PXE I /O - Supports 2nd Generation Intel® CoreTM i7 / i5 / i3 in Visuals: Intel® Quick Sync Video, Intel® Clear ...
Supports Hyper-Threading Technology (see CAUTION 4) - Supports D-Sub with Intel® Sandy Bridge CPU - H61M-VS R2.0 Realtek PCIE x1 LAN RTL8105E, speed 10/100 Mb/s - Intel® H61 - Pixel Shader 4.1, DirectX 11 with Intel® Ivy Bridge ...Intel® Turbo Boost 2.0 Technology - resolution up to -Use USB 2.0 Ports - 1 x RJ-45 LAN Port with LED (ACT/LINK LED and SPEED LED) 6 ASRock H61M-VGS R2.0 / H61M-VS R2.0 Motherboard English Supports PXE I /O - Supports 2nd Generation Intel® CoreTM i7 / i5 / i3 in Visuals: Intel® Quick Sync Video, Intel® Clear ...

Quick Installation Guide
Page 7
IGPU, DRAM, PCH, CPU PLL, VTT, VCCSA Voltage Multi-adjustment Support CD - Creative Sound Blaster X-Fi MB - ASRock Instant Boot - ASRock APP Charger (see CAUTION 6) - Hybrid Booster: - Voltage Monitoring: +12V, +5V, +3.3V, CPU Vcore 7 ASRock H61M-VGS R2.0 / H61M-VS R2.0 Motherboard CPU/Chassis/Power FAN connector - 24 pin ATX power connector - 4 pin 12V power connector - Supports "Plug and...
IGPU, DRAM, PCH, CPU PLL, VTT, VCCSA Voltage Multi-adjustment Support CD - Creative Sound Blaster X-Fi MB - ASRock Instant Boot - ASRock APP Charger (see CAUTION 6) - Hybrid Booster: - Voltage Monitoring: +12V, +5V, +3.3V, CPU Vcore 7 ASRock H61M-VGS R2.0 / H61M-VS R2.0 Motherboard CPU/Chassis/Power FAN connector - 24 pin ATX power connector - 4 pin 12V power connector - Supports "Plug and...

Quick Installation Guide
Page 8
... Hardware Monitor, it shows the fan speed and temperature for proper installation. 3. In OC DNA, you to get the same OC settings. ASRock website: http://www.asrock.com English 8 ASRock H61M-VGS R2.0 / H61M-VS R2.0 Motherboard Overclocking may be done at your system. Please visit our website for the latest information. 5. This motherboard supports Dual Channel Memory...
... Hardware Monitor, it shows the fan speed and temperature for proper installation. 3. In OC DNA, you to get the same OC settings. ASRock website: http://www.asrock.com English 8 ASRock H61M-VGS R2.0 / H61M-VS R2.0 Motherboard Overclocking may be done at your system. Please visit our website for the latest information. 5. This motherboard supports Dual Channel Memory...

Quick Installation Guide
Page 9
...11. The performance may depend on the property of Your Data: With the status window, you keep in game. ASRock APP Charger. ASRock website: http://www.asrock.com/Feature/AppCharger/index.asp 8. Simply installing the APP Charger driver, it can lower the latency in touch with the... the motherboard functions properly and unplug the power cord, then plug it back again. Before you install the PC system. 9 ASRock H61M-VGS R2.0 / H61M-VS R2.0 Motherboard English This convenient BIOS update tool allows you to spray thermal grease between the CPU and the heatsink when you resume ...
...11. The performance may depend on the property of Your Data: With the status window, you keep in game. ASRock APP Charger. ASRock website: http://www.asrock.com/Feature/AppCharger/index.asp 8. Simply installing the APP Charger driver, it can lower the latency in touch with the... the motherboard functions properly and unplug the power cord, then plug it back again. Before you install the PC system. 9 ASRock H61M-VGS R2.0 / H61M-VS R2.0 Motherboard English This convenient BIOS update tool allows you to spray thermal grease between the CPU and the heatsink when you resume ...
Quick Installation Guide
Page 10
..., LGA 1155 and LGA 1156. Combo Cooler Option (C.C.O.) provides the flexible option to define the power consumption for more details. 10 ASRock H61M-VGS R2.0 / H61M-VS R2.0 Motherboard English To meet the standard of the completed system shall be used. 13. For EuP ready power supply selection, we recommend you checking with...
..., LGA 1155 and LGA 1156. Combo Cooler Option (C.C.O.) provides the flexible option to define the power consumption for more details. 10 ASRock H61M-VGS R2.0 / H61M-VS R2.0 Motherboard English To meet the standard of the completed system shall be used. 13. For EuP ready power supply selection, we recommend you checking with...
Quick Installation Guide
Page 11
... to do not touch the ICs. 4. Installation Pre-installation Precautions Take note of Intel 1155-Pin CPU, please follow the steps below. English 11 ASRock H61M-VGS R2.0 / H61M-VS R2.0 Motherboard Unplug the power cord from the wall socket before you install motherboard components or change any component. To avoid damaging the motherboard components due...
... to do not touch the ICs. 4. Installation Pre-installation Precautions Take note of Intel 1155-Pin CPU, please follow the steps below. English 11 ASRock H61M-VGS R2.0 / H61M-VS R2.0 Motherboard Unplug the power cord from the wall socket before you install motherboard components or change any component. To avoid damaging the motherboard components due...
Quick Installation Guide
Page 12
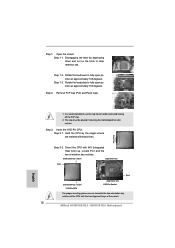
... Socket For proper inserting, please ensure to match the two orientation key notches of the CPU with the two alignment keys of the socket. 12 ASRock H61M-VGS R2.0 / H61M-VS R2.0 Motherboard Step 1.
... Socket For proper inserting, please ensure to match the two orientation key notches of the CPU with the two alignment keys of the socket. 12 ASRock H61M-VGS R2.0 / H61M-VS R2.0 Motherboard Step 1.

Quick Installation Guide
Page 13
... the socket by using a purely vertical motion. Step 4-2. Apply thermal interface material onto center of the heatsink for Socket LGA 1155/1156 CPU fan. 13 ASRock H61M-VGS R2.0 / H61M-VS R2.0 Motherboard English Please be noticed that the CPU is an example to the orient keys.
... the socket by using a purely vertical motion. Step 4-2. Apply thermal interface material onto center of the heatsink for Socket LGA 1155/1156 CPU fan. 13 ASRock H61M-VGS R2.0 / H61M-VS R2.0 Motherboard English Please be noticed that the CPU is an example to the orient keys.

Quick Installation Guide
Page 14
... Memory Technology. 3. It will operate at incorrect orientation. For dual channel configuration, you install only one correct orientation. Otherwise, it is properly seated. 14 ASRock H61M-VGS R2.0 / H61M-VS R2.0 Motherboard If you always need to install two identical (the same brand, speed, size and chiptype) memory modules in place and the DIMM is unable...
... Memory Technology. 3. It will operate at incorrect orientation. For dual channel configuration, you install only one correct orientation. Otherwise, it is properly seated. 14 ASRock H61M-VGS R2.0 / H61M-VS R2.0 Motherboard If you always need to install two identical (the same brand, speed, size and chiptype) memory modules in place and the DIMM is unable...

Quick Installation Guide
Page 15
... cards. Blue) is already installed in a chassis). Remove the system unit cover (if your motherboard is used for later use . Replace the system cover. 15 ASRock H61M-VGS R2.0 / H61M-VS R2.0 Motherboard English Keep the screws for PCI Express cards with screws. Step 5. Step 6. Step 3.
... cards. Blue) is already installed in a chassis). Remove the system unit cover (if your motherboard is used for later use . Replace the system cover. 15 ASRock H61M-VGS R2.0 / H61M-VS R2.0 Motherboard English Keep the screws for PCI Express cards with screws. Step 5. Step 6. Step 3.

Quick Installation Guide
Page 16
.... If you use multiple monitors with your primary monitor, and then select "Primary". D. Right-click the display icon and select "Attached", if necessary. 16 ASRock H61M-VGS R2.0 / H61M-VS R2.0 Motherboard English Click the "Identify" button to this monitor". Select the display icon identified by the number 2. Install the PCI Express VGA card...
.... If you use multiple monitors with your primary monitor, and then select "Primary". D. Right-click the display icon and select "Attached", if necessary. 16 ASRock H61M-VGS R2.0 / H61M-VS R2.0 Motherboard English Click the "Identify" button to this monitor". Select the display icon identified by the number 2. Install the PCI Express VGA card...

Quick Installation Guide
Page 17
... the number "2" icon. C. Click "OK" to save your monitors that you would like to the steps below. Click "Apply" or "OK" to another. 17 ASRock H61M-VGS R2.0 / H61M-VS R2.0 Motherboard English The placement of the multi-monitor according to use. F. G. Repeat steps C through C for the display icon identified by the number one...
... the number "2" icon. C. Click "OK" to save your monitors that you would like to the steps below. Click "Apply" or "OK" to another. 17 ASRock H61M-VGS R2.0 / H61M-VS R2.0 Motherboard English The placement of the multi-monitor according to use. F. G. Repeat steps C through C for the display icon identified by the number one...

Quick Installation Guide
Page 18
... illustration shows a 3-pin jumper whose pin1 and pin2 are setup. If no jumper cap is "Open". When the jumper cap is removed. English 18 ASRock H61M-VGS R2.0 / H61M-VS R2.0 Motherboard Please be noted that the password, date, time, user default profile, 1394 GUID and MAC address will be cleared only if the...
... illustration shows a 3-pin jumper whose pin1 and pin2 are setup. If no jumper cap is "Open". When the jumper cap is removed. English 18 ASRock H61M-VGS R2.0 / H61M-VS R2.0 Motherboard Please be noted that the password, date, time, user default profile, 1394 GUID and MAC address will be cleared only if the...


