User Manual
Page 10
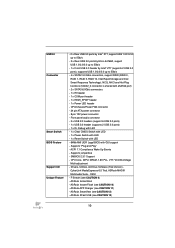
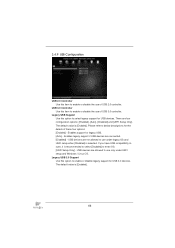
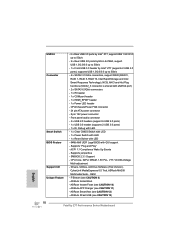
...10 CPU/Chassis/Power FAN connector - 24 pin ATX power connector - 8 pin 12V power connector - Drivers, Utilities, AntiVirus Software (Trial Version), CyberLink MediaEspresso 6.5 Trial, ASRock MAGIX Multimedia Suite - CPU Core, IGPU, DRAM, 1.8V PLL, VTT, VCCSA Voltage Multi-adjustment - Supports "Plug and Play" - ASRock Instant Flash (see CAUTION 10) - ASRock Instant Boot - Front panel audio connector - 3 x USB 2.0 headers (support 6 USB 2.0 ports) - 1 x USB 3.0 header (supports 2 USB 3.0 ports) - 1 x Dr. Debug with LED - 1 x Clear CMOS Switch with LED - 1 x Power Switch with LED...
...10 CPU/Chassis/Power FAN connector - 24 pin ATX power connector - 8 pin 12V power connector - Drivers, Utilities, AntiVirus Software (Trial Version), CyberLink MediaEspresso 6.5 Trial, ASRock MAGIX Multimedia Suite - CPU Core, IGPU, DRAM, 1.8V PLL, VTT, VCCSA Voltage Multi-adjustment - Supports "Plug and Play" - ASRock Instant Flash (see CAUTION 10) - ASRock Instant Boot - Front panel audio connector - 3 x USB 2.0 headers (support 6 USB 2.0 ports) - 1 x USB 3.0 header (supports 2 USB 3.0 ports) - 1 x Dr. Debug with LED - 1 x Clear CMOS Switch with LED - 1 x Power Switch with LED...
User Manual
Page 12
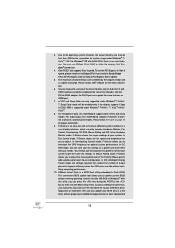
... RAM to utilize the memory that Windows® cannot use two of the Fatal1ty Mouse port to -HDMI adapter, the DVI-D port can update your OC settings as HDMI port. 7. Deep Color mode will run the PCI Express in EDID. Please check the table on page 16 for the latest information. 6. In Overclocking Control mode, F-Stream allows you to use . 4. You can choose to adjust. In Fan Control mode, F-Stream shows the fan speed and temperature...
... RAM to utilize the memory that Windows® cannot use two of the Fatal1ty Mouse port to -HDMI adapter, the DVI-D port can update your OC settings as HDMI port. 7. Deep Color mode will run the PCI Express in EDID. Please check the table on page 16 for the latest information. 6. In Overclocking Control mode, F-Stream allows you to use . 4. You can choose to adjust. In Fan Control mode, F-Stream shows the fan speed and temperature...
User Manual
Page 15
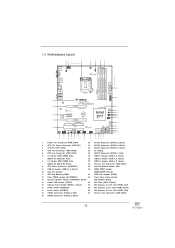
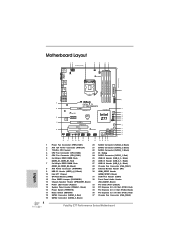
...-pin DDR3 DIMM Slots 27 USB 2.0 Header (USB_8_9, Black) (DDR3_A2, DDR3_B2, Black) 28 Chassis Fan Connector (CHA_FAN1) 8 ATX Power Connector (ATXPWR1) 29 Infrared Module Header (IR1) 9 USB 3.0 Header (USB3_4_5, Black) 30 HDMI_SPDIF Header 10 Intel Z77 Chipset (HDMI_SPDIF1, Black) 11 SPI Flash Memory (64Mb) 31 COM Port Header (COM1) 12 Clear CMOS Jumper (CLRCMOS1) 32 Front Panel Audio Header 13 Chassis Speaker Header (SPEAKER1, Black) (HD_AUDIO1, Black) 14 Power LED Header (PLED1) 33 PCI Slots (PCI1-2, Black) 15 System Panel Header (PANEL1, Black) 34 PCI Express 2.0 x16 Slot...
...-pin DDR3 DIMM Slots 27 USB 2.0 Header (USB_8_9, Black) (DDR3_A2, DDR3_B2, Black) 28 Chassis Fan Connector (CHA_FAN1) 8 ATX Power Connector (ATXPWR1) 29 Infrared Module Header (IR1) 9 USB 3.0 Header (USB3_4_5, Black) 30 HDMI_SPDIF Header 10 Intel Z77 Chipset (HDMI_SPDIF1, Black) 11 SPI Flash Memory (64Mb) 31 COM Port Header (COM1) 12 Clear CMOS Jumper (CLRCMOS1) 32 Front Panel Audio Header 13 Chassis Speaker Header (SPEAKER1, Black) (HD_AUDIO1, Black) 14 Power LED Header (PLED1) 33 PCI Slots (PCI1-2, Black) 15 System Panel Header (PANEL1, Black) 34 PCI Express 2.0 x16 Slot...
User Manual
Page 27
... your computer. AMD recommends Windows® XP Service Pack 2 or higher to download it again): http://www.microsoft.com/windowsxp/sp2/default.mspx B. Restart your computer and boot into OS. You must have Microsoft .NET Framework installed prior to installation. Double-click "ATI Catalyst Control Center". We recommend using this utility to uninstall any VGA driver installed in your system, there is an optional download. Step...
... your computer. AMD recommends Windows® XP Service Pack 2 or higher to download it again): http://www.microsoft.com/windowsxp/sp2/default.mspx B. Restart your computer and boot into OS. You must have Microsoft .NET Framework installed prior to installation. Double-click "ATI Catalyst Control Center". We recommend using this utility to uninstall any VGA driver installed in your system, there is an optional download. Step...
User Manual
Page 42
... 0xDA 0xDB 0xDC SCSI Detect SCSI Enable Setup Verifying Password Start of Setup Reserved for ASL (see ASL Status Codes section below) Setup Input Wait Reserved for ASL (see ASL Status Codes section below) Ready To Boot event Legacy Boot event Exit Boot Services event Runtime Set Virtual Address MAP Begin Runtime Set Virtual Address MAP End Legacy Option ROM Initialization System Reset USB hot plug PCI bus hot plug Clean-up of NVRAM Confi...
... 0xDA 0xDB 0xDC SCSI Detect SCSI Enable Setup Verifying Password Start of Setup Reserved for ASL (see ASL Status Codes section below) Setup Input Wait Reserved for ASL (see ASL Status Codes section below) Ready To Boot event Legacy Boot event Exit Boot Services event Runtime Set Virtual Address MAP Begin Runtime Set Virtual Address MAP End Legacy Option ROM Initialization System Reset USB hot plug PCI bus hot plug Clean-up of NVRAM Confi...
User Manual
Page 47
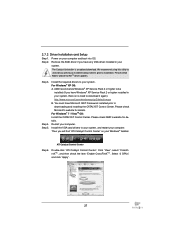
... Rapid Storage" will be auto-detected and listed on your optical drive first. Please refer to the document in the Support CD, "Guide to SATA Hard Disks Installation and RAID Configuration", which is located in the support CD, "Guide to Intel Rapid Storage", which is not supported under Windows® XP / XP 64-bit. Enter UEFI SETUP UTILITY Advanced screen Storage Configuration. STEP 2: Use "RAID Installation Guide" to [RAID]. 2.18 Driver Installation Guide To install the drivers to your...
... Rapid Storage" will be auto-detected and listed on your optical drive first. Please refer to the document in the Support CD, "Guide to SATA Hard Disks Installation and RAID Configuration", which is located in the support CD, "Guide to Intel Rapid Storage", which is not supported under Windows® XP / XP 64-bit. Enter UEFI SETUP UTILITY Advanced screen Storage Configuration. STEP 2: Use "RAID Installation Guide" to [RAID]. 2.18 Driver Installation Guide To install the drivers to your...
User Manual
Page 57
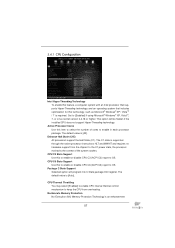
... enable in each processor package. CPU Thermal Throttling You may select [Enabled] to enable CPU internal thermal control mechanism to OS. No-Execute Memory Protection No-Execution (NX) Memory Protection Technology is an enhancement 57 CPU C6 State Support Use this to enable or disable CPU C3 (ACPI C2) report to keep the CPU from the chipset. Active Processor Cores Use this item to [Enabled] if using Microsoft® Windows® XP, VistaTM, 7, or Linux kernel version...
... enable in each processor package. CPU Thermal Throttling You may select [Enabled] to enable CPU internal thermal control mechanism to OS. No-Execute Memory Protection No-Execution (NX) Memory Protection Technology is an enhancement 57 CPU C6 State Support Use this to enable or disable CPU C3 (ACPI C2) report to keep the CPU from the chipset. Active Processor Cores Use this item to [Enabled] if using Microsoft® Windows® XP, VistaTM, 7, or Linux kernel version...

User Manual
Page 59
... you to set onboard VGA share memory feature. Share Memory This allows you install the PCI Express card under Windows® XP / VistaTM OS, please disable this to enable or disable Render Standby by Internal Graphics Device. IGPU Multi-Moniter This allows you to select [Onboard], [PCI] or [PCI Express] as the boot graphic adapter priority. Render Standby Use this option. Deep Render Standby Use this to enable or disable Intel® VT-d technology (Intel® Virtualization Technology for Directed...
... you to set onboard VGA share memory feature. Share Memory This allows you install the PCI Express card under Windows® XP / VistaTM OS, please disable this to enable or disable Render Standby by Internal Graphics Device. IGPU Multi-Moniter This allows you to select [Onboard], [PCI] or [PCI Express] as the boot graphic adapter priority. Render Standby Use this option. Deep Render Standby Use this to enable or disable Intel® VT-d technology (Intel® Virtualization Technology for Directed...
User Manual
Page 66
...Disabled] to enter OS. [UEFI Setup Only] - Enables support for the details of these four options: [Enabled] - USB devices are not allowed to use of USB 3.0 controller. The default value is [Enabled]. Legacy USB Support Use this item to enable or disable the use under UEFI setup and Windows / Linux OS. Please refer to below descriptions for legacy USB. [Auto] - The default value is [Enabled]. 66 USB devices are allowed to use of USB 2.0 controller. If you have USB compatibility issues, it is selected. There are connected. [Disabled] - 3.4.9 USB Configuration USB...
...Disabled] to enter OS. [UEFI Setup Only] - Enables support for the details of these four options: [Enabled] - USB devices are not allowed to use of USB 3.0 controller. The default value is [Enabled]. Legacy USB Support Use this item to enable or disable the use under UEFI setup and Windows / Linux OS. Please refer to below descriptions for legacy USB. [Auto] - The default value is [Enabled]. 66 USB devices are allowed to use of USB 2.0 controller. If you have USB compatibility issues, it is selected. There are connected. [Disabled] - 3.4.9 USB Configuration USB...
User Manual
Page 71
..., locate and double click on a specific item then follow the installation wizard to install it. 4.2.4 Contact Information If you may contact your OS documentation for more about ASRock, welcome to display the menu. 4.2.2 Drivers Menu The Drivers Menu shows the available device's drivers if the system detects installed devices. Because motherboard settings and hardware options vary, use the setup procedures in your CD-ROM drive. The CD automatically displays the Main Menu if...
..., locate and double click on a specific item then follow the installation wizard to install it. 4.2.4 Contact Information If you may contact your OS documentation for more about ASRock, welcome to display the menu. 4.2.2 Drivers Menu The Drivers Menu shows the available device's drivers if the system detects installed devices. Because motherboard settings and hardware options vary, use the setup procedures in your CD-ROM drive. The CD automatically displays the Main Menu if...
Quick Installation Guide
Page 4
... 21 Power Fan Connector (PWR_FAN1) 20 ATX 12V Power Connector (ATX12V1) 21 1155-Pin CPU Socket 22 CPU Fan Connector (CPU_FAN2) 23 CPU Fan Connector (CPU_FAN1) 24 2 x 240-pin DDR3 DIMM Slots 25 (DDR3_A1, DDR3_B1, Red) 26 2 x 240-pin DDR3 DIMM Slots 27 (DDR3_A2, DDR3_B2, Black) 28 ATX Power Connector (ATXPWR1) 29 USB 3.0 Header (USB3_4_5, Black) 30 Intel Z77 Chipset SPI Flash Memory (64Mb) 31 Clear CMOS Jumper (CLRCMOS1) 32 Chassis Speaker Header (SPEAKER1, Black) Power LED Header (PLED1) 33 System Panel Header (PANEL1, Black) 34 Power Switch (PWRBTN) 35 Reset...
... 21 Power Fan Connector (PWR_FAN1) 20 ATX 12V Power Connector (ATX12V1) 21 1155-Pin CPU Socket 22 CPU Fan Connector (CPU_FAN2) 23 CPU Fan Connector (CPU_FAN1) 24 2 x 240-pin DDR3 DIMM Slots 25 (DDR3_A1, DDR3_B1, Red) 26 2 x 240-pin DDR3 DIMM Slots 27 (DDR3_A2, DDR3_B2, Black) 28 ATX Power Connector (ATXPWR1) 29 USB 3.0 Header (USB3_4_5, Black) 30 Intel Z77 Chipset SPI Flash Memory (64Mb) 31 Clear CMOS Jumper (CLRCMOS1) 32 Chassis Speaker Header (SPEAKER1, Black) Power LED Header (PLED1) 33 System Panel Header (PANEL1, Black) 34 Power Switch (PWRBTN) 35 Reset...
Quick Installation Guide
Page 7
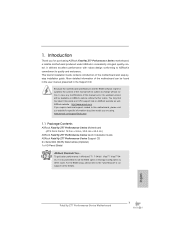
... "User Manual" in Storage Configuration to quality and endurance. More detailed information of this motherboard, please visit our website for specific information about the model you for details. 7 Fatal1ty Z77 Performance Series Motherboard English For the BIOS setup, please refer to this manual occur, the updated version will be found in the user manual presented in , 30.5 cm x 24.4 cm) ASRock Fatal1ty Z77 Performance Series Quick Installation Guide ASRock Fatal1ty Z77 Performance Series Support CD 2 x Serial ATA (SATA) Data Cables (Optional) 1 x I/O Panel...
... "User Manual" in Storage Configuration to quality and endurance. More detailed information of this motherboard, please visit our website for specific information about the model you for details. 7 Fatal1ty Z77 Performance Series Motherboard English For the BIOS setup, please refer to this manual occur, the updated version will be found in the user manual presented in , 30.5 cm x 24.4 cm) ASRock Fatal1ty Z77 Performance Series Quick Installation Guide ASRock Fatal1ty Z77 Performance Series Support CD 2 x Serial ATA (SATA) Data Cables (Optional) 1 x I/O Panel...
Quick Installation Guide
Page 10
... "Plug and Play" - CPU Core, IGPU, DRAM, 1.8V PLL, VTT, VCCSA Voltage Multi-adjustment - ASRock Instant Flash (see CAUTION 10) - OEM - Front panel audio connector - 3 x USB 2.0 headers (support 6 USB 2.0 ports) - 1 x USB 3.0 header (supports 2 USB 3.0 ports) - 1 x Dr. Debug with LED - 1 x Clear CMOS Switch with LED - 1 x Power Switch with LED - 1 x Reset Switch with LED - 64Mb AMI UEFI Legal BIOS with eSATA2 port) - 2 x SATA3 6.0Gb/s connectors - 1 x IR header - 1 x COM port header - 1 x HDMI_SPDIF header - 1 x Power LED header - Drivers, Utilities, AntiVirus Software (Trial Version...
... "Plug and Play" - CPU Core, IGPU, DRAM, 1.8V PLL, VTT, VCCSA Voltage Multi-adjustment - ASRock Instant Flash (see CAUTION 10) - OEM - Front panel audio connector - 3 x USB 2.0 headers (support 6 USB 2.0 ports) - 1 x USB 3.0 header (supports 2 USB 3.0 ports) - 1 x Dr. Debug with LED - 1 x Clear CMOS Switch with LED - 1 x Power Switch with LED - 1 x Reset Switch with LED - 64Mb AMI UEFI Legal BIOS with eSATA2 port) - 2 x SATA3 6.0Gb/s connectors - 1 x IR header - 1 x COM port header - 1 x HDMI_SPDIF header - 1 x Power LED header - Drivers, Utilities, AntiVirus Software (Trial Version...

Quick Installation Guide
Page 12
... optimal system performance. ASRock Instant Flash is an all-in a user-friendly interface, which currently includes Hardware Monitor, Fan Control, Overclocking, OC DNA, Mouse Polling and IES. 3. You can press the key during the POST or the key to enter into the BIOS setup menu to utilize the memory that Windows® cannot use two of your friends. This convenient BIOS update tool allows you can use ASRock XFast RAM to access ASRock Instant Flash. xvYCC and...
... optimal system performance. ASRock Instant Flash is an all-in a user-friendly interface, which currently includes Hardware Monitor, Fan Control, Overclocking, OC DNA, Mouse Polling and IES. 3. You can press the key during the POST or the key to enter into the BIOS setup menu to utilize the memory that Windows® cannot use two of your friends. This convenient BIOS update tool allows you can use ASRock XFast RAM to access ASRock Instant Flash. xvYCC and...
Quick Installation Guide
Page 24
... installed (If you have Windows® XP Service Pack 2 or higher installed in your system. Double-click "ATI Catalyst Control Center". We recommend using this utility to your system, and restart your system. Step 5. Please check AMD's website for ATITM driver updates. Step 2. English 24 Fatal1ty Z77 Performance Series Motherboard Step 3. ATI Catalyst Control Center Step 6. Power on your system, there is an optional download. Install the VGA card drivers to uninstall any VGA driver installed...
... installed (If you have Windows® XP Service Pack 2 or higher installed in your system. Double-click "ATI Catalyst Control Center". We recommend using this utility to your system, and restart your system. Step 5. Please check AMD's website for ATITM driver updates. Step 2. English 24 Fatal1ty Z77 Performance Series Motherboard Step 3. ATI Catalyst Control Center Step 6. Power on your system, there is an optional download. Install the VGA card drivers to uninstall any VGA driver installed...
Quick Installation Guide
Page 216
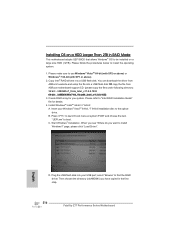
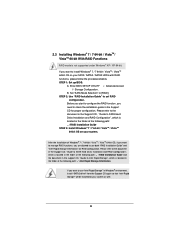
... launch boot menu at system POST and choose the item "UEFI:xxx" to install the operating system. 1. Then choose the directory (xx\AMD64\) you system. Please follow the procedures below to boot. B. Start Windows® Installation. Plug the USB flash disk into your Windows® VistaTM 64-bit / 7 64-bit installation disc to be installed on a HDD Larger Than 2TB in the first step. 216 Fatal1ty Z77 Performance Series Motherboard English Installing...
... launch boot menu at system POST and choose the item "UEFI:xxx" to install the operating system. 1. Then choose the directory (xx\AMD64\) you system. Please follow the procedures below to boot. B. Start Windows® Installation. Plug the USB flash disk into your Windows® VistaTM 64-bit / 7 64-bit installation disc to be installed on a HDD Larger Than 2TB in the first step. 216 Fatal1ty Z77 Performance Series Motherboard English Installing...
Quick Installation Guide
Page 217
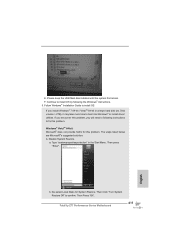
...® does not provide hotfix for System Restore. a. Then Click "Turn System Restore Off" to fix this problem. Please keep the USB flash disk installed until the system first reboot. Type "systempropertiesprotection" in a large hard disk (ex. Disable System Restore. Then Press "Ok". 217 Fatal1ty Z77 Performance Series Motherboard English E. If you encounter this problem, you install Windows® 7 64-bit / VistaTM 64-bit in the Start Menu. F.
...® does not provide hotfix for System Restore. a. Then Click "Turn System Restore Off" to fix this problem. Please keep the USB flash disk installed until the system first reboot. Type "systempropertiesprotection" in a large hard disk (ex. Disable System Restore. Then Press "Ok". 217 Fatal1ty Z77 Performance Series Motherboard English E. If you encounter this problem, you install Windows® 7 64-bit / VistaTM 64-bit in the Start Menu. F.
RAID Installation Guide
Page 6
... SATA Hard Disks Installation and RAID Configuration", which is located in the Support CD, "Guide to install Windows® 7 / 7 64-bit / VistaTM / VistaTM 64-bit OS on your system as well. 6 Please refer to the document in the Support CD, "Guide to SATA Hard Disks Installation and RAID Configuration", which is not supported under Windows® XP / XP 64-bit. STEP 2: Use "RAID Installation Guide" to [RAID]. B. Enter BIOS SETUP UTILITY Advanced screen Storage Configuration. Set "SATA Mode Selection" to set RAID...
... SATA Hard Disks Installation and RAID Configuration", which is located in the Support CD, "Guide to install Windows® 7 / 7 64-bit / VistaTM / VistaTM 64-bit OS on your system as well. 6 Please refer to the document in the Support CD, "Guide to SATA Hard Disks Installation and RAID Configuration", which is not supported under Windows® XP / XP 64-bit. STEP 2: Use "RAID Installation Guide" to [RAID]. B. Enter BIOS SETUP UTILITY Advanced screen Storage Configuration. Set "SATA Mode Selection" to set RAID...
Intel Rapid Storage Guide
Page 13
This message appears at the beginning of available SCSI adapters. Use the Floppy Configuration Utility to create a floppy disk with a screen asking you need to install a third party SCSI or RAID driver. Select your exit. When you have successfully installed the driver and Windows setup should continue. Press Enter to confirm your controller and continue. You will then be visible. 6. At this point, you see a message in...
This message appears at the beginning of available SCSI adapters. Use the Floppy Configuration Utility to create a floppy disk with a screen asking you need to install a third party SCSI or RAID driver. Select your exit. When you have successfully installed the driver and Windows setup should continue. Press Enter to confirm your controller and continue. You will then be visible. 6. At this point, you see a message in...

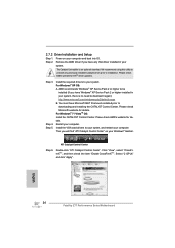
Intel Smart Response Installation Guide
Page 1
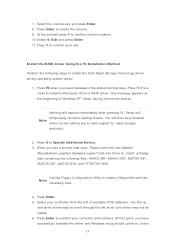
Boot system to show the newly accelerated system configuration. * Intel® will refresh to desktop, open , click on the "Enable Acceleration" button on the GUI panel. 5. After clicking OK button, SRT will enable automatically, and the RST GUI will update the new version RST driver in RAID ROM. It is not necessary to use Enhanced or Maximized Mode. 6. Intel Smart Response Technology Installation Guide This motherboard supports Intel Smart Response Technology. When pop-up...
Boot system to show the newly accelerated system configuration. * Intel® will refresh to desktop, open , click on the "Enable Acceleration" button on the GUI panel. 5. After clicking OK button, SRT will enable automatically, and the RST GUI will update the new version RST driver in RAID ROM. It is not necessary to use Enhanced or Maximized Mode. 6. Intel Smart Response Technology Installation Guide This motherboard supports Intel Smart Response Technology. When pop-up...


