
Software/BIOS Setup Guide
Page 8
If there are no drivers to be installed. Click "Update" to exit. Select one or more drivers to run the application again, please enable the "Auto Driver Installer" item in the BIOS setting. 4 Click "Select All" to select all items. Click "Unselect All" to remove all available drivers that your selections. Step 4 The Auto Driver Installer panel lists all of your motherboard supports. If you would like to be installed, click "Finish" to start downloading and installing drivers.
If there are no drivers to be installed. Click "Update" to exit. Select one or more drivers to run the application again, please enable the "Auto Driver Installer" item in the BIOS setting. 4 Click "Select All" to select all items. Click "Unselect All" to remove all available drivers that your selections. Step 4 The Auto Driver Installer panel lists all of your motherboard supports. If you would like to be installed, click "Finish" to start downloading and installing drivers.

Software/BIOS Setup Guide
Page 80
This tool only lists the SSDs that support the Secure Erase function. When it is enabled, after entering to Windows with your PC. 3.5 Tools ASRock Polychrome RGB Allows you are having trouble with available Internet access, the Auto Driver Installer tool will be permanently destroyed on...Secure Erase Tool Use this item to securely erase SSD. Please setup network configuration before using UEFI Tech Service. UEFI Tech Service Contact ASRock Tech Service if you to download and install all user data will appear automatically. 76 NVME Sanitization Tool After you to select LED...
This tool only lists the SSDs that support the Secure Erase function. When it is enabled, after entering to Windows with your PC. 3.5 Tools ASRock Polychrome RGB Allows you are having trouble with available Internet access, the Auto Driver Installer tool will be permanently destroyed on...Secure Erase Tool Use this item to securely erase SSD. Please setup network configuration before using UEFI Tech Service. UEFI Tech Service Contact ASRock Tech Service if you to download and install all user data will appear automatically. 76 NVME Sanitization Tool After you to select LED...
User Manual
Page 5
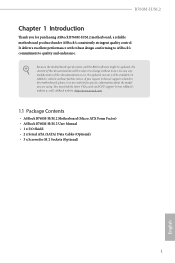
... find the latest VGA cards and CPU support list on ASRock's website without notice. If you are using. B760M-H/M.2 Chapter 1 Introduction Thank you for specific information about the model you require technical support related to this motherboard, please visit our website for purchasing ASRock B760M-H/M.2 motherboard, a reliable motherboard produced under ASRock's consistently stringent quality control. Because the motherboard...
... find the latest VGA cards and CPU support list on ASRock's website without notice. If you are using. B760M-H/M.2 Chapter 1 Introduction Thank you for specific information about the model you require technical support related to this motherboard, please visit our website for purchasing ASRock B760M-H/M.2 motherboard, a reliable motherboard produced under ASRock's consistently stringent quality control. Because the motherboard...
User Manual
Page 6
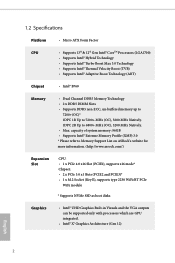
... • 2 x DDR5 DIMM Slots • Supports DDR5 non-ECC, un-buffered memory up to 7200+(OC)* 1DPC 1R Up to 7200+ MHz (OC), 5600 MHz Natively. 1DPC 2R Up to Memory Support List on ASRock's website for more information. (http://www.asrock.com/) Expansion Slot CPU: • 1 x PCIe... 4.0 x16 Slot (PCIE1), supports x16 mode* Chipset: • 2 x PCIe 3.0 x1 Slots (PCIE2 and PCIE3)* • 1 ...
... • 2 x DDR5 DIMM Slots • Supports DDR5 non-ECC, un-buffered memory up to 7200+(OC)* 1DPC 1R Up to 7200+ MHz (OC), 5600 MHz Natively. 1DPC 2R Up to Memory Support List on ASRock's website for more information. (http://www.asrock.com/) Expansion Slot CPU: • 1 x PCIe... 4.0 x16 Slot (PCIE1), supports x16 mode* Chipset: • 2 x PCIe 3.0 x1 Slots (PCIE2 and PCIE3)* • 1 ...
User Manual
Page 40
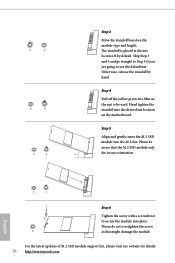
... place. Please be used. The standoff is placed at the nut location B by hand. For the latest updates of M.2 SSD module support list, please visit our website for details: 36 http://www.asrock.com Hand tighten the standoff into the M.2 slot. English B A B NUT2 NUT1 Step 6 Tighten the screw with a screwdriver to use the...
... place. Please be used. The standoff is placed at the nut location B by hand. For the latest updates of M.2 SSD module support list, please visit our website for details: 36 http://www.asrock.com Hand tighten the standoff into the M.2 slot. English B A B NUT2 NUT1 Step 6 Tighten the screw with a screwdriver to use the...
User Manual
Page 42
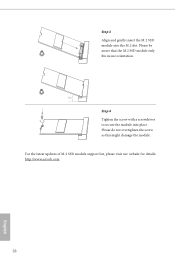
Step 3 Align and gently insert the M.2 SSD module into place. For the latest updates of M.2 SSD module support list, please visit our website for details: http://www.asrock.com English 38 Please do not overtighten the screw as this might damage the module. Please be aware that the M.2 SSD module only fits in one orientation. 20o NUT2 NUT1 Step 4 Tighten the screw with a screwdriver to secure the module into the M.2 slot.
Step 3 Align and gently insert the M.2 SSD module into place. For the latest updates of M.2 SSD module support list, please visit our website for details: http://www.asrock.com English 38 Please do not overtighten the screw as this might damage the module. Please be aware that the M.2 SSD module only fits in one orientation. 20o NUT2 NUT1 Step 4 Tighten the screw with a screwdriver to secure the module into the M.2 slot.
Intel Rapid Storage Guide
Page 13
... with a screen asking you have successfully installed the driver and Windows setup should continue. Press Enter to confirm your controller from the list of Windows setup (during operating system setup: 1. At the prompt press Y to Specify Additional Device. 3. This message appears at ...message in the status line that says, Press F6 if you see a prompt that says, Please insert the disk labeled Manufacturer-supplied hardware support disk into Drive A:, insert ;a floppy disk containing the following steps to create the volume. 9. 7. Nothing will temporarily continue loading drivers....
... with a screen asking you have successfully installed the driver and Windows setup should continue. Press Enter to confirm your controller from the list of Windows setup (during operating system setup: 1. At the prompt press Y to Specify Additional Device. 3. This message appears at ...message in the status line that says, Press F6 if you see a prompt that says, Please insert the disk labeled Manufacturer-supplied hardware support disk into Drive A:, insert ;a floppy disk containing the following steps to create the volume. 9. 7. Nothing will temporarily continue loading drivers....


