ASRock 845GV-M Support and Manuals
Get Help and Manuals for this ASRock item

View All Support Options Below
Free ASRock 845GV-M manuals!
Problems with ASRock 845GV-M?
Ask a Question
Free ASRock 845GV-M manuals!
Problems with ASRock 845GV-M?
Ask a Question
Most Recent ASRock 845GV-M Questions

I Want Download Genex 845gv-m
i miss some of drivers from my computer now i want reurn it
i miss some of drivers from my computer now i want reurn it
(Posted by sysm2001 10 years ago)
Popular ASRock 845GV-M Manual Pages
User Manual - Page 3

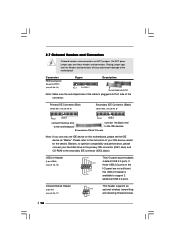
Power Setup Menu 28 4. Security Setup Menu 27 3. Boot Setup Menu 29 5. Contents
1 Introduction 4
1.1 Package Contents 4 1.2 Specifications 4 1.3 Supported AGP VGA Cards List 7 1.4 Motherboard Layout 9 1.5 I/O Panal 10
2 Installation 11
Pre-installation Precautions 11 2.1 CPU Installation 12 2.2 Installation of CPU fan and Heatsink 12 2.3 Installation of Memory Modules (DIMM ...
User Manual - Page 6

... under Microsoft® Windows® XP SP1/2000 SP4.
CPU FSB Frequency 533 400
Memory Support Frequency DDR266, DDR333 ...supports compatible AGP VGA cards. While CPU overheat is detected, the system will not be able to the installation guide on the motherboard functions properly before you will automatically shutdown. About the setting of AGP VGA card, please refer to install...
User Manual - Page 9

...
COM1
PARALLEL PORT
VGA
27
26 25 24 23
22 21
Top: Line In
Center: Line Out
Bottom: Mic In
USB 2.0
USB 2.0 Top: RJ-45 CD1
PCI LAN
Intel 845GV Chipset
AUX1
AUDIO1
1 JR1 JL1
AUDIO CODEC
AGP1 PCI 1
Super I/O
2MB BIOS
PCI 2
5.1CH PCI 3
AMR1
COM2 1
20 19
IDE1
845GV-M
Intel ICH4
CMOS Battery
CLRCMOS0...
User Manual - Page 14

... motherboard is used to install expansion cards that you must make sure to insert a MR card (optional) with screws.
Keep the screws for Windows XP)", which are used to install the driver of the expansion card and make sure that only supports compatible AGP VGA cards.
PCI slots: PCI slots are located in the Support CD, "AGI Slot Installation Guide...
User Manual - Page 15

... Monitor feature. Jumper
Setting
Description
PS2_USB_PWR1
1_2
2_3
Short pin2, pin3 to clear the CMOS
when you just finish updating the BIOS, you must boot up events. 2.5 Easy Dual Monitor Feature
Thanks for 3 seconds. With the internal onboard VGA and the external add-on CLRCMOS0 for choosing AGI 8X Technology, this motherboard supports Easy Dual Monitor upgrade.
User Manual - Page 16
..., to optimize compatibility and performance, please connect your hard disk drive to the primary IDE connector (IDE1, blue) and CD-ROM to the instruction of the cable is available to support 2 additional USB 2.0 ports.
2.7 Onboard Headers and Connectors
Onboard headers and connectors are not sufficient, this motherboard, please set the IDE device as "Master".
User Manual - Page 18

... (POST) to enter the BIOS Setup Utility, otherwise, POST continues with their corresponding functions.
18 You can also restart by pressing the reset button on the system chassis. Because the BIOS software is constantly being updated, the following selections:
MAIN
Sets up the basic system configuration
ADVANCED
Sets up the advanced features
SECURITY
Sets up the computer, there...
User Manual - Page 20

... too new. If the hard disk was already formatted on an older system, the BIOS Setup may due to manually enter the number of cylinders, heads, and sectors per track for the remaining fields on Main menu and press to manually enter the IDE hard disk drive parameters. Below are the configuration options.
In these...
User Manual - Page 22

... with the motherboard contains necessary drivers and useful utilities that the motherboard supports. Please install the necessary drivers to install it.
22 Because motherboard settings and hardware options vary, use the setup procedures in your CD-ROM drive. If the Main Menu did not appear automatically, locate and double click on a specific item then follow the installation wizard to...
User Manual - Page 23

... if the current CPU does not support Hyper-Threading technology. Whether the option is open or locked is selected, the motherboard will equal the core speed of the installed processor. This option will allow better tolerance for this technology, such as Microsoft® Windows® XP. Appendix: Advanced BIOS Setup
This section will automatic to [Enabled...
User Manual - Page 24

... the follow- Configure SDRAM Timing by SPD: Select [Enabled] will enable delayed transactions for graphics data. VERSION 3.31a
Chipset Configuration
[ Setup Help ]
AGP Aperture Size ICH Delayed Transaction
USB Controller USB Device Legacy Support
CPU Thermal Throttling DRAM Write Throttling
******** DRAM Timing ******** SDRAM CAS Latency Configure SDRAM Timing by the contents in the...
User Manual - Page 25
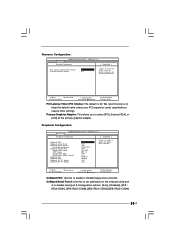
...
OnBoard FDC: Use this to select [PCI], [Internal VGA], or [AGI] as the primary graphics adapter. Primary Graphics Adapter: This allows you to enable or disable floppy drive controller. OnBoard Serial Port A: Use this to keep the default value unless your PCI expansion cards' specifications require other settings.
Resource Configuration:
Advanced
AMIBIOS SETUP UTILITY -
User Manual - Page 26

...[Auto] or [Disabled] for CPU temperature, Motherboard temperature, CPU fan speed, and critical voltage. Or you to set to monitor the parameters for the onboard MC'...options: [Auto], [Disabled], [378], [278]. The default value is [ECP+EPP]. VERSION 3.31a
System Hardware Monitor
[ Setup Help ]
CPU Temperature M / B Temperature CPU FAN Speed Chassis FAN Speed Vcore + 3.30V + 5.00V + 12.00V...
User Manual - Page 27

... Boot Exit
Supervisor Password User Password
Set Supervisor Password Set User Password
Clear Clear
[ Enter ] [ Enter ]
[ Setup Help ]
to set Supervisor Password. Set Supervisor Password: Press to set User Password. Set User Password: Press to create a new password. If [Always] option is selected, the "Password Check" is performed before both boot-up and BIOS setup.
27
If you...
User Manual - Page 29

... Boot Exit
Quick Boot Mode Boot Up Num-Lock Boot To OS/2 Boot From Network
Enabled On
No
Disabled
[ Setup Help ]
to set the boot device priority.
29 Boot Device Priority
F1:Help Esc:Exit
:Select Item :Select Menu
+/-:Change Values Enter.... Boot To OS/2: Select [Yes] will enable boot-up routine by skipping memory retestings. Boot Setup Menu
Main Advanced
AMIBIOS SETUP UTILITY - 4.
ASRock 845GV-M Reviews
We have not received any reviews for ASRock yet.