RAID Installation Guide
Page 2
... performance, please install identical drives of the same model and capacity when creating a RAID set the option to RAID mode by using the onboard FastBuild BIOS utility under BIOS environment. Hot-Plug any fault tolerance. 1. WARNING!! AMD BIOS RAID Installation Guide AMD BIOS RAID Installation Guide is an instruction for "Redundant Array of the data in the other drive if one drive to read and write data in our support CD, then you can improve the access performance, it...
... performance, please install identical drives of the same model and capacity when creating a RAID set the option to RAID mode by using the onboard FastBuild BIOS utility under BIOS environment. Hot-Plug any fault tolerance. 1. WARNING!! AMD BIOS RAID Installation Guide AMD BIOS RAID Installation Guide is an instruction for "Redundant Array of the data in the other drive if one drive to read and write data in our support CD, then you can improve the access performance, it...
RAID Installation Guide
Page 8
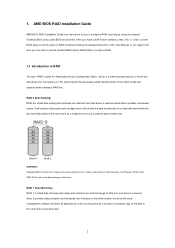
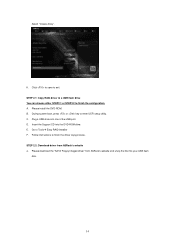
... "SATA Floppy Imaged driver" from ASRock's website A. Click to finish the configuration. STEP 3.1: Copy RAID driver to a USB flash drive You can choose either STEP 3.1 or STEP 3.2 to find the driver inside your USB flash disk. B. C. B. A. Insert the Support CD into one of the USB port. During system boot, press or key to Tools Easy RAID Installer F. Plug a USB drive into the DVD-ROM drive. D. Go to enter UEFI setup utility. STEP 3.2: Download driver from ASRock's website and unzip the file into your USB flash drive. 8 During Windows installation...
... "SATA Floppy Imaged driver" from ASRock's website A. Click to finish the configuration. STEP 3.1: Copy RAID driver to a USB flash drive You can choose either STEP 3.1 or STEP 3.2 to find the driver inside your USB flash disk. B. C. B. A. Insert the Support CD into one of the USB port. During system boot, press or key to Tools Easy RAID Installer F. Plug a USB drive into the DVD-ROM drive. D. Go to enter UEFI setup utility. STEP 3.2: Download driver from ASRock's website and unzip the file into your USB flash drive. 8 During Windows installation...
RAID Installation Guide
Page 14
... the driver copy process. Follow instructions to Tools Easy RAID Installer F. Click to save to enter UEFI setup utility. Plug a USB drive into your USB flash disk. 14 C. D. E. Please download the "SATA Floppy Imaged driver" from ASRock's website A. STEP 2.2: Download driver from ASRock's website and unzip the file into one of the USB port. B. During system boot, press or key to exit. Select "Create Array". K. Please install the DVD-ROM. Insert the Support CD into the DVD-ROM drive. STEP 2.1: Copy RAID driver to a USB flash drive You...
... the driver copy process. Follow instructions to Tools Easy RAID Installer F. Click to save to enter UEFI setup utility. Plug a USB drive into your USB flash disk. 14 C. D. E. Please download the "SATA Floppy Imaged driver" from ASRock's website A. STEP 2.2: Download driver from ASRock's website and unzip the file into one of the USB port. B. During system boot, press or key to exit. Select "Create Array". K. Please install the DVD-ROM. Insert the Support CD into the DVD-ROM drive. STEP 2.1: Copy RAID driver to a USB flash drive You...

RAID Installation Guide
Page 15
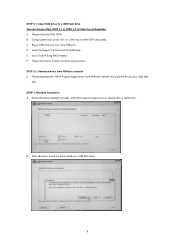
... restart the system. Using SATA/NVMe RAID driver package (version 9.2.0.127) from . Click to find the driver inside your USB flash drive. During Windows installation process, when Disk selection page show up, please click . B. It should list the USB drive as a UEFI device. It might look different when using a different version driver package. 15 If the system restarts at this to open the F11 boot menu again. STEP 3: Windows installation Insert the USB drive with Windows 10 installation files.
... restart the system. Using SATA/NVMe RAID driver package (version 9.2.0.127) from . Click to find the driver inside your USB flash drive. During Windows installation process, when Disk selection page show up, please click . B. It should list the USB drive as a UEFI device. It might look different when using a different version driver package. 15 If the system restarts at this to open the F11 boot menu again. STEP 3: Windows installation Insert the USB drive with Windows 10 installation files.
User Manual
Page 4
... Contents 1 1.2 Specifications 2 1.3 Motherboard Layout 8 1.4 I/O Panel 10 Chapter 2 Installation 12 2.1 Installing the CPU 13 2.2 Installing the CPU Fan and Heatsink 15 2.3 Installing Memory Modules (DIMM) 23 2.4 Expansion Slots (PCI Express Slots) 26 2.5 Jumpers Setup 27 2.6 Onboard Headers and Connectors 28 2.7 Smart Switches 33 2.8 Dr. Debug 34 2.9 CrossFireXTM and Quad CrossFireXTM Operation Guide 40 2.9.1 Installing Two CrossFireXTM-Ready Graphics Cards 40 2.9.2 Driver Installation and Setup 42 2.10 M.2 WiFi/BT Module Installation Guide (M2_WIFI_1) 43...
... Contents 1 1.2 Specifications 2 1.3 Motherboard Layout 8 1.4 I/O Panel 10 Chapter 2 Installation 12 2.1 Installing the CPU 13 2.2 Installing the CPU Fan and Heatsink 15 2.3 Installing Memory Modules (DIMM) 23 2.4 Expansion Slots (PCI Express Slots) 26 2.5 Jumpers Setup 27 2.6 Onboard Headers and Connectors 28 2.7 Smart Switches 33 2.8 Dr. Debug 34 2.9 CrossFireXTM and Quad CrossFireXTM Operation Guide 40 2.9.1 Installing Two CrossFireXTM-Ready Graphics Cards 40 2.9.2 Driver Installation and Setup 42 2.10 M.2 WiFi/BT Module Installation Guide (M2_WIFI_1) 43...
User Manual
Page 7
... step-by-step installation guides. In this motherboard, please visit our website for specific information about the model you for M.2 Sockets (Optional) 1 English It delivers excellent performance with robust design conforming to ASRock's commitment to change without further notice. Chapter 4 contains the configuration guide of the software and utilities. B550 PG Velocita Chapter 1 Introduction Thank you are using. Because the motherboard specifications and the BIOS software might be updated, the content of...
... step-by-step installation guides. In this motherboard, please visit our website for specific information about the model you for M.2 Sockets (Optional) 1 English It delivers excellent performance with robust design conforming to ASRock's commitment to change without further notice. Chapter 4 contains the configuration guide of the software and utilities. B550 PG Velocita Chapter 1 Introduction Thank you are using. Because the motherboard specifications and the BIOS software might be updated, the content of...

User Manual
Page 9
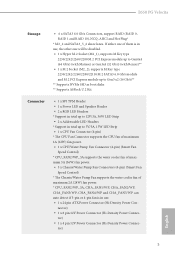
... Front Panel Audio Connector (Supports up to 600 Ohm headsets) • Pure Power-In • Direct Drive Technology • PCB Isolate Shielding 3 English PCIE3: Gen3 x4 mode)* * Supports NVMe SSD as boot disks • 2 x PCI Express 3.0 x1 Slots • Supports AMD Quad CrossFireXTM and CrossFireXTM • 1 x M.2 Socket (Key E), supports type 2230 WiFi/BT module • 15μ Gold Contact in VGA PCIe Slot (PCIE1) Graphics • Integrated AMD RadeonTM Vega Series Graphics in Ryzen Series APU* * Actual support may...
... Front Panel Audio Connector (Supports up to 600 Ohm headsets) • Pure Power-In • Direct Drive Technology • PCB Isolate Shielding 3 English PCIE3: Gen3 x4 mode)* * Supports NVMe SSD as boot disks • 2 x PCI Express 3.0 x1 Slots • Supports AMD Quad CrossFireXTM and CrossFireXTM • 1 x M.2 Socket (Key E), supports type 2230 WiFi/BT module • 15μ Gold Contact in VGA PCIe Slot (PCIE1) Graphics • Integrated AMD RadeonTM Vega Series Graphics in Ryzen Series APU* * Actual support may...
User Manual
Page 11
tor) 5 English tor) • 1 x 4 pin 12V Power Connector (Hi-Density Power Connec- B550 PG Velocita Storage • 6 x SATA3 6.0 Gb/s Connectors, support RAID (RAID 0, RAID 1 and RAID 10), NCQ, AHCI and Hot Plug* * M2_2 and SATA3_5_6 share lanes. If either one of them is in use, the other one will be disabled. • 1 x Hyper M.2 Socket (M2_1), supports M Key type 2230/2242/2260/2280 M.2 PCI Express module up to Gen4x4 (64 Gb/s) (with Matisse) or Gen3x4 (32...
tor) 5 English tor) • 1 x 4 pin 12V Power Connector (Hi-Density Power Connec- B550 PG Velocita Storage • 6 x SATA3 6.0 Gb/s Connectors, support RAID (RAID 0, RAID 1 and RAID 10), NCQ, AHCI and Hot Plug* * M2_2 and SATA3_5_6 share lanes. If either one of them is in use, the other one will be disabled. • 1 x Hyper M.2 Socket (M2_1), supports M Key type 2230/2242/2260/2280 M.2 PCI Express module up to Gen4x4 (64 Gb/s) (with Matisse) or Gen3x4 (32...
User Manual
Page 12
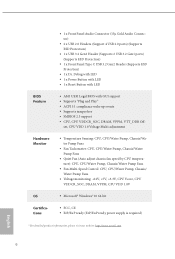
... chassis fan speed by CPU temperature): CPU, CPU/Water Pump, Chassis/Water Pump Fans • Fan Multi-Speed Control: CPU, CPU/Water Pump, Chassis/ Water Pump Fans • Voltage monitoring: +12V, +5V, +3.3V, CPU Vcore, CPU VDDCR_SOC, DRAM, VPPM, CPU VDD 1.8V • Microsoft® Windows® 10 64-bit • FCC, CE • ErP/EuP ready (ErP/EuP ready power supply is required) * For detailed product information, please visit our website: http://www.asrock.com English 6 BIOS...
... chassis fan speed by CPU temperature): CPU, CPU/Water Pump, Chassis/Water Pump Fans • Fan Multi-Speed Control: CPU, CPU/Water Pump, Chassis/ Water Pump Fans • Voltage monitoring: +12V, +5V, +3.3V, CPU Vcore, CPU VDDCR_SOC, DRAM, VPPM, CPU VDD 1.8V • Microsoft® Windows® 10 64-bit • FCC, CE • ErP/EuP ready (ErP/EuP ready power supply is required) * For detailed product information, please visit our website: http://www.asrock.com English 6 BIOS...
User Manual
Page 15
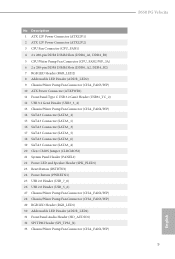
... SATA3 Connector (SATA3_6) 19 SATA3 Connector (SATA3_4) 20 Clear CMOS Jumper (CLRCMOS1) 21 System Panel Header (PANEL1) 22 Power LED and Speaker Header (SPK_PLED1) 23 Reset Button (RSTBTN1) 24 Power Button (PWRBTN1) 25 USB 2.0 Header (USB_7_8) 26 USB 2.0 Header (USB_5_6) 27 Chassis/Water Pump Fan Connector (CHA_FAN2/WP) 28 Chassis/Water Pump Fan Connector (CHA_FAN3/WP) 29 RGB LED Header (RGB_LED1) 30 Addressable LED Header (ADDR_LED1) 31 Front Panel Audio Header (HD_AUDIO1) 32 SPI TPM Header (SPI_TPM_J1) 33 Chassis/Water Pump Fan Connector (CHA_FAN1/WP) B550 PG Velocita 9 English...
... SATA3 Connector (SATA3_6) 19 SATA3 Connector (SATA3_4) 20 Clear CMOS Jumper (CLRCMOS1) 21 System Panel Header (PANEL1) 22 Power LED and Speaker Header (SPK_PLED1) 23 Reset Button (RSTBTN1) 24 Power Button (PWRBTN1) 25 USB 2.0 Header (USB_7_8) 26 USB 2.0 Header (USB_5_6) 27 Chassis/Water Pump Fan Connector (CHA_FAN2/WP) 28 Chassis/Water Pump Fan Connector (CHA_FAN3/WP) 29 RGB LED Header (RGB_LED1) 30 Addressable LED Header (ADDR_LED1) 31 Front Panel Audio Header (HD_AUDIO1) 32 SPI TPM Header (SPI_TPM_J1) 33 Chassis/Water Pump Fan Connector (CHA_FAN1/WP) B550 PG Velocita 9 English...
User Manual
Page 29
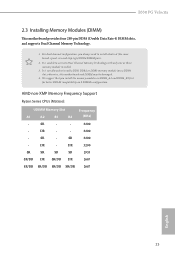
...-XMP Memory Frequency Support Ryzen Series CPUs (Matisse): UDIMM Memory Slot A1 A2 B1 B2 Frequency (Mhz) - It is not allowed to install identical (the same brand, speed, size and chip-type) DDR4 DIMM pairs. 2. SR 3200 - SR - DR - B550 PG Velocita 2.3 Installing Memory Modules (DIMM) This motherboard provides four 288-pin DDR4 (Double Data Rate 4) DIMM slots, and supports Dual Channel Memory Technology. 1. For dual channel configuration, you install the memory modules on DDR4_A2 and DDR4_B2 first for better DRAM compatibility...
...-XMP Memory Frequency Support Ryzen Series CPUs (Matisse): UDIMM Memory Slot A1 A2 B1 B2 Frequency (Mhz) - It is not allowed to install identical (the same brand, speed, size and chip-type) DDR4 DIMM pairs. 2. SR 3200 - SR - DR - B550 PG Velocita 2.3 Installing Memory Modules (DIMM) This motherboard provides four 288-pin DDR4 (Double Data Rate 4) DIMM slots, and supports Dual Channel Memory Technology. 1. For dual channel configuration, you install the memory modules on DDR4_A2 and DDR4_B2 first for better DRAM compatibility...
User Manual
Page 32
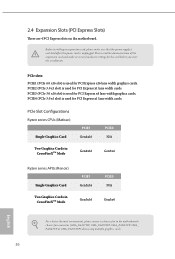
... make sure that the power supply is switched off or the power cord is used for PCI Express x16 lane width graphics cards. PCIe Slot Configurations Ryzen series CPUs (Matisse): Single Graphics Card PCIE1 Gen4x16 Two Graphics Cards in CrossFireXTM Mode Gen4x16 PCIE3 N/A Gen3x4 Ryzen series APUs (Renoir): Single Graphics Card Two Graphics Cards in CrossFireXTM Mode PCIE1 Gen3x16 Gen3x16 PCIE3 N/A Gen3x4 English For a better thermal environment, please connect a chassis fan to the motherboard's chassis fan connector (CHA_FAN1/WP, CHA_FAN2/WP...
... make sure that the power supply is switched off or the power cord is used for PCI Express x16 lane width graphics cards. PCIe Slot Configurations Ryzen series CPUs (Matisse): Single Graphics Card PCIE1 Gen4x16 Two Graphics Cards in CrossFireXTM Mode Gen4x16 PCIE3 N/A Gen3x4 Ryzen series APUs (Renoir): Single Graphics Card Two Graphics Cards in CrossFireXTM Mode PCIE1 Gen3x16 Gen3x16 PCIE3 N/A Gen3x4 English For a better thermal environment, please connect a chassis fan to the motherboard's chassis fan connector (CHA_FAN1/WP, CHA_FAN2/WP...
User Manual
Page 35
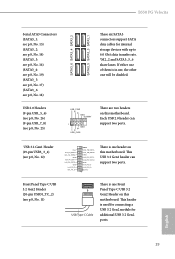
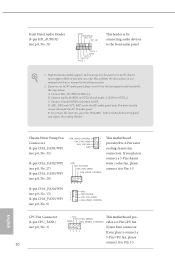
... headers on this motherboard. This header is in use, the other one will be disabled. B550 PG Velocita Serial ATA3 Connectors (SATA3_1: see p.8, No. 15) (SATA3_2: see p.8, No. 14) (SATA3_3: see p.8, No. 16) (SATA3_4: see p.8, No. 19) (SATA3_5: see p.8, No. 17) (SATA3_6: see p.8, No. 18) USB 2.0 Headers (9-pin USB_5_6) (see p.8, No. 26) (9-pin USB_7_8) (see p.8, No. 11) USB Type-C Cable There is one Front Panel Type C USB 3.2 Gen2 Header on this motherboard...
... headers on this motherboard. This header is in use, the other one will be disabled. B550 PG Velocita Serial ATA3 Connectors (SATA3_1: see p.8, No. 15) (SATA3_2: see p.8, No. 14) (SATA3_3: see p.8, No. 16) (SATA3_4: see p.8, No. 19) (SATA3_5: see p.8, No. 17) (SATA3_6: see p.8, No. 18) USB 2.0 Headers (9-pin USB_5_6) (see p.8, No. 26) (9-pin USB_7_8) (see p.8, No. 11) USB Type-C Cable There is one Front Panel Type C USB 3.2 Gen2 Header on this motherboard...
User Manual
Page 36
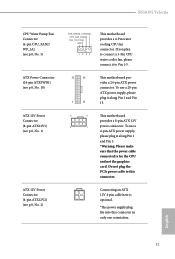
... vides a 4-Pin CPU fan 1 2 3 4 (Quiet Fan) connector. Connect Ground (GND) to function correctly. E. English High Definition Audio supports Jack Sensing, but the panel wire on the chassis must support HDA to Ground (GND). Please follow the instructions in the Realtek Control panel and adjust "Recording Volume". If you plan to connect a 3-Pin chassis water cooler fan, please connect it to Pin 1-3. 1 2 3 4 1 GND 2 FAN_VOLTAGE 3 CHA_FAN_SPEED 4 FAN_SPEED_CONTROL CPU Fan Connector (4-pin CPU_FAN1) (see p.8, No. 3) 30 +12V This motherboard pro- B. D. MIC_RET...
... vides a 4-Pin CPU fan 1 2 3 4 (Quiet Fan) connector. Connect Ground (GND) to function correctly. E. English High Definition Audio supports Jack Sensing, but the panel wire on the chassis must support HDA to Ground (GND). Please follow the instructions in the Realtek Control panel and adjust "Recording Volume". If you plan to connect a 3-Pin chassis water cooler fan, please connect it to Pin 1-3. 1 2 3 4 1 GND 2 FAN_VOLTAGE 3 CHA_FAN_SPEED 4 FAN_SPEED_CONTROL CPU Fan Connector (4-pin CPU_FAN1) (see p.8, No. 3) 30 +12V This motherboard pro- B. D. MIC_RET...
User Manual
Page 37
... plug the PCIe power cable to this connector in only one orientation. To use a 20-pin ATX power supply, please plug it along Pin 1 and Pin 5. *Warning: Please make sure that the power cable connected is optional. *The power supply plug fits into this connector. If you plan to Pin 1-3. 12 24 1 13 This motherboard provides a 24-pin ATX power connector. To use a 4-pin ATX power supply, please plug it to connect a 3-Pin CPU water cooler fan, please connect it along Pin 1 and Pin 13. 8 5 This motherboard provides a 8-pin ATX 12V 4 1 power connector. B550 PG Velocita...
... plug the PCIe power cable to this connector in only one orientation. To use a 20-pin ATX power supply, please plug it along Pin 1 and Pin 5. *Warning: Please make sure that the power cable connected is optional. *The power supply plug fits into this connector. If you plan to Pin 1-3. 12 24 1 13 This motherboard provides a 24-pin ATX power connector. To use a 4-pin ATX power supply, please plug it to connect a 3-Pin CPU water cooler fan, please connect it along Pin 1 and Pin 13. 8 5 This motherboard provides a 8-pin ATX 12V 4 1 power connector. B550 PG Velocita...
User Manual
Page 46
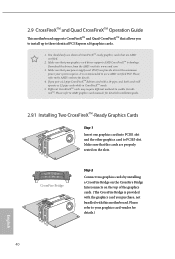
... CrossFireXTM Edition card with this motherboard. Make sure that your graphics card driver supports AMD CrossFireXTM technology. It is provided with the graphics card you purchase, not bundled with a 16-pipe card, both cards will operate as 12-pipe cards while in CrossFireXTM mode. 5. CrossFire Bridge Step 2 Connect two graphics cards by installing a CrossFire Bridge on the CrossFire Bridge Interconnects on the slots. Download the drivers from the AMD's website: www.amd.com 3.
... CrossFireXTM Edition card with this motherboard. Make sure that your graphics card driver supports AMD CrossFireXTM technology. It is provided with the graphics card you purchase, not bundled with a 16-pipe card, both cards will operate as 12-pipe cards while in CrossFireXTM mode. 5. CrossFire Bridge Step 2 Connect two graphics cards by installing a CrossFire Bridge on the CrossFire Bridge Interconnects on the slots. Download the drivers from the AMD's website: www.amd.com 3.
User Manual
Page 48
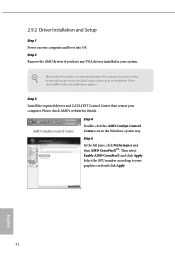
... Enable AMD CrossFireX and click Apply. Step 2 Remove the AMD drivers if you have any previously installed Catalyst drivers prior to your computer and boot into OS. Step 5 In the left pane, click Performance and then AMD CrossFireXTM. English 42 Please check AMD's website for AMD driver updates. We recommend using this utility to uninstall any VGA drivers installed in the Windows® system tray. 2.9.2 Driver Installation and Setup Step 1 Power on your graphics card...
... Enable AMD CrossFireX and click Apply. Step 2 Remove the AMD drivers if you have any previously installed Catalyst drivers prior to your computer and boot into OS. Step 5 In the left pane, click Performance and then AMD CrossFireXTM. English 42 Please check AMD's website for AMD driver updates. We recommend using this utility to uninstall any VGA drivers installed in the Windows® system tray. 2.9.2 Driver Installation and Setup Step 1 Power on your graphics card...
User Manual
Page 57
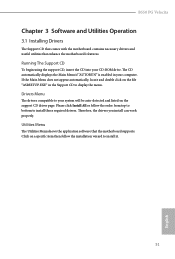
... drivers compatible to install those required drivers. If the Main Menu does not appear automatically, locate and double click on the file "ASRSETUP.EXE" in your system will be auto-detected and listed on a specific item then follow the order from top to bottom to your computer. B550 PG Velocita Chapter 3 Software and Utilities Operation 3.1 Installing Drivers The Support CD that comes with the motherboard contains necessary drivers and useful utilities that the motherboard supports...
... drivers compatible to install those required drivers. If the Main Menu does not appear automatically, locate and double click on the file "ASRSETUP.EXE" in your system will be auto-detected and listed on a specific item then follow the order from top to bottom to your computer. B550 PG Velocita Chapter 3 Software and Utilities Operation 3.1 Installing Drivers The Support CD that comes with the motherboard contains necessary drivers and useful utilities that the motherboard supports...
User Manual
Page 74
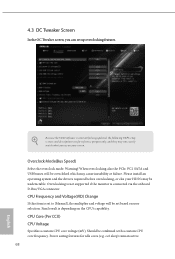
... user selection. CPU Core (Per CCX) CPU Voltage Specifies a custom CPU core voltage (mV), Should be overcloked which may be set to [Manual], the multiplier and voltage will be combined with a custom CPU core frequency. 4.3 OC Tweaker Screen In the OC Tweaker screen, you see on the CPU's capability. Because the UEFI software is depending on your HDD's may cause instability or failure. CPU Frequency and Voltage(VID) Change If this item is connected via the onboard D-Bus/VGA connector...
... user selection. CPU Core (Per CCX) CPU Voltage Specifies a custom CPU core voltage (mV), Should be overcloked which may be set to [Manual], the multiplier and voltage will be combined with a custom CPU core frequency. 4.3 OC Tweaker Screen In the OC Tweaker screen, you see on the CPU's capability. Because the UEFI software is depending on your HDD's may cause instability or failure. CPU Frequency and Voltage(VID) Change If this item is connected via the onboard D-Bus/VGA connector...
User Manual
Page 81
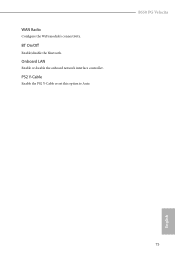
B550 PG Velocita English 75 PS2 Y-Cable Enable the PS2 Y-Cable or set this option to Auto. Onboard LAN Enable or disable the onboard network interface controller. BT On/Off Enable/disable the bluetooth. WAN Radio Configure the WiFi module's connectivity.
B550 PG Velocita English 75 PS2 Y-Cable Enable the PS2 Y-Cable or set this option to Auto. Onboard LAN Enable or disable the onboard network interface controller. BT On/Off Enable/disable the bluetooth. WAN Radio Configure the WiFi module's connectivity.


