Intel Rapid Storage Guide
Page 12
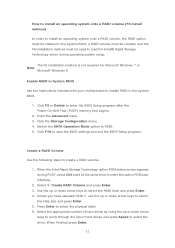
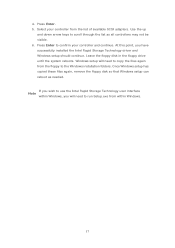
... in the system BIOS, a RAID volume must be created, and the F6 installation method must be used to load the Intel® Rapid Storage Technology driver during POST, press Ctrl and i at the same time to enter the option ROM user interface. 2. Click F2 or Delete to enable RAID in System...
... in the system BIOS, a RAID volume must be created, and the F6 installation method must be used to load the Intel® Rapid Storage Technology driver during POST, press Ctrl and i at the same time to enter the option ROM user interface. 2. Click F2 or Delete to enable RAID in System...
Intel Rapid Storage Guide
Page 13
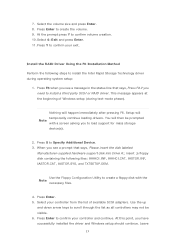
... load support for mass storage device(s). 2. Press F6 when you need to create a floppy disk with a screen asking you have successfully installed the driver and Windows setup should continue. Use the Floppy Configuration Utility to install a third party SCSI or RAID... text-mode phase). Select 4: Exit and press Enter. 11. Select your controller and continue. Nothing will temporarily continue loading drivers. 7. Install the RAID Driver Using the F6 Installation Method Perform the following files: IAAHCI.INF, IAAHCI.CAT, IASTOR.INF, IASTOR.CAT, IASTOR.SYS, and TXTSETUP.OEM. Leave...
... load support for mass storage device(s). 2. Press F6 when you need to create a floppy disk with a screen asking you have successfully installed the driver and Windows setup should continue. Use the Floppy Configuration Utility to install a third party SCSI or RAID... text-mode phase). Select 4: Exit and press Enter. 11. Select your controller and continue. Nothing will temporarily continue loading drivers. 7. Install the RAID Driver Using the F6 Installation Method Perform the following files: IAAHCI.INF, IAAHCI.CAT, IASTOR.INF, IASTOR.CAT, IASTOR.SYS, and TXTSETUP.OEM. Leave...
Intel Rapid Storage Guide
Page 16
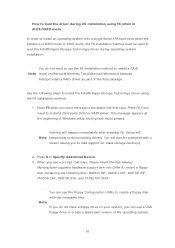
... used to load support for mass storage device(s). 2. Note If you do not need to install the Intel® Rapid Storage Technology driver using F6 when in AHCI/RAID mode In order to install an operating system onto a single Serial ATA hard drive when the system ... Manufacturer-supplied hardware support disk into Drive A:, insert a floppy disk containing the following steps to install a third party SCSI or RAID driver. How to load the driver during OS installation using the F6 installation method. 1. You can use a USB floppy drive or create a slipstream version of the operating...
... used to load support for mass storage device(s). 2. Note If you do not need to install the Intel® Rapid Storage Technology driver using F6 when in AHCI/RAID mode In order to install an operating system onto a single Serial ATA hard drive when the system ... Manufacturer-supplied hardware support disk into Drive A:, insert a floppy disk containing the following steps to install a third party SCSI or RAID driver. How to load the driver during OS installation using the F6 installation method. 1. You can use a USB floppy drive or create a slipstream version of the operating...
Intel Rapid Storage Guide
Page 17
... arrow keys to use the Intel Rapid Storage Technology user interface Note within Windows. 17 If you have successfully installed the Intel Rapid Storage Technology driver and Windows setup should continue. Select your controller and continue. At this point, you wish to scroll through the list as needed. Press Enter...
... arrow keys to use the Intel Rapid Storage Technology user interface Note within Windows. 17 If you have successfully installed the Intel Rapid Storage Technology driver and Windows setup should continue. Select your controller and continue. At this point, you wish to scroll through the list as needed. Press Enter...
RAID Installation Guide
Page 7
... 64-bit OS on how to set RAID configuration. Follow the onscreen instruction to enter BIOS setup utility. STEP 2: Use ASRock Easy RAID Installer Easy RAID Installer can copy the RAID driver from a support CD to confirm the selection C. Enter UEFI SETUP UTILITY Tool and highlight "Easy RAID Installer". Press [Enter] to...
... 64-bit OS on how to set RAID configuration. Follow the onscreen instruction to enter BIOS setup utility. STEP 2: Use ASRock Easy RAID Installer Easy RAID Installer can copy the RAID driver from a support CD to confirm the selection C. Enter UEFI SETUP UTILITY Tool and highlight "Easy RAID Installer". Press [Enter] to...
RAID Installation Guide
Page 19
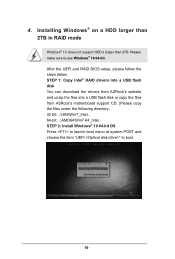
... RAID BIOS setup, please follow the steps below. STEP 1: Copy Intel® RAID drivers into a USB flash disk You can download the drivers from ASRock's website and unzip the files into a USB flash disk or copy the files from ASRock's motherboard support CD. (Please copy the files under the following directory: 32 bit: ..\i386...
... RAID BIOS setup, please follow the steps below. STEP 1: Copy Intel® RAID drivers into a USB flash disk You can download the drivers from ASRock's website and unzip the files into a USB flash disk or copy the files from ASRock's motherboard support CD. (Please copy the files under the following directory: 32 bit: ..\i386...
RAID Installation Guide
Page 20
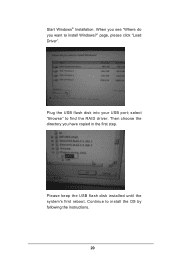
Then choose the directory you want to install Windows?" select "Browse" to install the OS by following the instructions. 20 When you see "Where do you have copied in the first step. Please keep the USB flash disk installed until the system's first reboot. Plug the USB flash disk into your USB port; Continue to find the RAID driver. page, please click "Load Driver". Start Windows® Installation.
Then choose the directory you want to install Windows?" select "Browse" to install the OS by following the instructions. 20 When you see "Where do you have copied in the first step. Please keep the USB flash disk installed until the system's first reboot. Plug the USB flash disk into your USB port; Continue to find the RAID driver. page, please click "Load Driver". Start Windows® Installation.
RAID Installation Guide
Page 21
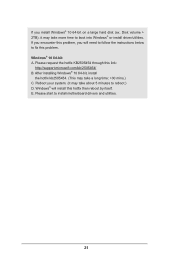
Reboot your system. (It may take about 5 minutes to install motherboard drivers and utilities. 21 If you will install this hotfix then reboot by itself. E. Please start to reboot.) D. If you encounter this problem, you install Windows&#...174; 10 64-bit on a large hard disk (ex. Windows® will need to follow the instructions below to boot into Windows® or install driver/utilities. Please request the hotfix KB2505454 through this problem. Disk volume > 2TB), it may take more time to fix this link: http://support.microsoft.com...
Reboot your system. (It may take about 5 minutes to install motherboard drivers and utilities. 21 If you will install this hotfix then reboot by itself. E. Please start to reboot.) D. If you encounter this problem, you install Windows&#...174; 10 64-bit on a large hard disk (ex. Windows® will need to follow the instructions below to boot into Windows® or install driver/utilities. Please request the hotfix KB2505454 through this problem. Disk volume > 2TB), it may take more time to fix this link: http://support.microsoft.com...
User Manual
Page 4
... Setup 19 2.6 Onboard Headers and Connectors 20 2.7 Post Status Checker 26 2.8 CrossFireXTM and Quad CrossFireXTM Operation Guide 27 2.8.1 Installing Two CrossFireXTM-Ready Graphics Cards 27 2.8.2 Driver Installation and Setup 29 2.9 M.2_SSD (NGFF) Module Installation Guide (M2_1) 30 2.10 M.2_SSD (NGFF) Module Installation Guide (M2_2) 33 2.11 M.2 WiFi/BT Module Installation Guide...
... Setup 19 2.6 Onboard Headers and Connectors 20 2.7 Post Status Checker 26 2.8 CrossFireXTM and Quad CrossFireXTM Operation Guide 27 2.8.1 Installing Two CrossFireXTM-Ready Graphics Cards 27 2.8.2 Driver Installation and Setup 29 2.9 M.2_SSD (NGFF) Module Installation Guide (M2_1) 30 2.10 M.2_SSD (NGFF) Module Installation Guide (M2_2) 33 2.11 M.2 WiFi/BT Module Installation Guide...
User Manual
Page 5
... Update & APP Shop 43 3.3.1 UI Overview 43 3.3.2 Apps 44 3.3.3 BIOS & Drivers 47 3.3.4 Setting 48 3.4 Nahimic Audio 49 3.5 ASRock Polychrome SYNC 50 Chapter 4 UEFI SETUP UTILITY 53 4.1 Introduction 53 4.2 EZ Mode 54 4.3 Advanced Mode 55 4.3.1 UEFI Menu Bar 55 4.3.2 Navigation Keys 56 4.4 Main Screen ...
... Update & APP Shop 43 3.3.1 UI Overview 43 3.3.2 Apps 44 3.3.3 BIOS & Drivers 47 3.3.4 Setting 48 3.4 Nahimic Audio 49 3.5 ASRock Polychrome SYNC 50 Chapter 4 UEFI SETUP UTILITY 53 4.1 Introduction 53 4.2 EZ Mode 54 4.3 Advanced Mode 55 4.3.1 UEFI Menu Bar 55 4.3.2 Navigation Keys 56 4.4 Main Screen ...
User Manual
Page 33
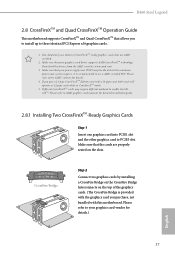
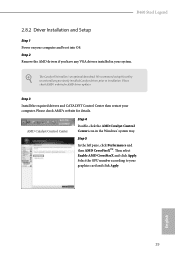
... that are properly seated on the top of the graphics cards. (The CrossFire Bridge is recommended to enable CrossFireXTM. Download the drivers from the AMD's website: www.amd.com 3. It is provided with the graphics card you purchase, not bundled with a 16... the AMD's website for details.) English 27 Make sure that your graphics card driver supports AMD CrossFireXTM technology. If you pair a 12-pipe CrossFireXTM Edition card with this motherboard. B460 Steel Legend 2.8 CrossFireXTM and Quad CrossFireXTM Operation Guide This motherboard supports CrossFireXTM and Quad CrossFireXTM...
... that are properly seated on the top of the graphics cards. (The CrossFire Bridge is recommended to enable CrossFireXTM. Download the drivers from the AMD's website: www.amd.com 3. It is provided with the graphics card you purchase, not bundled with a 16... the AMD's website for details.) English 27 Make sure that your graphics card driver supports AMD CrossFireXTM technology. If you pair a 12-pipe CrossFireXTM Edition card with this motherboard. B460 Steel Legend 2.8 CrossFireXTM and Quad CrossFireXTM Operation Guide This motherboard supports CrossFireXTM and Quad CrossFireXTM...
User Manual
Page 35
.... Please check AMD's website for AMD driver updates. Step 2 Remove the AMD drivers if you have any previously installed Catalyst drivers prior to your system. Step 3 Install the required drivers and CATALYST Control Center then restart your computer and boot into OS. Please check AMD's website for details. B460 Steel Legend 2.8.2 Driver Installation and Setup Step 1 Power on...
.... Please check AMD's website for AMD driver updates. Step 2 Remove the AMD drivers if you have any previously installed Catalyst drivers prior to your system. Step 3 Install the required drivers and CATALYST Control Center then restart your computer and boot into OS. Please check AMD's website for details. B460 Steel Legend 2.8.2 Driver Installation and Setup Step 1 Power on...
User Manual
Page 45
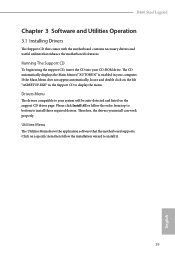
... "AUTORUN" is enabled in the Support CD to install those required drivers. Click on the file "ASRSETUP.EXE" in your CD-ROM drive. B460 Steel Legend Chapter 3 Software and Utilities Operation 3.1 Installing Drivers The Support CD that comes with the motherboard contains necessary drivers and useful utilities that the motherboard supports. Utilities Menu The Utilities Menu...
... "AUTORUN" is enabled in the Support CD to install those required drivers. Click on the file "ASRSETUP.EXE" in your CD-ROM drive. B460 Steel Legend Chapter 3 Software and Utilities Operation 3.1 Installing Drivers The Support CD that comes with the motherboard contains necessary drivers and useful utilities that the motherboard supports. Utilities Menu The Utilities Menu...
User Manual
Page 53
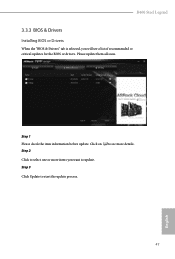
Click on Step 2 to update. Click to select one or more items you will see more details. B460 Steel Legend 3.3.3 BIOS & Drivers Installing BIOS or Drivers When the "BIOS & Drivers" tab is selected, you want to see a list of recommended or critical updates for the BIOS or drivers. Please update them all soon. Step 3 Click Update to start the update process. 47 English Step 1 Please check the item information before update.
Click on Step 2 to update. Click to select one or more items you will see more details. B460 Steel Legend 3.3.3 BIOS & Drivers Installing BIOS or Drivers When the "BIOS & Drivers" tab is selected, you want to see a list of recommended or critical updates for the BIOS or drivers. Please update them all soon. Step 3 Click Update to start the update process. 47 English Step 1 Please check the item information before update.
User Manual
Page 82
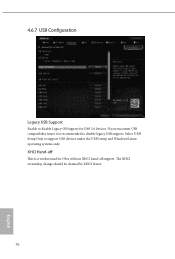
XHCI Hand-off This is recommended to support USB devices under the UEFI setup and Windows/Linux operating systems only. The XHCI ownership change should be claimed by XHCI driver. 76 English Select UEFI Setup Only to disable legacy USB support. If you encounter USB compatibility issues it is a workaround for USB 2.0 devices. 4.6.7 USB Configuration Legacy USB Support Enable or disable Legacy OS Support for OSes without XHCI hand-off support.
XHCI Hand-off This is recommended to support USB devices under the UEFI setup and Windows/Linux operating systems only. The XHCI ownership change should be claimed by XHCI driver. 76 English Select UEFI Setup Only to disable legacy USB support. If you encounter USB compatibility issues it is a workaround for USB 2.0 devices. 4.6.7 USB Configuration Legacy USB Support Enable or disable Legacy OS Support for OSes without XHCI hand-off support.
User Manual
Page 84
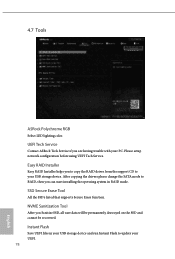
..., all user data will be permanently destroyed on the SSD and cannot be recovered. NVME Sanitization Tool After you to copy the RAID driver from the support CD to your USB storage device. Please setup network configuration before using UEFI Tech Service. After copying the... drivers please change the SATA mode to update your PC. UEFI Tech Service Contact ASRock Tech Service if you can start installing the operating system in your USB storage device and run Instant ...
..., all user data will be permanently destroyed on the SSD and cannot be recovered. NVME Sanitization Tool After you to copy the RAID driver from the support CD to your USB storage device. Please setup network configuration before using UEFI Tech Service. After copying the... drivers please change the SATA mode to update your PC. UEFI Tech Service Contact ASRock Tech Service if you can start installing the operating system in your USB storage device and run Instant ...


