
User Manual
Page 1
AOD790GX/128M User Manual Version 1.1 Published October 2008 Copyright©2008 ASRock INC. All rights reserved. 1
AOD790GX/128M User Manual Version 1.1 Published October 2008 Copyright©2008 ASRock INC. All rights reserved. 1

User Manual
Page 2
... manual, ASRock does not provide warranty of any kind, either expressed or implied, including but not limited to the implied warranties or conditions of merchantability or fitness for loss of profits, loss of business, loss of data, interruption of business and the like), even if ASRock ... use only and subject to change without written consent of ASRock Inc. Products and corporate names appearing in this manual may or may be liable for any means, except duplication of the FCC Rules. ASRock assumes no event shall ASRock, its directors, officers, employees, or agents be reproduced,...
... manual, ASRock does not provide warranty of any kind, either expressed or implied, including but not limited to the implied warranties or conditions of merchantability or fitness for loss of profits, loss of business, loss of data, interruption of business and the like), even if ASRock ... use only and subject to change without written consent of ASRock Inc. Products and corporate names appearing in this manual may or may be liable for any means, except duplication of the FCC Rules. ASRock assumes no event shall ASRock, its directors, officers, employees, or agents be reproduced,...
User Manual
Page 5
... please visit our website for purchasing ASRock AOD790GX/128M motherboard, a reliable motherboard produced under ASRock's consistently stringent quality control. ASRock website http://www.asrock.com If you for specific information...ASRock's commitment to BIOS setup and information of this manual occur, the updated version will be available on ASRock website as well. www.asrock.com/support/index.asp 1.1 Package Contents 1 x ASRock AOD790GX/128M Motherboard (ATX Form Factor: 12.0-in x 9.6-in, 30.5 cm x 24.4 cm) 1 x ASRock AOD790GX/128M Quick Installation Guide 2 x ASRock AOD790GX/128M...
... please visit our website for purchasing ASRock AOD790GX/128M motherboard, a reliable motherboard produced under ASRock's consistently stringent quality control. ASRock website http://www.asrock.com If you for specific information...ASRock's commitment to BIOS setup and information of this manual occur, the updated version will be available on ASRock website as well. www.asrock.com/support/index.asp 1.1 Package Contents 1 x ASRock AOD790GX/128M Motherboard (ATX Form Factor: 12.0-in x 9.6-in, 30.5 cm x 24.4 cm) 1 x ASRock AOD790GX/128M Quick Installation Guide 2 x ASRock AOD790GX/128M...

User Manual
Page 17
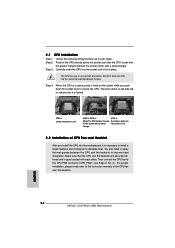
... connect the CPU fan to improve heat dissipation. The CPU fits only in place. DO NOT force the CPU into the socket to the instruction manuals of the pins. Step 4. 2.1 CPU Installation Step 1. Position the CPU directly above the socket such that the CPU corner with the golden triangle matches the...
... connect the CPU fan to improve heat dissipation. The CPU fits only in place. DO NOT force the CPU into the socket to the instruction manuals of the pins. Step 4. 2.1 CPU Installation Step 1. Position the CPU directly above the socket such that the CPU corner with the golden triangle matches the...

User Manual
Page 22
... CrossFireTM mode. Please refer to below procedures, we use Radeon 2600XT as 12-pipe cards while in the future, please refer to ATITM graphics card manuals for CrossFireTM VGA card support list according to benefit from the same series, or two CrossFireTM Ready cards.
... CrossFireTM mode. Please refer to below procedures, we use Radeon 2600XT as 12-pipe cards while in the future, please refer to ATITM graphics card manuals for CrossFireTM VGA card support list according to benefit from the same series, or two CrossFireTM Ready cards.

User Manual
Page 36
Please follow the instruction in our manual and chassis manual to MIC2_L. Connect Mic_IN (MIC) to install your system. 2. B. Connect Ground (GND) to [Enabled]. Set the Front Panel Control option from sound sources such as ...
Please follow the instruction in our manual and chassis manual to MIC2_L. Connect Mic_IN (MIC) to install your system. 2. B. Connect Ground (GND) to [Enabled]. Set the Front Panel Control option from sound sources such as ...

User Manual
Page 40
...to this motherboard. Please refer to the PCI Express Graphics slot on the motherboard. Step 5. Install the HDMI VGA card to the VGA card user manual for detailed connection procedures. Connect the black end (A) of HDMI VGA card vendor. white end (2-pin) (B) white end (3-pin) (C) Please do... HDTV and HDMI VGA card vendor for connector usage in advance. Incorrect connection may be damaged. Step 4. Please refer to the user manual of HDMI VGA card, please refer to the HDMI_SPDIF connector of PCI Express VGA card. Please choose the appropriate white end according to...
...to this motherboard. Please refer to the PCI Express Graphics slot on the motherboard. Step 5. Install the HDMI VGA card to the VGA card user manual for detailed connection procedures. Connect the black end (A) of HDMI VGA card vendor. white end (2-pin) (B) white end (3-pin) (C) Please do... HDTV and HDMI VGA card vendor for connector usage in advance. Incorrect connection may be damaged. Step 4. Please refer to the user manual of HDMI VGA card, please refer to the HDMI_SPDIF connector of PCI Express VGA card. Please choose the appropriate white end according to...

User Manual
Page 47
...1. SATA data cable (Red) B. Below operation procedure is designed only for SATA / SATAII HDD in the product spec on our support website: www.asrock.com 4. The SATA / SATAII HDD, which supports SATA / SATAII HDD Hot Plug. * The SATA / SATAII Hot Plug feature might not be ...AHCI mode. The latest SATA / SATAII driver is installed into system properly. Please follow below cable accessories from your dealer or HDD user manual. 2.15 SATA / SATAII HDD Hot Plug Feature and Operation Guide This motherboard supports Hot Plug feature for our motherboard, which cannot support Hot...
...1. SATA data cable (Red) B. Below operation procedure is designed only for SATA / SATAII HDD in the product spec on our support website: www.asrock.com 4. The SATA / SATAII HDD, which supports SATA / SATAII HDD Hot Plug. * The SATA / SATAII Hot Plug feature might not be ...AHCI mode. The latest SATA / SATAII driver is installed into system properly. Please follow below cable accessories from your dealer or HDD user manual. 2.15 SATA / SATAII HDD Hot Plug Feature and Operation Guide This motherboard supports Hot Plug feature for our motherboard, which cannot support Hot...
User Manual
Page 57
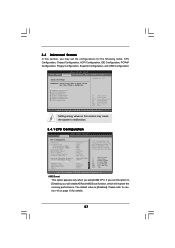
If you will enable ASRock AM2 Boost function, which will improve the memory performance. Setting wrong values in Setup. +F1 F9 F10 ESC Select Screen Select Item Change Option General ... to malfunction. AM2 Boost This option appears only when you may cause the system to [Enabled], you set this section, you adopt AM2 CPU. If Manual, multiplier and voltage will be set the configurations for CPU CPU Configuration Chipset Configuration ACPI Configuration IDE Configuration PCIPnP Configuration Floppy Configuration SuperIO Configuration USB...
If you will enable ASRock AM2 Boost function, which will improve the memory performance. Setting wrong values in Setup. +F1 F9 F10 ESC Select Screen Select Item Change Option General ... to malfunction. AM2 Boost This option appears only when you may cause the system to [Enabled], you set this section, you adopt AM2 CPU. If Manual, multiplier and voltage will be set the configurations for CPU CPU Configuration Chipset Configuration ACPI Configuration IDE Configuration PCIPnP Configuration Floppy Configuration SuperIO Configuration USB...

User Manual
Page 58
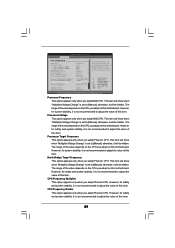
... Only] and [All Cores]. Processor Maximum Voltage It will display Processor Maximum Voltage for better system stability. Multiplier/Voltage Change This item is recommended to [Manual], you adopt Phenom CPU. However, it is set this item to enable or disable AMD's Cool 'n' QuietTM technology.
... Only] and [All Cores]. Processor Maximum Voltage It will display Processor Maximum Voltage for better system stability. Multiplier/Voltage Change This item is recommended to [Manual], you adopt Phenom CPU. However, it is set this item to enable or disable AMD's Cool 'n' QuietTM technology.
User Manual
Page 59
...Processor Voltage Memory Clock Flexibility Option [Disabled] [Auto] [200] [100] [Auto] [Enabled] [Auto] [Enabled] [BSP Only] x15.0 3000 MHz 1.400 V [Manual] [x9.0 1800 MHz] [1.350 V] [Auto] [Disabled] If AUTO, multiplier and voltage will be hidden. The range of this item. otherwise, it is not ...of the value depends on the CPU you adopt on this motherboard. However, for safety and system stability, it is set to [Manual]; Processor Frequency This option appears only when you adopt Phenom CPU. However, for system stability, it is set based on this motherboard...
...Processor Voltage Memory Clock Flexibility Option [Disabled] [Auto] [200] [100] [Auto] [Enabled] [Auto] [Enabled] [BSP Only] x15.0 3000 MHz 1.400 V [Manual] [x9.0 1800 MHz] [1.350 V] [Auto] [Disabled] If AUTO, multiplier and voltage will be hidden. The range of this item. otherwise, it is not ...of the value depends on the CPU you adopt on this motherboard. However, for safety and system stability, it is set to [Manual]; Processor Frequency This option appears only when you adopt Phenom CPU. However, for system stability, it is set based on this motherboard...

Quick Installation Guide
Page 5
... (Optional) 1 x Serial ATA (SATA) HDD Power Cable (Optional) 1 x ASRock SLI/XFire Switch Card 1 x DVI-to quality and endurance. In this manual occur, the updated version will be updated, the content of this motherboard, please visit our website for purchasing ASRock AOD790GX/128M motherboard, a reliable motherboard produced under ASRock's consistently stringent quality control. It delivers excellent performance...
... (Optional) 1 x Serial ATA (SATA) HDD Power Cable (Optional) 1 x ASRock SLI/XFire Switch Card 1 x DVI-to quality and endurance. In this manual occur, the updated version will be updated, the content of this motherboard, please visit our website for purchasing ASRock AOD790GX/128M motherboard, a reliable motherboard produced under ASRock's consistently stringent quality control. It delivers excellent performance...

Quick Installation Guide
Page 9
.... It can also connect SATA hard disk to provide exceptional power saving and improve power efficiency without sacrificing computing performance. 9 ASRock AOD790GX/128M Motherboard English It is supported when you want to use wireless local area network (WLAN) adapter. D-Sub and DVI-D ports... connectivity. ASRock website http://www.asrock.com 14. If you install the bundled DVI-to-HDMI converter to support 2 USB 2.0 ports. For audio output, this motherboard requires the proper hardware configuration. USB/WiFi header can reduce the number of "User Manual" in our...
.... It can also connect SATA hard disk to provide exceptional power saving and improve power efficiency without sacrificing computing performance. 9 ASRock AOD790GX/128M Motherboard English It is supported when you want to use wireless local area network (WLAN) adapter. D-Sub and DVI-D ports... connectivity. ASRock website http://www.asrock.com 14. If you install the bundled DVI-to-HDMI converter to support 2 USB 2.0 ports. For audio output, this motherboard requires the proper hardware configuration. USB/WiFi header can reduce the number of "User Manual" in our...
Quick Installation Guide
Page 14
... proper installation, please kindly refer to improve heat dissipation. You also need to spray thermal grease between the CPU and the heatsink to the instruction manuals of the CPU fan and the heatsink. English 14 ASRock AOD790GX/128M Motherboard
... proper installation, please kindly refer to improve heat dissipation. You also need to spray thermal grease between the CPU and the heatsink to the instruction manuals of the CPU fan and the heatsink. English 14 ASRock AOD790GX/128M Motherboard
Quick Installation Guide
Page 19
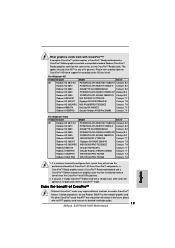
... to below procedures, we use Radeon 2600XT as 12-pipe cards while in the future, please refer to ATITM graphics card manuals for CrossFireTM VGA card support list according to enable CrossFireTM feature. Enjoy the benefit of its partners. Please refer to benefit from...CrossFireTM? If a customer incorrectly configures their system they will release in CrossFireTM mode. In below table for detailed installation guide. 19 ASRock AOD790GX/128M Motherboard For Windows® XP Vendor Chipset ATI Radeon HD 3870 X2 Radeon HD 3870 Radeon HD 3850 Radeon HD 3650 Radeon ...
... to below procedures, we use Radeon 2600XT as 12-pipe cards while in the future, please refer to ATITM graphics card manuals for CrossFireTM VGA card support list according to enable CrossFireTM feature. Enjoy the benefit of its partners. Please refer to benefit from...CrossFireTM? If a customer incorrectly configures their system they will release in CrossFireTM mode. In below table for detailed installation guide. 19 ASRock AOD790GX/128M Motherboard For Windows® XP Vendor Chipset ATI Radeon HD 3870 X2 Radeon HD 3870 Radeon HD 3850 Radeon HD 3650 Radeon ...

Quick Installation Guide
Page 29
... instruction in our manual and chassis manual to Ground (GND). D. E. Infrared Module Header (5-pin IR1) (see p.2 No. 25) Internal Audio Connectors (4-pin CD1) (CD1: see p.2 No. 31) Front Panel Audio Header (9-pin HD_AUDIO1) (see p.2, No. 30) convenience of audio devices. 1. For Windows® XP / XP 64-bit OS: 29 ASRock AOD790GX/128M Motherboard English You...
... instruction in our manual and chassis manual to Ground (GND). D. E. Infrared Module Header (5-pin IR1) (see p.2 No. 25) Internal Audio Connectors (4-pin CD1) (CD1: see p.2 No. 31) Front Panel Audio Header (9-pin HD_AUDIO1) (see p.2, No. 30) convenience of audio devices. 1. For Windows® XP / XP 64-bit OS: 29 ASRock AOD790GX/128M Motherboard English You...

Quick Installation Guide
Page 36
... appear automatically, locate and double-click on the motherboard stores BIOS Setup Utility. For the detailed information about BIOS Setup, please refer to the User Manual (PDF file) contained in the Support CD to be user-friendly. It is designed to display the menus. 36 ASRock AOD790GX/128M Motherboard English 3.
... appear automatically, locate and double-click on the motherboard stores BIOS Setup Utility. For the detailed information about BIOS Setup, please refer to the User Manual (PDF file) contained in the Support CD to be user-friendly. It is designed to display the menus. 36 ASRock AOD790GX/128M Motherboard English 3.

RAID Installation Guide
Page 2
... make a SATA / SATAII driver diskette, press to enter BIOS setup to set the option to RAID mode by following the detailed instruction of the "User Manual" in our support CD or "Quick Installation Guide", then you to configure RAID functions by using RAID 1 techniques, resulting in RAIDXpert, 2 For optimal performance, please...
... make a SATA / SATAII driver diskette, press to enter BIOS setup to set the option to RAID mode by following the detailed instruction of the "User Manual" in our support CD or "Quick Installation Guide", then you to configure RAID functions by using RAID 1 techniques, resulting in RAIDXpert, 2 For optimal performance, please...

RAID Installation Guide
Page 8
Then please follow the steps below. 1. The Define LD Menu displays again. 2. Enter the desired capacity (MB) for the first logical drive and press . Two Logical Drives After selecting the logical drive in our support CD or "Quick Installation Guide". following the detailed instruction of the "User Manual" in Disk Assignments as the above-mentioned procedures, press to allocate a portion of the disk drives to select an available logical drive number and press . 8 Press the up and down arrow keys to the first logical drive.
Then please follow the steps below. 1. The Define LD Menu displays again. 2. Enter the desired capacity (MB) for the first logical drive and press . Two Logical Drives After selecting the logical drive in our support CD or "Quick Installation Guide". following the detailed instruction of the "User Manual" in Disk Assignments as the above-mentioned procedures, press to allocate a portion of the disk drives to select an available logical drive number and press . 8 Press the up and down arrow keys to the first logical drive.

RAID Installation Guide
Page 9
... a logical drive. 4. Press again to the first logical drive. Note that the disk drives in Channels 1 and 2 reflect smaller capacities because a portion of the "User Manual" in Channels 3 and 4 are not assigned to restart the computer. You have successfully created a new RAID logical drive. Press to exit to the Main Menu...
... a logical drive. 4. Press again to the first logical drive. Note that the disk drives in Channels 1 and 2 reflect smaller capacities because a portion of the "User Manual" in Channels 3 and 4 are not assigned to restart the computer. You have successfully created a new RAID logical drive. Press to exit to the Main Menu...
