User Manual
Page 3
... 34 3.3.6 Floppy Configuration 35 3.3.7 Super IO Configuration 35 3.3.8 USB Configuration 36 3.4 Hardware Health Event Monitoring Screen 37 3.5 Boot Screen 38 3 Installation 12 Pre-installation Precautions 12 2.1 CPU Installation 13 2.2 Installation of CPU Fan and Heatsink 13 2.3 ...ATA (SATA) Hard Disks Installation 22 2.8 Hot Plug and Hot Swap Functions for Windows® VistaTM Logo 9 1.4 Motherboard Layout 10 1.5 ASRock 8CH I/O 11 2 . Introduction 5 1.1 Package Contents 5 1.2 Specifications 6 1.3 Minimum Hardware Requirement Table for SATA HDDs 22 2.9 Driver Installation...
... 34 3.3.6 Floppy Configuration 35 3.3.7 Super IO Configuration 35 3.3.8 USB Configuration 36 3.4 Hardware Health Event Monitoring Screen 37 3.5 Boot Screen 38 3 Installation 12 Pre-installation Precautions 12 2.1 CPU Installation 13 2.2 Installation of CPU Fan and Heatsink 13 2.3 ...ATA (SATA) Hard Disks Installation 22 2.8 Hot Plug and Hot Swap Functions for Windows® VistaTM Logo 9 1.4 Motherboard Layout 10 1.5 ASRock 8CH I/O 11 2 . Introduction 5 1.1 Package Contents 5 1.2 Specifications 6 1.3 Minimum Hardware Requirement Table for SATA HDDs 22 2.9 Driver Installation...
User Manual
Page 4
Software Support 41 4.1 Install Operating System 41 4.2 Support CD Information 41 4.2.1 Running Support CD 41 4.2.2 Drivers Menu 41 4.2.3 Utilities Menu 41 4.2.4 Contact Information 41 APPENDIX: AMD's Cool 'n' QuietTM Technology ...... 42 4 3.5.1 Boot Settings Configuration 38 3.6 Security Screen 39 3.7 Exit Screen 40 4 .
Software Support 41 4.1 Install Operating System 41 4.2 Support CD Information 41 4.2.1 Running Support CD 41 4.2.2 Drivers Menu 41 4.2.3 Utilities Menu 41 4.2.4 Contact Information 41 APPENDIX: AMD's Cool 'n' QuietTM Technology ...... 42 4 3.5.1 Boot Settings Configuration 38 3.6 Security Screen 39 3.7 Exit Screen 40 4 .
User Manual
Page 6
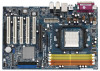
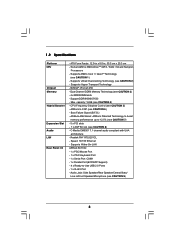
... - Max. capacity: 16GB (see CAUTION 1) - Dual Channel DDRII Memory Technology (see CAUTION 5) - CPU Frequency Stepless Control (see CAUTION 3) - 4 x DDRII DIMM slots - ASRock U-COP (see CAUTION 8) - Boot Failure Guard (B.F.G.) - ASRock AM2 Boost: ASRock Patented Technology to boost memory performance up to -Use USB 2.0 Ports - 1 x RJ-45 Port - C-Media CM6501 7.1 channel audio compliant with UAA architecture...
... - Max. capacity: 16GB (see CAUTION 1) - Dual Channel DDRII Memory Technology (see CAUTION 5) - CPU Frequency Stepless Control (see CAUTION 3) - 4 x DDRII DIMM slots - ASRock U-COP (see CAUTION 8) - Boot Failure Guard (B.F.G.) - ASRock AM2 Boost: ASRock Patented Technology to boost memory performance up to -Use USB 2.0 Ports - 1 x RJ-45 Port - C-Media CM6501 7.1 channel audio compliant with UAA architecture...
User Manual
Page 17
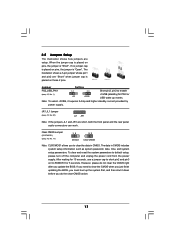
... are "Short" when jumper cap is placed on pins, the jumper is placed on these 2 pins. Note: To select +5VSB, it down before you must boot up events. When the jumper cap is "Short". However, please do the clear-CMOS action. 17 Clear CMOS Jumper (CLRCMOS1) (see p.10, No. 20) JL1...
... are "Short" when jumper cap is placed on pins, the jumper is placed on these 2 pins. Note: To select +5VSB, it down before you must boot up events. When the jumper cap is "Short". However, please do the clear-CMOS action. 17 Clear CMOS Jumper (CLRCMOS1) (see p.10, No. 20) JL1...
User Manual
Page 23
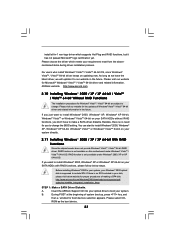
...not available on updating now. Besides, there is only available under Windows® VistaTM / VistaTM 64-bit OS. A. As long as the boot device. 23 Before installing Windows® 2000 to change the BIOS setting. Please visit our website for Windows® VistaTM / VistaTM 64-bit... proper procedures of Windows® VistaTM / VistaTM 64-bit driver and related information in -1 non-logo driver which meets your system. ASRock website http://www.asrock.com 2.10 Installing Windows® 2000 / XP / XP 64-bit / VistaTM / VistaTM 64-bit Without RAID Functions The installation ...
...not available on updating now. Besides, there is only available under Windows® VistaTM / VistaTM 64-bit OS. A. As long as the boot device. 23 Before installing Windows® 2000 to change the BIOS setting. Please visit our website for Windows® VistaTM / VistaTM 64-bit... proper procedures of Windows® VistaTM / VistaTM 64-bit driver and related information in -1 non-logo driver which meets your system. ASRock website http://www.asrock.com 2.10 Installing Windows® 2000 / XP / XP 64-bit / VistaTM / VistaTM 64-bit Without RAID Functions The installation ...
User Manual
Page 25
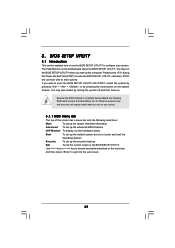
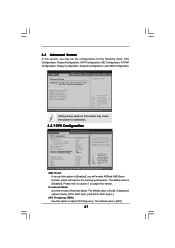
... following selections: Main To set up the system time/date information Advanced To set up the advanced BIOS features H/W Monitor To display current hardware status Boot To set up the default system device to enter the BIOS SETUP UTILITY after POST, restart the system by pressing + + , or by turning the system...
... following selections: Main To set up the system time/date information Advanced To set up the advanced BIOS features H/W Monitor To display current hardware status Boot To set up the default system device to enter the BIOS SETUP UTILITY after POST, restart the system by pressing + + , or by turning the system...
User Manual
Page 26
... and Exit Exit v02.54 (C) Copyright 1985-2003, American Megatrends, Inc. BIOS SETUP UTILITY Main Advanced H/W Monitor Boot Security Exit System Overview System Time System Date [17:00:09] [Fri 06/09/2006] BIOS Version : AM2NF3-VSTA BIOS P1.0 Processor Type : AMD Athlon(tm) 64 Processor 3400+ (64bit supported) Processor Speed : 2200 MHz...
... and Exit Exit v02.54 (C) Copyright 1985-2003, American Megatrends, Inc. BIOS SETUP UTILITY Main Advanced H/W Monitor Boot Security Exit System Overview System Time System Date [17:00:09] [Fri 06/09/2006] BIOS Version : AM2NF3-VSTA BIOS P1.0 Processor Type : AMD Athlon(tm) 64 Processor 3400+ (64bit supported) Processor Speed : 2200 MHz...
User Manual
Page 27
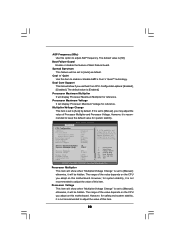
...malfunction. 3.3.1 CPU Configuration BIOS SETUP UTILITY Advanced CPU Configuration AM2 Boost Overclock Mode CPU Frequency (MHz) AGP Frequency (MHz) Boot Failure Guard Spread Spectrum Cool' n' Quiet Dual Core Support Processor Maximum Multiplier Processor Maximum Voltage Multiplier/Voltage Change Memory Clock Flexibility ... Floppy Configuration SuperIO Configuration USB Configuration Options for CPU Select Screen Select Item Enter Go to [Enabled], you will enable ASRock AM2 Boost function, which will be set the configurations for details. AM2 Boost If you may cause system to adjust ...
...malfunction. 3.3.1 CPU Configuration BIOS SETUP UTILITY Advanced CPU Configuration AM2 Boost Overclock Mode CPU Frequency (MHz) AGP Frequency (MHz) Boot Failure Guard Spread Spectrum Cool' n' Quiet Dual Core Support Processor Maximum Multiplier Processor Maximum Voltage Multiplier/Voltage Change Memory Clock Flexibility ... Floppy Configuration SuperIO Configuration USB Configuration Options for CPU Select Screen Select Item Enter Go to [Enabled], you will enable ASRock AM2 Boost function, which will be set the configurations for details. AM2 Boost If you may cause system to adjust ...
User Manual
Page 28
...[Auto] as default. BIOS SETUP UTILITY Advanced CPU Configuration AM2 Boost Overclock Mode CPU Frequency (MHz) AGP Frequency (MHz) Boot Failure Guard Spread Spectrum Cool' n' Quiet Dual Core Support Processor Maximum Multiplier Processor Maximum Voltage Multiplier/Voltage Change Processor Multiplier Processor... [Enabled], [Disabled]. If Manual, multiplier and voltage will be set to adjust the value of this motherboard. The range of Boot Failure Guard. However, for system stability, it will show when "Multiplier/Voltage Change" is set to [Manual]; Multiplier/Voltage Change ...
...[Auto] as default. BIOS SETUP UTILITY Advanced CPU Configuration AM2 Boost Overclock Mode CPU Frequency (MHz) AGP Frequency (MHz) Boot Failure Guard Spread Spectrum Cool' n' Quiet Dual Core Support Processor Maximum Multiplier Processor Maximum Voltage Multiplier/Voltage Change Processor Multiplier Processor... [Enabled], [Disabled]. If Manual, multiplier and voltage will be set to adjust the value of this motherboard. The range of Boot Failure Guard. However, for system stability, it will show when "Multiplier/Voltage Change" is set to [Manual]; Multiplier/Voltage Change ...
User Manual
Page 31
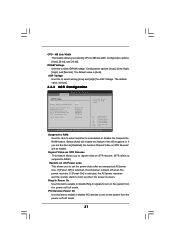
... Help Load Defaults Save and Exit Exit v02.54 (C) Copyright 1985-2003, American Megatrends, Inc. Configuration options: [Auto], [8 bit], and [16 bit]. If you to boot up when the power recovers. The default value is selected, the AC/power resumes and the system starts to set this item to select whether...
... Help Load Defaults Save and Exit Exit v02.54 (C) Copyright 1985-2003, American Megatrends, Inc. Configuration options: [Auto], [8 bit], and [16 bit]. If you to boot up when the power recovers. The default value is selected, the AC/power resumes and the system starts to set this item to select whether...
User Manual
Page 37
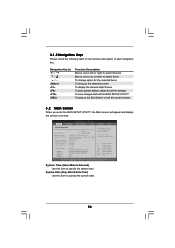
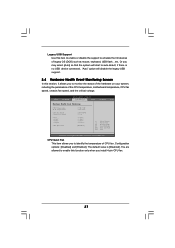
... CPU temperature, motherboard temperature, CPU fan speed, chassis fan speed, and the critical voltage. Configuration options: [Disabled] and [Enabled]. BIOS SETUP UTILITY Main Advanced H/W Monitor Boot Security Exit Hardware Health Event Monitoring CPU Temperature M / B Temperature CPU Fan Speed Chassis Fan Speed Vcore + 3.30V + 5.00V + 12.00V CPU Quiet Fan : 37 C / 98...
... CPU temperature, motherboard temperature, CPU fan speed, chassis fan speed, and the critical voltage. Configuration options: [Disabled] and [Enabled]. BIOS SETUP UTILITY Main Advanced H/W Monitor Boot Security Exit Hardware Health Event Monitoring CPU Temperature M / B Temperature CPU Fan Speed Chassis Fan Speed Vcore + 3.30V + 5.00V + 12.00V CPU Quiet Fan : 37 C / 98...
User Manual
Page 38
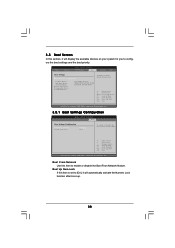
...v02.54 (C) Copyright 1985-2003, American Megatrends, Inc. 3.5.1 Boot Settings Configuration BIOS SETUP UTILITY Boot Boot Settings Configuration Boot From Network Bootup Num-Lock [Disabled] [On] To enable or disable the boot from network feature. +F1 F9 F10 ESC Select Screen Select...v02.54 (C) Copyright 1985-2003, American Megatrends, Inc. Main Advanced BIOS SETUP UTILITY H/W Monitor Boot Security Exit Boot Settings Boot Settings Configuration 1st Boot Device 2nd Boot Device 3rd Boot Device Hard Disk Drives Removable Drives CD/DVD Drives [1st Floppy Device] [HDD: PM-MAXTOR...
...v02.54 (C) Copyright 1985-2003, American Megatrends, Inc. 3.5.1 Boot Settings Configuration BIOS SETUP UTILITY Boot Boot Settings Configuration Boot From Network Bootup Num-Lock [Disabled] [On] To enable or disable the boot from network feature. +F1 F9 F10 ESC Select Screen Select...v02.54 (C) Copyright 1985-2003, American Megatrends, Inc. Main Advanced BIOS SETUP UTILITY H/W Monitor Boot Security Exit Boot Settings Boot Settings Configuration 1st Boot Device 2nd Boot Device 3rd Boot Device Hard Disk Drives Removable Drives CD/DVD Drives [1st Floppy Device] [HDD: PM-MAXTOR...

User Manual
Page 39
Select Screen Select Item Enter Change F1 General Help F9 Load Defaults F10 Save and Exit ESC Exit v02.54 (C) Copyright 1985-2003, American Megatrends, Inc. 39 BIOS SETUP UTILITY Main Advanced H/W Monitor Boot Security Exit Security Settings Supervisor Password : Not Installed User Password : Not Installed Change Supervisor Password Change User Password Install or Change the password. 3.6 Security Screen In this section, you may set or change the supervisor/user password for the system. For the user password, you may also clear it.
Select Screen Select Item Enter Change F1 General Help F9 Load Defaults F10 Save and Exit ESC Exit v02.54 (C) Copyright 1985-2003, American Megatrends, Inc. 39 BIOS SETUP UTILITY Main Advanced H/W Monitor Boot Security Exit Security Settings Supervisor Password : Not Installed User Password : Not Installed Change Supervisor Password Change User Password Install or Change the password. 3.6 Security Screen In this section, you may set or change the supervisor/user password for the system. For the user password, you may also clear it.

User Manual
Page 40
... the BIOS SETUP UTILITY without saving any changes. Select [OK] to discard all the setup configurations. 40 3.7 Exit Screen Main BIOS SETUP UTILITY Advanced H/W Monitro Boot Security Exit Exit Options Save Changes and Exit Discard Changes and Exit Discard Changes Load Optimal Defaults Exit system setup after saving the changes. Discard...
... the BIOS SETUP UTILITY without saving any changes. Select [OK] to discard all the setup configurations. 40 3.7 Exit Screen Main BIOS SETUP UTILITY Advanced H/W Monitro Boot Security Exit Exit Options Save Changes and Exit Discard Changes and Exit Discard Changes Load Optimal Defaults Exit system setup after saving the changes. Discard...
Quick Installation Guide
Page 5
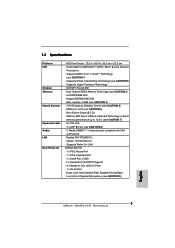
...PCI slots - 1 x AGP 8X slot (see CAUTION 4) - Support DDRII800/667/533 - Max. CPU Frequency Stepless Control (see CAUTION 9) English 5 ASRock AM2NF3-VSTA Motherboard Audio Jack: Side Speaker/Rear Speaker/Central Bass/ Line in , 30.5 cm x 20.3 cm - Supports Wake-On-LAN...-Use USB 2.0 Ports - 1 x RJ-45 Port - Realtek PHY RTL8201CL - capacity: 16GB (see CAUTION 8) - ASRock U-COP (see CAUTION 2) - Supports Untied Overclocking Technology (see CAUTION 6) - Boot Failure Guard (B.F.G.) - Speed: 10/100 Ethernet - ATX Form Factor: 12.0-in x 8.0-in /Front Speaker/Microphone (see...
...PCI slots - 1 x AGP 8X slot (see CAUTION 4) - Support DDRII800/667/533 - Max. CPU Frequency Stepless Control (see CAUTION 9) English 5 ASRock AM2NF3-VSTA Motherboard Audio Jack: Side Speaker/Rear Speaker/Central Bass/ Line in , 30.5 cm x 20.3 cm - Supports Wake-On-LAN...-Use USB 2.0 Ports - 1 x RJ-45 Port - Realtek PHY RTL8201CL - capacity: 16GB (see CAUTION 8) - ASRock U-COP (see CAUTION 2) - Supports Untied Overclocking Technology (see CAUTION 6) - Boot Failure Guard (B.F.G.) - Speed: 10/100 Ethernet - ATX Form Factor: 12.0-in x 8.0-in /Front Speaker/Microphone (see...

Quick Installation Guide
Page 13
Note: To select +5VSB, it down before you do not clear the CMOS right after you update the BIOS. English 13 ASRock AM2NF3-VSTA Motherboard If no jumper cap is "Open". The illustration shows a 3-pin jumper whose pin1 and pin2 are "Short" when jumper cap is placed on pins, ... the jumper is placed on CLRCMOS1 for 15 seconds, use a jumper cap to enable (see p.2, No. 17) Default Clear CMOS Note: CLRCMOS1 allows you must boot up events. 2.4 Jumpers Setup The illustration shows how jumpers are short, both the front panel and the rear panel audio connectors can work.
Note: To select +5VSB, it down before you do not clear the CMOS right after you update the BIOS. English 13 ASRock AM2NF3-VSTA Motherboard If no jumper cap is "Open". The illustration shows a 3-pin jumper whose pin1 and pin2 are "Short" when jumper cap is placed on pins, ... the jumper is placed on CLRCMOS1 for 15 seconds, use a jumper cap to enable (see p.2, No. 17) Default Clear CMOS Note: CLRCMOS1 allows you must boot up events. 2.4 Jumpers Setup The illustration shows how jumpers are short, both the front panel and the rear panel audio connectors can work.
Quick Installation Guide
Page 19
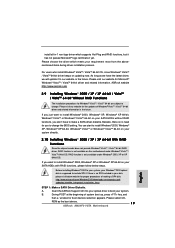
As long as the boot device. 19 ASRock AM2NF3-VSTA Motherboard Please visit our website for you don't have...asrock.com 2.9 Installing Windows® 2000 / XP / XP 64-bit / VistaTM / VistaTM 64-bit Without RAID Functions The installation procedures for boot devices selection appears. install all-in the future. Please visit our website for the updates of system boot... related information. If there is only available under Windows® VistaTM / VistaTM 64-bit OS. Insert the ASRock Support CD into your optical drive to install Windows® 2000, Windows® XP, Windows® XP...
As long as the boot device. 19 ASRock AM2NF3-VSTA Motherboard Please visit our website for you don't have...asrock.com 2.9 Installing Windows® 2000 / XP / XP 64-bit / VistaTM / VistaTM 64-bit Without RAID Functions The installation procedures for boot devices selection appears. install all-in the future. Please visit our website for the updates of system boot... related information. If there is only available under Windows® VistaTM / VistaTM 64-bit OS. Insert the ASRock Support CD into your optical drive to install Windows® 2000, Windows® XP, Windows® XP...
RAID Installation Guide
Page 3
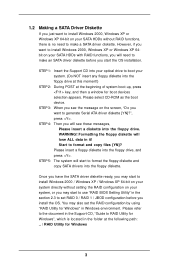
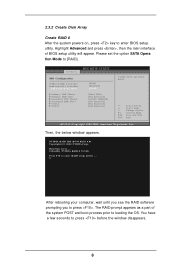
... system directly without setting the RAID configuration on your SATA HDDs without RAID functions, there is located in the folder at the beginning of system boot-up, press key, and then a window for Windows 3 STEP 3: When you see these messages, Please insert a diskette into the floppy drive. STEP 5:...Windows environment. STEP 1: Insert the Support CD into the floppy diskette. WARNING! Please refer to the document in the Support CD, "Guide to boot your SATA HDDs with RAID functions, you want to install Windows 2000, Windows XP or Windows XP 64bit on your system. (Do NOT insert ...
... system directly without setting the RAID configuration on your SATA HDDs without RAID functions, there is located in the folder at the beginning of system boot-up, press key, and then a window for Windows 3 STEP 3: When you see these messages, Please insert a diskette into the floppy drive. STEP 5:...Windows environment. STEP 1: Insert the Support CD into the floppy diskette. WARNING! Please refer to the document in the Support CD, "Guide to boot your SATA HDDs with RAID functions, you want to install Windows 2000, Windows XP or Windows XP 64bit on your system. (Do NOT insert ...
RAID Installation Guide
Page 8
... to press before the window disappears. 8 You have a few seconds to press . Highlight Advanced and press , then the main interface of the system POST and boot process prior to enter RAID setup utility . . .
... to press before the window disappears. 8 You have a few seconds to press . Highlight Advanced and press , then the main interface of the system POST and boot process prior to enter RAID setup utility . . .
RAID Installation Guide
Page 11
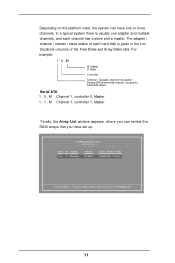
... Controller Channel - In a typical system there is usually one or more channels. Serial ATA 1 . 0 . NVIDIA RAID Utility - Boot Id Status Yes 2 Healthy Vendor NVIDIA Array Model Name STRIPING 74.53G [Ctrl-X]Exit [ ]Select [B]Set Boot [N]New Array [ENTER]Detail 11 Depending on the platform used for Parallel ATA drives while channel 1 is...
... Controller Channel - In a typical system there is usually one or more channels. Serial ATA 1 . 0 . NVIDIA RAID Utility - Boot Id Status Yes 2 Healthy Vendor NVIDIA Array Model Name STRIPING 74.53G [Ctrl-X]Exit [ ]Select [B]Set Boot [N]New Array [ENTER]Detail 11 Depending on the platform used for Parallel ATA drives while channel 1 is...

