
User Manual
Page 5
... ATITM CrossFireTM without notice. Because the motherboard specifications and the BIOS software might be updated, the content of this manual will be subject to choose PCIE functions between one PCIE x16 slot and two PCIE slots for purchasing ASRock ALiveXFire-eSATA2 motherboard, a reliable motherboard produced under ASRock's consistently stringent quality control. In case any modifications of...
... ATITM CrossFireTM without notice. Because the motherboard specifications and the BIOS software might be updated, the content of this manual will be subject to choose PCIE functions between one PCIE x16 slot and two PCIE slots for purchasing ASRock ALiveXFire-eSATA2 motherboard, a reliable motherboard produced under ASRock's consistently stringent quality control. In case any modifications of...
User Manual
Page 24
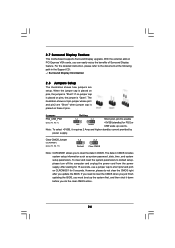
...p.10, No. 1) +5V +5VSB +5VSB (standby) for 5 seconds. To clear and reset the system parameters to clear the CMOS when you just finish updating the BIOS, you can easily enjoy the benefits of Surround Display feature. Note: To select +5VSB, it down before you do not clear the CMOS right after... setup. For the detailed instruction, please refer to enable (see p.10, No. 11) 1_2 2_3 Default Clear CMOS Note: CLRCMOS1 allows you update the BIOS. If you need to default setup, please turn off the computer and unplug the power cord from the power supply. However, please do the ...
...p.10, No. 1) +5V +5VSB +5VSB (standby) for 5 seconds. To clear and reset the system parameters to clear the CMOS when you just finish updating the BIOS, you can easily enjoy the benefits of Surround Display feature. Note: To select +5VSB, it down before you do not clear the CMOS right after... setup. For the detailed instruction, please refer to enable (see p.10, No. 11) 1_2 2_3 Default Clear CMOS Note: CLRCMOS1 allows you update the BIOS. If you need to default setup, please turn off the computer and unplug the power cord from the power supply. However, please do the ...
User Manual
Page 37
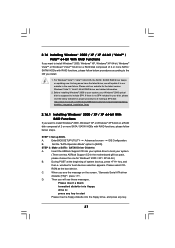
...® 2000 / XP / XP 64-bit With RAID Functions If you install. 1. Enter BIOS SETUP UTILITY Advanced screen IDE Configuration. A. When you will update it to boot your system. (There are two ASRock Support CD in your Windows® 2000 optical disk is no SP4 included in the motherboard gift... box pack, please choose the one for Windows® 2000 / XP / XP 64-bit.) B. C. B. Insert the ASRock Support CD into ...
...® 2000 / XP / XP 64-bit With RAID Functions If you install. 1. Enter BIOS SETUP UTILITY Advanced screen IDE Configuration. A. When you will update it to boot your system. (There are two ASRock Support CD in your Windows® 2000 optical disk is no SP4 included in the motherboard gift... box pack, please choose the one for Windows® 2000 / XP / XP 64-bit.) B. C. B. Insert the ASRock Support CD into ...

User Manual
Page 43
...may not exactly match what you see on the system chassis. Please press during the Power-On-Self-Test (POST) to enter the BIOS SETUP UTILITY, otherwise, POST will continue with the following selections: Main To set up the system time/date information Advanced To set up ... the system by pressing + + , or by turning the system off and then back on the motherboard stores the BIOS SETUP UTILITY. 3. The Flash Memory on . Because the BIOS software is constantly being updated, the following BIOS setup screens and descriptions are for reference purpose only, and they may run the...
...may not exactly match what you see on the system chassis. Please press during the Power-On-Self-Test (POST) to enter the BIOS SETUP UTILITY, otherwise, POST will continue with the following selections: Main To set up the system time/date information Advanced To set up ... the system by pressing + + , or by turning the system off and then back on the motherboard stores the BIOS SETUP UTILITY. 3. The Flash Memory on . Because the BIOS software is constantly being updated, the following BIOS setup screens and descriptions are for reference purpose only, and they may run the...
User Manual
Page 44
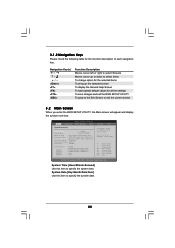
... the system date. 44 3.1.2 Navigation Keys Please check the following table for all the settings To save changes and exit the BIOS SETUP UTILITY To jump to the Exit Screen or exit the current screen 3.2 Main Screen When you enter the...Monitor Boot System Overview System Time System Date [17:00:09] [Fri 08/25/2006] BIOS Version : ALiveXFire-eSATA2 BIOS P1.0 Processor Type : AMD Athlon(tm) 64 X2 Dual Core Processor 4200+ (64bit supported) Processor Speed : 2200 MHz Microcode Update : 40FB2/0 Cache Size : 1024KB Total Memory DDRII1 DDRII2 DDRII3 DDRII4 : 512MB Dual-Channel...
... the system date. 44 3.1.2 Navigation Keys Please check the following table for all the settings To save changes and exit the BIOS SETUP UTILITY To jump to the Exit Screen or exit the current screen 3.2 Main Screen When you enter the...Monitor Boot System Overview System Time System Date [17:00:09] [Fri 08/25/2006] BIOS Version : ALiveXFire-eSATA2 BIOS P1.0 Processor Type : AMD Athlon(tm) 64 X2 Dual Core Processor 4200+ (64bit supported) Processor Speed : 2200 MHz Microcode Update : 40FB2/0 Cache Size : 1024KB Total Memory DDRII1 DDRII2 DDRII3 DDRII4 : 512MB Dual-Channel...
Quick Installation Guide
Page 4
.... 4 ASRock ALiveXFire-eSATA2 Motherboard English ASRock website http://www.asrock.com 1.1 Package Contents 1 x ASRock ALiveXFire-eSATA2 Motherboard (ATX Form Factor: 12.0-in x 8.2-in, 30.5 cm x 20.8 cm) 1 x ASRock ALiveXFire-eSATA2 Quick Installation Guide 1 x ASRock ALiveXFire-eSATA2 Support CD 1 x Ultra ATA 66/100/133 IDE Ribbon Cable (80-conductor) 1 x 3.5-in the Support CD. This Quick Installation Guide contains introduction of this manual occur, the updated version...
.... 4 ASRock ALiveXFire-eSATA2 Motherboard English ASRock website http://www.asrock.com 1.1 Package Contents 1 x ASRock ALiveXFire-eSATA2 Motherboard (ATX Form Factor: 12.0-in x 8.2-in, 30.5 cm x 20.8 cm) 1 x ASRock ALiveXFire-eSATA2 Quick Installation Guide 1 x ASRock ALiveXFire-eSATA2 Support CD 1 x Ultra ATA 66/100/133 IDE Ribbon Cable (80-conductor) 1 x 3.5-in the Support CD. This Quick Installation Guide contains introduction of this manual occur, the updated version...

Quick Installation Guide
Page 20
For the detailed instruction, please refer to clear the CMOS when you just finish updating the BIOS, you must boot up events. If no jumper cap is "Open". To clear and reset the system parameters to clear the data in CMOS. However, ... supply. When the jumper cap is "Short". Note: To select +5VSB, it down before you do not clear the CMOS right after you update the BIOS. English 20 ASRock ALiveXFire-eSATA2 Motherboard The illustration shows a 3-pin jumper whose pin1 and pin2 are setup. With the external add-on PCI Express VGA cards, you to default...
For the detailed instruction, please refer to clear the CMOS when you just finish updating the BIOS, you must boot up events. If no jumper cap is "Open". To clear and reset the system parameters to clear the data in CMOS. However, ... supply. When the jumper cap is "Short". Note: To select +5VSB, it down before you do not clear the CMOS right after you update the BIOS. English 20 ASRock ALiveXFire-eSATA2 Motherboard The illustration shows a 3-pin jumper whose pin1 and pin2 are setup. With the external add-on PCI Express VGA cards, you to default...
Quick Installation Guide
Page 33
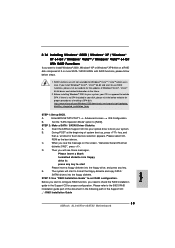
... driver and related information in the Support CD: .. \ RAID Installation Guide English 33 ASRock ALiveXFire-eSATA2 Motherboard htm#the_integrated_installation_fmay STEP 1: Set up , press key, and then a window for the updates of making a SP4 disk: http://www.microsoft.com/Windows2000/downloads/servicepacks/sp4/spdeploy. ... 64-bit / Windows® VistaTM / Windows® VistaTM 64-bit With RAID Functions If you want to [RAID]. Enter BIOS SETUP UTILITY Advanced screen IDE Configuration. B. Before installing Windows® 2000 to your system, your optical drive to check the RAID...
... driver and related information in the Support CD: .. \ RAID Installation Guide English 33 ASRock ALiveXFire-eSATA2 Motherboard htm#the_integrated_installation_fmay STEP 1: Set up , press key, and then a window for the updates of making a SP4 disk: http://www.microsoft.com/Windows2000/downloads/servicepacks/sp4/spdeploy. ... 64-bit / Windows® VistaTM / Windows® VistaTM 64-bit With RAID Functions If you want to [RAID]. Enter BIOS SETUP UTILITY Advanced screen IDE Configuration. B. Before installing Windows® 2000 to your system, your optical drive to check the RAID...


