
RAID Installation Guide
Page 8
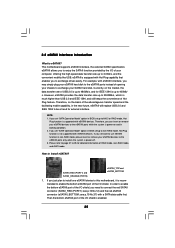
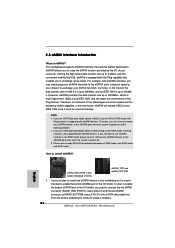
... the instructions below screen appears. 8 Please read this guide carefully and follow the instructions below according to configure and manage RAID functions. NVIDIA Windows RAID Installation Guide NVIDIA Windows RAID Installation Guide is an instruction for Windows 2000 / XP / XP 64-bit Users A. Enter NVRAIDMAN RAID driver is also a "Mediashield" shortcut on the desktop.) Then, the below to the OS you install. 2.1 NVIDIA Windows RAID Installation Guide for you can create, delete, or rebuild any RAID array. For Windows...
... the instructions below screen appears. 8 Please read this guide carefully and follow the instructions below according to configure and manage RAID functions. NVIDIA Windows RAID Installation Guide NVIDIA Windows RAID Installation Guide is an instruction for Windows 2000 / XP / XP 64-bit Users A. Enter NVRAIDMAN RAID driver is also a "Mediashield" shortcut on the desktop.) Then, the below to the OS you install. 2.1 NVIDIA Windows RAID Installation Guide for you can create, delete, or rebuild any RAID array. For Windows...
User Manual
Page 8
...; Windows® VistaTM / VistaTM 64-bit driver and related information. This motherboard supports Dual Channel Memory Technology. Frequencies other than 4GB for the reservation for keeping the stability of the system or damage the CPU. 6. While CPU overheat is detected, the system will update it to our website in the BIOS setup, the memory performance will overclock the chipset/CPU reference clock. If you enable this motherboard supports both stereo and mono modes. This motherboard supports...
...; Windows® VistaTM / VistaTM 64-bit driver and related information. This motherboard supports Dual Channel Memory Technology. Frequencies other than 4GB for the reservation for keeping the stability of the system or damage the CPU. 6. While CPU overheat is detected, the system will update it to our website in the BIOS setup, the memory performance will overclock the chipset/CPU reference clock. If you enable this motherboard supports both stereo and mono modes. This motherboard supports...
User Manual
Page 20
... the instruction in our manual and chassis manual to enter Realtek HD Audio Manager. B. F. Click "Audio I/O", select "Connector Settings" , choose "Disable front panel jack detection", and save the change by clicking "OK". 20 This connector allows you use AC'97 audio panel, please install it to the front panel audio header as a CD-ROM, DVD-ROM, TV tuner card, or MPEG card. Set the Front Panel Control option from sound sources such as below: A. Enter Advanced Settings, and then select Chipset Configuration. Enter Windows system. High Definition Audio supports...
... the instruction in our manual and chassis manual to enter Realtek HD Audio Manager. B. F. Click "Audio I/O", select "Connector Settings" , choose "Disable front panel jack detection", and save the change by clicking "OK". 20 This connector allows you use AC'97 audio panel, please install it to the front panel audio header as a CD-ROM, DVD-ROM, TV tuner card, or MPEG card. Set the Front Panel Control option from sound sources such as below: A. Enter Advanced Settings, and then select Chipset Configuration. Enter Windows system. High Definition Audio supports...
User Manual
Page 24
... video monitor, such as HDTV. Step 3. Step 5. To use HDMI function on HDMI_SPDIF cable. Connect the white end (B or C) of HDMI_SPDIF cable to the VGA card user manual for detailed connection procedures. Please refer to the HDMI_SPDIF connector of HDMI VGA card. (There are two white ends (2-pin and 3-pin) on this picture shows the wrong example of HDMI_SPDIF header and HDMI_SPDIF cable connectors, please refer to the PCI Express Graphics slot on HDMI VGA card to this motherboard. Install...
... video monitor, such as HDTV. Step 3. Step 5. To use HDMI function on HDMI_SPDIF cable. Connect the white end (B or C) of HDMI_SPDIF cable to the VGA card user manual for detailed connection procedures. Please refer to the HDMI_SPDIF connector of HDMI VGA card. (There are two white ends (2-pin and 3-pin) on this picture shows the wrong example of HDMI_SPDIF header and HDMI_SPDIF cable connectors, please refer to the PCI Express Graphics slot on HDMI VGA card to this motherboard. Install...
User Manual
Page 25
... Plug capability that enables you set "SATA Operation Mode" option in BIOS setup to enjoy the SATAII function provided by the I /O shield is power-on the basis of the advantageous transfer speed and the facilitating mobile capability, in non-RAID mode, please insert or remove your eSATAII devices to the eSATAII ports while the system is enabled. 25 Therefore, you need to AHCI or RAID mode, Hot Plug function is supported...
... Plug capability that enables you set "SATA Operation Mode" option in BIOS setup to enjoy the SATAII function provided by the I /O shield is power-on the basis of the advantageous transfer speed and the facilitating mobile capability, in non-RAID mode, please insert or remove your eSATAII devices to the eSATAII ports while the system is enabled. 25 Therefore, you need to AHCI or RAID mode, Hot Plug function is supported...
User Manual
Page 28
...://www.hitachigst.com/hdd/support/download.htm The above examples are just for changing various ATA features. In order to enable SATAII function, please follow the below instruction with the best performance. For different SATAII hard disk products of SATAII hard disks may not be enabled. Some default setting of different vendors, the jumper pin setting methods may fail to run at SATAII mode, which operate with...
...://www.hitachigst.com/hdd/support/download.htm The above examples are just for changing various ATA features. In order to enable SATAII function, please follow the below instruction with the best performance. For different SATAII hard disk products of SATAII hard disks may not be enabled. Some default setting of different vendors, the jumper pin setting methods may fail to run at SATAII mode, which operate with...
User Manual
Page 30
... Hot Plug Function? However, please note that enables you may simply plug your eSATAII devices to the eSATAII ports instead of opening your chassis to exchange your SATAII hard disk. 2.12 Driver Installation Guide To install the drivers to your system, please insert the support CD to insert and remove the SATA / SATAII HDDs while the system is still power-on and in RAID / AHCI mode. For example, with Hot Plug capability...
... Hot Plug Function? However, please note that enables you may simply plug your eSATAII devices to the eSATAII ports instead of opening your chassis to exchange your SATAII hard disk. 2.12 Driver Installation Guide To install the drivers to your system, please insert the support CD to insert and remove the SATA / SATAII HDDs while the system is still power-on and in RAID / AHCI mode. For example, with Hot Plug capability...
User Manual
Page 34
...to [RAID]. NVIDIA RAID Driver (required) B. Set the "SATA Operation Mode" option to install. STEP 2: Use "RAID Installation Guide" to set RAID configuration. Insert the Windows® VistaTM / Windows® VistaTM 64-bit optical disk into the optical drive to boot your system. STEP 3: Use "RAID Installation Guide" to set RAID configuration. After reading the floppy disk, the drivers will be presented. B. Please specify the first RAID driver and then specify again for RAID mode, you install Windows® 2000 / Windows® XP / Windows® XP 64-bit on IDE HDDs and...
...to [RAID]. NVIDIA RAID Driver (required) B. Set the "SATA Operation Mode" option to install. STEP 2: Use "RAID Installation Guide" to set RAID configuration. Insert the Windows® VistaTM / Windows® VistaTM 64-bit optical disk into the optical drive to boot your system. STEP 3: Use "RAID Installation Guide" to set RAID configuration. After reading the floppy disk, the drivers will be presented. B. Please specify the first RAID driver and then specify again for RAID mode, you install Windows® 2000 / Windows® XP / Windows® XP 64-bit on IDE HDDs and...

User Manual
Page 39
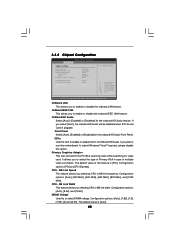
... or compatibility issue with some memory modules or power supplies. However, it is supported by default. Configuration options: [Enabled] and [Disabled]. The default value is [Auto]. Configuration options: [Disabled], and [Enabled]. The default value is [100]. PCIE Frequency (MHz) Use this option to [0.75% Hershey] as default. G Dual Core AM2 CPU on this motherboard. Processor Maximum Voltage It will enter C1E power saving state when both of Boot Failure Guard. C1E is an enhanced power saving state which is set to [Auto] by AM2 dual core processors. CPU/LDT...
... or compatibility issue with some memory modules or power supplies. However, it is supported by default. Configuration options: [Enabled] and [Disabled]. The default value is [Auto]. Configuration options: [Disabled], and [Enabled]. The default value is [100]. PCIE Frequency (MHz) Use this option to [0.75% Hershey] as default. G Dual Core AM2 CPU on this motherboard. Processor Maximum Voltage It will enter C1E power saving state when both of Boot Failure Guard. C1E is an enhanced power saving state which is set to [Auto] by AM2 dual core processors. CPU/LDT...
User Manual
Page 42
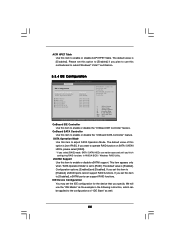
...Primary VGA in case of multiple video controllers. CPU - CPU - DRAM Voltage Use this to enable or disable CD-In of this motherboard to NB link frequency. CD-In Use this option. Configuration options: [Auto], [8 bit], and [16 bit]. The default value is [PCI]. If you select [Auto], the onboard HD Audio will switch the PCI Bus scanning order while searching for video card. OnBoard HD Audio Select [Auto], [Enabled] or [Disabled] for the onboard HD Audio Front Panel. Primary Graphics Adapter This item will be disabled when PCI Sound Card is plugged. Configuration options: [Auto...
...Primary VGA in case of multiple video controllers. CPU - CPU - DRAM Voltage Use this to enable or disable CD-In of this motherboard to NB link frequency. CD-In Use this option. Configuration options: [Auto], [8 bit], and [16 bit]. The default value is [PCI]. If you select [Auto], the onboard HD Audio will switch the PCI Bus scanning order while searching for video card. OnBoard HD Audio Select [Auto], [Enabled] or [Disabled] for the onboard HD Audio Front Panel. Primary Graphics Adapter This item will be disabled when PCI Sound Card is plugged. Configuration options: [Auto...
User Manual
Page 44
... following instruction, which can support RAID functions. If you want to operate RAID function on SATA / SATAII HDDs, please select [RAID]. * If you select [RAID] mode, SATA / SATAII HDDs can not be applied to enable or disable the "OnBoard IDE Controller" feature. The default value is set to [Disabled], eSATAII ports can be accessed until you set this option to [Enabled] if you plan to use the "IDE Master" as the example in NVIDIA BIOS / Windows RAID Utility. Please set this...
... following instruction, which can support RAID functions. If you want to operate RAID function on SATA / SATAII HDDs, please select [RAID]. * If you select [RAID] mode, SATA / SATAII HDDs can not be applied to enable or disable the "OnBoard IDE Controller" feature. The default value is set to [Disabled], eSATAII ports can be accessed until you set this option to [Enabled] if you plan to use the "IDE Master" as the example in NVIDIA BIOS / Windows RAID Utility. Please set this...
User Manual
Page 46
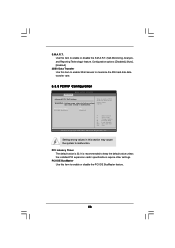
... Select Screen Select Item Change Option General Help Load Defaults Save and Exit Exit v02.54 (C) Copyright 1985-2003, American Megatrends, Inc. PCI Latency Timer The default value is recommended to malfunction. PCI IDE BusMaster Use this item to enable 32-bit access to maximize the IDE hard disk data transfer rate. 3.3.5 PCIPnP Configuration BIOS SETUP UTILITY Advanced Advanced PCI / PnP Settings WARNING: Setting wrong values in units of PCI clocks for PCI device latency timer register. S.M.A.R.T. Configuration options: [Disabled], [Auto], [Enabled...
... Select Screen Select Item Change Option General Help Load Defaults Save and Exit Exit v02.54 (C) Copyright 1985-2003, American Megatrends, Inc. PCI Latency Timer The default value is recommended to malfunction. PCI IDE BusMaster Use this item to enable 32-bit access to maximize the IDE hard disk data transfer rate. 3.3.5 PCIPnP Configuration BIOS SETUP UTILITY Advanced Advanced PCI / PnP Settings WARNING: Setting wrong values in units of PCI clocks for PCI device latency timer register. S.M.A.R.T. Configuration options: [Disabled], [Auto], [Enabled...
User Manual
Page 47
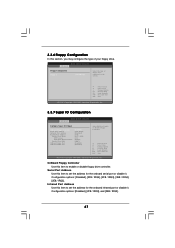
...OnBoard Floppy Controller Use this section, you may configure the type of floppy drive connected to the system. +F1 F9 F10 ESC Select Screen Select Item Change Option General Help Load Defaults Save and Exit Exit v02.54 (C) Copyright 1985-2003, American Megatrends, Inc. 3.3.7 Super IO Configuration BIOS SETUP UTILITY Advanced Configure Super IO Chipset OnBoard Floppy Controller Serial Port Address Infrared Port Address Parallel Port Address Parallel Port Mode EPP Version ECP Mode DMA Channel Parallel Port IRQ OnBoard Game Port OnBoard MIDI Port [Enabled] [3F8 / IRQ4] [Disabled...
...OnBoard Floppy Controller Use this section, you may configure the type of floppy drive connected to the system. +F1 F9 F10 ESC Select Screen Select Item Change Option General Help Load Defaults Save and Exit Exit v02.54 (C) Copyright 1985-2003, American Megatrends, Inc. 3.3.7 Super IO Configuration BIOS SETUP UTILITY Advanced Configure Super IO Chipset OnBoard Floppy Controller Serial Port Address Infrared Port Address Parallel Port Address Parallel Port Mode EPP Version ECP Mode DMA Channel Parallel Port IRQ OnBoard Game Port OnBoard MIDI Port [Enabled] [3F8 / IRQ4] [Disabled...
User Manual
Page 53
... begin using the support CD, insert the CD into your computer. Click on the file "ASSETUP.EXE" from the BIN folder in your CD-ROM drive. If the Main Menu did not appear automatically, locate and double click on a specific item then follow the installation wizard to your OS documentation for further information. 53 Because motherboard settings and hardware options vary, use the setup procedures...
... begin using the support CD, insert the CD into your computer. Click on the file "ASSETUP.EXE" from the BIN folder in your CD-ROM drive. If the Main Menu did not appear automatically, locate and double click on a specific item then follow the installation wizard to your OS documentation for further information. 53 Because motherboard settings and hardware options vary, use the setup procedures...
User Manual
Page 54
... is strongly recommended to Classic View. (for Windows® XP only) 3. Double-click the Display icon in the Control Panel then select the Screen Saver tab. 4. Switch to enable AMD's Cool 'n' QuietTM technology under Windows® system. Click OK to install "AMD Processor Driver" from the "Support CD" first. From the Windows® 2000/XP operating system, click the Start button. Select Settings, then Control Panel. 2. The following dialog box appears. 5.
... is strongly recommended to Classic View. (for Windows® XP only) 3. Double-click the Display icon in the Control Panel then select the Screen Saver tab. 4. Switch to enable AMD's Cool 'n' QuietTM technology under Windows® system. Click OK to install "AMD Processor Driver" from the "Support CD" first. From the Windows® 2000/XP operating system, click the Start button. Select Settings, then Control Panel. 2. The following dialog box appears. 5.
Quick Installation Guide
Page 7
... control, it is enabled, it to SATAII mode. However, we will improve up to your system. 8. For audio output, this motherboard supports both stereo and mono modes. You can not guarantee the system stability for all CPU/DRAM configurations. Microsoft® Windows® VistaTM / VistaTM 64-bit driver keeps on page 22 for proper installation. 4. This motherboard supports Dual Channel Memory Technology. Although this function in the BIOS setup, the memory performance will update...
... control, it is enabled, it to SATAII mode. However, we will improve up to your system. 8. For audio output, this motherboard supports both stereo and mono modes. You can not guarantee the system stability for all CPU/DRAM configurations. Microsoft® Windows® VistaTM / VistaTM 64-bit driver keeps on page 22 for proper installation. 4. This motherboard supports Dual Channel Memory Technology. Although this function in the BIOS setup, the memory performance will update...
Quick Installation Guide
Page 17
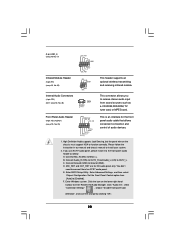
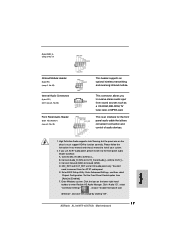
...: see p.2, No. 28) Front Panel Audio Header (9-pin HD_AUDIO1) (see p.2, No. 25) This header supports an optional wireless transmitting and receiving infrared module. Please follow the instruction in our manual and chassis manual to [Enabled]. Click "Audio I/O", select "Connector Settings" , choose "Disable front panel jack detection", and save the change by clicking "OK". 17 ASRock ALiveNF5-eSATA2+ Motherboard English Connect Mic_IN (MIC) to OUT2_L. Connect Audio_R (RIN) to OUT2_R and Audio_L (LIN) to MIC2_L. B. Enter BIOS Setup Utility.
...: see p.2, No. 28) Front Panel Audio Header (9-pin HD_AUDIO1) (see p.2, No. 25) This header supports an optional wireless transmitting and receiving infrared module. Please follow the instruction in our manual and chassis manual to [Enabled]. Click "Audio I/O", select "Connector Settings" , choose "Disable front panel jack detection", and save the change by clicking "OK". 17 ASRock ALiveNF5-eSATA2+ Motherboard English Connect Mic_IN (MIC) to OUT2_L. Connect Audio_R (RIN) to OUT2_R and Audio_L (LIN) to MIC2_L. B. Enter BIOS Setup Utility.

Quick Installation Guide
Page 21
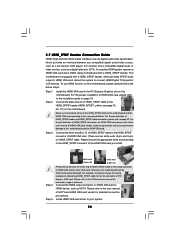
... ASRock ALiveNF5-eSATA2+ Motherboard Step 5. Please refer to the user manual of HDMI_SPDIF cable to this motherboard. Install HDMI VGA card driver to the same pin definition. Install the HDMI VGA card to the user manual of the HDMI VGA card you install. Connect the black end (A) of HDTV and HDMI VGA card vendor for connector usage in advance. Step 3. Connect the HDMI output connector on HDMI VGA card, please refer to the PCI Express Graphics slot on the motherboard. For the proper installation of HDMI_SPDIF header and HDMI_SPDIF cable connectors, please refer to connect...
... ASRock ALiveNF5-eSATA2+ Motherboard Step 5. Please refer to the user manual of HDMI_SPDIF cable to this motherboard. Install HDMI VGA card driver to the same pin definition. Install the HDMI VGA card to the user manual of the HDMI VGA card you install. Connect the black end (A) of HDTV and HDMI VGA card vendor for connector usage in advance. Step 3. Connect the HDMI output connector on HDMI VGA card, please refer to the PCI Express Graphics slot on the motherboard. For the proper installation of HDMI_SPDIF header and HDMI_SPDIF cable connectors, please refer to connect...
Quick Installation Guide
Page 22
... devices. If you still want to use eSATAII function in BIOS setup to non-RAID mode, Hot Plug function is up to 480Mb/s, and for external interface. If you set "SATA Operation Mode" option in non-RAID mode, please insert or remove your eSATAII devices to exchange your chassis to the eSATAII ports only when the system is supported with eSATAII interface, you to AHCI or RAID mode, Hot Plug function is power...
... devices. If you still want to use eSATAII function in BIOS setup to non-RAID mode, Hot Plug function is up to 480Mb/s, and for external interface. If you set "SATA Operation Mode" option in non-RAID mode, please insert or remove your eSATAII devices to exchange your chassis to the eSATAII ports only when the system is supported with eSATAII interface, you to AHCI or RAID mode, Hot Plug function is power...
Quick Installation Guide
Page 31
... BIOS. The drivers are two RAID drivers needed for the second one.) NOTE. Enter BIOS SETUP UTILITY Advanced screen IDE Configuration. When you see "Where do you need to check the RAID installation guide in the Support CD: .. \ RAID Installation Guide STEP 4: Install Windows® 2000 / XP / XP 64-bit OS on your system. Please refer to 31 ASRock ALiveNF5-eSATA2+ Motherboard NVIDIA RAID Driver (required) B. Set the "SATA Operation Mode" option to install. Before you start to configure RAID function, you want to the BIOS RAID installation guide part...
... BIOS. The drivers are two RAID drivers needed for the second one.) NOTE. Enter BIOS SETUP UTILITY Advanced screen IDE Configuration. When you see "Where do you need to check the RAID installation guide in the Support CD: .. \ RAID Installation Guide STEP 4: Install Windows® 2000 / XP / XP 64-bit OS on your system. Please refer to 31 ASRock ALiveNF5-eSATA2+ Motherboard NVIDIA RAID Driver (required) B. Set the "SATA Operation Mode" option to install. Before you start to configure RAID function, you want to the BIOS RAID installation guide part...


