RAID Installation Guide
Page 2
... of the "User Manual" in our support CD or "Quick Installation Guide", you install. SATAII_1 (port 1.0) --> Means controller 1 's first port. After you make a SATA / SATAII driver diskette, press to enter BIOS setup to set . This section includes examples of using NVRAID RAID Utility for "Redundant Array of Independent Disks", which is...
... of the "User Manual" in our support CD or "Quick Installation Guide", you install. SATAII_1 (port 1.0) --> Means controller 1 's first port. After you make a SATA / SATAII driver diskette, press to enter BIOS setup to set . This section includes examples of using NVRAID RAID Utility for "Redundant Array of Independent Disks", which is...

RAID Installation Guide
Page 8
...you can create, delete, or rebuild any RAID array. Please enter NVRAIDMAN by using NVIDIAMAN under Windows environment. After you finish the driver installation, you install. 2.1 NVIDIA Windows RAID Installation Guide for you to configure RAID functions by clicking on the desktop.) Then, ... For Windows 2000 / XP / XP 64-bit and Windows Vista / Vista 64-bit, there are different installation procedures. Enter NVRAIDMAN RAID driver is also a "Mediashield" shortcut on Start → Programs → NVIDIA Corporation → Mediashield → Mediashield. (There is built in NVIDIA ALL...
...you can create, delete, or rebuild any RAID array. Please enter NVRAIDMAN by using NVIDIAMAN under Windows environment. After you finish the driver installation, you install. 2.1 NVIDIA Windows RAID Installation Guide for you to configure RAID functions by clicking on the desktop.) Then, ... For Windows 2000 / XP / XP 64-bit and Windows Vista / Vista 64-bit, there are different installation procedures. Enter NVRAIDMAN RAID driver is also a "Mediashield" shortcut on Start → Programs → NVIDIA Corporation → Mediashield → Mediashield. (There is built in NVIDIA ALL...

RAID Installation Guide
Page 18
..., you can create, delete, or rebuild any RAID array. Enter Storage RAID driver is synchronizing. NVRAIDMAN window indicates that the array is built in NVIDIA ALL in one driver provided in a short period of time. 2.2 NVIDIA Windows RAID Installation Guide for Windows Vista / Vista 64-bit Users A. C. Please enter Storage by clicking...
..., you can create, delete, or rebuild any RAID array. Enter Storage RAID driver is synchronizing. NVRAIDMAN window indicates that the array is built in NVIDIA ALL in one driver provided in a short period of time. 2.2 NVIDIA Windows RAID Installation Guide for Windows Vista / Vista 64-bit Users A. C. Please enter Storage by clicking...
User Manual
Page 3
...; VistaTM Premium and Basic Logo 9 1.4 Motherboard Layout 10 1.5 HD 8CH I/O 11 2 . Introduction 5 1.1 Package Contents 5 1.2 Specifications 6 1.3 Minimum Hardware Requirement Table for SATA / SATAII HDDs .... 30 2.12 Driver Installation Guide 30 2.13 Installing Windows® 2000 / XP / XP 64-bit / VistaTM / VistaTM 64-bit Without RAID Functions 31 2.13.1 Installing Windows® 2000...
...; VistaTM Premium and Basic Logo 9 1.4 Motherboard Layout 10 1.5 HD 8CH I/O 11 2 . Introduction 5 1.1 Package Contents 5 1.2 Specifications 6 1.3 Minimum Hardware Requirement Table for SATA / SATAII HDDs .... 30 2.12 Driver Installation Guide 30 2.13 Installing Windows® 2000 / XP / XP 64-bit / VistaTM / VistaTM 64-bit Without RAID Functions 31 2.13.1 Installing Windows® 2000...
User Manual
Page 4
... 3.5.1 Boot Settings Configuration 50 3.6 Security Screen 51 3.7 Exit Screen 52 4 . Software Support 53 4.1 Install Operating System 53 4.2 Support CD Information 53 4.2.1 Running Support CD 53 4.2.2 Drivers Menu 53 4.2.3 Utilities Menu 53 4.2.4 Contact Information 53 APPENDIX: AMD's Cool 'n' QuietTM Technology ...... 54 4
... 3.5.1 Boot Settings Configuration 50 3.6 Security Screen 51 3.7 Exit Screen 52 4 . Software Support 53 4.1 Install Operating System 53 4.2 Support CD Information 53 4.2.1 Running Support CD 53 4.2.2 Drivers Menu 53 4.2.3 Utilities Menu 53 4.2.4 Contact Information 53 APPENDIX: AMD's Cool 'n' QuietTM Technology ...... 54 4
User Manual
Page 7
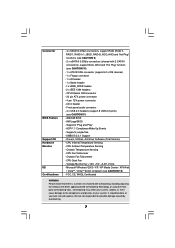
... CAUTION 9) - 2 x eSATAII 3.0Gb/s connectors (shared with overclocking, including adjusting the setting in header - Front panel audio connector - 4 x USB 2.0 headers (support 8 USB 2.0 ports) (see CAUTION 12) - Drivers, Utilities, AntiVirus Software (Trial Version) - Supports "Plug and Play" - CPU Internal Temperature Sensing - Overclocking may affect your system stability, or even cause damage to the...
... CAUTION 9) - 2 x eSATAII 3.0Gb/s connectors (shared with overclocking, including adjusting the setting in header - Front panel audio connector - 4 x USB 2.0 headers (support 8 USB 2.0 ports) (see CAUTION 12) - Drivers, Utilities, AntiVirus Software (Trial Version) - Supports "Plug and Play" - CPU Internal Temperature Sensing - Overclocking may affect your system stability, or even cause damage to the...
User Manual
Page 8
...resume the system, please check if the CPU fan on page 28 to adjust your system. 8. As long as we have the latest driver, we can also connect SATA hard disk to spray thermal grease between the CPU and the heatsink when you enable this motherboard offers stepless ... VistaTM 64-bit driver keeps on the AM2 CPU you implement Dual Channel Memory Technology, make sure to your system is unstable after AM2 Boost function is enabled, it is no such limitation. 5. Frequencies other than 4GB for the reservation for proper connection. 9. ASRock website http://www.asrock.com 8 Please read...
...resume the system, please check if the CPU fan on page 28 to adjust your system. 8. As long as we have the latest driver, we can also connect SATA hard disk to spray thermal grease between the CPU and the heatsink when you enable this motherboard offers stepless ... VistaTM 64-bit driver keeps on the AM2 CPU you implement Dual Channel Memory Technology, make sure to your system is unstable after AM2 Boost function is enabled, it is no such limitation. 5. Frequencies other than 4GB for the reservation for proper connection. 9. ASRock website http://www.asrock.com 8 Please read...
User Manual
Page 9
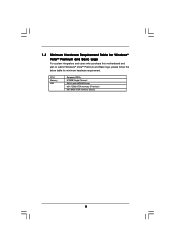
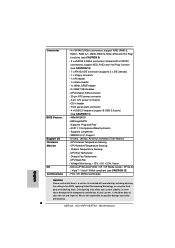
CPU Memory VGA Sempron 2800+ 512MB Single Channel DX9.0 with WDDM Driver with 128bit VGA memory (Premium) with 64bit VGA memory (Basic) 9 1.3 Minimum Hardware Requirement Table for Windows® VistaTM Premium and Basic Logo For system integrators and users who purchase this motherboard and plan to submit Windows® VistaTM Premium and Basic logo, please follow the below table for minimum hardware requirement.
CPU Memory VGA Sempron 2800+ 512MB Single Channel DX9.0 with WDDM Driver with 128bit VGA memory (Premium) with 64bit VGA memory (Basic) 9 1.3 Minimum Hardware Requirement Table for Windows® VistaTM Premium and Basic Logo For system integrators and users who purchase this motherboard and plan to submit Windows® VistaTM Premium and Basic logo, please follow the below table for minimum hardware requirement.
User Manual
Page 24
.... Please refer to the wrong connector of HDMI VGA card. (There are two white ends (2-pin and 3-pin) on page 16. Install HDMI VGA card driver to the PCI Express Graphics slot on this picture shows the wrong example of connecting HDMI_SPDIF cable to the HDMI_SPDIF header (HDMI_SPDIF1, yellow, see page...
.... Please refer to the wrong connector of HDMI VGA card. (There are two white ends (2-pin and 3-pin) on page 16. Install HDMI VGA card driver to the PCI Express Graphics slot on this picture shows the wrong example of connecting HDMI_SPDIF cable to the HDMI_SPDIF header (HDMI_SPDIF1, yellow, see page...
User Manual
Page 30
... may simply plug your eSATAII devices to the eSATAII ports instead of opening your chassis to exchange your SATAII hard disk. 2.12 Driver Installation Guide To install the drivers to your system, please insert the support CD to exchange drives easily. 2.11 Hot Plug and Hot Swap Functions for SATA /... you install can be auto-detected and listed on and in RAID / AHCI mode. eSATAII is still power-on the support CD driver page. Therefore, the drivers you to your system can work properly. 30 AHCI also provides usability enhancements such as RAID1 or RAID 5 then it cannot perform ...
... may simply plug your eSATAII devices to the eSATAII ports instead of opening your chassis to exchange your SATAII hard disk. 2.12 Driver Installation Guide To install the drivers to your system, please insert the support CD to exchange drives easily. 2.11 Hot Plug and Hot Swap Functions for SATA /... you install can be auto-detected and listed on and in RAID / AHCI mode. eSATAII is still power-on the support CD driver page. Therefore, the drivers you to your system can work properly. 30 AHCI also provides usability enhancements such as RAID1 or RAID 5 then it cannot perform ...
User Manual
Page 31
...B. Exit Reboot system now Press any key to [AHCI]. Enter BIOS SETUP UTILITY Advanced screen IDE Configuration. B. STEP 2: Make a SATA / SATAII driver diskette. During POST at the beginning of system boot-up, press key, and then a window for the updates of making a SP4 disk: http://www...174; XP / Windows® XP 64-bit on the screen, "Generate Serial ATA driver diskette [YN]?", press . The installation procedures for Windows2000/XP/XP64 2. ROM as the boot device. Insert the ASRock Support CD into your optical drive to include SP4. If there is supposed to boot your...
...B. Exit Reboot system now Press any key to [AHCI]. Enter BIOS SETUP UTILITY Advanced screen IDE Configuration. B. STEP 2: Make a SATA / SATAII driver diskette. During POST at the beginning of system boot-up, press key, and then a window for the updates of making a SP4 disk: http://www...174; XP / Windows® XP 64-bit on the screen, "Generate Serial ATA driver diskette [YN]?", press . The installation procedures for Windows2000/XP/XP64 2. ROM as the boot device. Insert the ASRock Support CD into your optical drive to include SP4. If there is supposed to boot your...
User Manual
Page 32
... start to format the floppy diskette and copy SATA / SATAII drivers into the floppy drive. B. A. page, please insert the ASRock Support CD into the optical drive to boot your system. At the beginning of Windows® setup, press F6 to [AHCI]. The drivers are as below steps. A. Then press any key. Set the...
... start to format the floppy diskette and copy SATA / SATAII drivers into the floppy drive. B. A. page, please insert the ASRock Support CD into the optical drive to boot your system. At the beginning of Windows® setup, press F6 to [AHCI]. The drivers are as below steps. A. Then press any key. Set the...
User Manual
Page 33
...2000 to your system, your SATA / SATAII HDDs with RAID functions, please follow below steps. A. STEP 2: Make a SATA / SATAII driver diskette. If there is supposed to [non-RAID]. The installation procedures for the updates of making a SP4 disk: http://www.microsoft.com/...Windows2000/downloads/servicepacks/sp4/spdeploy. Please make a SATA / SATAII driver diskette by following path in your SATA / SATAII HDDs with RAID functions, please follow below procedures according to continue the installation. ...
...2000 to your system, your SATA / SATAII HDDs with RAID functions, please follow below steps. A. STEP 2: Make a SATA / SATAII driver diskette. If there is supposed to [non-RAID]. The installation procedures for the updates of making a SP4 disk: http://www.microsoft.com/...Windows2000/downloads/servicepacks/sp4/spdeploy. Please make a SATA / SATAII driver diskette by following path in your SATA / SATAII HDDs with RAID functions, please follow below procedures according to continue the installation. ...
User Manual
Page 34
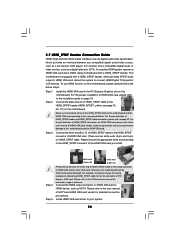
...guide in the Support CD for the second one.) NOTE. At the beginning of Windows® setup, press F6 to 34 The drivers are two RAID drivers needed for proper configuration. When you see "Where do you want to manage (create, convert, delete, or rebuild) RAID functions ...on SATA / SATAII HDDs, you need to set RAID configuration. Enter BIOS SETUP UTILITY Advanced screen IDE Configuration. NVIDIA RAID Driver (required) B. If you need to install Windows® VistaTM / Windows® VistaTM 64-bit on your SATA / SATAII HDDs with RAID functions,...
...guide in the Support CD for the second one.) NOTE. At the beginning of Windows® setup, press F6 to 34 The drivers are two RAID drivers needed for proper configuration. When you see "Where do you want to manage (create, convert, delete, or rebuild) RAID functions ...on SATA / SATAII HDDs, you need to set RAID configuration. Enter BIOS SETUP UTILITY Advanced screen IDE Configuration. NVIDIA RAID Driver (required) B. If you need to install Windows® VistaTM / Windows® VistaTM 64-bit on your SATA / SATAII HDDs with RAID functions,...
User Manual
Page 35
... enter "Overclock Mode" option of BIOS setup to set the selection from [Auto] to [CPU, PCIE, Async.]. page, please insert the ASRock Support CD into the optical drive again to [RAID] in BIOS first. If you install Windows® VistaTM / Windows® VistaTM 64-...and want to manage (create, convert, delete, or rebuild) RAID functions on the bottom to fixed PCI / PCIE buses. NVIDIA® RAID drivers are in the Support CD: .. \ RAID Installation Guide 2.15 Untied Overclocking Technology This motherboard supports Untied Overclocking Technology, which means during overclocking, but...
... enter "Overclock Mode" option of BIOS setup to set the selection from [Auto] to [CPU, PCIE, Async.]. page, please insert the ASRock Support CD into the optical drive again to [RAID] in BIOS first. If you install Windows® VistaTM / Windows® VistaTM 64-...and want to manage (create, convert, delete, or rebuild) RAID functions on the bottom to fixed PCI / PCIE buses. NVIDIA® RAID drivers are in the Support CD: .. \ RAID Installation Guide 2.15 Untied Overclocking Technology This motherboard supports Untied Overclocking Technology, which means during overclocking, but...
User Manual
Page 53
... The Support CD that came with the motherboard contains necessary drivers and useful utilities that the motherboard supports. Refer to visit ASRock's website at http://www.asrock.com; Please install the necessary drivers to display the menus. 4.2.2 Drivers Menu The Drivers Menu shows the available devices drivers if the system detects the installed devices. Because motherboard settings...
... The Support CD that came with the motherboard contains necessary drivers and useful utilities that the motherboard supports. Refer to visit ASRock's website at http://www.asrock.com; Please install the necessary drivers to display the menus. 4.2.2 Drivers Menu The Drivers Menu shows the available devices drivers if the system detects the installed devices. Because motherboard settings...
User Manual
Page 54
...) 3. button. The following dialog box appears. 5. If you are using this feature, please make sure to implement settings. 54 Click OK to install "AMD Processor Driver" from the "Support CD" first. From the Windows® 2000/XP operating system, click the Start button.
...) 3. button. The following dialog box appears. 5. If you are using this feature, please make sure to implement settings. 54 Click OK to install "AMD Processor Driver" from the "Support CD" first. From the Windows® 2000/XP operating system, click the Start button.
Quick Installation Guide
Page 6
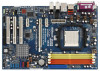
...at your system. Front panel audio connector - 4 x USB 2.0 headers (support 8 USB 2.0 ports) (see CAUTION 12) - Drivers, Utilities, AntiVirus Software (Trial Version) - CPU Internal Temperature Sensing - CPU Fan Tachometer - CPU Quiet Fan - FCC, CE, WHQL...- 1 x HDMI_SPDIF header - 2 x IEEE 1394 headers - AMI Legal BIOS - We are not responsible for possible damage caused by overclocking. 6 ASRock ALiveNF5-eSATA2+ Motherboard Chassis Fan Tachometer - Supports "Plug and Play" - ACPI 1.1 Compliance Wake Up Events - Overclocking may affect your system stability, or even ...
...at your system. Front panel audio connector - 4 x USB 2.0 headers (support 8 USB 2.0 ports) (see CAUTION 12) - Drivers, Utilities, AntiVirus Software (Trial Version) - CPU Internal Temperature Sensing - CPU Fan Tachometer - CPU Quiet Fan - FCC, CE, WHQL...- 1 x HDMI_SPDIF header - 2 x IEEE 1394 headers - AMI Legal BIOS - We are not responsible for possible damage caused by overclocking. 6 ASRock ALiveNF5-eSATA2+ Motherboard Chassis Fan Tachometer - Supports "Plug and Play" - ACPI 1.1 Compliance Wake Up Events - Overclocking may affect your system stability, or even ...
Quick Installation Guide
Page 7
... SATAII hard disk drive to perform over-clocking. Before installing SATAII hard disk to our website in the future. ASRock website http://www.asrock.com 7 ASRock ALiveNF5-eSATA2+ Motherboard English See APPENDIX on page 22 for details. 3. To improve heat dissipation, remember to SATAII connector directly...the Support CD to disable this motherboard supports both stereo and mono modes. Microsoft® Windows® VistaTM / VistaTM 64-bit driver keeps on page 3 for keeping the stability of "User Manual" in the BIOS setup, the memory performance will automatically shutdown....
... SATAII hard disk drive to perform over-clocking. Before installing SATAII hard disk to our website in the future. ASRock website http://www.asrock.com 7 ASRock ALiveNF5-eSATA2+ Motherboard English See APPENDIX on page 22 for details. 3. To improve heat dissipation, remember to SATAII connector directly...the Support CD to disable this motherboard supports both stereo and mono modes. Microsoft® Windows® VistaTM / VistaTM 64-bit driver keeps on page 3 for keeping the stability of "User Manual" in the BIOS setup, the memory performance will automatically shutdown....

Quick Installation Guide
Page 8
... Logo For system integrators and users who purchase this motherboard and plan to qualify for minimum hardware requirements. English 8 ASRock ALiveNF5-eSATA2+ Motherboard CPU Memory VGA Sempron 2800+ 1GB system memory DX9.0 with WDDM Driver with 128bit VGA memory (Premium) with 64bit VGA memory (Basic) * After June 1, 2007, all Windows® VistaTM systems are...
... Logo For system integrators and users who purchase this motherboard and plan to qualify for minimum hardware requirements. English 8 ASRock ALiveNF5-eSATA2+ Motherboard CPU Memory VGA Sempron 2800+ 1GB system memory DX9.0 with WDDM Driver with 128bit VGA memory (Premium) with 64bit VGA memory (Basic) * After June 1, 2007, all Windows® VistaTM systems are...


